NUVO 65/679 Handleiding
NUVO Verlichting 65/679
Bekijk gratis de handleiding van NUVO 65/679 (2 pagina’s), behorend tot de categorie Verlichting. Deze gids werd als nuttig beoordeeld door 5 mensen en kreeg gemiddeld 4.1 sterren uit 2 reviews. Heb je een vraag over NUVO 65/679 of wil je andere gebruikers van dit product iets vragen? Stel een vraag
Pagina 1/2
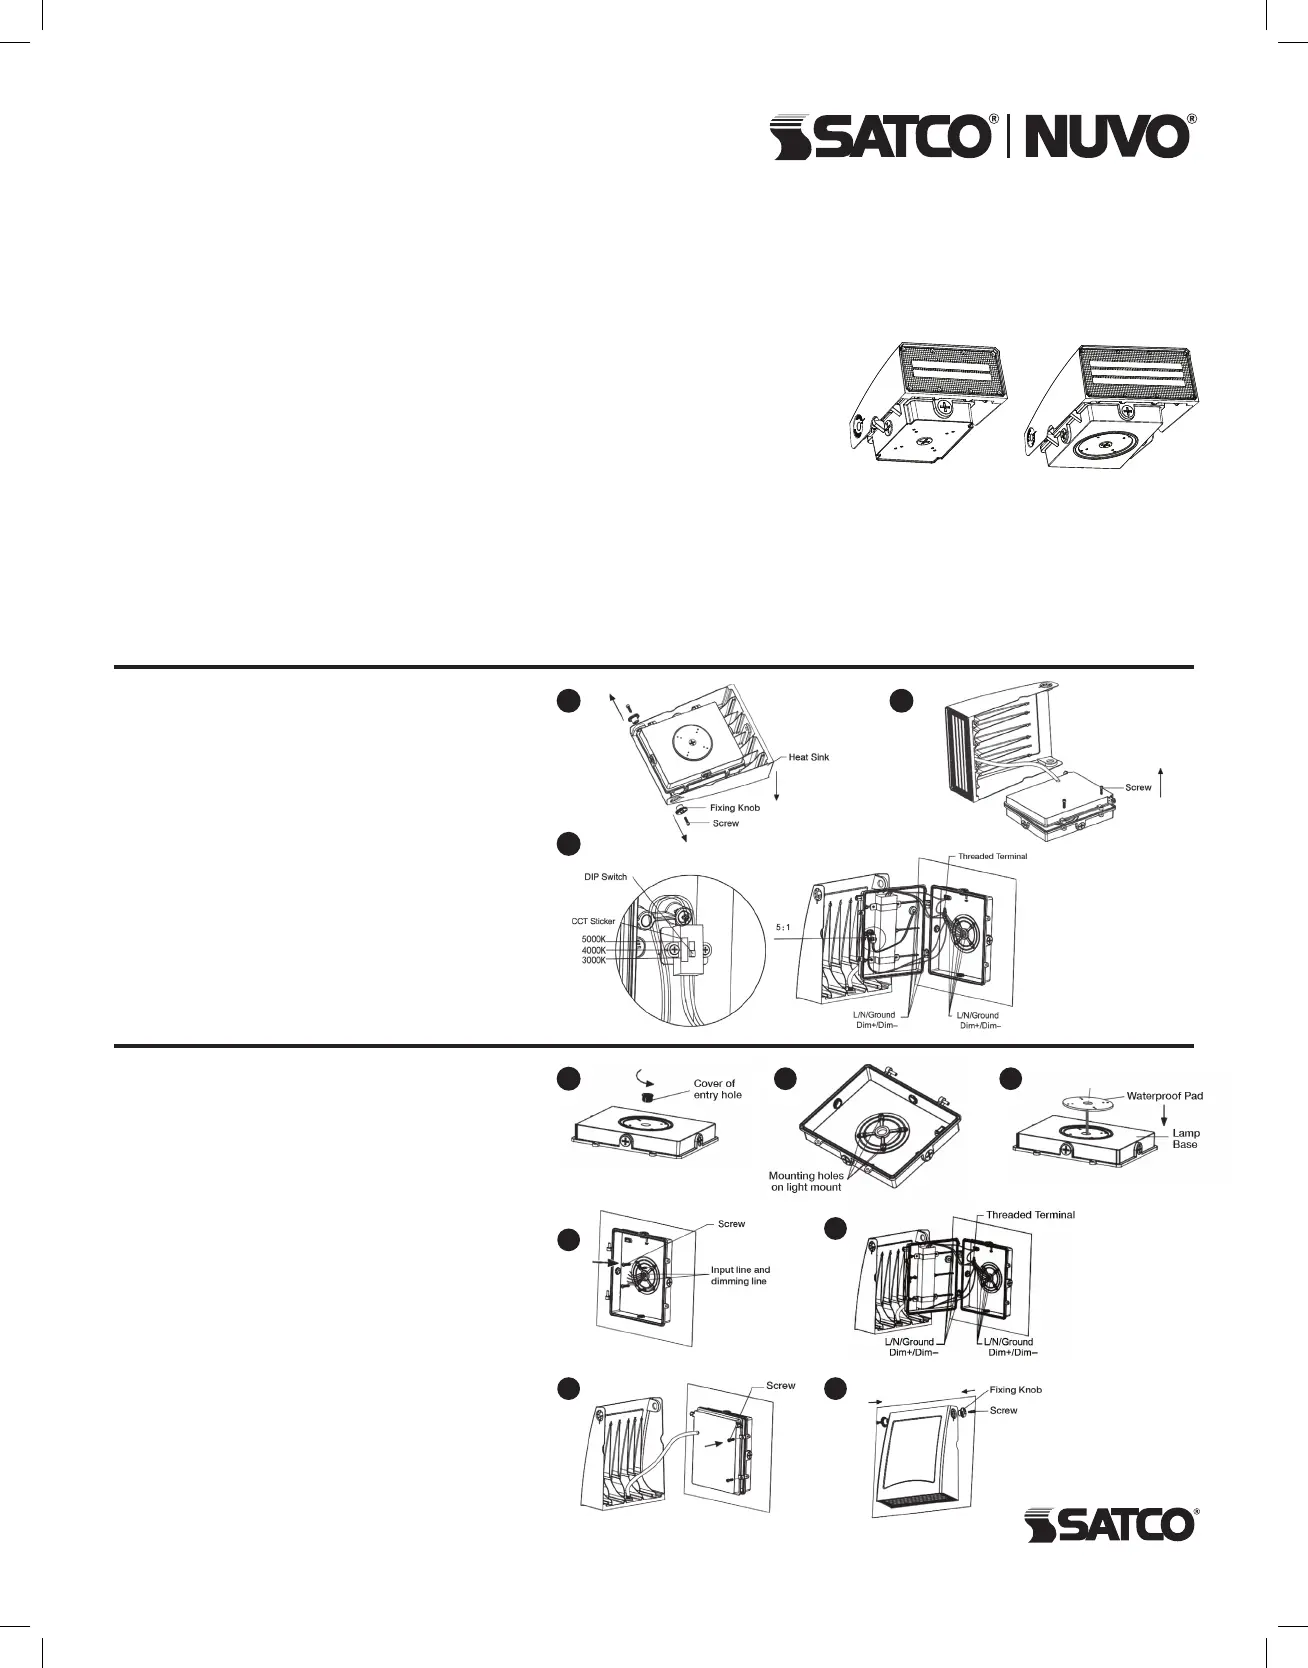
Follow STEPS 1 and 2 above (see diagrams).
STEP 3: Unscrew the cover of the entry hole on
the lamp base and remove the cover.
STEP 4: According to the embedded terminal
box, punch the corresponding mounting hole on
the light mount.
STEP 5: Tear off the adhesive paper of the
waterproof pad and stick the waterproof pad to the
lamp base.
STEP 6: Put the input line and dimming line from
the embedded junction box through the lamp base
and then screw the lamp base to the embedded
junction box.
STEP 7: Install the upper half of the xture on
the lamp base, then use the threaded terminal
to connect L, N, ground wire, dim+ and dim–
separately. Next, plug the threaded terminals into
the embedded junction box.
STEP 8: Screw the cover back in place.
STEP 9: To complete installation, install the heat
sink assembly and tighten screws and xing knobs.
WARNING: Risk of Fire or Electric Shock
• To reduce the risk of re, electrical shock or injury to persons; read and follow all
warnings and installation instructions before installing.
• All installation should be performed by a qualied electrician.
• To avoid electric shock, ensure power is turned off before installation or inspection.
All wiring must be installed in accordance with Electrical Code and local electrical code.
• To prevent re, this xture is rated for use in 120-277V, 50-60Hz protected circuit and
105°C rated supply wire.
• To prevent product malfunction and/or electrical shock, this product must be
properly grounded.
• To avoid damage and/or product malfunction, do not modify the xture or
replace accessories without conrming with the supplier rst.
• To prevent wiring damage or abrasion, do not expose wiring to edges of sheet
metal or other sharp objects.
• Suitable for wet locations.
IMPORTANT:This product must be installed in accordance with the applicable installation code by a person familiar with the
construction and operation of the product and the hazards involved.
STEP 1: Use screwdriver to remove screws and xing
knobs on both sides, then take down the heat sink.
STEP 2: Remove screws with screwdriver, detach
the cover from bottom box.
STEP 3: Unscrew and open bottom box, set up
CCT through inside DIP Switch, default switch gear
is 4000K, dial downward for positioning 3000K, dial
upward for 5000K, dial to middle for 4000K. Users
can dial to positions for the CCT needed.
STEP 4: After selecting CCT, screw the cover back
in place.
STEP 5: To complete CCT adjustment, attach the
heat sink to bottom box, tighten screws and xing
knobs.
CCT SELECTABLE ADJUSTABLE
LED WALL PACK
Models: 65/677, 65/678, 65/679, 65/680
CCT INSTRUCTIONS
INSTALLATION
INSTALLATION AND SAFETY INSTRUCTIONS
IMPORTANT: Read before installing xture. Retain for future reference.
© Copyright 2020 Satco Products, Inc. 5/20
4
2
6 1/2" (165mm) W
x 3 7/8" (98mm) H
x 8" (205mm) D
8 1/2" (216mm) W
x 4 3/8" (112mm) H
x 11" (280mm) D
3
1
3
5
6
7
89
Satco Products, Inc.
Brentwood, NY 11717
Product specificaties
| Merk: | NUVO |
| Categorie: | Verlichting |
| Model: | 65/679 |
Heb je hulp nodig?
Als je hulp nodig hebt met NUVO 65/679 stel dan hieronder een vraag en andere gebruikers zullen je antwoorden
Handleiding Verlichting NUVO

14 Maart 2026
13 Maart 2026
13 Maart 2026
12 Maart 2026
30 December 2026
30 December 2026
30 December 2026
30 December 2026
29 December 2026
29 December 2026
Handleiding Verlichting
Nieuwste handleidingen voor Verlichting
23 April 2026
23 April 2026
22 April 2026
22 April 2026
22 April 2026
21 April 2026
21 April 2026
21 April 2026
21 April 2026
21 April 2026