NUVO 65/536R1 Handleiding
NUVO Verlichting 65/536R1
Bekijk gratis de handleiding van NUVO 65/536R1 (2 pagina’s), behorend tot de categorie Verlichting. Deze gids werd als nuttig beoordeeld door 19 mensen en kreeg gemiddeld 4.4 sterren uit 5 reviews. Heb je een vraag over NUVO 65/536R1 of wil je andere gebruikers van dit product iets vragen? Stel een vraag
Pagina 1/2
LED MEDIUM FLOOD LIGHTS
Models: 65-534R1, 65-535R1, 65-536R1, 65-537R1,
65-538R1, 65-539R1
Satco Products, Inc.
Brentwood, NY 11717
INSTALLATION AND SAFETY INSTRUCTIONS
IMPORTANT: Read before installing xture. Retain for future reference.
© Copyright 2022 Satco Products, Inc. 7/22 v1.1
WARNING:
• To reduce the risk of personal injury or property damage from
re, electric shock, falling parts, cuts/abrasions and other
hazards read all warnings and instructions included with and
on the xture and all xture labels.
• Commercial installation, service and maintenance of luminaries
should be performed by a qualied licensed electrician. For
the installation; if you are unsure about the installation or
maintenance of the luminaries, consult a qualied licensed
electrician and check your local electrical code.
• Turn OFF the power when you perform any maintenance.
• All connections should be capped with UL approved wire
connectors.
• Minimum size 18 AWG or 14 AWG for continuous runs.
• Risk of burn. Disconnect power and allow xture to cool
before handling.
• Verify that supply voltage is correct by comparing it with the
luminaire label information.
• Do not install in a hazardous atmosphere, except where the
ambient temperature does not exceed the rated operating
temperature of the xture.
• Keep tightly closed when in operation.
Electrical Requirements:
The LED driver must be supplied with 120–277V, 50/60 Hz and
connected to an individual, properly grounded branch circuit
protected by a 20 ampere circuit breaker. Use min. 75°C supply.
Grounding Instructions:
The grounding and bonding of the overall system shall be done
in accordance with NEC Article 600 and local codes.
Tools Required:
Crescent Wrench, Wire Strippers and Wire Cutters
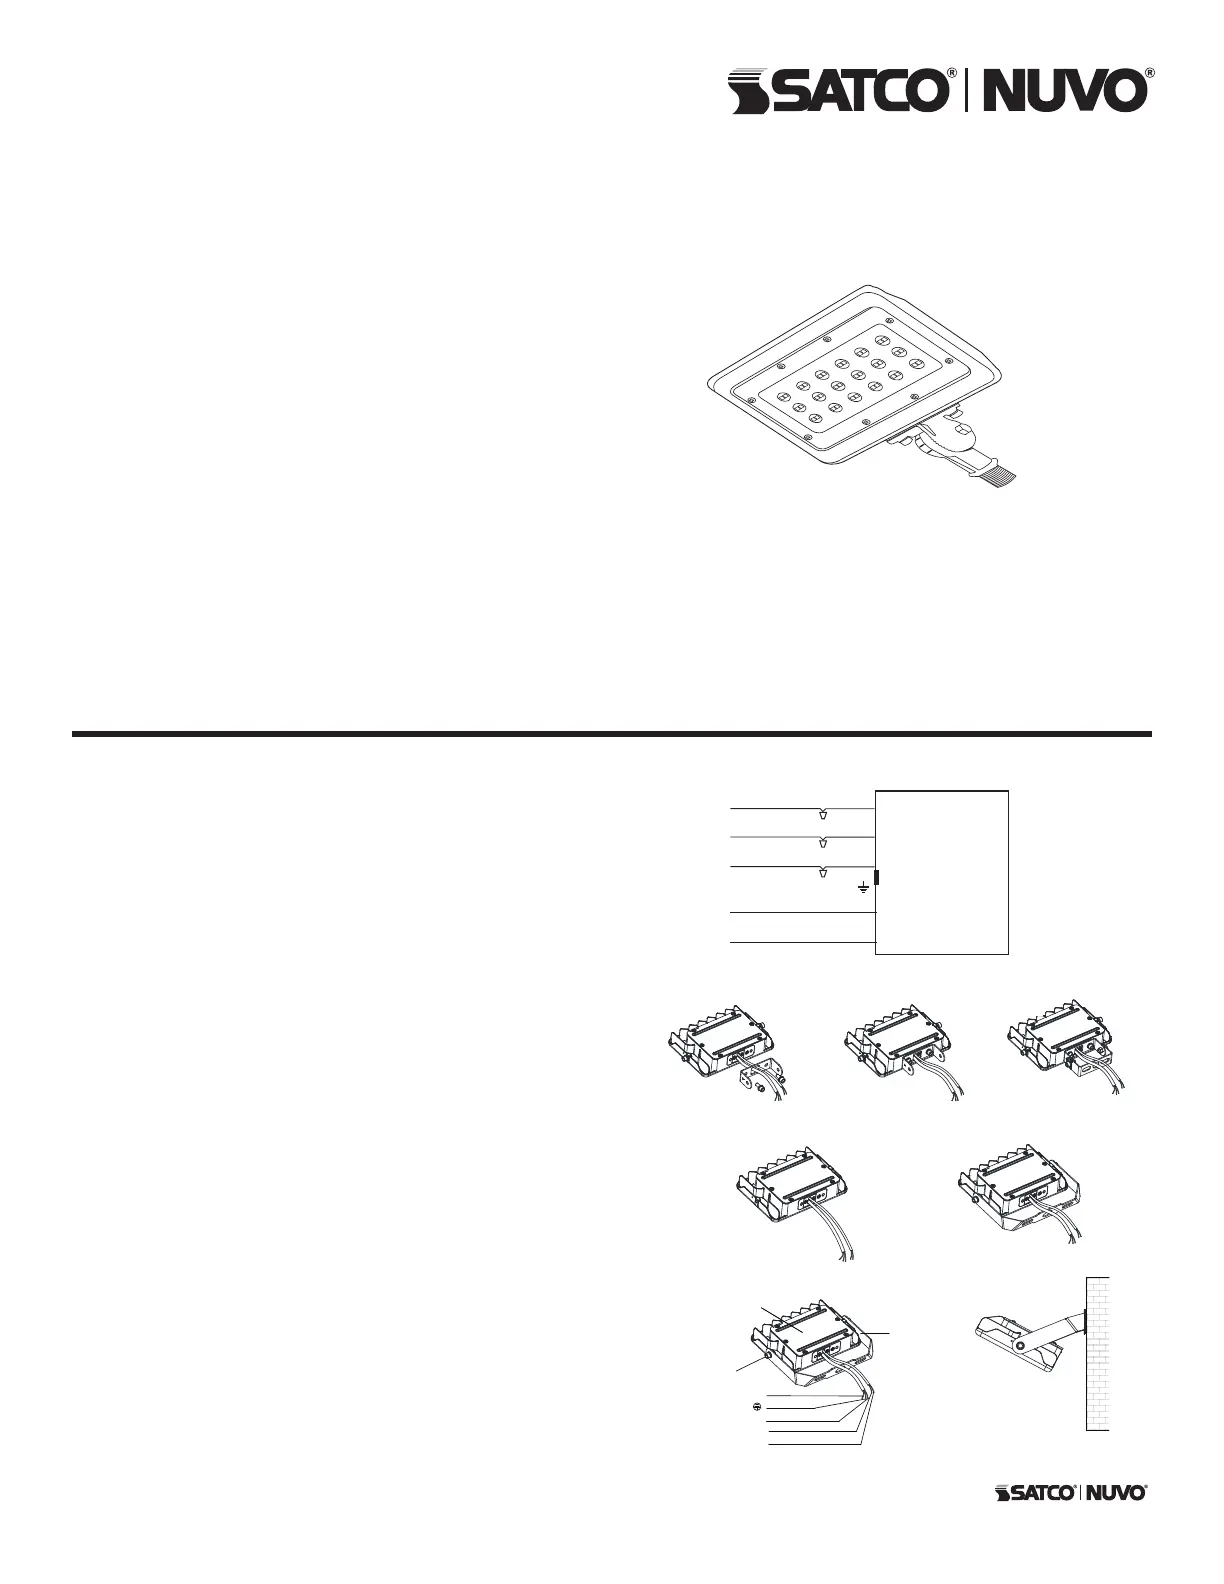
WIRING DIAGRAM
Light Fixture
L = BLACK
N = WHITE
G = YELLOW/GREEN
DIM + PURPLE
DIM – GRAY/VIOLET
Installation Instructions for Different Brackets:
1. TRUNION MOUNTING (TM)
Suitable for all power in this series
STEP 1: Pass the input wire of the xture through the
bracket (Figure 1).
STEP 2: Fix the bracket (Figure 2).
STEP 3: Tighten the other bracket with screws (Figure 3).
2. YOKE MOUNTING (YM)
Suitable for all power in this series
STEP 1: Take the lamp out of package (Figure 4).
STEP 2: Tighten the brackets and screws (Figure 5).
2.1. Installation of LED lamp with ood mount (B
=
FM)
Suitable for all power in this series
STEP 1: Take the lamp out of package.
STEP 2: Connect the wires properly according to the
right wiring requirements (pay attention to positive wire,
negative wire, and ground wire), and then put the wires
into lamp pole (Figure 6).
STEP 3: Loosen the screws, adjust the lamp angles as per
actual demands and then tighten the screws (Figure 7).
NOTE: Lamp angles are adjustable.
Figure 1Figure 2Figure 3
Bracket
Hexagon Socket Screws
Black/Brown: ACL
White/Blue: ACN
Green/Yellow
LED Lamp
DIM+
DIM –
INSTALLATION: Turn OFF power at fuse or circuit breaker.
• Unpack xture and ensure there are no damaged parts.
• Attach xture to outdoor box cover, routing the xture wires
into the junction box. Connect xture cables as seen in Wiring
Diagram: Black to Black, White to White, and Green to Green.
• Aim xture by loosening bolt on the arm, and repositioning to
the desired angle. Tighten the bolt.
Figure 4Figure 5
Figure 6
Figure 7
Product specificaties
| Merk: | NUVO |
| Categorie: | Verlichting |
| Model: | 65/536R1 |
Heb je hulp nodig?
Als je hulp nodig hebt met NUVO 65/536R1 stel dan hieronder een vraag en andere gebruikers zullen je antwoorden
Handleiding Verlichting NUVO

14 Maart 2026
13 Maart 2026
13 Maart 2026
12 Maart 2026
30 December 2026
30 December 2026
30 December 2026
30 December 2026
29 December 2026
29 December 2026
Handleiding Verlichting
Nieuwste handleidingen voor Verlichting
30 Juni 2026
30 Juni 2026
30 Juni 2026
30 Juni 2026
30 Juni 2026
29 Juni 2026
29 Juni 2026
29 Juni 2026
29 Juni 2026
26 Juni 2026