NUVO 62/1672 Handleiding
NUVO Verlichting 62/1672
Bekijk gratis de handleiding van NUVO 62/1672 (2 pagina’s), behorend tot de categorie Verlichting. Deze gids werd als nuttig beoordeeld door 15 mensen en kreeg gemiddeld 4.2 sterren uit 9 reviews. Heb je een vraag over NUVO 62/1672 of wil je andere gebruikers van dit product iets vragen? Stel een vraag
Pagina 1/2
WARNING: Risk of Fire or Electric Shock
• Disconnect power before installation or maintenance of the xture.
• This product must be installed in accordance with applicable installation
codes by a person familiar with mentioned above codes and hazards
involved. These xtures are designed to meet the latest NEC requirements
and are listed in full compliance with UL 1598.
• Supply wires must be rated minimum 90ºC. If uncertain consult an electrician.
• The product is purposed for interior use only, suitable for wet locations.
• Protect the product against direct contact with water.
• Assemble the product only with the use of parts provided and the housing;
improper assembly may result in device failing which could damage the
product, personal property or cause injury.
• CAUTION: When handling the xture, do not apply pressure to the LEDs.
Hold the xture by the base only.
HARDWARE INCLUDED
7" & 10" LED DISK LIGHTS
Models: 62-1660, 62-1661, 62-1662, 62-1663,
62-1670, 62-1671, 62-1672, 62-1673
Satco Products, Inc.
Brentwood, NY 11717
INSTALLATION
INSTALLATION AND SAFETY INSTRUCTIONS
IMPORTANT: Read before installing xture. Retain for future reference.
© Copyright 2021 Satco Products, Inc. 11/21 v1.1
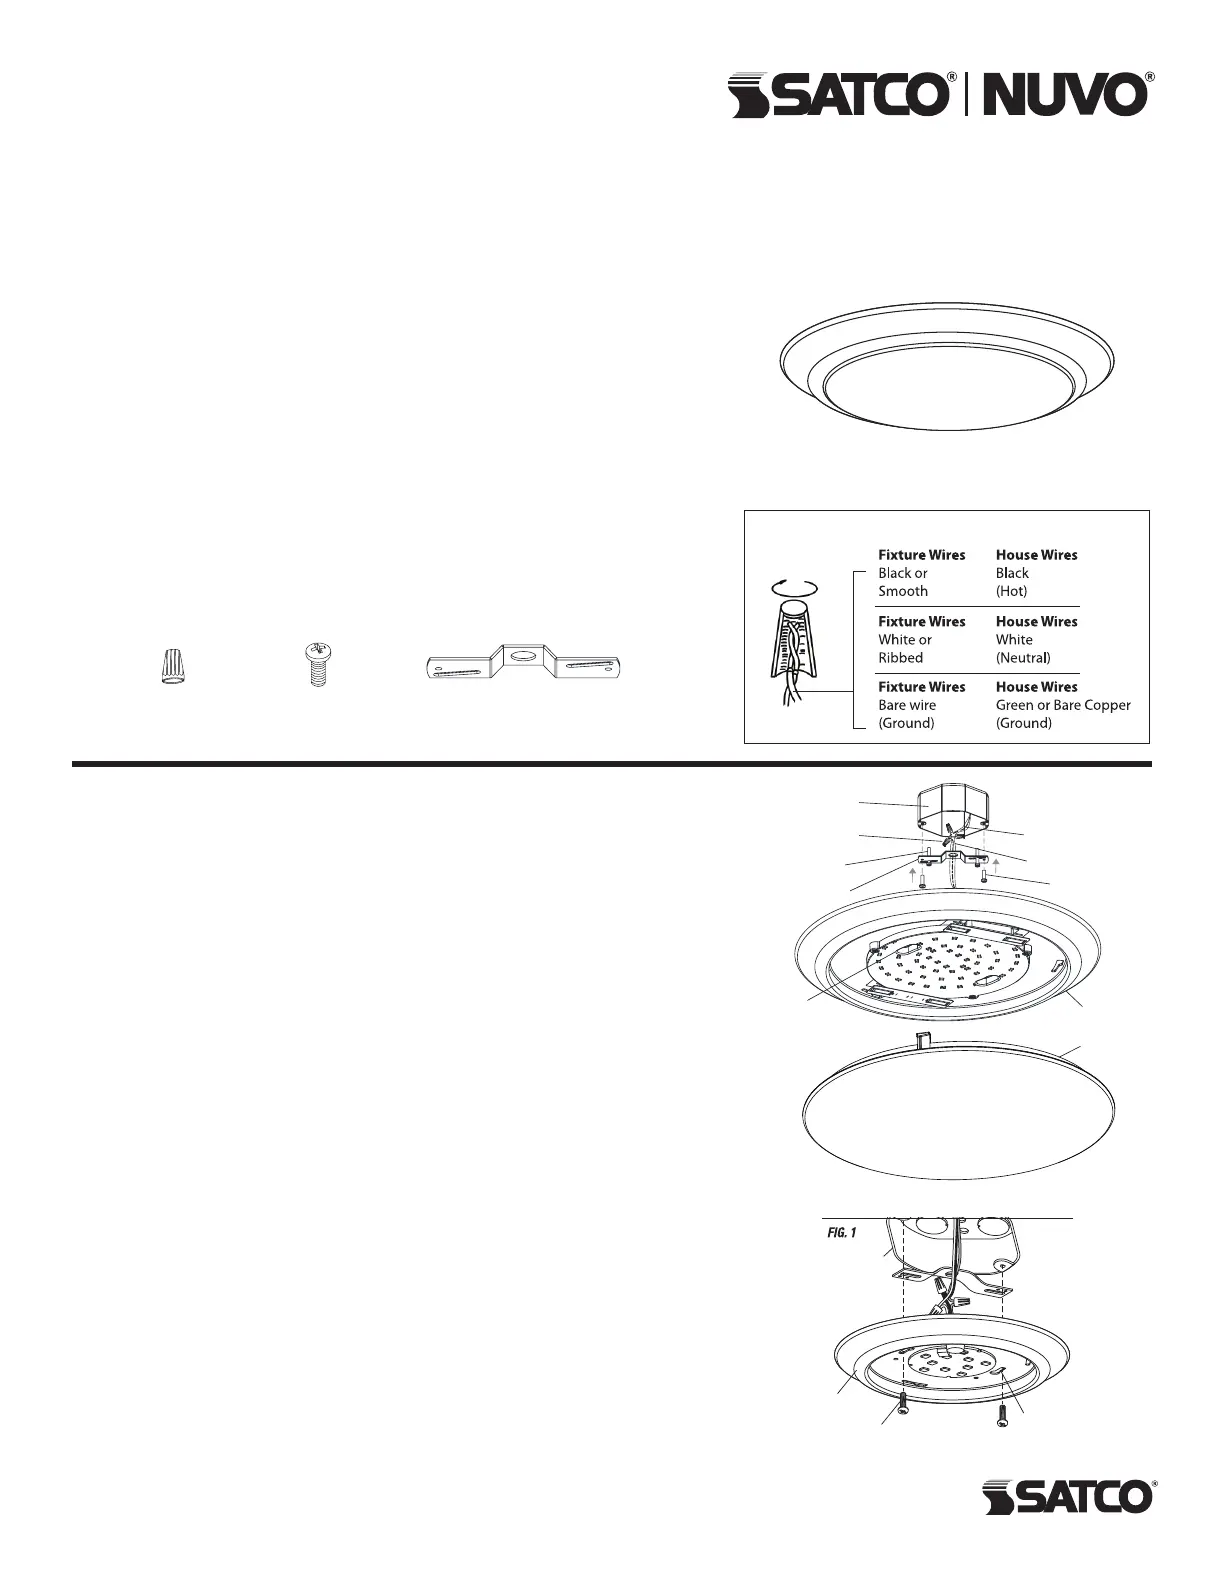
WIRING DIAGRAM
NOTE: Shut OFF the power at the circuit breaker and remove existing
xture, including the mounting hardware.
Carefully unpack your new xture and lay out all the parts on a clear
area. Be careful not to lose any small parts necessary for installation.
1. Twist lens cover counter-clockwise to remove from Disk Light.
2. Secure Crossbar to the Junction Box using Junction Box Screws.
The side of the mounting plate marked “GND” must face out.
3. Place the Disk Light over the Crossbar and secure with Junction Box
Screws through canopy Keyholes. Make sure Disk Light is ush to
the ceiling. See Figure 1.
4. Replace the lens back onto the Disk Light by turning clockwise.
ELECTRICAL CONNECTION
Connect the xture input wires to Junction Box wires as shown in the
Wiring Diagram, making sure all wire connectors are secure. If the Junction Box
has a Ground Wire (Green or Bare Copper), connect the xture’s Ground Wire
to it. After wires are connected, tuck them carefully inside the Junction Box.
Dimming
This product is compatible with most residential type dimmers available on the
market. The dimming performance will depend on kind of dimmer and dimmer
settings. Visit Satco.com for an up to date list of compatible dimmers.
Cleaning
Clean with a soft or damp cloth, make sure the power is OFF. Do not clean
with liquids or abrasives.
5-Year Limited Warranty
The purchased product is covered with a 5-year warranty in respect of any
defect in material or workmanship after purchase date.
Satco shall bear no responsibility on account of guarantee, as well as shall
bear no liability for any faults, in case of improper operation, use negligence,
accident or exposure to natural hazard, or excessive use over the limits
specied for the unit, or if any unauthorized alteration or repair followed.
62-1660 – 62-1663 = 7" (177.8mm)
62-1670 – 62-1673 = 10" (254mm)
Wire Connector
Qty: 3
Junction Box Screw
Qty: 2 + 2 Extra
Crossbar
Qty: 1
Ground Wire
Wires (Black, White)
Junction Box
Screws
Disk Light
Lens
Keyholes
Mounting Screws
Crossbar
Connectors
Junction Box
Keyholes
Disk Light
Junction Box
Junction Box
Screws
Product specificaties
| Merk: | NUVO |
| Categorie: | Verlichting |
| Model: | 62/1672 |
Heb je hulp nodig?
Als je hulp nodig hebt met NUVO 62/1672 stel dan hieronder een vraag en andere gebruikers zullen je antwoorden
Handleiding Verlichting NUVO

14 Maart 2026
13 Maart 2026
13 Maart 2026
12 Maart 2026
30 December 2026
30 December 2026
30 December 2026
30 December 2026
29 December 2026
29 December 2026
Handleiding Verlichting
Nieuwste handleidingen voor Verlichting
23 April 2026
23 April 2026
22 April 2026
22 April 2026
22 April 2026
21 April 2026
21 April 2026
21 April 2026
21 April 2026
21 April 2026