EK Water Blocks EK-D5 Handleiding
Bekijk gratis de handleiding van EK Water Blocks EK-D5 (1 pagina’s), behorend tot de categorie Hardwarekoeling. Deze gids werd als nuttig beoordeeld door 15 mensen en kreeg gemiddeld 4.2 sterren uit 3 reviews. Heb je een vraag over EK Water Blocks EK-D5 of wil je andere gebruikers van dit product iets vragen? Stel een vraag
Pagina 1/1
Revision 1.0. Released on 12
th
of February, 2014.
Installaon and mounng manual for EK-D5 Cover Kit
This product is intended for installaon only by expert users. Please consult with a qualied technician for installaon. Improper installaon may result in damage to your equipment. EK Water Blocks assumes no liability whatsoever,
expressed or implied, for the use of these products, nor their installaon. The following instrucons are subject to change without noce. Please visit our web site at for updates. Before installaon of this product please www.ekwb.com
read important noce, disclosure and warranty condions printed on the back of the box.
Before you start using this product please follow these basic guidelines:
1.Please carefully read the manual before through before beginning with the installaon process!
2.The EK High Flow and EK-CSQ type ngs require only a small amount of force to screw them rmly in place since the liquid seal is ensured by the rubber o-ring gaskets.
3.The use of corrosion inhibing coolants is always recommended for any liquid cooling system.
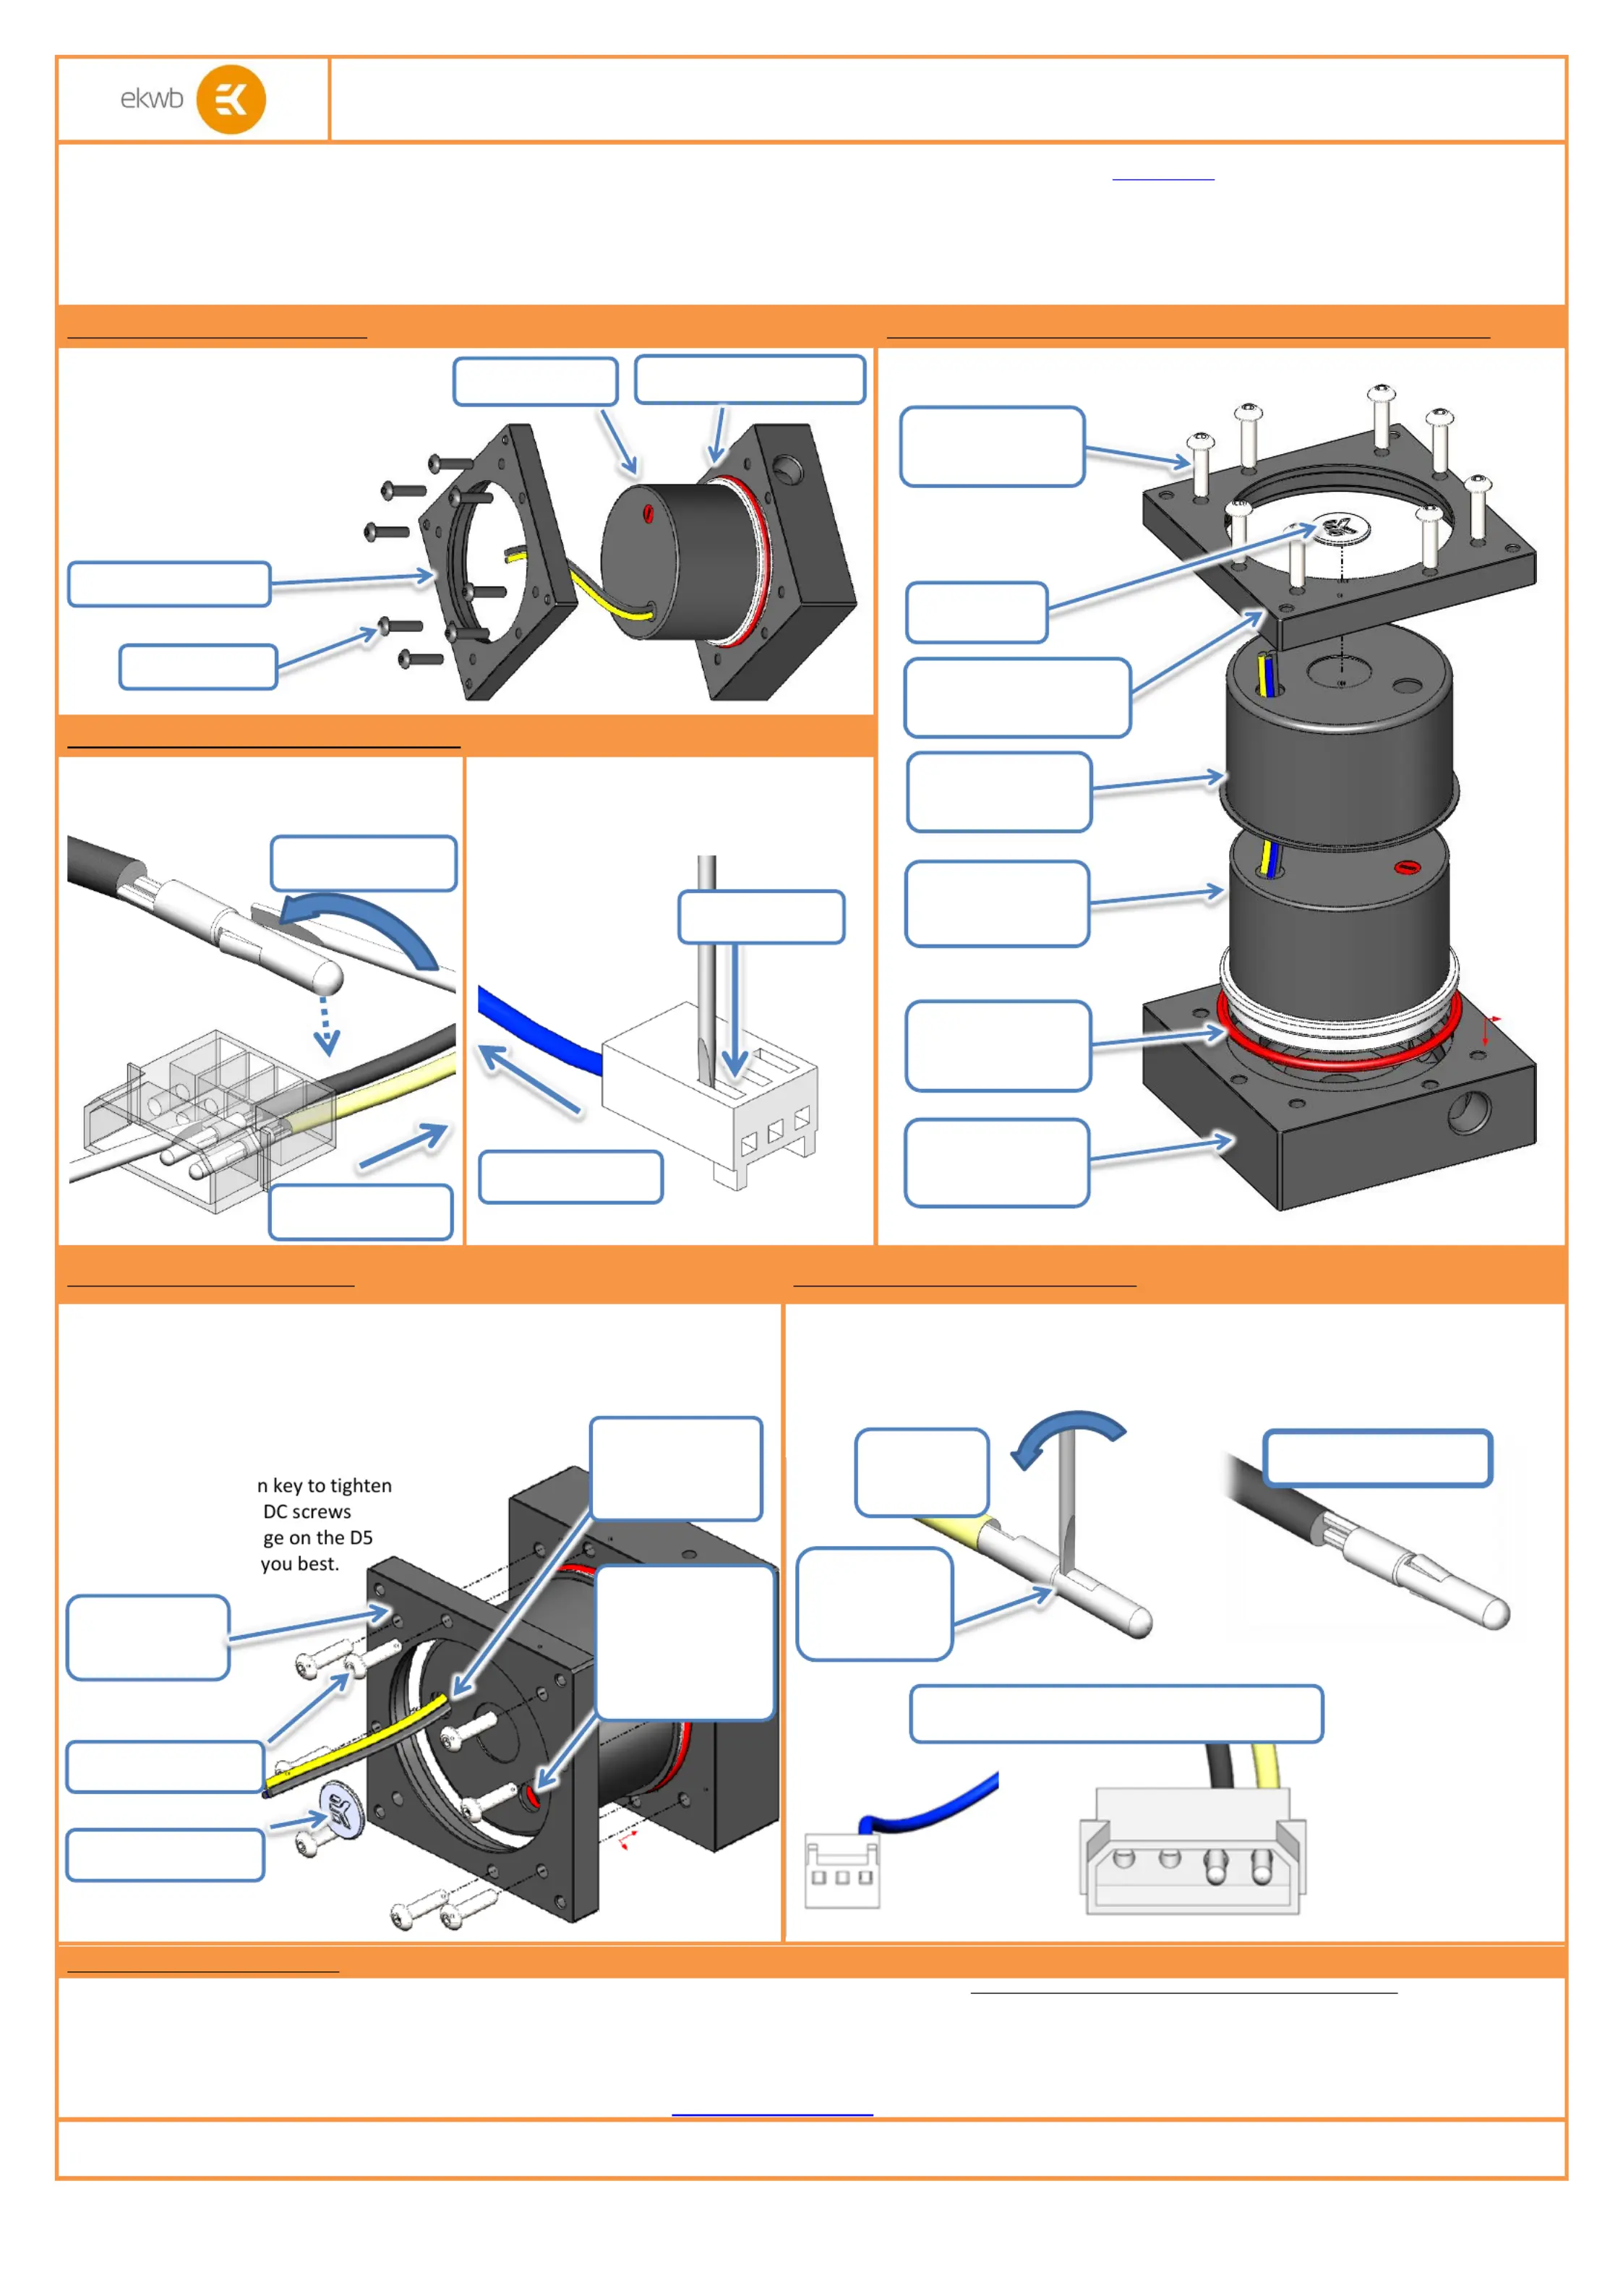
STEP 1: PREPARING THE PUMP
SAMPLE INSTALLATION OVERVIEW - -D5 X-TOP WITH COVER EK
Remove eight (8) original screws marked on
picture below and remove the original D5 X-
Top ring. Store original ring for possible reuse
without D5 Cover.
Keep original 8 pcs of M4×16mm
screws as you will need to reuse them!
STEP 2: INSTALLING THE CONNECTOR UN
4-PIN MOLEX CONNECTOR
1.Flaen the pins in Molex connector
2.Remove Cables from Molex connector
3-PIN FAN CONNECTOR
1.Push the pin on fan connector with
screwdriver
2.Remove the cable
STEP 3: INSTALLING -Cover D5
STEP 4INSTALLING THE CONECTOR :
1.Insert cables through hole in Cover and make sure to have other hole D5
over the D5 potenometer (Potentiometer is only with D5 Vario/MCP655,
PWM version does not have potenometer).
2.5 Place Housing over Dmotor.
3.Install the new X-Top ring over series X-TOP
or X-RES by using eight (8) -16mm screws. M4
4.Use 2mm Alle.5
the -16mm DM4
5.Place the EK bad
Cover as it suits
1.Put the screwdriver into pin gap in Molex connector
2.Recover aered pin into original posion
3.Put cables back to Molex connector and fan connector(Watch out for correct
order of cables)
IMPORTANT DISCLOSURES:
VERY IMPORTANT NOTICE:Once the installaon is completed, it is a recommended pracce to test the cooling circuit for leaks prior to powering up the computer. We highly recommend a 24 hour leak test prior to powering up the computer. Do not test the water block
using tap water pressure. This will rupture the top of the housing and render the block unusable (and will void your warranty).While all eorts have been made to provide the most comprehensive tutorial possible, EK Water Blocks assumes no liability expressed or implied
for any consequenal damage(s) occurring to your equipment as a result of using EK Water Blocks cooling products, either due to errors or omissions on our part in the above instrucons, or due to failure or defect in the EK Water Blocks cooling product s.
WARRANTY: Our products are warranted against defects in materials or workmanship for a period of 24 months beginning from the date of delivery to the nal user. During this period, products will be repaired or have parts replaced at our discreon provided that: (I) the
product is returned to the agent from whom it was purchased; (II) the product has been purchased by an end user and has not used for commercial purposes; (III) the product has not been misused, handled carelessly, or used in a manner other than in accordance with
the instrucons provided describing its installaon and proper use. This warranty does not confer rights other than those expressly set out above and does not cover any claims for consequenal loss or damage. This warranty is oered as an extra benet and does not
aect your statutory rights as a consumer. This warranty is voided if the product comes in contact with aggressive UV addives or other improper liquids.
Any RMA claims are to be solved through our online support cket system: www.ekwb.com/support.
REQUIRED TOOLS: Allen Key 2.5mm (Enclosed with Pump top delivedy) Small at screwdriver or tweezer ,
Screws M4x16
(not enclosed)
D-Pump 5
(not enclosed)
O –ring
(not enclosed)
EK-D5 X-TOP
(not enclosed)
D5 X-TOP RING
For Cover
DCover5
ORIGINAL POSITION
1.Flaer the pins
2. cables Remove
1.Push the pin
2. cables Remove
Watch out for correct order of cables
2. recover
the pins
1. Put the
screwdriver
into the gap
EK badge
1. Insert cables
through hole in
D5 Cover.
2. Make sure
that other of D5
Cover hole is
over
potentiometer.
Sealing gasket (O-ring)
3. Install new
X-Top Ring
4. Tighten screws
original scews
D5 X-TOP RING
5. Place EK badge
D5 pump
Product specificaties
| Merk: | EK Water Blocks |
| Categorie: | Hardwarekoeling |
| Model: | EK-D5 |
Heb je hulp nodig?
Als je hulp nodig hebt met EK Water Blocks EK-D5 stel dan hieronder een vraag en andere gebruikers zullen je antwoorden
Handleiding Hardwarekoeling EK Water Blocks

29 Maart 2025
29 Maart 2025
30 Juli 2024
19 Maart 2024
19 Maart 2024
19 Maart 2024
19 Maart 2024
19 Maart 2024
19 Maart 2024
19 Maart 2024
Handleiding Hardwarekoeling
Nieuwste handleidingen voor Hardwarekoeling
22 April 2026
21 April 2026
21 April 2026
12 April 2026
12 April 2026
11 April 2026
11 April 2026
11 April 2026
11 April 2026
6 April 2026