Dahua Technology AX15M Handleiding
Dahua Technology Router AX15M
Bekijk gratis de handleiding van Dahua Technology AX15M (1 pagina’s), behorend tot de categorie Router. Deze gids werd als nuttig beoordeeld door 75 mensen en kreeg gemiddeld 4.3 sterren uit 9 reviews. Heb je een vraag over Dahua Technology AX15M of wil je andere gebruikers van dit product iets vragen? Stel een vraag
Pagina 1/1
AX1500 Wi-Fi6 Wireless Router
User's Manual
2E202A60911-01
ZHEJIANG DAHUA VISION TECHNOLOGY CO., LTD. V1.0.0
Foreword
General
This manual introduces the installation, functions and operations of the
AX1500 Wifi6 Wireless Router (hereinafter referred to as "the Device").
Read carefully before using the device, and keep the manual safe for future
reference.
Do not connect the device to two or more kinds of power supplies, to
avoid damage to the device.
●
The device is a class I electrical appliance. Make sure that the power
supply of the device is connected to a power socket with protective
earthing.
●
The device must be grounded by a copper wire with a cross-sectional
area of 2.5 mm2 and a ground resistance no more than 4 Ω.
●
Voltage stabilizer and lightning surge protector are optional depending on
the actual power supply on site and the ambient environment.
●
To ensure heat dissipation, the gap between the device and the
surrounding area should not be less than 10 cm on the sides and 10 cm
on top of the device.
●
When installing the device, make sure that the power plug and appliance
coupler can be easily reached to cut off power.
●
Outdoor models of the device must be securely installed on poles or
brackets that are perpendicular to the ground. Make sure the entire
surface of the device and all its related components are covered with
anti-oxidation coating (such as rust preventive paint), and that the
installation site and height of the device meet the requirements of the
plan.
●
●
Do not disassemble the device without professional instruction.
●
Operate the device within the rated range of power input and output.
●
Make sure that the power supply is correct before use.
●
Make sure the device is powered off before disassembling wires to avoid
personal injury.
Install outdoor models of the device on top of buildings where there is
little to no direct sunlight to avoid the device becoming overheated. Make
sure to take all necessary measures to protect the device.
●
Face the side with the Ethernet port downwards, and arrange the wires in
a downward direction when installing outdoor models of the device.
●
WARNING
!
Operation Requirements
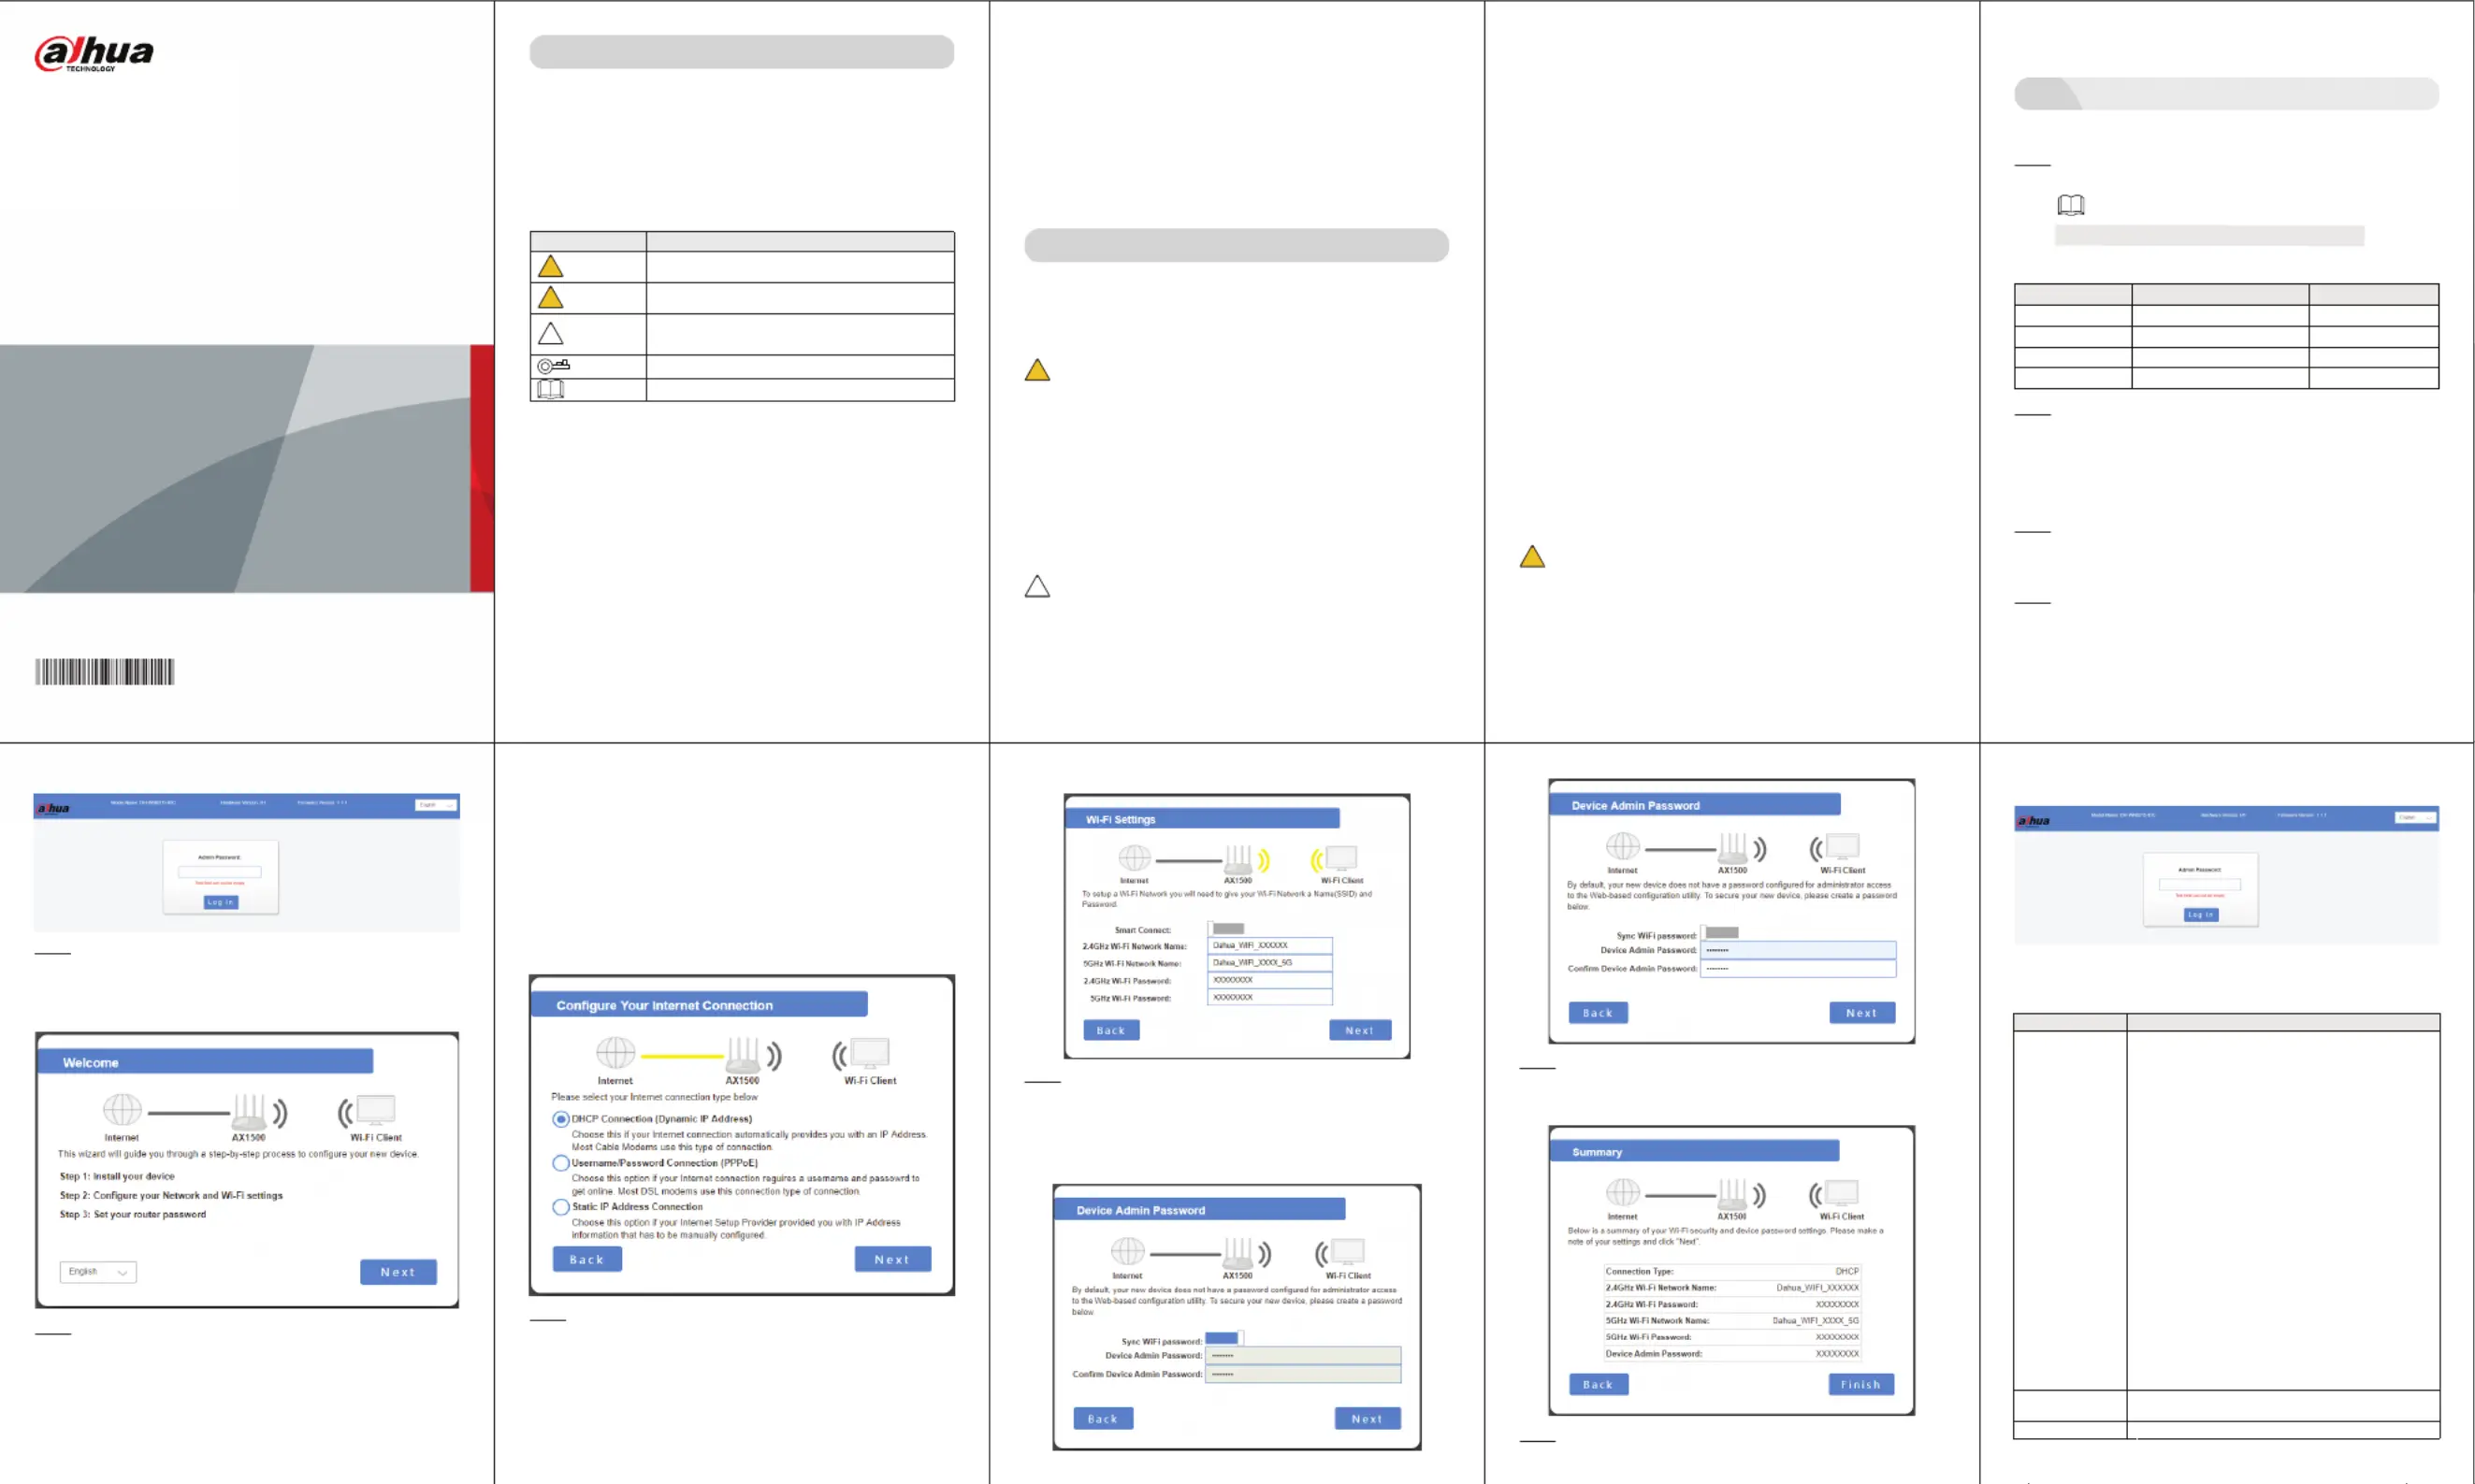
Figure 1-4 Wifi settings
Figure 1-5 Wifi settings
Step 6
Enter the webpage, configure the admin Device Admin Password
password according to the prompts. When is Sync WiFi password
enabled, the is automatically Device Admin Password
synchronized to be consistent with the Wi-Fi password. When Sync
WiFi password is disabled, you need to configure the password.
After configuration, click .Next
Figure 1-6 Summary
Step 7 Enter the webpage, check , SummaryConnection TypeWi-Fi
Network Name, Wi-Fi PasswordFinish, and then click .
Step 8 Search for new Wi-Fi name and input password. After the connection,
input "192.168.1.110" to access the device management page.
Table 1-2 Indicator and button
Safety Instructions
The following signal words might appear in the manual.
●
The manual is for reference only. Slight differences might be found
between the manual and the product.
●
We are not liable for losses incurred due to operating the product in ways
that are not in compliance with the manual.
●
The manual will be updated according to the latest laws and regulations
of related jurisdictions. For detailed information, see the paper user’s
manual, use our CD-ROM, scan the QR code or visit our official website.
The manual is for reference only. Slight differences might be found
between the electronic version and the paper version.
●
All designs and software are subject to change without prior written
notice. Product updates might result in some differences appearing
between the actual product and the manual. Please contact customer
service for the latest program and supplementary documentation.
●
There might be errors in the print or deviations in the description of the
functions, operations and technical data. If there is any doubt or dispute,
About the Manual
DANGER
!
WARNING
!
CAUTION
!
NOTE
Signal Words Meaning
Indicates a high potential hazard which, if not avoided, will result
in death or serious injury.
Indicates a medium or low potential hazard which, if not avoided,
could result in slight or moderate injury.
Indicates a potential risk which, if not avoided, could result in
property damage, data loss, reductions in performance, or
unpredictable results.
Provides methods to help you solve a problem or save time.
Provides additional information as a supplement to the text.
TIPS
Figure 1-7 Log in
1.3 Indicator Description
●
Do not unplug the power cord on the side of the device while the adapter
is powered on.
1
Operation Guide
1.1 Preparations
Step 1 Check if the package is missing or damaged, and contact after-sale
personnel if there is.
Step 2
Connect the broadband access line to the WAN port of the device
and plug the DC power plug into the DC interface of the device. After
powering on, the indicator light is solid red for 10 seconds and then
flashes green, blue and red alternately. The system flashes green
after it starts normally.
Packing list might differ depending on actual products.
Table 1-1 Packing list
No. Name Quantity
1 Router 1
2 Power adapter 1
3 User's manual 1
4 Network cable 1
1.2 Configuring Router
Step 2 Open the browser, input "192.168.1.110" and press the Enter key to
enter the device management webpage. Input the , Admin Password
and then click. Log In
Step 1 Search for wifi signal with phones or laptops, and then connect the
wifi. The name is "Dahua_WIFI_XXXXXX" or
"Dahua_WIFI_XXXXXX_5G" (XXXXXX is the last six digits of the
MAC address of the device), and the defaulted wifi has no password.
Step 3 When logging in to the webpage for the first time, the device will pop
up the setup wizard. You can switch the language according to the
page prompts, and then click after the configuration is Next
completed.
●
If you do not need any settings to access the Internet, select
DHCP Connection.
Step 4 Enter the webpage and Configure Your Internet Connection
change the connection type as required. After configuration, click
Next DHCP Connection .Internet connection type includes
(Dynamic IP Address)Username/Password Connection ,
(PPPoE)Static IP Address Connection, and .
Figure 1-2 Setup wizard
●
If you need to enter the account and password to access the
Internet, select , click , and input broadband account PPPoENext
and broadband password.
●
If you cannot acquire IP address automatically, consult the
network administrator or broadband operator, select Static IP
Address Connection Next, and then click, and enter the IP
address, subnet mask, gateway address, preferred DNS address,
and alternate DNS address as prompted on the page.
This manual uses as a example.DHCP Connection
Figure 1-3 Internet connection
Step 5 Enter the webpage, configure wifi network name and Wi-Fi Settings
password. When is disabled, the network names of Smart Connect
2.4 GHz and 5 GHz need to be different. After configuration, click
Next.
Indicator and port
Description
Indicator
●
During Startup:
◇
Power indicator: Flashes green.
◇
5G indicator: Off and solid green.
◇
2.4G indicator: Off.
◇
Internet indicator: Off.
◇
LAN indicaotr: Off.
◇
WPS indicaotr: Off.
●
After startup:
◇
Power indicator: Flashes green.
◇
5G indicator: Solid green when 5G is enabled, and
off when disabled.
◇
2.4G indicator: Solid green when 2.4G is enabled,
and off when disabled.
◇
Internet indicator: Solid green when network is
connected, flashes when data is transmitted, and off
when disconnected.
◇
LAN indicaotr: Solid green when at least one device is
LAN port of the router, and off when no device is LAN
port of the router.
◇
WPS indicaotr: Stops flashing when WPS is enabled
and successfully connected to end devices. Stops
flashing in 120 seconds when WPS is not connected
to end
devices. Off when the WPS is disabled.
Reset button
Restore to the default settings. Press and hold for 10
seconds to restore and restart automatically.
WPS button
Press for 1 second to enable the WPS function.
we reserve the right of final explanation.
Important Safeguards and Warnings
!
Strictly comply with the local electrical safety code and standards. Make
sure the ambient voltage is stable and meets the power supply
requirements of the device.
●
Personnel working at heights must take all necessary measures to
ensure personal safety including wearing a helmet and safety belts.
●
Do not leave outdoor models of the device hanging in the air or facing
outwards when installing onto poles that are on top of buildings.
●
Do not place the device in a place exposed to sunlight or near heat
sources.
●
Put the device in a well-ventilated place, and do not block its ventilation.
●
Use an adapter or cabinet power supply provided by the manufacturer.
●
This section introduces content covering the proper handling of the device,
hazard prevention, and prevention of property damage. Read carefully
before using the device, and comply with the guidelines when using it.
Installation Requirements
Do not connect the power adapter to the device while the adapter is
powered on.
●
WARNING
!
●
Upgrade the reader software or try other mainstream reader software if
the manual (in PDF format) cannot be opened.
●
All trademarks, registered trademarks and company names in the
manual are properties of their respective owners.
●
Please visit our website, contact the supplier or customer service if any
problems occur while using the device.
●
If there is any uncertainty or controversy, we reserve the right of final
explanation.
Figure 1-1 Log in
Product specificaties
| Merk: | Dahua Technology |
| Categorie: | Router |
| Model: | AX15M |
| Kleur van het product: | Zwart |
| Gewicht: | 260 g |
| Breedte: | 119 mm |
| Diepte: | 215 mm |
| Hoogte: | 173 mm |
| Gewicht verpakking: | 560 g |
| Breedte verpakking: | 285 mm |
| Diepte verpakking: | 295 mm |
| Hoogte verpakking: | 70 mm |
| Gebruikershandleiding: | Ja |
| Wi-Fi-standaarden: | 802.11a, 802.11b, 802.11g, Wi-Fi 4 (802.11n), Wi-Fi 5 (802.11ac), Wi-Fi 6 (802.11ax) |
| USB-poort: | Nee |
| Ethernet LAN: | Ja |
| Type stroombron: | DC |
| Meegeleverde kabels: | LAN (RJ-45) |
| Inclusief AC-adapter: | Ja |
| Indicatielampje: | Ja |
| Aantal Ethernet LAN (RJ-45)-poorten: | 3 |
| MIMO: | Ja |
| Aansluiting voor netstroomadapter: | Ja |
| Intern geheugen: | 128 MB |
| SIM-kaartsleuf: | Nee |
| 3G/4G USB modem compatibiliteit: | Nee |
| Modulatie: | 1024-QAM |
| Wifi-band: | Dual-band (2.4 GHz / 5 GHz) |
| Wifi-standaard: | Wi-Fi 6 (802.11ax) |
| WLAN gegevensoverdrachtsnelheid (max): | 1500 Mbit/s |
| WLAN gegevensoverdrachtsnelheid (eerste band): | 300 Mbit/s |
| WLAN gegevensoverdrachtsnelheid (tweede band): | 1201 Mbit/s |
| Gevoeligheid ontvanger: | 2.4 GHz\n11n HT20_MCS0: -95 dbm\n11n HT20_MCS7: -75 dbm\n11n HT40_MCS0: -92 dbm\n11n HT40_MCS7: -72 dbm\n5 GHz\n11ac VHT80_MCS0: -89 dbm\n11ac VHT80_MCS9: -62 dbm\n11ax HE80_MCS0: -89 dbm\n11ax HE80_MCS11: -59 dbm |
| Interfacetype Ethernet LAN: | Ethernet |
| Ethernet LAN, data-overdrachtsnelheden: | 10,100,1000 Mbit/s |
| Bekabelingstechnologie: | 10/100/1000Base-T(X) |
| Ondersteunde beveiligingsalgoritmen: | WPA-PSK, WPA2-PSK, WPA3 |
| Soort antenne: | 2x2 |
| Antennas quantity: | 4 |
| Antenne versterkingsniveau (max): | 5 dBi |
| Temperatuur bij opslag: | -20 - 70 °C |
| Upgraden van firmware mogelijk: | Ja |
| Web-gebaseerd management: | Ja |
| Reset button: | Ja |
| Externe adapter: | Ja |
| Bandbreedte (eerste): | 2.484 GHz |
| Ethernet WAN: | Ja |
| Output current: | 1 A |
| Spanning: | 12 V |
| Flash memory: | 128 MB |
| DHCP server: | Ja |
| Ouderlijk toezicht: | Ja |
| Kanaalbandbreedte: | 80 MHz |
| Quality of Service (QoS): | Ja |
| DHCP client: | Ja |
| Aantal kanalen: | 165 kanalen |
| Network address translation (NAT): | Ja |
| Toegang voor gasten: | Ja |
| Aantal gelijktijdig verbonden apparaten (max): | 32 |
| DSL WAN: | Nee |
| WPS Push Button Security: | Ja |
| Automatische kanaalselectie: | Ja |
| Type WAN-aansluiting: | RJ-45 |
| Stroomverbruik (typisch): | 10 W |
| Bedrijfstemperatuur (T-T): | 0 - 40 °C |
| Relatieve vochtigheid in bedrijf (V-V): | 10 - 90 procent |
| Type product: | Router om neer te zetten |
| Aantal producten inbegrepen: | 1 stuk(s) |
| MU-MIMO-technologie: | Ja |
| Antenne-ontwerp: | Extern |
| Dynamic DNS (DDNS): | Ja |
| Bandbreedte (tweede): | 5.85 GHz |
| System event log: | Ja |
Heb je hulp nodig?
Als je hulp nodig hebt met Dahua Technology AX15M stel dan hieronder een vraag en andere gebruikers zullen je antwoorden
Handleiding Router Dahua Technology

6 Januari 2024
6 Januari 2024
6 Januari 2024
6 Januari 2024
5 Januari 2024
12 Februari 2023
Handleiding Router
Nieuwste handleidingen voor Router
22 April 2026
22 April 2026
21 April 2026
21 April 2026
21 April 2026
21 April 2026
20 April 2026
20 April 2026
14 April 2026
13 April 2026