StarTech.com HD2VID2 Handleiding


Lees hieronder de 📖 handleiding in het Nederlandse voor StarTech.com HD2VID2 (2 pagina's) in de categorie Audio/video-converter. Deze handleiding was nuttig voor 20 personen en werd door 2 gebruikers gemiddeld met 4.5 sterren beoordeeld

Pagina 1/2
Quick-Start Guide
To view manuals, FAQs, videos, drivers, downloads, technical drawings, and more, visit www.startech.com/support.
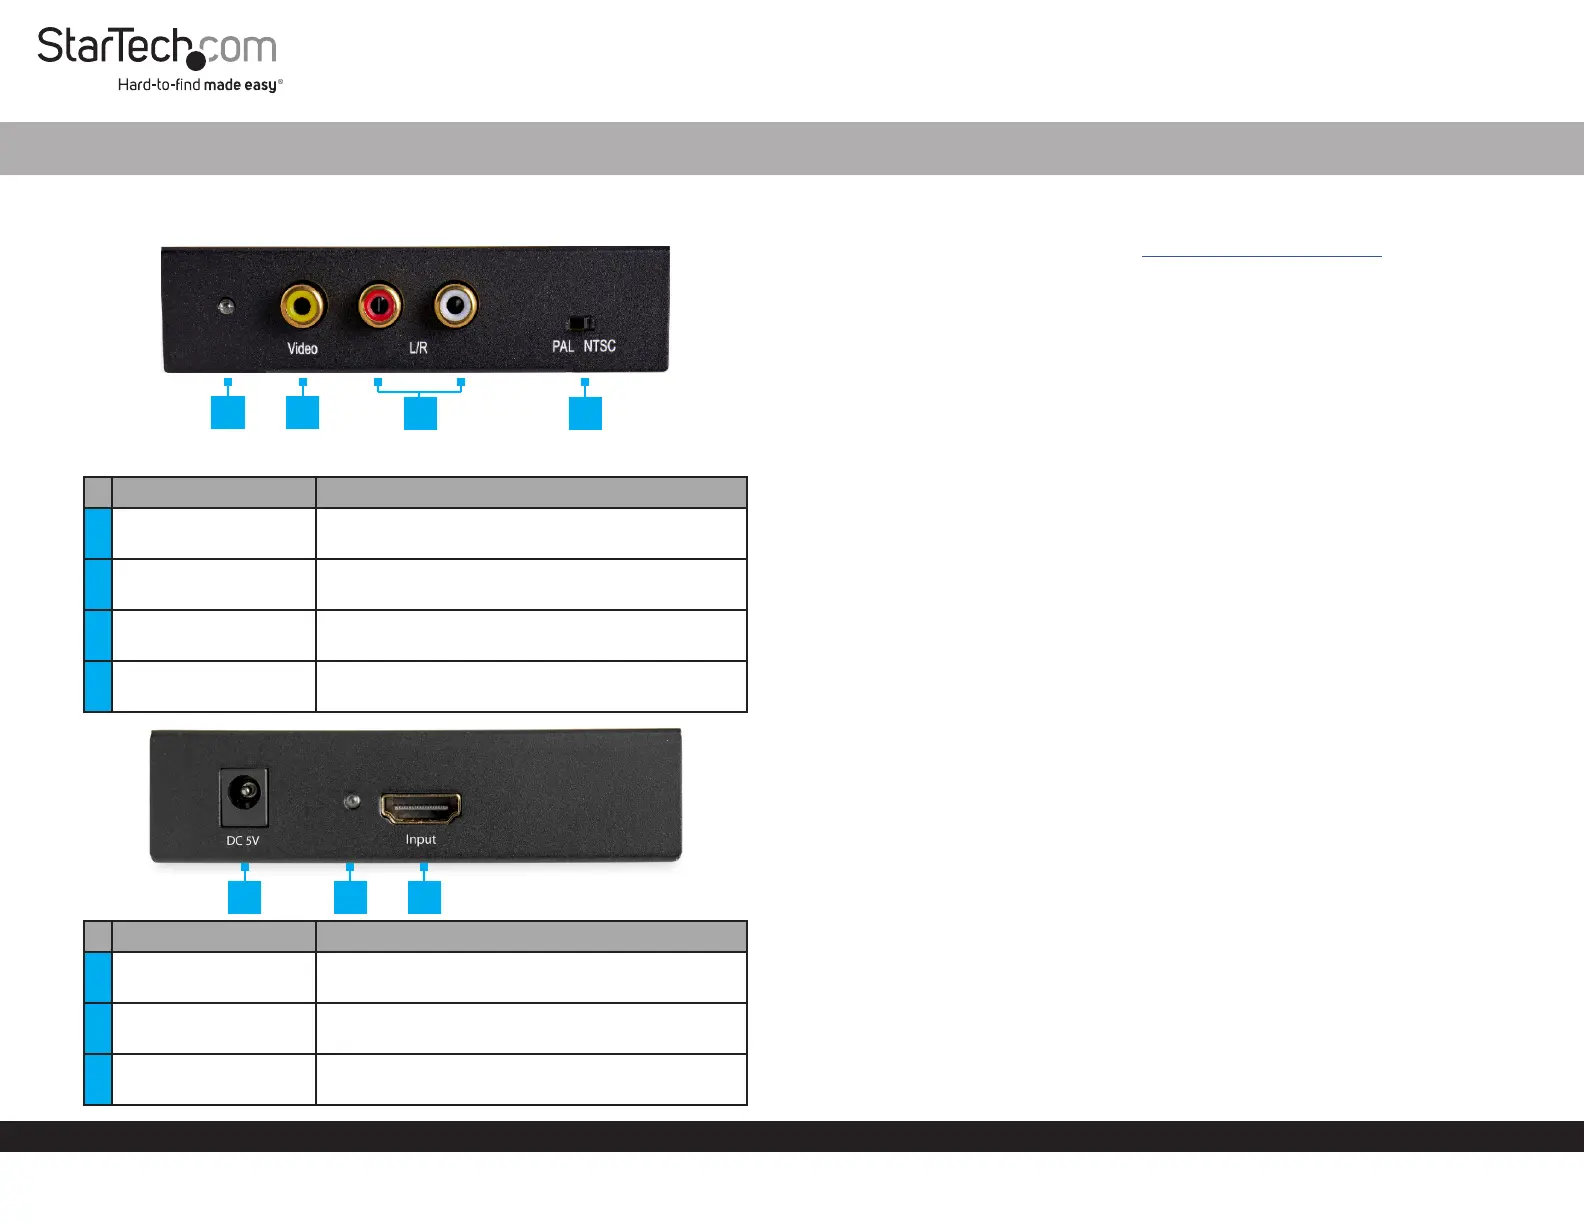
Product Diagram (HD2VID2)
Port/LED Function
1Composite LED Indicates that video is connected using the
HDMI Port.
2Composite Video Port
(Yellow)
Used to connect a to the Display Device
Converter.
3Stereo Port L/R (Red/
White)
Used to connect an to the Audio Device
Converter.
4PAL/NTSC Switch Used to toggle between PAL and NTSC video
modes.
Port/LED Function
5DC/5V Port Used with the to Universal Power Adapter
power the .Converter
6Power LED Indicates that the is receiving Converter
power.
7HDMI Input Port Used to connect a to the Video Source Device
Converter.
HDMI® to Composite Video Converter with Audio
1
Requirements
For the latest requirements, please visit . www.startech.com/HD2VID2
Note: All Required items are sold separately.
HDMI Enabled Video Source x 1
Composite Video Enabled Display Device (e.g. Monitor, Projector, HDTV, etc.) x 1
HDMI Cable x 1
RCA Composite Video Cable x 1
Phillips Head Screwdriver x 1
Composite Audio Cable x 1
Installation
Note: Power o all devices before connecting the .Converter
1. Connect an to the on the and connect the other HDMI Cable HDMI Port Converter
end of the to the HDMI port on the .HDMI Cable Video Source Device
2. Connect an (sold separately) to the RCA Composite Cable Composite Video Port
on the and connect the other end of the to the Converter RCA Composite Cable
composite video port on the .Display Device
3. If HDMI audio is being used, connect (sold separately) Composite Audio Cables
to the on the and the other end of the Stereo Port L and R Ports Converter
Composite Audio Cables Speakers/Audio Receiver to the .
4. Connect the to the on the and Universal Power Adapter DC/5V Port Converter
other end to an . The will light up solid.AC Electrical Outlet Power LED
5. Power on the and the .Video Display Device HDMI Video Source
6. Slide the to adjust the video mode to either PAL or NTSC.PAL/NTSC Switch
Connecting a Regional Power Clip
1. Select a . Regional Power Clip
2. Align the two on the with the notches on the face Side Tabs Regional Power Clip
of the . Universal Power Adapter
3. Slide the down until you hear a click, connecting the contact Regional Power Clip
prongs on the with the contact prongs on the Regional Power Clip Universal
Power Adapter.
2 4
3
5 6 7
FCC Compliance Statement
This equipment has been tested and found to comply with the limits for a Class B digital device, pursuant to part 15 of the FCC
Rules. These limits are designed to provide reasonable protection against harmful interference in a residential installation.
This equipment generates, uses and can radiate radio frequency energy and, if not installed and used in accordance with the
instructions, may cause harmful interference to radio communications. However, there is no guarantee that interference will not
occur in a particular installation. If this equipment does cause harmful interference to radio or television reception, which can be
determined by turning the equipment o and
on, the user is encouraged to try to correct the interference by one or more of the following measures:
Reorient or relocate the receiving antenna.
Increase the separation between the equipment and receiver.
Connect the equipment into an outlet on a circuit dierent from that to which the receiver is connected.
Consult the dealer or an experienced radio/TV technician for help
This device complies with part 15 of the FCC Rules. Operation is subject to the following two conditions:
(1) This device may not cause harmful interference, and (2) this device must accept any interference received, including
interference that may cause undesired operation. Changes or modications not expressly approved by StarTech.com could void
the user’s authority to operate the equipment.
Industry Canada Statement
This Class B digital apparatus complies with Canadian ICES-003.
Cet appareil numérique de la classe [B] est conforme à la norme NMB-003 du Canada.
CAN ICES-3 (B)/NMB-3(B)
This device complies with Industry Canada licence-exempt RSS standard(s). Operation is subject to the following two conditions:
(1) This device may not cause interference, and (2) This device must accept any interference, including interference that may
cause undesired operation of the device.
Le présent appareil est conforme aux CNR d’Industrie Canada applicables aux appareils radio exempts de licence. L’exploitation
est autorisée aux deux conditions suivantes:
(1) l’appareil ne doit pas produire de brouillage, et (2) l’utilisateur de l’appareil doit accepter tout brouillage radioélectrique subi,
même si le brouillage est susceptible d’en compromettre le fonctionnement.
Use of Trademarks, Registered Trademarks, and other Protected Names and Symbols
This manual may make reference to trademarks, registered trademarks, and other protected names and/or symbols of third-
party companies not related in any way to StarTech.com. Where they occur these references are for illustrative purposes only
and do not represent an endorsement of a product or service by StarTech.com, or an endorsement of the product(s) to which
this manual applies by the third-party company in question. StarTech.com hereby acknowledges that all trademarks, registered
trademarks, service marks, and other protected names and/or symbols contained in this manual and related documents are the
property of their respective holders.
Warranty Information
This product is backed by a two year warranty.
For further information on product warranty terms and conditions, please refer to .www.startech.com/warranty
Limitation of Liability
In no event shall it be the liability of StarTech.com Ltd. and StarTech.com USA LLP (or their ocers, directors, employees or
agents) for any damages (whether direct or indirect, special, punitive, incidental, consequential, or otherwise), loss of prots, loss
of business, or any pecuniary loss, arising out of or related to the use of the product exceed the actual price paid for the product.
Some states do not allow the exclusion or limitation of incidental or consequential damages. If such laws apply, the limitations
or exclusions contained in this statement may not apply to you.
Safety Measures
If product has an exposed circuit board, do not touch the product under power.
Mesures de sécuri
Si l’un des circuits imprimés du produit est visible, ne pas touchez le produit lorsqu’il est sous tension.
安全対策
• 製品に露出した状態の回路基盤が含まれる場合、電源が入っている状態で製品に触らないでください
Misure di sicurezza
Se il prodotto ha un circuito stampato visibile, non toccare il prodotto quando è acceso.
Säkerhetsåtgärder
Rör aldrig vid enheter med oskyddade kretskort när strömmen är påslagen.
FR: fr.startech.com
DE: de.startech.com
ES: es.startech.com
NL: nl.startech.com
IT: it.startech.com
JP: jp.startech.com
StarTech.com Ltd.
45 Artisans Cres
London, Ontario
N5V 5E9
Canada
StarTech.com Ltd.
Unit B, Pinnacle 15
Gowerton Rd,
Brackmills
Northampton
NN4 7BW
United Kingdom
StarTech.com LLP
2500 Creekside
Parkwy
Lockbourne, Ohio
43137
U.S.A.
Supported Resolutions
Description
Video
Input Resolutions:
HD: 1080p, 720p, 576p, 480p @ 60Hz
PC: 1280x800, 1280x768, 1224x768, 800x600, 640x480 @ 60Hz
Output Resolutions:
480i (NTSC) @ 3.58MHz
576i (PAL) @ 4.43MHz
Removing a Regional Power Clip
1. Push the on the .Release Button Universal Power Adapter
2. Slide the upward, aligning the on the Regional Power Clip Side Tabs Regional
Power Clip Universal Power Adapter with the notches on the .
3. Pull the away from the .Regional Power Clip Universal Power Adapter
Installing the Mounting Brackets
1. Align a with the two on the side of the Mounting Bracket Mounting Holes
Converter.
Note: The has four , two on each side.Converter Mounting Holes
2. Insert the through the and into the Bracket Screws (x2) Mounting Bracket
Mounting Holes.
3. Tighten the using a , be careful not to Mounting Screws Phillips Head Screwdriver
overtighten.
4. Before installing the onto the mounting surface, contact a Mounting Bracket
professional. Product mounting should be completed by a certied professional as
per the local safety and building code guidelines.


Product specificaties

Merk: StarTech.com
Categorie: Audio/video-converter
Model: HD2VID2
Kleur van het product: Zwart
Gewicht: 225 g
Breedte: 103 mm
Diepte: 104 mm
Hoogte: 25 mm
Type stekker: Type M
Gewicht verpakking: 545 g
Breedte verpakking: 150 mm
Diepte verpakking: 210.5 mm
Hoogte verpakking: 52 mm
Gebruikershandleiding: Ja
Stroom: 0.4 A
Ondersteunde video-modi: 480p, 576p, 720p, 1080p
Inclusief AC-adapter: Ja
Certificering: REACH, FCC
Maximale videoresolutie: 1920 x 1080 Pixels
Videoresoluties: 640 x 480,800 x 600,1920 x 1080 Pixels
Duurzaamheidscertificaten: RoHS
Ingangsspanning: 100 - 240 V
Temperatuur bij opslag: -20 - 60 °C
Externe adapter: Ja
Audio-uitgangskanalen: 2.0 kanalen
Hostinterface: HDMI
Operating voltage: 5 V
Bedrijfstemperatuur (T-T): 0 - 40 °C
Relatieve vochtigheid in bedrijf (V-V): 20 - 90 procent
Code geharmoniseerd systeem (HS): 85176990
Inclusief bevestigingsbeugel: Ja
Type converter: Actieve video-omzetter
Werkzame stroming: 2 A
Inbegrepen soorten voedingsstekkers: ANZ, EU, JP, NA, UK
Audiosamplefrequentie: 48 kHz

Heb je hulp nodig?

Als je hulp nodig hebt met StarTech.com HD2VID2 stel dan hieronder een vraag en andere gebruikers zullen je antwoorden


Handleiding Audio/video-converter StarTech.com

Handleiding Audio/video-converter

Nieuwste handleidingen voor Audio/video-converter