Behringer 911 Envelope Generator Handleiding
Behringer
Synthesizer
911 Envelope Generator
Bekijk gratis de handleiding van Behringer 911 Envelope Generator (9 pagina’s), behorend tot de categorie Synthesizer. Deze gids werd als nuttig beoordeeld door 59 mensen en kreeg gemiddeld 4.6 sterren uit 30 reviews. Heb je een vraag over Behringer 911 Envelope Generator of wil je andere gebruikers van dit product iets vragen? Stel een vraag
Pagina 1/9

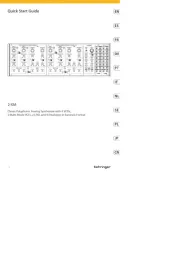
Quick Start Guide
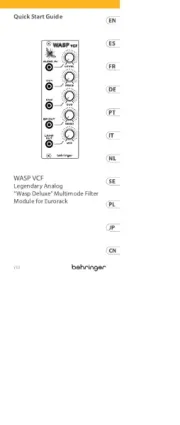
(EN) Controls
(1) T1 (Attack) – Controls the envelope attack time
from 2 ms to 10 seconds.
(2) T2 (Decay) – Controls the envelope decay time
from 2 ms to 10 seconds.
(3) T3 (Release) – Controls the envelope release time
from 2 ms to 10 seconds.
(4) E sus (Sustain) – Controls the sustain time
from 0 or 10 seconds.
(5) S-TRIG IN – Connect an external trigger signal
via 3.5 mm TS cable.
(6) OUT – Send the envelope to another module
via 3.5 mm TS cable.
(1)
(3)
(4)
(5) (6)
(2)
Power Connection
The 911 comes with the required power cable for connecting
to a standard Eurorack power supply system. Follow these steps
to connect power to the module. It is easier to make these
connections before the module has been mounted into a rack case.
1. Turn the power supply or rack case power o and
disconnect the power cable.
2. Insert the 16-pin connector on the power cable into
the socket on the power supply or rack case. The connector
has a tab that will align with the gap in the socket, so it
cannot be inserted incorrectly. If the power supply does not
have a keyed socket, be sure to orient pin 1 (-12 V)
with the red stripe on the cable.
3. Insert the 10-pin connector into the socket on the back
of the module. The connector has a tab that will align
with the socket for correct orientation.
4. After both ends of the power cable have been securely
attached, you may mount the module in a case and turn on
the power supply.
Installation
The necessary screws are included with the module for mounting
in a Eurorack case. Connect the power cable before mounting.
Depending on the rack case, there may be a series of xed holes
spaced 2 HP apart along the length of the case, or a track
that allows individual threaded plates to slide along the length
of the case. The free-moving threaded plates allow precise
positioning of the module, but each plate should be positioned
in the approximate relation to the mounting holes in your module
before attaching the screws.
Hold the module against the Eurorack rails so that each of the
mounting holes are aligned with a threaded rail or threaded
plate. Attach the screws part way to start, which will allow small
adjustments to the positioning while you get them all aligned. After
the nal position has been established, tighten the screws down.
911 ENVELOPE GENERATOR
Legendary Analog Envelope Generator
Module for Eurorack
V 1.0

Conexión Eléctrica
El 911 viene con el cable de alimentación necesario para conectarse
a un sistema de suministro de energía Eurorack estándar. Siga estos
pasos para conectar la alimentación al módulo. Es más fácil realizar
estas conexiones antes de que el módulo se haya montado en una
caja de rack.
1. Apague la fuente de alimentación o la caja del bastidor y
desconecte el cable de alimentación.
2. Inserte el conector de 16 clavijas del cable de alimentación en
la toma de la fuente de alimentación o en la caja del bastidor.
El conector tiene una pestaña que se alineará con el espacio
en el zócalo, por lo que no se puede insertar incorrectamente.
Si la fuente de alimentación no tiene un enchufe con llave,
asegúrese de orientar el pin 1 (-12 V) con la raya roja en el
cable.
3. Inserte el conector de 10 pines en el zócalo en la parte
posterior del módulo. El conector tiene una pestaña que se
alineará con el enchufe para una orientación correcta.
4. Una vez que ambos extremos del cable de alimentación se
hayan conectado de forma segura, puede montar el módulo
en una caja y encender la fuente de alimentación.
Instalación
Los tornillos necesarios se incluyen con el módulo para el montaje en
una caja Eurorack. Conecte el cable de alimentación antes del montaje.
Dependiendo de la caja del bastidor, puede haber una serie de
oricios jos separados 2 HP a lo largo de la caja, o una pista que
permita que las placas roscadas individuales se deslicen a lo largo
de la caja. Las placas roscadas de movimiento libre permiten
un posicionamiento preciso del módulo, pero cada placa debe
colocarse en una relación aproximada con los oricios de montaje
en su módulo antes de colocar los tornillos.
Sostenga el módulo contra los rieles Eurorack de modo que cada
uno de los oricios de montaje esté alineado con un riel o placa
roscada. Coloque los tornillos parcialmente para comenzar, lo
que permitirá pequeños ajustes en la posición mientras los alinea
todos. Una vez establecida la posición nal, apriete los tornillos.
(ES) Controles
(1) T1 (ataque) - Controla el tiempo de ataque
de la envolvente de 2 ms a 10 segundos.
(2) T2 (decaimiento) - Controla el tiempo de caída
de la envolvente de 2 ms a 10 segundos.
(3) T3 (Release) - controla el tiempo de liberación
de la envolvente de 2 ms a 10 segundos.
(4) E sus (sostenido) - Controla el tiempo de sostenido
de 0 a 10 segundos.
(5) S-TRIG IN - Conecte una señal de disparo externa
mediante un cable TS de 3,5 mm.
(6) FUERA - Envíe el sobre a otro módulo mediante cable
TS de 3,5 mm.
(1)
(3)
(4)
(5) (6)
(2)
2911 ENVELOPE GENERATOR

(DE) Bedienelemente
(1) T1 (Angri) - Steuert die Hüllkurvenangriszeit
von 2 ms bis 10 Sekunden.
(2) T2 (Zerfall) - Steuert die Hüllkurvenabklingzeit
von 2 ms bis 10 Sekunden.
(3) T3 (Release) - Steuert die Release-Zeit der Hüllkurve
von 2 ms bis 10 Sekunden.
(4) E sus (Sustain) - Steuert die Haltezeit von 0 oder 10
Sekunden.
(5) S-TRIG IN - Schließen Sie ein externes Triggersignal
über ein 3,5 mm TS-Kabel an.
(6) AUS - Senden Sie den Umschlag über ein
3,5-mm-TS-Kabel an ein anderes Modul.
(1)
(3)
(4)
(5) (6)
(2)
Netzanschluss
Der 911 wird mit dem erforderlichen Stromkabel für den Anschluss
an ein Standard-Eurorack-Stromversorgungssystem geliefert.
Befolgen Sie diese Schritte, um das Modul mit Strom zu versorgen.
Es ist einfacher, diese Verbindungen herzustellen, bevor das
Modul in ein Rackgehäuse eingebaut wurde.
1. Schalten Sie das Netzteil oder das Rackgehäuse aus und
ziehen Sie das Netzkabel ab.
2. Stecken Sie den 16-poligen Stecker am Netzkabel in die
Buchse am Netzteil oder im Rack-Gehäuse. Der Anschluss
verfügt über eine Lasche, die an der Lücke in der Buchse
ausgerichtet ist, sodass sie nicht falsch eingeführt werden
kann. Wenn das Netzteil keine Schlüsselbuchse hat, achten
Sie darauf, Pin 1 (-12 V) mit dem roten Streifen am Kabel
auszurichten.
3. Stecken Sie den 10-poligen Stecker in die Buchse auf der
Rückseite des Moduls. Der Anschluss verfügt über eine
Lasche, die zur korrekten Ausrichtung an der Buchse
ausgerichtet wird.
4. Nachdem beide Enden des Netzkabels fest angeschlossen
wurden, können Sie das Modul in einem Gehäuse
montieren und die Stromversorgung einschalten.
Installation
Die erforderlichen Schrauben sind im Lieferumfang des Moduls für
die Montage in einem Eurorack-Gehäuse enthalten. Schließen Sie
das Netzkabel vor der Montage an.
Abhängig vom Rack-Gehäuse kann es eine Reihe von festen
Löchern geben, die entlang der Länge des Gehäuses 2 PS
voneinander entfernt sind, oder eine Schiene, mit der einzelne
Gewindeplatten entlang der Länge des Gehäuses gleiten können.
Die frei beweglichen Gewindeplatten ermöglichen eine präzise
Positionierung des Moduls. Jede Platte sollte jedoch in der
ungefähren Beziehung zu den Befestigungslöchern in Ihrem
Modul positioniert werden, bevor Sie die Schrauben anbringen.
Halten Sie das Modul so gegen die Eurorack-Schienen, dass jedes
der Befestigungslöcher mit einer Gewindeschiene oder einer
Gewindeplatte ausgerichtet ist. Bringen Sie die Schrauben teilweise
an, um zu beginnen. Dadurch können Sie die Position geringfügig
anpassen, während Sie alle ausrichten. Ziehen Sie die Schrauben
fest, nachdem die endgültige Position festgelegt wurde.
4911 ENVELOPE GENERATOR
Product specificaties
| Merk: | Behringer |
| Categorie: | Synthesizer |
| Model: | 911 Envelope Generator |
Heb je hulp nodig?
Als je hulp nodig hebt met Behringer 911 Envelope Generator stel dan hieronder een vraag en andere gebruikers zullen je antwoorden
Handleiding Synthesizer Behringer
4 Juni 2025

1 April 2025
1 April 2025
1 April 2025
1 April 2025

1 April 2025
30 Januari 2025

2 Januari 2025
2 Januari 2025

2 Januari 2025
Handleiding Synthesizer
- Nystrom
- (Recovery)
- Korg
- Roland
- Modal Electronics
- Fred's Lab
- Meebleeps Machines
- GS Music
- Noise Engineering
- ELTA Music
- Erica Synths
- IK Multimedia
- Majella
- Jomox
- Sequential
Nieuwste handleidingen voor Synthesizer

3 September 2025

1 September 2025

30 Juni 2025

10 Juni 2025
16 Mei 2025
13 Mei 2025
13 Mei 2025

12 Mei 2025

12 Mei 2025

12 Mei 2025