VTech VM2251 Handleiding
Bekijk gratis de handleiding van VTech VM2251 (4 pagina’s), behorend tot de categorie Babyfoon. Deze gids werd als nuttig beoordeeld door 90 mensen en kreeg gemiddeld 4.3 sterren uit 5 reviews. Heb je een vraag over VTech VM2251 of wil je andere gebruikers van dit product iets vragen? Stel een vraag
Pagina 1/4
Quick start guide
VM2251
VM2251-2
Video Monitor
Go to www.vtechphones.com
to register your product for
enhanced warranty support and
the latest VTech product news.
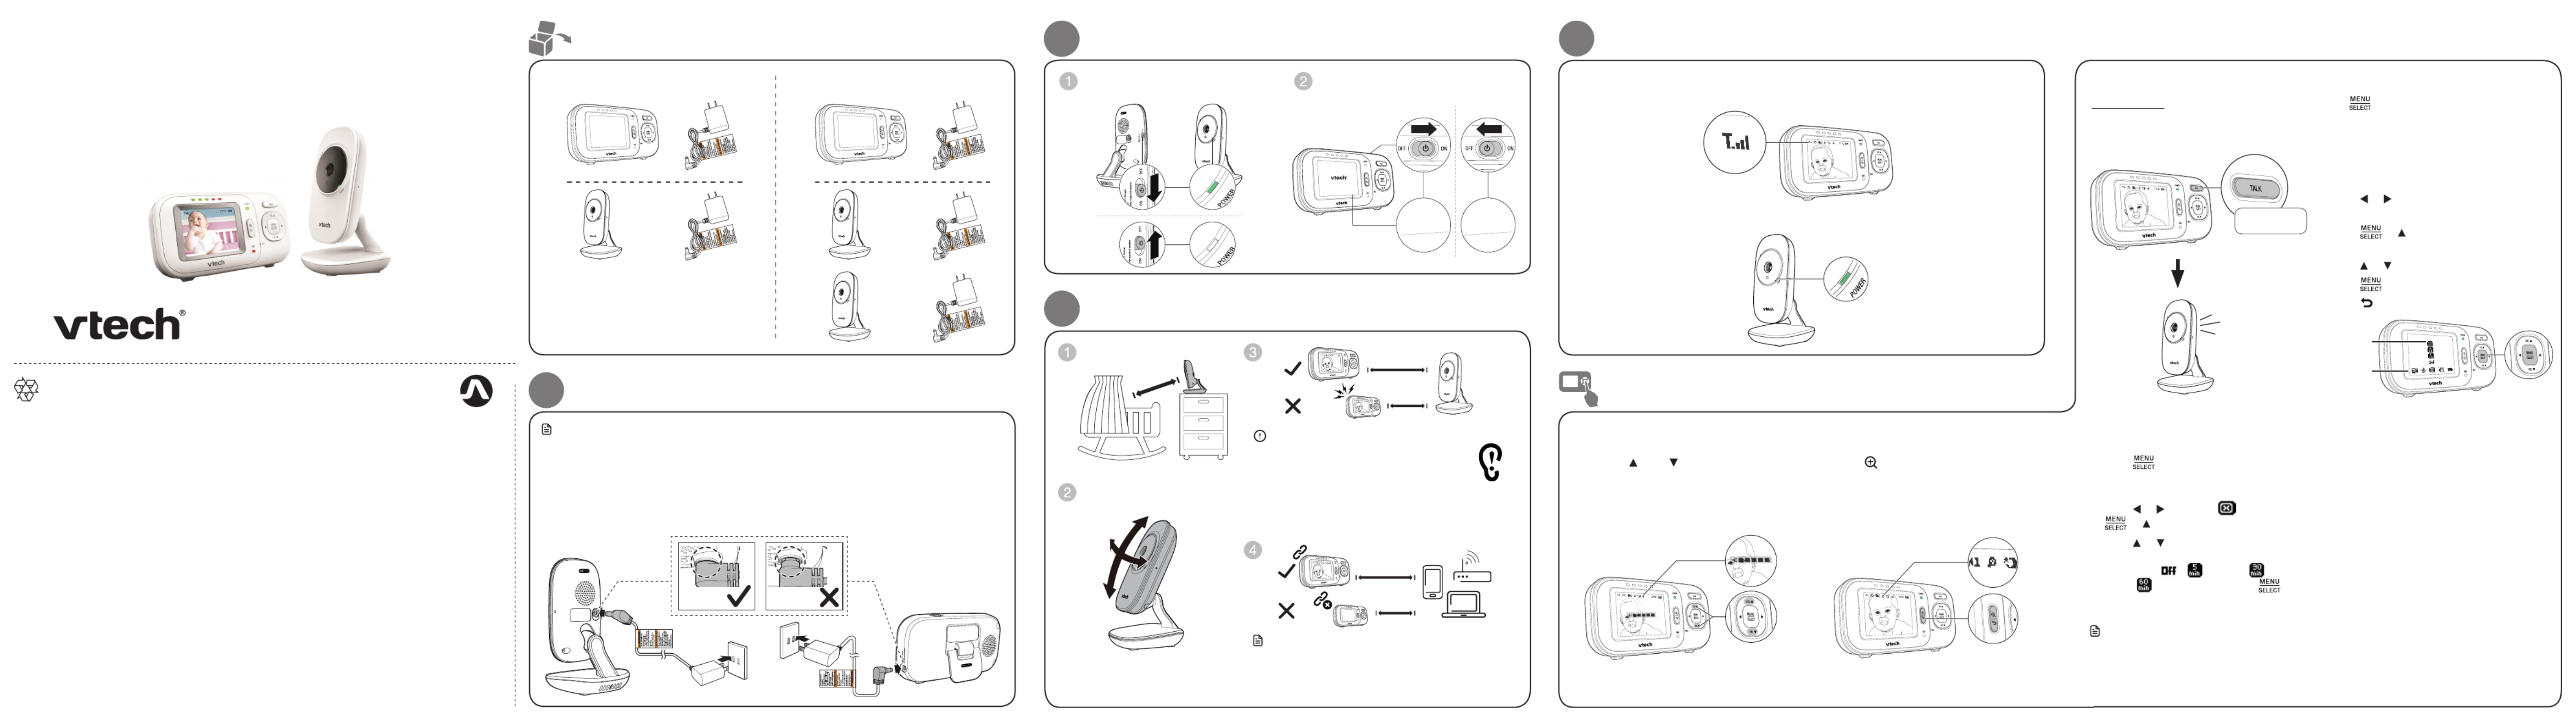
What’s in the box
VM2251 VM2251-2
1
Connect the baby monitor
NOTESNOTE
• The rechargeable battery is pre-installed in your parent unit.
• Use only the power adapters supplied with this product.
• Make sure the baby monitor is not connected to the switch controlled electric outlet.
• Connect the power adapters in a vertical or floor mount position only. The adapters’ prongs are
not designed to hold the weight of baby monitor, so do not connect them to any ceiling, under-
the-table, or cabinet outlets. Otherwise, the adapters may not properly connect to the outlets.
• Make sure the parent unit, the baby unit and the power adapter cords are out of reach of children.
2 Power on the baby monitor
Slide the ON/OFF switch to power
on your baby unit.
Slide the ON/OFF switch to power
on your parent unit.
4 Status check
Once you power on both your baby unit and parent unit, your parent unit displays image
from the baby unit, and the connection status displays on the LCD screen.
The LED light of baby unit turns on.POWER
Adjust speaker volume
Press to adjust your parent VOL / VOL
unit speaker volume. It determines the
volume of sound transmitted from your
baby units.
Zoom
Press to zoom in or out.
Talk to your baby unit
Press and hold TALK and speak to your
parent unit. Your voice is transmitted to
the baby unit.
Use the menu
Press to enter the menu, choose a menu
item, or save a setting. You can use the parent
unit for advanced settings or operations, such
as to adjust the baby unit sound sensitivity or
the temperature range for alerts.
While in the menu:
• Press or to scroll among the menu
options.
• Press or to enter the desired
submenu.
• Press or to select an item.
• Press to confirm your selection.
• Press to exit the menu or submenu.
Main menu
Submenu
Set screen off timer
1. Press to enter the main menu
when
the parent unit is idle.
2. Press or to choose , then press
or to open the submenu.
3. Press or to choose the desired
time period to automatically turn
off screen ( / - 5 min./ - 30
min. / - 60min.), then press to
confirm your selection.
Note
• Press any keys on the parent unit to turn on
the screen again.
Basic operation - Parent unit
Press and hold
6U]KXOTMUT
3OYKKTLUTIZOUT
6U]KXOTMULL
3OYKKTLUTIZOUT
6U]KXOTMUT
3OYKKTLUTIZOUT
Specifications are subject to change without notice.
© 2018 VTech Communications, Inc. All rights reserved.
11/18. VM2251-2_QSG_V6.
Document order number: 96-011937-060-100
Caution
• The default volume of your parent unit is level
3, and the maximum volume is level 5. If you
experience high-pitched screeching noise from
your baby monitor while positioning:
-Make sure your baby unit and parent unit are more
than 1 meter (3 feet) apart, OR
-Turn down the volume of your parent unit.
3
Positioning the baby monitor
>
< 3ft (1m)
3ft (1m)
Note
• To avoid interference from other electronic devices,
place your baby monitor at least 3 feet (1 meter) away
from devices such as wireless routers, microwaves, cell
phones and computers.
≥
<
3ft (1m)
3ft (1m)
﹏﹏﹏
﹏﹏﹏
﹏﹏﹏﹏
﹏﹏﹏﹏
﹏﹏﹏﹏
﹏﹏﹏﹏﹏
﹏﹏﹏﹏﹏
﹏﹏﹏
﹏﹏﹏
﹏﹏﹏﹏
﹏﹏﹏﹏
﹏﹏﹏﹏
﹏﹏﹏﹏﹏
﹏﹏﹏﹏﹏
> 3ft (1m)
Product specificaties
| Merk: | VTech |
| Categorie: | Babyfoon |
| Model: | VM2251 |
Heb je hulp nodig?
Als je hulp nodig hebt met VTech VM2251 stel dan hieronder een vraag en andere gebruikers zullen je antwoorden
Handleiding Babyfoon VTech

5 Februari 2026
5 Februari 2026
5 Februari 2026
4 Februari 2026
4 Februari 2026
4 Februari 2026
4 Februari 2026
4 Februari 2026
4 Februari 2026
4 Februari 2026
Handleiding Babyfoon
Nieuwste handleidingen voor Babyfoon
17 Juni 2026
6 Mei 2026
11 April 2026
31 Maart 2026
17 Maart 2026
4 Maart 2026
3 Maart 2026
2 Maart 2026
2 Maart 2026
1 Maart 2026