Shelly 2Pro Handleiding
Shelly
Smarth home
2Pro
Lees hieronder de đ handleiding in het Nederlandse voor Shelly 2Pro (2 pagina's) in de categorie Smarth home. Deze handleiding was nuttig voor 60 personen en werd door 2 gebruikers gemiddeld met 4.5 sterren beoordeeld
Pagina 1/2
SHELLY MOBILE APPLICATION
FOR
Introduction
Shelly devices can be controlled and managed directly in the lo-
cal network or by using the Shelly cloud service accessible via
the Internet.
Download the Shelly Cloud Application by scanning the QR code
above, or access the devices through the Embedded web inter-
face, explained further down in the user guide.
Shelly devices are compatible with Amazon Echo and Google
Home supported functionalities. See details at
https://shelly.cloud/compatibility/.
Registration
The îźrst time you load the Shelly Cloud mobile app, you have to
create an account which can manage all your Shelly devices. You
need to use an actual e-mail because that e-mail will be used in
case of Đ° forgotten password!
Forgotten password
In case you forget or lose your password, click the âForgot Pass-
word?â link on the login screen and type the e-mail you used in
your registration. You will receive an e-mail with Đ° link to Đ° page
where you can reset your password. The link is unique and can
be used only once.
â ATTENTION! If you are unable to reset your password, you
have to reset your device (as explained in âDevice Inclusionâ sec-
tion, Step 1).
First steps
After registering, create your îźrst room (or rooms), where you
are going to add and use your Shelly devices. Shelly Cloud al-
lows you to create scenes for automatic control of devices at
predeîźned hours or based on other parameters like tempera-
ture, humidity, light, etc. (with available sensors in Shelly Cloud).
Shelly Cloud allows easy control and monitoring using a mobile
phone, Đ° tablet, or a PC. Shelly Pro 2 can be grouped with other
devices in the application, as well as be set to trigger actions
on other Shelly devices. Setting parameters for lights, controlling
blinds, etc., is also supported.
Device inclusion
Step 1
When the installation of Shelly is done and the power is on, Shelly
will create its own Wi-Fi Access Point (AP).
â WARNING! In case the device has not created its own AP Wi-Fi
network with SSID like , please check ShellyPro2-F008D1DB58A0
if the device is connected according to the User and Safety Guide,
Installation Instructions. If you still do not see an active Wi-Fi net-
work with SSID like , or you want to ShellyPro2-F008D1DB58A0
add the device to another Wi-Fi network, reset the device. If the
device has been powered on, you have to restart it by powering it
off and then again on. After that you have one minute to press 5
consecutive times the button/switch connected to the SW termi-
nal. You should hear the relay trigger itself. After the trigger sound,
Shelly Pro 2 will return to AP mode. If not, please repeat or contact
our customer support at: .support@shelly.cloud
Step 2
Please keep in mind that Shelly devicesâ inclusion is different on
iOS and Android devices.
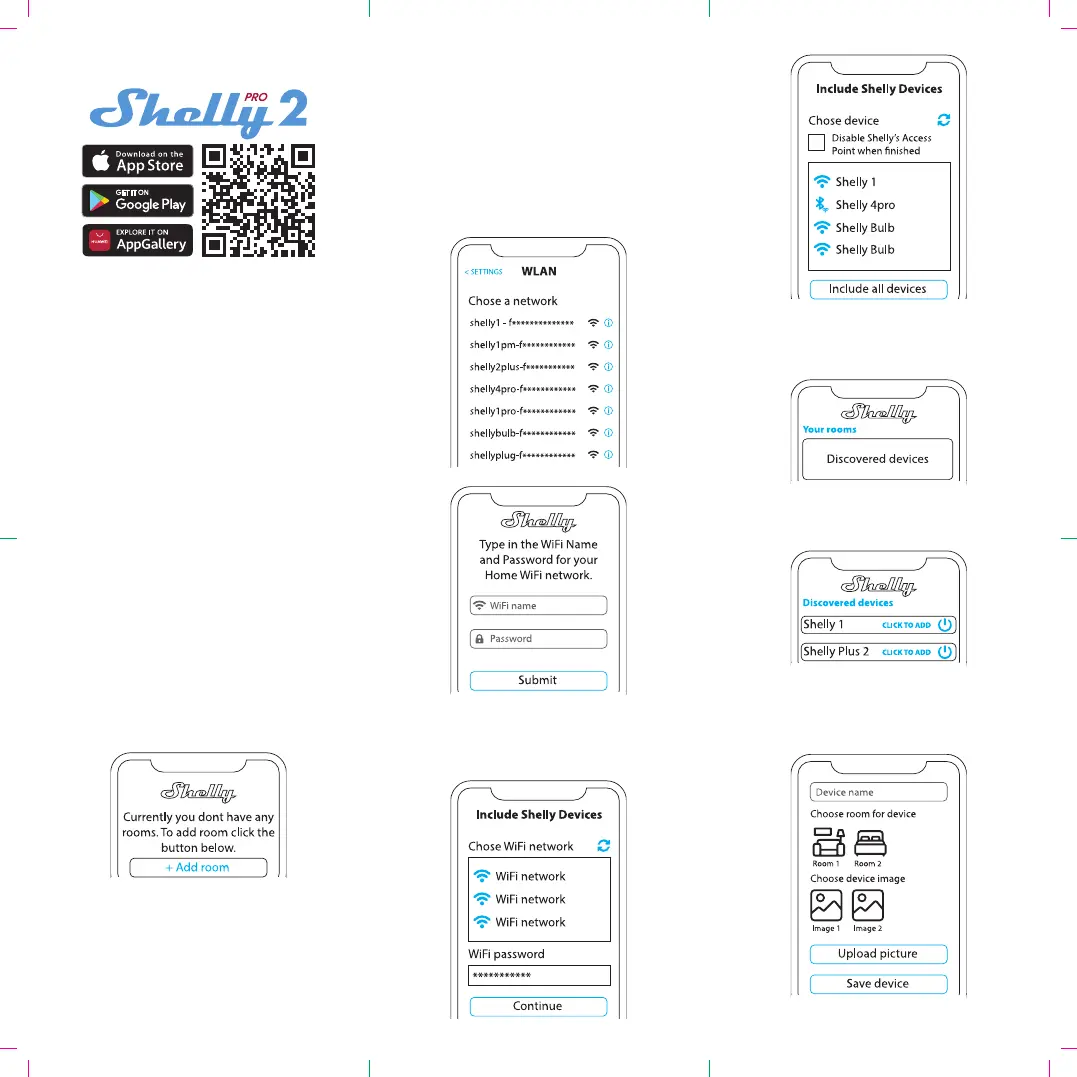
1. iOS inclusion - On your iOS device, open the Settings menu >
WLAN and connect to the Wi-Fi network created by your Shelly
device, i.e. ShellyPro2-F008D1DB58A0 (îźg. 1). Open your Shelly
app again and type in your home Wi-Fi credentials .(îźg. 2)
îźg. 1
îźg. 2
2. Android inclusion - From the hamburger menu on the main
screen of your Shelly App choose âAdd deviceâ. Then choose
your home network and type in your password . After that, (îźg. 3)
pick the Shelly device you want to include. The name of the de-
vice will be similar to: ShellyPro2-F008D1DB58A0 (îźg. 4).
îźg. 3
îźg. 4
Step 3
Approximately 30 sec. after discovering any new devices Đžn the
local Wi-Fi network, Đ° list will be displayed in the âDiscovered De-
vicesâ room by default.
Step 4
Select âDiscovered devicesâ and choose the device you want to
include in your account.
Step 5
Enter a name for the device (in the âDevice Nameâ îźeld). Choose
a âRoomâ where the device will be positioned and controlled
from. You can choose an icon or add a picture to make it easier
to recognize. Press âSave deviceâ.
Step 6
To control Shelly devices only through the local network, press
âNoâ.
Device settings
After your Shelly device is added in the application, you can con-
trol it, change its settings, and automate the way it works.
To switch the device on and off, use the ON/OFF button. For de-
vice management, simply click on the deviceâs name. From there
you may control the device, as well as edit its appearance and
settings.
Timer
Đllows you to manage the power supply automatically. You may
use:
⢠Auto ON: After turning off, the relay output will be automatical-
ly turned on after a predeîźned time (in seconds).
⢠Auto OFF: After turning on, the relay output will be automati-
cally turned off after a predeîźned time (in seconds).
Schedule
This function requires a working connection to the Internet.
Shelly may turn on/off automatically at a predeîźned time and
day throughout the week. Additionally, Shelly may turn on/off
automatically at sunrise/sunset, or at a speciîźed time before or
after sunrise/sunset. You may add up to 20 weekly schedules.
Internet
Conîźgure Wi-Fi, AP, Cloud, Bluetooth, MQTT settings.
⢠Wi-Fi Mode Client: Connect the relay to your Wi-Fi network.
Here, you can also set a static IP address.
⢠Wi-Fi Client Backup: An option to connect to an alternative
network in case the primary network fails or is too slow.
⢠Wi-Fi Mode AP: The mode in which the device creates its own
Wi-Fi connection point with the respective name (SSID).
⢠Ethernet: Connect the Shelly device to a network using an eth-
ernet cable. This requires a device reboot! Here, you can also set
a static IP address.
⢠Cloud: Connection to the cloud allows you to control your de-
vice remotely and to receive notiîźcations and updates.
⢠Bluetooth: Enable/disable
⢠MQTT: Conîźgure the Shelly device to communicate over
MQTT.
Application Settings
⢠Channel Name: Set a name for the chosen channel
⢠Appliance Type: Choose from a given list what type of appli-
ances your Shelly Pro 2 will be used with. The available options
are âSocket, Lights, Heating, Entertainmentâ. Đ custom type can
be set as well.
⢠PIN lock: Restrict control of the Shelly device through the web
interface by setting a PIN code. Click âEnableâ and set the chan-
nel PIN lock, then click âSaveâ.
⢠Exclude from Event Log: Do not show events from this device
in the app.
Webhooks
Use events to trigger http endpoints. You can add up to 20 web-
hooks.
Share
Share the control of your device with other users.
Settings
⢠Button Type: These settings deîźne the way the attached
switch or button controls the output state. The possible input
modes are âbuttonâ and âswitchâ, and the relay mode can be cho-
sen depending on the preffered usage of the device.
⢠Invert Switch: When the input is on, the output is off and when
the input is off, the output is on. For the change to be applied,
the physical switch has to be toggled once after âinvertâ is set
to âtrueâ.
⢠Firmware version: Shows your current îźrmware version. If a
newer version is available, you can update your Shelly device by
clicking Update.
⢠Geo Location And Time Zone: Set your time zone and geo-lo-
cation manually, or enable/disable automatic detection.
⢠Device Reboot: Reboot your Shelly Pro 2.
⢠Factory Reset: Remove Shelly Pro 2 from your account and
return it to its factory settings.
⢠Device Information: Here you can view the ID, IP and other set-
tings of your device. Upon clicking âEdit deviceâ, you can change
the room, name or image of the device.
THE EMBEDDED WEB INTERFACE
Shelly can be set and controlled through a web browser.
Abbreviations used
⢠Shelly ID - the unique name of the device. It consists of 12
hexadecimal characters, the base MAC address of the device. It
may include numbers and letters, for example .F008D1DB58A0
⢠SSID - the name of the Wi-Fi network, created by the device, for
example .ShellyPro2-F008D1DB58A0
⢠Access Point (AP) - the mode in which the device creates its
own Wi-Fi connection point with the respective name (SSID).
⢠Wi-Fi - the mode in which the device is connected to another
Wi-Fi network.
Initial inclusion
Step 1
Install Shelly following the connection diagrams described in the
instructions included with the device, and place it into the junc-
tion box. After turning the power on, Shelly will create its own
Wi-Fi network (AP).
â WARNING! If you donât see the AP, please fĐžllow step 1 from
the âDevice Inclusionâ section of this guide.
Step 2
Shelly Pro 2 has created its own Wi-Fi network (AP), with name
(SSID) such as ShellyPro2-F008D1DB58A0. Connect to it with
your phone, Đ° tablet, or Đ° PC.
Step 3
Type 192.168.33.1 into the address îźeld of your browser to load
the web interface of Shelly.
General - Home page
This is the home page of the embedded web interface. If it has
been set up correctly, you will see information about the state of
the two switches (ON/OFF) and common functionality menus.
For individual functionality menus, choose one of the two chan-
nels.
Channel settings
Click on âChannel Settingsâ. The general settings about the chan-
nel will be displayed here. You can conîźgure I/O settings, chan-
nelâs state, channelâs name, etc.
⢠Input/output settings - input mode and relay type deîźne the
way the attached switch or button controls the output state. The
possible input modes are âbuttonâ and âswitchâ, and the relay
mode can be chosen depending on the preffered usage of the
device. âSet relay power on defaultâ allows you to choose the
default state of the relay when power is on.
⢠Invert Switch: When the input is on, the output is off and when
the input is off, the output is on. For the change to be applied,
the physical switch has to be toggled once after âinvertâ is set
to âtrueâ.
⢠Channel Name: Set a name for the chosen channel
⢠PIN lock - Restrict control of the Shelly device through the web
interface by setting a PIN code. After typing the details in the
respective îźelds, press âRestrict Shellyâ.
Timers
Đllows you to manage the power supply automatically. You may
use:
⢠Auto ON: After turning off, the relay output will be automatical-
ly turned on after a predeîźned time (in seconds).
⢠Auto OFF: After turning on, the relay output will be automati-
cally turned off after a predeîźned time (in seconds).
Schedules
This function requires a working connection to the Internet.
Shelly may turn on/off automatically at a predeîźned time and
day throughout the week. Additionally, Shelly may turn on/off
automatically at sunrise/sunset, or at a speciîźed time before or
after sunrise/sunset. You may add up to 20 weekly schedules.
Webhooks
Use events to trigger http endpoints. You can add up to 20 web-
hooks.
Device
Get information about your deviceâs îźrmware version and loca-
tion. Perform reboot and factory reset. Set your time zone and
geo-location manually, or enable/disable automatic detection.
⢠Authentication - you can set credentials to lock your device or
change already existing credentials.
Networks
Conîźgure Wi-Fi, AP, Cloud, Bluetooth, MQTT settings.
Product specificaties
Merk: | Shelly |
Categorie: | Smarth home |
Model: | 2Pro |
Heb je hulp nodig?
Als je hulp nodig hebt met Shelly 2Pro stel dan hieronder een vraag en andere gebruikers zullen je antwoorden
Handleiding Smarth home Shelly
9 Juli 2023
9 Juli 2023
8 Juli 2023
8 Juli 2023
6 Juli 2023
6 Juli 2023
5 Juli 2023
4 Juli 2023
2 Juli 2023
1 Juli 2023
Handleiding Smarth home
- Smarth home Bosch
- Smarth home Philips
- Smarth home Xiaomi
- Smarth home Panasonic
- Smarth home Gigaset
- Smarth home Honeywell
- Smarth home ABB
- Smarth home Abus
- Smarth home Acer
- Smarth home Airlive
- Smarth home Ajax
- Smarth home Alecto
- Smarth home Aluratek
- Smarth home Aqara
- Smarth home Blumfeldt
- Smarth home Bose
- Smarth home Brennenstuhl
- Smarth home Burg-Wachter
- Smarth home Byron
- Smarth home D-Link
- Smarth home Danfoss
- Smarth home Denver
- Smarth home Devolo
- Smarth home Digi
- Smarth home DIO
- Smarth home Drayton
- Smarth home Easy Home
- Smarth home Elro
- Smarth home Eufy
- Smarth home Ezviz
- Smarth home FireAngel
- Smarth home Gardena
- Smarth home Gira
- Smarth home Hager
- Smarth home Hama
- Smarth home Hikvision
- Smarth home Home Easy
- Smarth home Klarstein
- Smarth home KlikaanKlikuit
- Smarth home Laica
- Smarth home Lenovo
- Smarth home LevelOne
- Smarth home Linksys
- Smarth home Livoo
- Smarth home Logicom
- Smarth home Logitech
- Smarth home MAC
- Smarth home Manta
- Smarth home Nedis
- Smarth home Netatmo
- Smarth home Netgear
- Smarth home Niko
- Smarth home Nobo
- Smarth home Perel
- Smarth home Profile
- Smarth home Qnect
- Smarth home Rademacher
- Smarth home Ranex
- Smarth home Redmond
- Smarth home Renkforce
- Smarth home Ring
- Smarth home Salus
- Smarth home SEC24
- Smarth home Smartwares
- Smarth home Somfy
- Smarth home Technisat
- Smarth home Tenda
- Smarth home Tesla
- Smarth home TFA
- Smarth home Theben
- Smarth home TP Link
- Smarth home Trust
- Smarth home Velleman
- Smarth home Vivax
- Smarth home Jung
- Smarth home One For All
- Smarth home Oregon Scientific
- Smarth home Osram
- Smarth home Caliber
- Smarth home KrĂźger And Matz
- Smarth home Naxa
- Smarth home NGS
- Smarth home Niceboy
- Smarth home Steren
- Smarth home EMOS
- Smarth home KKT Kolbe
- Smarth home Hive
- Smarth home Imou
- Smarth home Trevi
- Smarth home REV
- Smarth home Chacon
- Smarth home Nexa
- Smarth home Swann
- Smarth home Dormakaba
- Smarth home SPC
- Smarth home Cisco
- Smarth home Sanus
- Smarth home Delta Dore
- Smarth home Fibaro
- Smarth home Paulmann
- Smarth home Energenie
- Smarth home Cleanmaxx
- Smarth home CyberPower
- Smarth home Totolink
- Smarth home Inkbird
- Smarth home Speed-Link
- Smarth home Busch-Jaeger
- Smarth home Audac
- Smarth home Eltako
- Smarth home Rain Bird
- Smarth home ATen
- Smarth home Popp
- Smarth home Fanvil
- Smarth home August
- Smarth home Aiphone
- Smarth home EQ3
- Smarth home Homematic IP
- Smarth home X-Sense
- Smarth home Crestron
- Smarth home Chuango
- Smarth home Airthings
- Smarth home Brilliant
- Smarth home KanexPro
- Smarth home Intertechno
- Smarth home EKO
- Smarth home Schellenberg
- Smarth home Aeotec
- Smarth home Adurosmart
- Smarth home Nous
- Smarth home Athom
- Smarth home Casambi
- Smarth home Tellur
- Smarth home TELE System
- Smarth home SwitchBot
- Smarth home Mach Power
- Smarth home Sonoff
- Smarth home Blebox
- Smarth home Lutron
- Smarth home Meross
- Smarth home Origin Acoustics
Nieuwste handleidingen voor Smarth home
18 April 2024
8 April 2024
25 Maart 2024
13 Maart 2024
12 Maart 2024
12 Maart 2024
12 Maart 2024
12 Maart 2024
12 Maart 2024
12 Maart 2024