Nitecore TIP3 Handleiding
Bekijk gratis de handleiding van Nitecore TIP3 (2 pagina’s), behorend tot de categorie Zaklamp. Deze gids werd als nuttig beoordeeld door 10 mensen en kreeg gemiddeld 4.4 sterren uit 2 reviews. Heb je een vraag over Nitecore TIP3 of wil je andere gebruikers van dit product iets vragen? Stel een vraag
Pagina 1/2
FL1 STANDARD
Cool White Light / Neutral White Light / Warm Light
TURBOHIGHMIDLOWULTRALOW
*720 Lumens220 Lumens65 Lumens15 Lumens1 Lumen
-1h 45min6h16h160h
*92m57m32m14m6m
*2,117cd830cd260cd55cd9cd
2m
IP54
Note: The stated data is measured by using the built-in Li-ion battery (650mAh), in accordance with the international ashlight
testing standards ANSI/PLATO FL 1-2019, at an ambient temperature of 26°C (79°F) from the NITECORE Lab. The data may
vary in real world use due to dierent environmental conditions.
* The data is tested without the temperature regulation.
Features
Specifications
Technical Data
Accessories
Product Overview
• Utilizes 4-core MCT (Multiple Color Temperatures) UHE
LEDs to deliver a max output of 720 lumens
• Equipped with 3 color temperatures (3,000K warm light
/ 4,500K neutral white light / 6,500K cool white light)
• Peak beam intensity of 2,117cd and max throw of 92
meters
• Designed with a TIR optical lens to oer uniform and
soft light
• Built-in 650mAh Li-ion battery, providing up to 160
hours of runtime
• Advanced Power Cut-O (APC) technology for an ultra-
low standby power consumption
• Built-in intelligent Li-ion battery charging circuit with a
USB-C charging port
• Highly ecient constant current circuit to provide a
stable output
• Dual button interface for convenient operation
• 5 brightness levels available with direct access to TURBO
• Intelligent memory function for color temperature and
brightness level
• Semi lockout mode and full lockout mode available
• Designed with power indicators to display the battery
level and a lockout indicator to show the lockout status
• Incorporated Advanced Temperature Regulation (ATR)
module (Patent No. ZL201510534543.6)
• Metal tail ring pull able to withstand up to 30 kilograms
of weight
• Constructed from aluminum alloy with HA III military
grade hard-anodized nish
• Waterproof and dustproof rating in accordance with IP54
• Impact resistant to 2 meters
Key Clasp, USB-C Charging Cable, Clip
Dimensions:62mm x 26mm x 15mm /
2.44" x 1.02" x 0.59" (Clip Not Included)
Weight:30g / 1.06 oz (Accessories Not Included)
(English)
(Deutsch)
(Francais)
(Español)
⚠ IMPORTANT
Thanks for purchasing NITECORE!
Please read this manual carefully before using the product and
follow the instructions.
This manual contains important safety information and operating
instructions. Please keep it for future reference.
In case of updates, please refer to the latest version available on
the ocial website.
TIP3 User Manual
Warranty Service
All NITECORE
®
products are warranted for quality.
Any DOA / defective product can be exchanged for a
replacement through a local distributor/dealer within 15
days of purchase. After that, all defective / malfunctioning
NITECORE
®
products can be repaired free of charge
within 24 months from the date of purchase. Beyond 24
months, a limited warranty applies, covering the cost of
labor and maintenance, but not the cost of accessories or
replacement parts.
The warranty will be nullied if
1. the product(s) is/are broken down, reconstructed and/
or modied by unauthorized parties;
2. the product(s) is/are damaged due to improper use.
For the latest information on NITECORE
®
products and
services, please contact a local NITECORE
®
distributor or
send an email to [email protected]
Charging Function
The product is equipped with an intelligent charging
system. Please charge the product before the rst use.
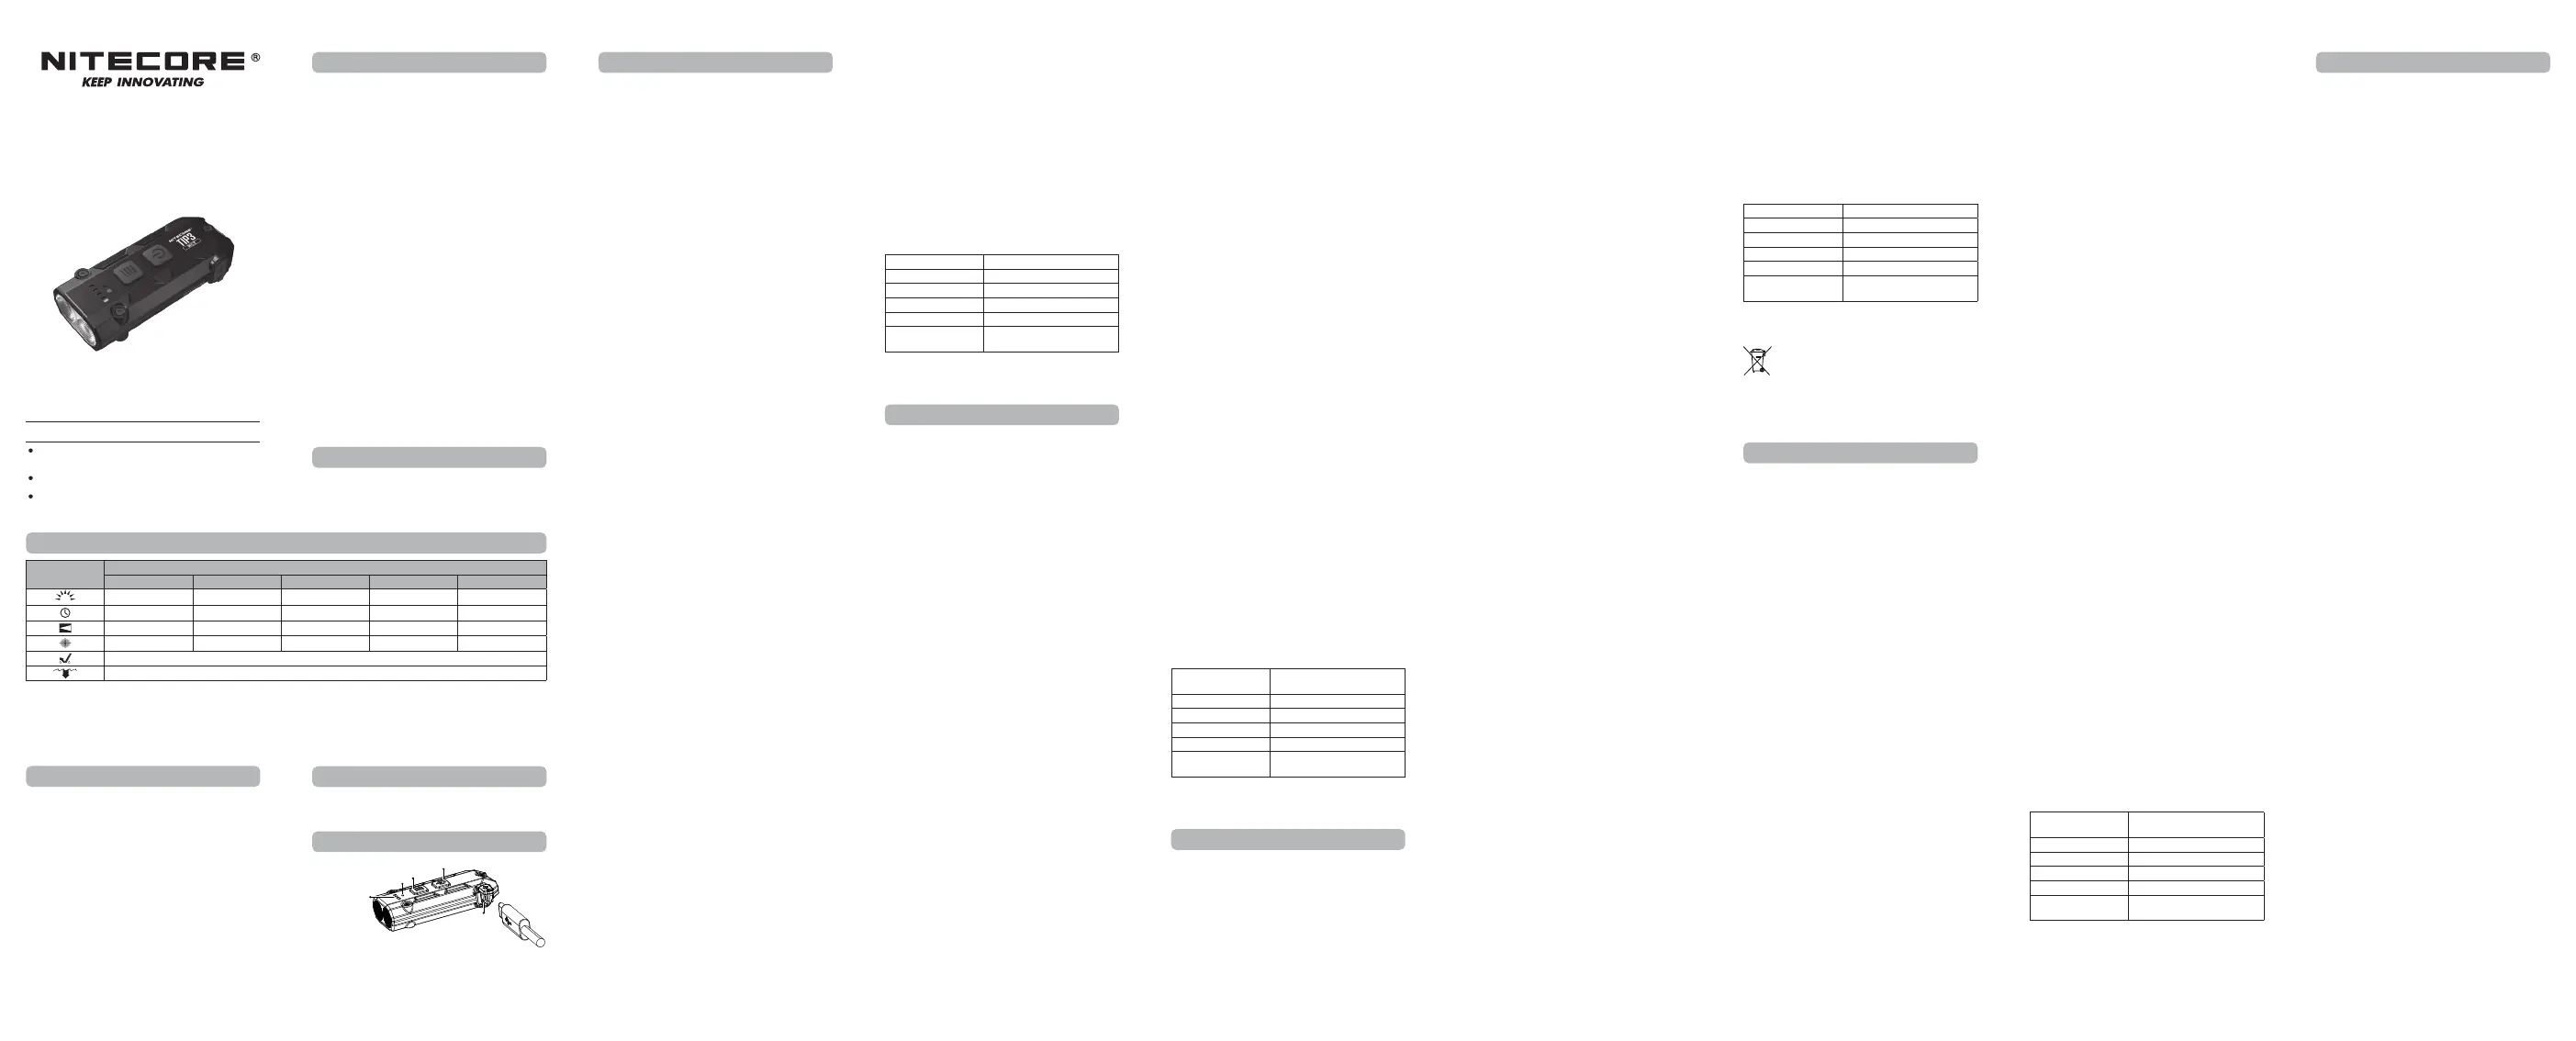
Power Connection: As illustrated, use the USB
charging cable to connect an external power supply (e.g.
an adapter, a power bank or other charging devices) to
the charging port of the product to begin the charging
process.
• During the charging process, the green power
indicators will gradually transition from ashing to a
steady light to display the power level. When fully
charged, the product will automatically cease the
charging process and all 4 power indicators will stay
solid when it is fully charged.
• The product can be used while charging.
• The charging time is approx. 1 hour 30 minutes.
(Charged via a 5V/2A adapter)
• When fully charged, the standby time is about 12
months.
On / Off
On: When the light is o, short press the Power Button
to turn it on.
O: When the light is on, short press the Power Button
to turn it o.
Color Temperatures Switching
The product has 3 color temperatures: warm light,
neutral white light and cool white light. When the light
is on, press and hold both buttons to cycle through the
following color temperatures: Cool White Light – Neutral
White Light – Warm Light. Release to conrm and
memorize the selected color temperature.
Brightness Levels Adjusting
When any color temperature of the light is on, short
press the Mode Button to cycle through the following
brightness levels: ULTRALOW – LOW – MID – HIGH.
Note: The product is designed with a memory
function. When reactivated, it will automatically access
the previous memorized brightness level and color
temperature.
Direct Access to ULTRALOW
When the light is o, long press the Power Button to
directly access ULTRALOW.
Direct Access to TURBO
When the light is on / o, long press the Mode Button to
directly access TURBO. Release to return to the previous
status.
Lockout / Unlock
The product has two lockout modes: Semi Lockout Mode
and Full Lockout Mode.
Semi Lockout Mode:
• When the light is on, press and hold the power button
until the red lockout indicator ashes once to conrm
Semi Lockout Mode is activated.
• In Semi Lockout Mode, the Power Button is
unavailable to activate the product. Long press the
Mode Button to directly access TURBO and release to
turn it o.
Full Lockout Mode (Default Setting):
• When the light is on, press and hold the Power Button
without releasing, even after the red lockout indicator
ashes once, and continue holding until it ashes
twice again to conrm Full Lockout Mode is activated.
• In Full Lockout Mode, both buttons are unavailable to
activate the product.
Unlock:
In either Lockout Mode, press and hold both buttons until
the product is turned on to exit Lockout Mode.
Note: The product will be automatically unlocked when
charging in Lockout Mode.
ATR (Advanced Temperature Regulation)
The integrated ATR technology regulates the output
of the product according to the working condition
and ambient environment to maintain the optimal
performance.
Power Indication
When the product is turned on, the corresponding
power indicators will be on to display the power level
and automatically turn o if there is no operation in 3
seconds. When the light is o, short press the Mode
Button and the the corresponding power indicators will
light up to display the power level.
Low Power Indication: When the battery power drops
below 10%, a green power indicator will ash, while the
output may dim or the ashlight may become unresponsive.
Please recharge the product as soon as possible.
Status of IndicatorsPower Level
4 Constant-on75% – 100%
3 Constant-on50% – 75%
2 Constant-on25% – 50%
1 Constant-on10% – 25%
1 Flashing
<10% (Please recharge the
product as soon as possible)
Función de carga
El producto cuenta con un sistema de carga inteligente.
Por favor, cárguelo antes del primer uso.
Conexión de alimentación: como se ilustra, utilice
el cable de carga USB para conectar una fuente de
alimentación externa (por ejemplo, un adaptador, un
banco de energía u otros dispositivos de carga) al puerto
de carga del producto para comenzar el proceso de carga.
• Durante el proceso de carga, los indicadores de
energía verdes pasarán gradualmente de parpadear
a una luz ja para mostrar el nivel de energía.
Cuando la carga esté completa, el producto detendrá
automáticamente el proceso de carga y los cuatro
indicadores de energía permanecerán jos.
• El producto se puede utilizar mientras se carga.
• El tiempo de carga es de aproximadamente 1 hora y 30
minutos (se carga mediante un adaptador de 5 V/2 A).
• Una vez completamente cargada, el tiempo de espera
es de aproximadamente 12 meses.
Encendido/Apagado
Encendido: cuando la luz esté apagada, presione
brevemente el botón de encendido para encenderla.
Apagado: cuando la luz esté encendida, presione
brevemente el botón de encendido para apagarla.
Cambio de temperaturas de color
El producto tiene 3 temperaturas de color: luz cálida,
luz blanca neutra y luz blanca fría. Cuando la luz esté
encendida, mantenga presionados ambos botones para
alternar entre las siguientes temperaturas de color:
luz blanca fría, luz blanca neutra y luz cálida. Suelte
para conrmar y memorizar la temperatura de color
seleccionada.
Ajuste de los niveles de brillo
Cuando cualquier temperatura de color de la luz es
Encienda, presione brevemente el botón Mode para
recorrer los siguientes niveles de brillo: ULTRABAJO –
BAJO – MEDIO – ALTO.
Nota: El producto cuenta con una función de memoria.
Al reactivarlo, accederá automáticamente al nivel de brillo
y la temperatura de color memorizados previamente.
Acceso directo a ULTRABAJO
Cuando la luz esté apagada, mantenga presionado el botón
de encendido para acceder directamente ULTRABAJO.
Power Button
USB-C
Charging Port
Mode Button
Lockout Indicator
Power Indicators
Acceso directo a TURBO
Cuando la luz esté encendida o apagada, mantenga
presionado el botón de modo para acceder directamente
a TURBO. Suéltelo para volver al estado anterior.
Bloqueo/Desbloqueo
El producto tiene dos modos de bloqueo: modo de
bloqueo parcial y modo de bloqueo total.
Modo de semibloqueo:
• Cuando la luz esté encendida, mantenga presionado el
botón de encendido hasta que el indicador de bloqueo
rojo Parpadea una vez para conrmar que el modo de
semibloqueo está activado.
• En el modo de semibloqueo, el botón de encendido no
permite activar el producto. Mantenga presionado el
botón de modo para acceder directamente a TURBO y
suéltelo para apagarlo.
Modo de bloqueo total (conguración
predeterminada):
• Cuando la luz esté encendida, mantenga presionado
el botón de encendido. sin soltarlo, incluso después de
que el indicador de bloqueo rojo parpadee una vez, y
continúe presionando hasta que parpadee dos veces
más para conrmar que el modo de bloqueo total está
activado.
• En el modo de bloqueo total, ambos botones no están
disponibles para activar el producto.
Descubrir:
En cualquier modo de bloqueo, mantenga presionados
ambos botones hasta que se encienda el producto. para
salir del modo de bloqueo.
Nota: El producto se desbloqueará automáticamente
cuando se cargue en modo de bloqueo.
ATR (Regulación avanzada de temperatura)
La tecnología ATR integrada regula la salida del producto
según las condiciones de trabajo y el entorno ambiental
para mantener el rendimiento óptimo.
Indicación de potencia
Al encender el producto, los indicadores de potencia
correspondientes se iluminarán para mostrar el nivel
de potencia y se apagarán automáticamente si no se
realiza ninguna operación durante 3 segundos. Cuando
la luz esté apagada, presione brevemente el botón de
modo y los indicadores de potencia correspondientes se
iluminarán para mostrar el nivel de potencia.
Indicación de batería baja: Cuando la carga de la
batería sea inferior al 10 %, un indicador de batería
verde parpadeará, aunque la potencia podría disminuir
o la linterna podría dejar de funcionar. Recargue el
producto lo antes posible.
Estado de los
indicadores
Nivel de potencia
4 Encendido constante75% – 100%
3 Encendido constante50% – 75%
2 encendido constante25% – 50%
1 Encendido constante10% – 25%
1 Intermitente
<10% (Recargue el producto lo
antes posible)
Ladefunktion
Die TIP3 ist mit einem intelligenten Ladesystem
ausgestattet. Bitte laden Sie das Produkt vor dem ersten
Gebrauch auf.
Stromanschluss: Verwenden Sie das USB-Ladekabel
wie abgebildet, um ein externes Netzteil (z. B. einen
Adapter, eine Powerbank oder andere Ladegeräte) an
den Ladeanschluss des Produkts anzuschließen und den
Ladevorgang zu starten.
• Während des Ladevorgangs wechseln die grünen LEDs
allmählich von blinkend zu dauerhaft leuchtend, um
den Ladezustand anzuzeigen. Bei vollständiger Ladung
beendet das Gerät automatisch den Ladevorgang und
alle 4 LEDs leuchten dauerhaft.
• Das Gerät kann während des Ladevorgangs verwendet
werden.
• Die Ladezeit beträgt ca. 1 Stunde 30 Minuten
(Auaden mit einem 5V/2A-Adapter).
• Wenn das Gerät vollständig aufgeladen ist, beträgt die
Standby-Zeit etwa 12 Monate.
Ein-/Ausschalten
EIN: Wenn das Licht ausgeschaltet ist, drücken Sie kurz
die EIN-/AUS-Taste, um das Licht einzuschalten.
AUS: Wenn das Licht eingeschaltet ist, drücken Sie kurz
die EIN-/AUS-Taste, um das Licht auszuschalten.
Umschalten der Farbtemperaturen
Die TIP3 verfügt über 3 Farbtemperaturen: Warm
White, Neutral White und Cool White. Wenn das Licht
eingeschaltet ist, halten Sie beide Tasten gedrückt, um
zwischen den folgenden Farbtemperaturen zu wechseln:
Cool White – Neutral White – Warm White. Lassen Sie
die Tasten los, um die ausgewählte Farbtemperatur zu
bestätigen und zu speichern.
Einstellen der Helligkeitsstufen
Wenn eine beliebige Farbtemperatur des Lichts
eingeschaltet ist, drücken Sie kurz auf die Mode-
Taste, um zwischen den folgenden Helligkeitsstufen zu
wechseln: „ULTRALOW“ – „LOW“ – „MID“ – „HIGH“.
Hinweis: Die TIP3 ist mit einer Speicherfunktion
ausgestattet. Wenn sie wieder aktiviert wird, greift sie
automatisch auf die zuvor gespeicherte Helligkeitsstufe
und Farbtemperatur zurück.
Direkter Zugriff auf ULTRALOW
Wenn das Licht ausgeschaltet ist, drücken Sie lange
auf die EIN-/AUS-Taste, um direkt auf „ULTRALOW“
zuzugreifen.
Direkter Zugriff auf TURBO
Wenn das Licht an/aus ist, drücken Sie lange auf
die Mode-Taste, um direkt auf „TURBO“ zuzugreifen.
Loslassen, um zum vorherigen Status zurückzukehren.
Sperren/Entsperren
Die TIP3 verfügt über zwei Sperr-Modi: Semi-Lockout-
Mode und Full-Lockout-Mode.
Semi-Lockout-Mode
• Wenn das Licht eingeschaltet ist, halten Sie die EIN-/
AUS-Taste gedrückt, bis die rote Sperranzeige einmal
blinkt, um zu bestätigen, dass der Semi-Lockout-Mode
aktiviert ist.
• Im Semi-Lockout-Mode ist die EIN-/AUS-Taste nicht
verfügbar, um das Gerät zu aktivieren. Drücken Sie
lange auf die Mode-Taste, um direkt auf „TURBO“
zuzugreifen, und lassen Sie sie los, um das Gerät
auszuschalten.
Full-Lockout-Mode (Standardeinstellung)
• Wenn das Licht an ist, halten Sie die EIN-/AUS-Taste
gedrückt, auch nachdem die rote Sperranzeige einmal
geblinkt hat, und halten Sie sie weiter gedrückt, bis sie
erneut zweimal blinkt, um zu bestätigen, dass der Full-
Lockout-Mode aktiviert ist.
• Im Full-Lockout-Mode sind beide Tasten nicht
verfügbar, um das Gerät zu aktivieren.
Entsperren
Halten Sie in beiden Sperr-Modi beide Tasten gedrückt,
bis die Lampe eingeschaltet wird, um den Sperr-Mode zu
verlassen.
Hinweis: Das Gerät wird beim Auaden im Sperr-Mode
automatisch entsperrt.
ATR
Mit integriertem „Advanced Temperature Regulation-
Modul“ passt die TIP3 ihre Leistung an die
Umgebungstemperatur an und erhält so die optimale
Leistung.
Système de rechargement
Le produit est équipé d'un système de rechargement
intelligent. Veuillez recharger le produit avant la première
utilisation.
Connexion à une source d’alimentation : comme
illustré, utilisez le câble de rechargement USB pour
connecter une source d'alimentation externe (par
exemple, un adaptateur, une batterie externe ou
tout autre dispositif de rechargement) au port de
rechargement du produit an de démarrer le processus
de rechargement.
• Pendant le processus de rechargement, les voyants
verts passent progressivement du clignotement à
une lumière xe pour indiquer le niveau de charge.
Une fois la charge complète, le produit arrête
automatiquement le processus de charge et les 4
voyants restent xes.
• Le produit peut être utilisé pendant son rechargement.
• Le temps de recharge est d'environ 1 heure 30
minutes. (Charge via un adaptateur 5V/2A)
• Une fois complètement rechargé, l'autonomie en veille
est d'environ 12 mois.
On / Off
On : lorsque la lampe est éteinte, appuyez brièvement
sur le bouton d'alimentation pour l'allumer.
O : lorsque la lampe est allumée, appuyez brièvement
sur le bouton d'alimentation pour l'éteindre.
Changement de température de couleur
Le produit dispose de 3 températures de couleur :
lumière chaude, lumière blanche neutre et lumière
blanche froide. Lorsque la lumière est allumée, appuyez
sur les deux boutons et maintenez-les enfoncés pour
passer d'une température de couleur à l'autre : lumière
blanche froide – lumière blanche neutre – lumière
chaude. Relâchez les boutons pour conrmer et
mémoriser la température de couleur sélectionnée.
Réglage des niveaux de luminosité
Lorsque la température de couleur de la lampe est
activée, appuyez brièvement sur le bouton Mode
pour faire déler les niveaux de luminosité suivants
: ULTRALOW (TRÈS FAIBLE) – LOW (FAIBLE) – MID
(MOYEN) – HIGH (ÉLEVÉ).
Remarque : le produit est doté d'une fonction mémoire.
Lorsqu'il est réactivé, il accède automatiquement au
niveau de luminosité et à la température de couleur
précédemment mémorisés.
Accès direct au mode ULTRALOW
Lorsque la lampe est éteinte, appuyez longuement sur le
bouton d'alimentation pour accéder directement au mode
ULTRALOW.
Accès direct au mode TURBO
Lorsque la lampe est allumée/éteinte, appuyez
longuement sur le bouton Mode pour accéder directement
au mode TURBO. Relâchez pour revenir à l'état précédent.
Verrouillage / Déverrouillage
Le produit dispose de deux modes de verrouillage :
le mode semi-verrouillage et le mode de verrouillage
complet.
Mode semi-verrouillage :
• Lorsque la lampe est allumée, appuyez sur le bouton
d'alimentation et maintenez-le enfoncé jusqu'à ce que
le voyant rouge de verrouillage clignote une fois pour
conrmer que le mode semi-verrouillage est activé.
• En mode semi-verrouillage, le bouton d'alimentation ne
permet pas d'activer le produit. Appuyez longuement
sur le bouton Mode pour accéder directement au mode
TURBO et relâchez-le pour le désactiver.
Mode de verrouillage complet (réglage par
défaut) :
• Lorsque la lampe est allumée, appuyez sur le bouton
d'alimentation et maintenez-le enfoncé, même après
que le voyant rouge de verrouillage ait clignoté une
fois, et continuez à le maintenir enfoncé jusqu'à ce
qu'il clignote à nouveau deux fois pour conrmer que
le mode de verrouillage complet est activé.
• En mode de verrouillage complet, les deux boutons
sont indisponibles pour activer le produit.
Déverrouillage :
Dans l'un ou l'autre des modes de verrouillage, appuyez
sur les deux boutons et maintenez-les enfoncés jusqu'à
ce que le produit s'allume pour quitter le mode de
verrouillage.
Remarque : le produit sera automatiquement déverrouillé
lorsqu'il sera en charge en mode de verrouillage.
ATR (régulation avancée de la température)
La technologie ATR intégrée régule la puissance
du produit en fonction des conditions de travail et
de l'environnement ambiant an de maintenir des
performances optimales.
Indicateur du niveau de batterie restant
Lorsque le produit est allumé, les indicateurs s'allument
pour acher le niveau de batterie restant et s'éteignent
automatiquement si aucune opération n'est eectuée
dans les 3 secondes. Lorsque la lampe est éteinte,
appuyez brièvement sur le bouton Mode et les indicateurs
s'allument pour acher le niveau de batterie restant.
Indicateur de batterie faible : lorsque la batterie est
inférieure à 10 %, un indicateur vert clignote, tandis que
la puissance de sortie peut diminuer ou que la lampe
torche peut ne plus répondre. Veuillez recharger le
produit dès que possible.
Statut des
indicateurs
Niveau de la batterie
4 Constants75% – 100%
3 Constants50% – 75%
2 Constants25% – 50%
1 Constant10% – 25%
1 Clignotant
<10% (Veuillez recharger le
produit dès que possible.)
Energieanzeige
Wenn die Lampe eingeschaltet wird, leuchten die
entsprechenden LEDs auf, um die Restenergie
anzuzeigen, und schalten sich automatisch aus, wenn
innerhalb von 3 Sekunden keine Bedienung erfolgt. Wenn
das Licht ausgeschaltet ist, drücken Sie kurz die Mode-
Taste, und die entsprechenden LEDs leuchten auf, um
den Ladezustand anzuzeigen.
Anzeige für niedrigen Ladezustand: Wenn der
Ladezustand des Akkus unter 10% fällt, blinkt eine grüne
LED, während die Leistung möglicherweise nachlässt
oder die Taschenlampe nicht mehr reagiert. Laden Sie
das Produkt bitte so schnell wie möglich auf.
Status der LEDsRest-Energie-Level
4 stetig an 75% – 100%
3 stetig an50% – 75%
2 stetig an25% – 50%
1 stetig an10% – 25%
1 blinkend
< 10% (Bitte das Produkt so
schnell wie möglich auaden)
Elektro- und Elektronikgeräte dürfen
nicht über den Hausmüll entsorgt werden.
Bitte geben Sie dieses Gerät nach Gebrauch
an einer zugelassenen Sammel- oder
Rücknahmestelle ab. Alternativ können Sie das
Altgerät zur Entsorgung an uns zurücksenden.
(Русский)
Зарядка
Устройство оснащено умной системой зарядки. Перед
первым использованием зарядите аккумулятор.
Подключение к источнику питания. Для зарядки
используйте USB-кабель и подключите его от
порта устройства к источнику питания (адаптеру,
пауэрбанку или другому устройству) так, как это
показано на иллюстрации.
• Во время зарядки зелёные индикаторы питания
постепенно переходят от мигания к постоянному
свечению, сообщая таким образом текущий уровень
заряда. По достижении полного заряда устройство
автоматически останавливает подачу питания, и все
4 индикатора начинают постоянно светиться.
• Устройство можно продолжать использовать во
время зарядки.
• Время полной зарядки составляет приблизительно 1
час 30 минут (при использовании адаптера 5В / 2А).
• В режиме ожидания устройство с полным зарядом
сохраняет заряд до 12 месяцев.
Включение / Выключение
Включение: в выключенном состоянии
кратковременно нажмите на кнопку питания для
включения.
Выключение: во включённом состоянии
кратковременно нажмите на кнопку питания для
выключения.
Выбор цветовой температуры
Устройство поддерживает 3 цветовые температуры:
теплый / нейтральный белый / холодный белый свет.
Во включенном состоянии зажмите и удерживайте
обе кнопки для последовательного переключения
между цветовыми температурами в следующем
порядке: Холодный белый свет / Нейтральный белый
свет / Тёплый свет. Отпустите кнопки для выбора
нужного режима.
Выбор уровня яркости
В режиме работы одной из цветовых температур
кратковременно нажимайте на кнопку режима
(Mode), чтобы последовательно переключаться между
следующими уровнями яркости: СВЕРХНИЗКИЙ –
НИЗКИЙ – СРЕДНИЙ – ВЫСОКИЙ.
Примечание. Устройство оснащено функцией
запоминания. При повторной активации фонарь
будет иметь те же уровень яркости и цветовую
температуру, что были установлены в последний раз.
Быстрый доступ в режим
СВЕРХНИЗКОГО уровня яркости
В выключенном состоянии зажмите и удерживайте
кнопку питания для активации в режиме
СВЕРХНИЗКОГО уровня яркости.
Быстрый доступ в режим ТУРБО
В активированном / выключенном состоянии зажмите
и удерживайте кнопку режима (Mode), чтобы быстро
перевести фонарь в режим ТУРБО. Отпустите кнопку,
чтобы вернуть фонарь в прежнее состояние.
Блокировка / Разблокировка
Устройство оснащено двумя режимами блокировки:
режимом частичной блокировки и режимом полной
блокировки.
Режим частичной блокировки:
• В активированном состоянии зажмите и удерживайте
кнопку питания, пока красный индикатор блокировки
однократно не мигнёт, что будет означать переход в
режим частичной блокировки.
• В режиме частичной блокировки кнопка питания
становится недоступна для активации устройства.
При этом вы можете зажать и удерживать кнопку
режима (Mode) для активации устройства в режиме
ТУРБО. Отпустите кнопку для выхода из режима
ТУРБО.
Product specificaties
| Merk: | Nitecore |
| Categorie: | Zaklamp |
| Model: | TIP3 |
Heb je hulp nodig?
Als je hulp nodig hebt met Nitecore TIP3 stel dan hieronder een vraag en andere gebruikers zullen je antwoorden
Handleiding Zaklamp Nitecore

15 Juli 2026
15 Juli 2026
13 Juli 2026
9 Juli 2026
24 Maart 2026
24 Maart 2026
8 Maart 2026
8 Maart 2026
8 Maart 2026
7 Oktober 2025
Handleiding Zaklamp
Nieuwste handleidingen voor Zaklamp
14 Juli 2026
10 Juli 2026
29 Juni 2026
26 Juni 2026
24 Juni 2026
24 Juni 2026
23 Juni 2026
23 Juni 2026
23 Juni 2026
23 Juni 2026