MSI RadiX AXE6600 Handleiding
Bekijk gratis de handleiding van MSI RadiX AXE6600 (2 pagina’s), behorend tot de categorie Router. Deze gids werd als nuttig beoordeeld door 42 mensen en kreeg gemiddeld 4.1 sterren uit 2 reviews. Heb je een vraag over MSI RadiX AXE6600 of wil je andere gebruikers van dit product iets vragen? Stel een vraag
Pagina 1/2
6
RadiX AXE6600
WiFi 6E Tri-Band Gaming Router
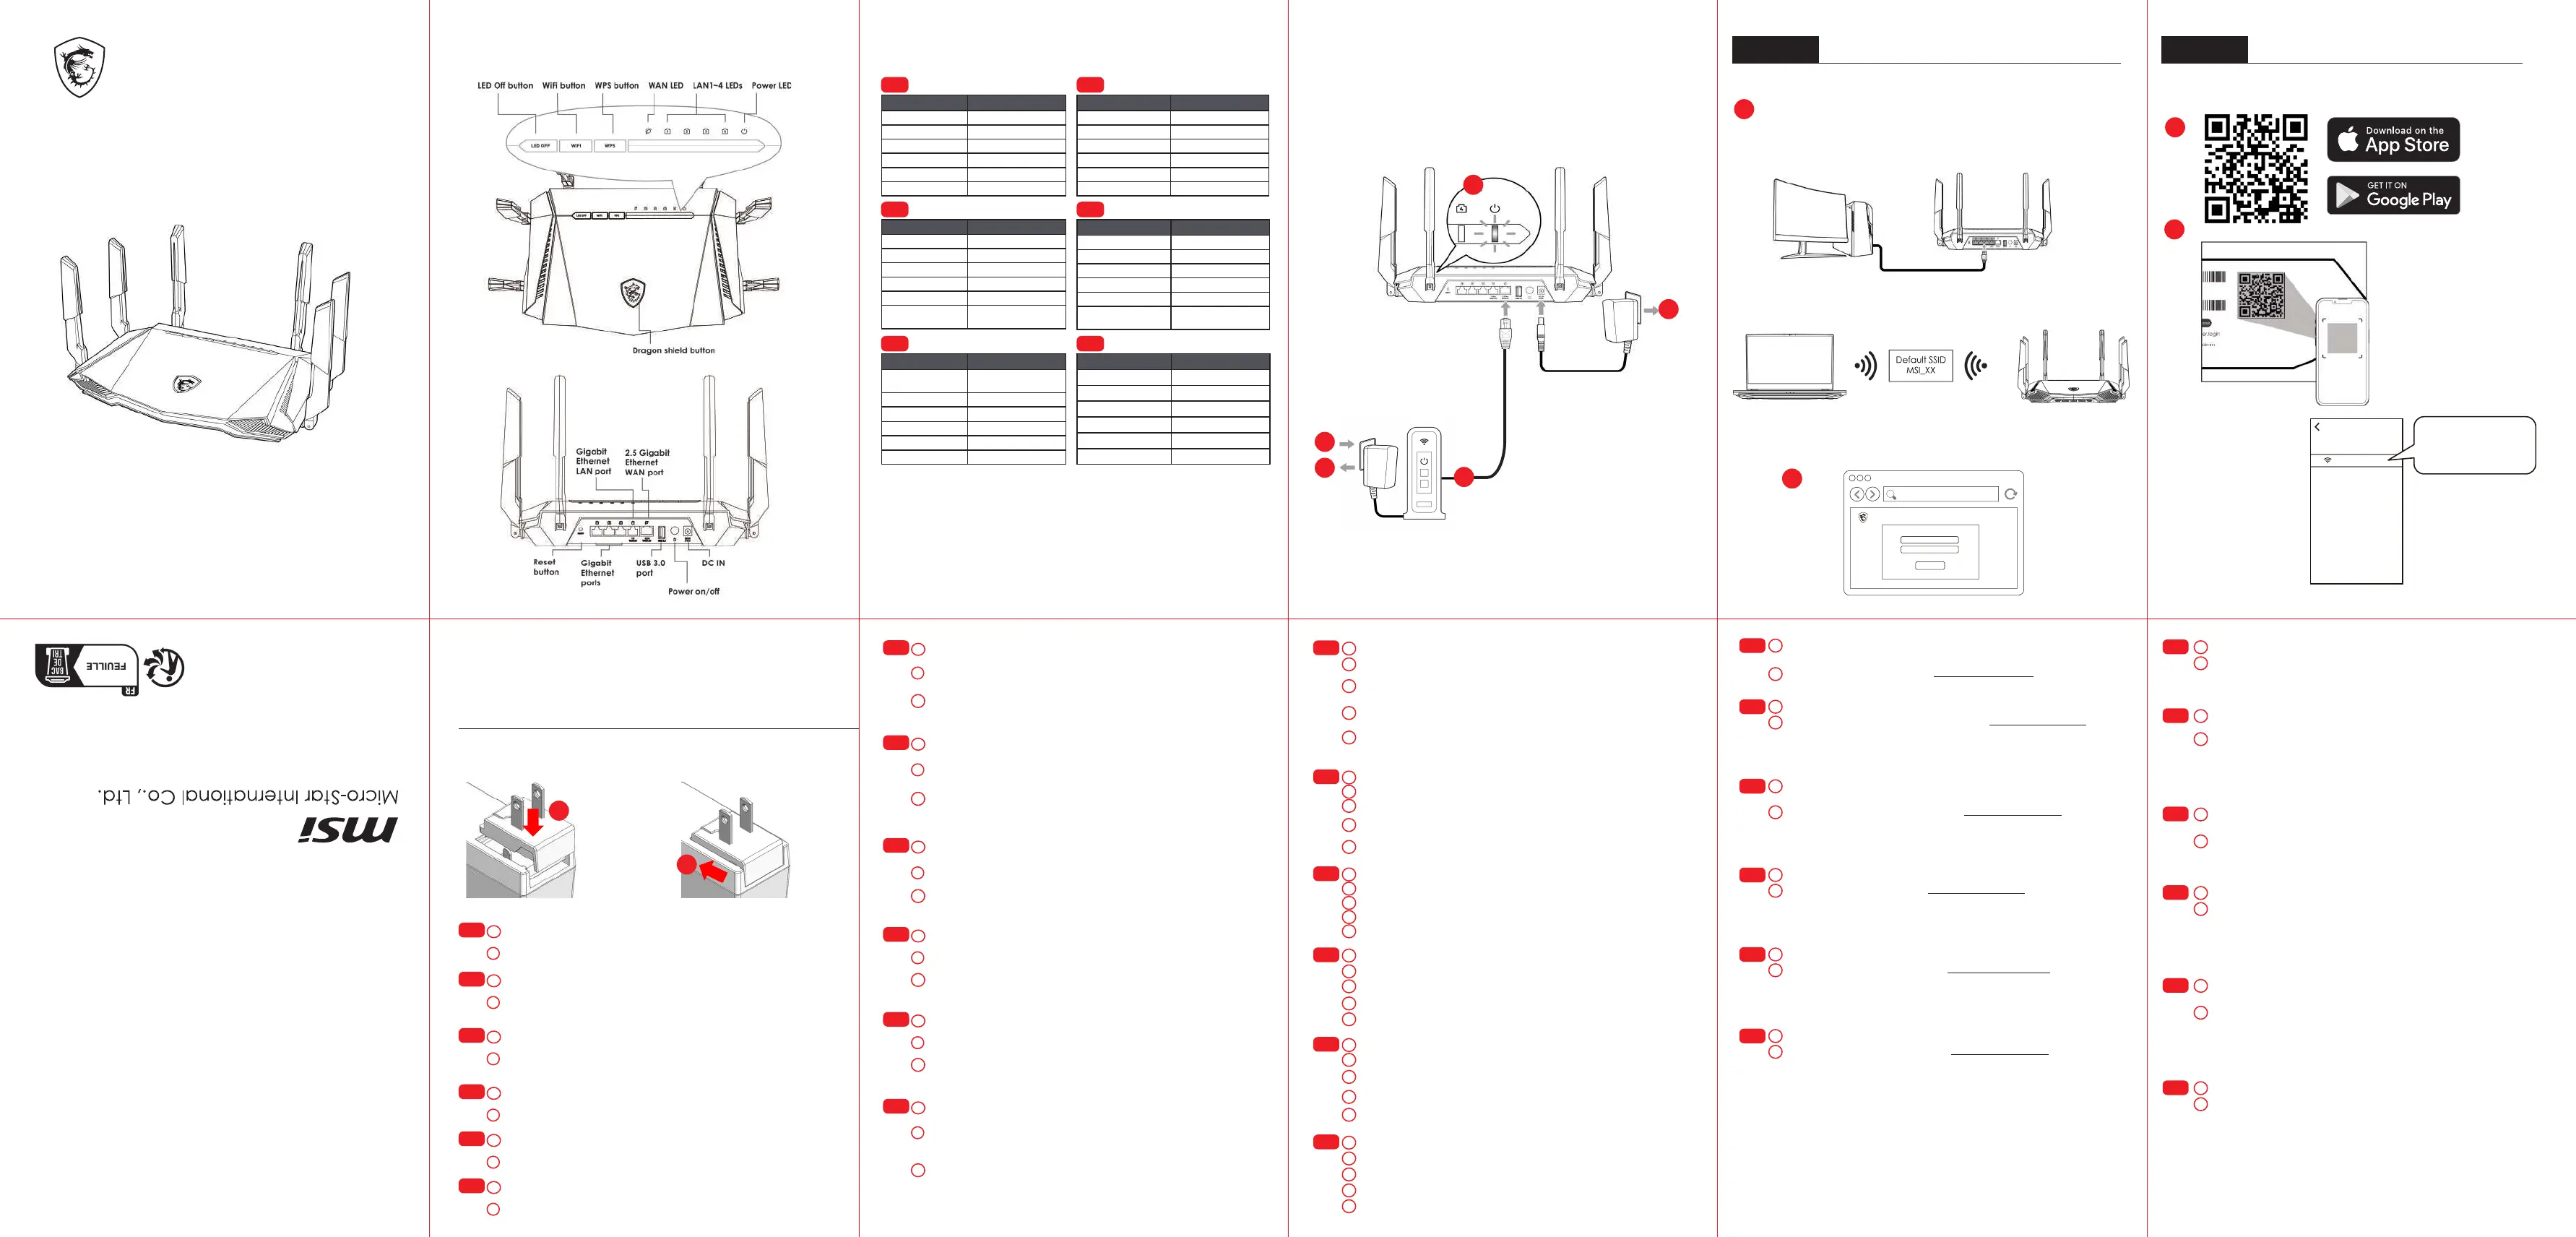
Product OverviewHardware Installation
Option
B
Initial Setup with Mobile Phone / Tablet
Wired
OR
Wireless
7
1
3
4
5
2
7
Option A
6
(XX indicates the last 2 digits of the device MAC address)
Initial Setup with PC / Laptop
Package contents
• RadiX AXE6600 WiFi 6E Tri-Band Gaming Router
• Ethernet cable
• Power adapter (The plug type varies by country or region)
Adaptor Installation
A
B
FAQ
For more information about your router, you can download the
user manual from https://www.msi.com.
No. 69, Lide St., Zhonghe Dist., New Taipei City 235, Taiwan
tel: +886-2-3234-5599 fax: +886-2-3234-5488
www.msi.com
MSI-Europe: Eindhoven 5706 5692 ER Son.
MSI_2G_XX
Networks
Wi-Fi
Connect to default
SSID MSI_2G_XX
http://msirouter.login
Username
Password
Sign in
MSI Router
GRAXE66
Quick Start Guide
ENGLISH | DEUTSCH | FRANÇAIS
ITALIANO | ESPAÑOL | NEDERLANDS
In order to use the Dragon Shield button, the AI QoS and Traditional
QoS functions need to be enabled.
a
b
EN
c
The Dragon Shield button can be pressed for 2 seconds to turn the
lights on/off in both the antennas and the Dragon Shield.
Press the Dragon Shield button to change the AI QoS mode. The
light color will change as shown in the table above.
Um die Drachenschild-Taste nutzen zu können, müssen die
Funktionen "KI QoS" und "Traditionelles QoS" aktiviert werden.
a
b
DE
c
DHalten Sie die Drachenschild Taste 2 Sekunden lang gedrückt
um die Beleuchtung der Antenne und der Taste Ein-/ bzw.
Auszuschalten.
Durch Drücken der Drachenschild-Taste ändert sich der KI-QoS-
Modus. Die Lichtfarbe wechselt wie in der Tabelle oben angegeben.
Avant d'utiliser le bouton Dragon Shield, les fonctions QoS AI et QoS
traditionnel
doivent être activées.
a
b
FR
c
Appuyez pendant 2 secondes pour activer/désactiver les antennes
et le rétroéclairage du logo Dragon Shield.
Appuyez pour changer le mode QoS AI. La couleur du rétroéclairage
change comme indiqué dans le tableau ci-dessus.
Dragon Shield Button and Antenna Lighting
ModeModeStatusStatus
DefaultSteady Red
AI AutoBreathing Aqua
GamingBreathing Red
StreamingBreathing Purple
WFHBreathing Blue
Traditional QoSBreathing Orange
EN
ModusStatus
StandardLeuchtet rot
Auto-KIPulsierend, Aqua
GamingPulsierend, Rot
StreamingPulsierend, Lila
HomeofcePulsierend, Blau
Standard-QoSPulsierend, Orange
DE
ModeÉtat
Par défautStatique rouge
AI AutoRespiration aqua
JeuxRespiration rouge
StreamingRespiration violet
WFHRespiration bleu
QoS traditionnelRespiration orange
FR
ModalitàModalitàStatoStato
PredenitoRosso sso
Auto IAAcqua intermittente
GamingRosso intermittente
StreamingViola intermittente
Smart WorkingBlu intermittente
QoS tradizionaliArancione
intermittente
IT
Prima di utilizzare il tasto Dragon Shield (Scudo del drago), è
necessario attivare le funzioni AI Auto (Auto AI) e QoS tradizionali.
a
b
IT
c
Premere per 2 secondi per accendere/spegnere le antenne e
l'illuminazione dello scudo del drago.
Premere per passare alla modalità AI QoS (QoS AI). Il colore
dell'illuminazione cambia come mostrato nella tabella sopra
.
ModoModoEstadoEstado
Valores
predeterminados
Rojo estable
IA autoAgua respiración
GamingRojo parpadeante
StreamingMorado parpadeante
Trabajar en casaAzul parpadeante
QoS tradicionalNaranja parpadeante
ES
Antes de usar el botón Dragon Shield, es necesario activar las
funciones IA QoS y QoS tradicional.
a
b
ES
c
Presione durante 2 segundos para encender/apagar las antenas y
la iluminación del Dragon Shield.
Presione para cambiar el modo IA QoS. El color de la iluminación
cambiará como se muestra en la tabla anterior
.
ModusModusStatusStatus
StandaardConstant rood
AI autoAdemend aqua
GamingAdemend rood
StreamingAdemend paars
ThuiswerkenAdemend blauw
Standard QoSAdemend oranje
NL
De AI QoS- and Traditional QoS functies moeten geactiveerd
worden alvorens de "Dragon Shield"-knop gebruikt kan worden.
a
b
NL
c
Druk gedurende 2 seconden om de antennes en de Dragon Shield-
verlichting in/uit te schakelen.
Gebruik de "Dragon Shield"-knop om van QoS mode te veranderen.
de verlichtingskleur zal hierbij veranderen zoals getoond in de tabel
hierboven.
EN
Turn off or unplug the power from the cable/DSL modem.
1
3
4
5
2
Press the power button and the power LED lights on will turn on.
Congure the initial setup with either Option A or Option B as directed
in this Quick Start Guide.
Connect the modem to the LAN 1 port on your MSI router with an
Ethernet cable.
Power on or plug in the modem to power. Check that the modem is
properly functioning per its manufacturer’s instructions.
Connect your MSI router to power by plugging the power adapter to
the DC IN jack.
7
EN
Open a web browser and go to http://msirouter.login
6
Connect your PC or laptop to the router with either a wired or wireless
connection.
EN
Download the MSI router app from Google Play Store or App Store.
6
7
Launch the MSI router app and scan the QR code on the label of
your router to connect to it via WiFi connection.
Follow the on-screen instructions to complete network settings.
DE
Trennen Sie die Stromversorgung des Kabel-/DSL-Modems.
1
3
4
5
2
Drücken Sie die Ein-/Austaste und die Betriebs-LED leuchtet auf, wenn Ihr
Router bereit ist.
Verbinden Sie das Modem und Ihren Router über ein Ethernet-Kabel.
Schließen Sie das Modem an und schalten Sie es ein. Prüfen Sie, ob das
Modem aktiv ist.
Verbinden Sie den Router mit dem mitgelieferten Netzteil mit dem
Stromnetz.
7
DE
Öffnen Sie einen Webbrowser und rufen Sie http://msirouter.login auf.
Standard-Nutzernamen und -Kennwort können Sie dem Typenschild
am Router entnehmen. Befolgen Sie die Bildschirmanweisungen zum
Abschließen der Netzwerkeinstellungen.
6
Verbinden Sie Ihren PC oder Laptop kabelgebunden oder kabellos.
DE
Laden Sie die MSI-Router-App von Google Play Store oder App Store
herunter.
6
7
Starten Sie die MSI-Router-App und scannen Sie den QR-Code
auf dem Typenschild Ihres Routers. Dadurch wird per WLAN eine
Verbindung zu Ihrem Router hergestellt.
Befolgen Sie die Bildschirmanweisungen zum abschließen der
Netzwerkeinstellungen.
FR
Débranchez l'alimentation du câble/modem DSL.
1
3
4
5
2
Appuyez sur le bouton d'alimentation. Le voyant LED d'alimentation
s'allumera lorsque votre routeur sera prêt.
Connectez le modem et votre routeur avec un câble Ethernet.
Branchez et allumez le modem. Vériez que le modem est allumé.
Branchez l'adaptateur sur la prise d’entrée CC de votre routeur.
7
FR
Ouvrez un navigateur Web et allez sur http://msirouter.login.
Le nom d'utilisateur et le mot de passe par défaut sont indiqués
sur l'étiquette de votre routeur. Suivez les instructions à l'écran pour
terminer la conguration du réseau.
6
Connectez votre PC de bureau ou votre ordinateur portable par
l'intermédiaire d'une connexion laire ou non laire.
FR
Téléchargez l'application « MSI Router » sur Google Play Store ou sur
l’App Store.
6
7
Lancez l'application « MSI Router » et scannez le code QR sur
l'étiquette de votre routeur pour vous connecter à votre routeur via
une connexion Wi-Fi.
IT
Scollegare l'alimentazione del modem via cavo/DSL.
1
3
4
5
2
Premere il tasto di accensione e il LED di alimentazione si accende
quando il router è pronto.
Collegare modem e router con un cavo Ethernet.
Collegare e accendere il modem. Controllare che il modem sia
attivo.
Collegare l'adattatore alla presa DC IN del router.
7
IT
Aprire un browser e andare su http://msirouter.login.
Nome utente e password predefiniti possono essere ottenuti
sull'etichetta afssa al router. Osservare le istruzioni sullo schermo per
completare le impostazioni di rete.
6
Collegare il PC o laptop cablato o wireless.
IT
Scaricare l'app del router MSI da Google Play Store o App Store.
6
7
Avviare l’app del router MSI ed eseguire la scansione del codice QR
sull’etichetta del router per connettersi al router tramite connessione
WiFi.
Osservare le istruzioni sullo schermo per completare le impostazioni di
rete.
ES
Desconecte la alimentación del módem por cable/DSL.
1
3
4
5
2
Presione el botón de alimentación y las luces LED de alimentación
cuando el router esté preparado.
Conecte el módem y el router con un cable Ethernet.
Enchufe y encienda el módem. Compruebe que el módem esté
activo.
Enchufe el adaptador a la toma de entrada de CC de su router.
7
ES
Abra un navegador web y vaya a http://msirouter.login.
El nombre de usuario y la contraseña predeterminados se pueden
obtener en la etiqueta adherida al router. Siga las instrucciones en
pantalla para completar la conguración de la red.
6
Conecte su PC o portátil con cable de forma inalámbrica.
ES
Descargue la aplicación MSI Router desde Google Play Store o App
Store.
6
7
Inicie la aplicación MSI Router y escanee el código QR en la etiqueta
de su router para conectarse a su router a través de una conexión
WiFi.
Siga las instrucciones en pantalla para completar la conguración
de la red.
NL
Koppel de stroom los van de kabel/de DSL-modem.
1
3
4
5
2
Druk op de aan/uit-knop en de voedings-LED gaat branden wanneer
uw router gereed is.
Sluit de modem en uw router aan met een Ethernetkabel.
Sluit- en schakel de modem aan. Controleer de het modem actief is.
Sluit de adapter aan op de DC-ingang van uw router.
7
NL
Open een webbrowser en ga naar http://msirouter.login.
U kan de gebruikersnaam en het bijhorend wachtwoord terugvinden
op het label op de router. Volg de instructies op het scherm om de
netwerkinstellingen te voltooien.
6
Verbind uw PC of laptop bekabeld of draadloos.
NL
Download de MSI router app in de Google Play Store of App Store.
6
7
Start de MSI router app scan de QR-code op het label van uw router
om verbinding te maken met uw router via WiFi-verbinding.
Volg de instructies op het scherm om de netwerkinstellingen te
voltooien.
Align the power connector with the latch on the power adapter.
a
b
EN
Push it all the way down. Make sure you hear a “click” sound.
Richten Sie den Adapter am Riegel der Basis aus.
a
b
DE
Stecken Sie ihn bis zum Anschlag ein. Ein Klickgeräusch zeigt an, dass
er richtig eingerastet ist.
Alignez l’adaptateur avec le loquet de la base.
a
b
FR
Insérez-le entièrement vers le bas. Assurez-vous que vous entendez
bien un « clic ».
Allineare l'adattatore con il fermo della base.
a
b
IT
Inserirlo no in fondo. Assicurarsi di sentire un "clic".
Alinee el adaptador con el pestillo de la base.
a
b
ES
Insértelo hasta el fondo. Asegúrese de que escucha un «clic».
Lijn de adapter uit met de grendel van de voet.
a
b
NL
Steek het er helemaal in. Zorg ervoor dat u een “klik”-geluid hoort.
Product specificaties
| Merk: | MSI |
| Categorie: | Router |
| Model: | RadiX AXE6600 |
Heb je hulp nodig?
Als je hulp nodig hebt met MSI RadiX AXE6600 stel dan hieronder een vraag en andere gebruikers zullen je antwoorden
Handleiding Router MSI

22 April 2026
14 Mei 2025
9 Augustus 2023
8 Augustus 2023
Handleiding Router
Nieuwste handleidingen voor Router
22 April 2026
21 April 2026
21 April 2026
21 April 2026
21 April 2026
20 April 2026
20 April 2026
14 April 2026
13 April 2026
11 April 2026