Kokido Skooba Handleiding
Kokido Stofzuiger Skooba
Bekijk gratis de handleiding van Kokido Skooba (1 pagina’s), behorend tot de categorie Stofzuiger. Deze gids werd als nuttig beoordeeld door 36 mensen en kreeg gemiddeld 4.7 sterren uit 5 reviews. Heb je een vraag over Kokido Skooba of wil je andere gebruikers van dit product iets vragen? Stel een vraag
Pagina 1/1
K535CBX/18/EU & K535CBX/18/US
Made in China
17009013
1. MAIN BODY (with pre-filter bag inside)
2. FLAT NOZZLE & BRUSH
3. CONNECTORS
4. POLES
5. HOSE SECTION
1 x long hose section (for K535CBX/18/EU)
3 x short hose sections (for K535CBX/18/US)
6. HOSE SECTIONS CONNECTORS
(for K535CBX/18/US only)
HOW TO OPERATE YOUR SKOOBA™
When your is ready, turn your pump ON and start using to clean theSKOOBA™SKOOBA™
bottom of your pool.
Your is made to vacuum debris from the bottom of your pool. The internal pre-filterSKOOBA™
bag is designed to trap leaves and larger debris, which could otherwise clog the filter of your
pool. Make sure to empty this pre-filter bag regularly to ensure the maximum
suction power.
NOTESKOOBA™: Never use your without the pre-filter bag. Failure to do so may clog the
filter of your pool.
For vinyl liner and fiberglass pool, it is recommended to keep the brush on the flat
nozzle to avoid damaging to the pool.
IMPORTANT: Trapped air in your vacuum system may prevent the pump from operating
correctly. In this case, if your pump has a release valve, open it to let air escape
until only water comes out from it and then close the valve.
Check pump manual how to remove the air.
HOW TO ASSEMBLE YOUR SKOOBA™
1. Align the rib of the flat nozzle to the notch on
the nozzle of cleaner hood and then slide the
suction head to the hood until it stops. (Fig.1)
2. Select a sufficient number of the pole
sections to
suit your pool size. Total length
should allow both
hands to grip during operation. Assemble the pole
sections by inserting the grooved end of one section
into the round end of the next one, finishing
with the
last section that has the plastic grip. Slide together
until grooved area is fully inserted. (Fig.2)
3.
Insert the grooved end of assembled poles
into the
main body securely.
(Fig.3)
ASSEMBLE THE HOSE TO THE
MAIN BODY
NOTE: For 3 short hose sections, connect them with
the hose section connectors provided. (Fig.4)
It is recommended to do this underwater to remove
all entrapped air.
Tips: To remove entrapped air in the hose, place the
hose cuff towards the pool water inlet hole to let
water flow in and push out the entrapped air.
After assembling all hose sections, immerse the main
body under the water. When bubbles stop coming
from the main unit, connect the open end of the hose
to the hose cuff of the body and slide on as far as it
can go. (Fig.5)
CONNECT SKOOBA™ TO THE POOL OUTLET
WARNING!
TURN OFF the pump before
connecting SKOOBA™ to the pool outlet.
1) If you have a surface wall skimmer:
Take the open end of the hose and connect
it onto
the vacuum plate of your skimmer.
Slide the hose as far as it can go and apply
clamp (not
included) to secure it on the vacuum plate.(Fig.6)
2) If you have a wall skimmer, check your pool manual
or
pool dealer for instructions on how to remove the
skimmer
weir. Place a skimmer vacuum plate (not
included, check
with your pool dealer for the correct
model with a cuff
connection to fit a 1¼in / 32mm soft
hose) over the skimmer
filter basket. Connect the
open end of the hose to the
vacuum plate cuff, and
slide it on as far as it can go.
(Fig.7)
IMPORTANT!Make sure the pool water level is over the
vacuum plate, otherwise it will suck-in air during operation.
NOTE: The vacuum plate
shown in diagrams is for (Fig.7)
demonstration only. Please
contact your pool dealer for the
correct model.
A vacuum plate with a 90 degree
elbow is recommended.
3)
If you don’t have a wall skimmer:
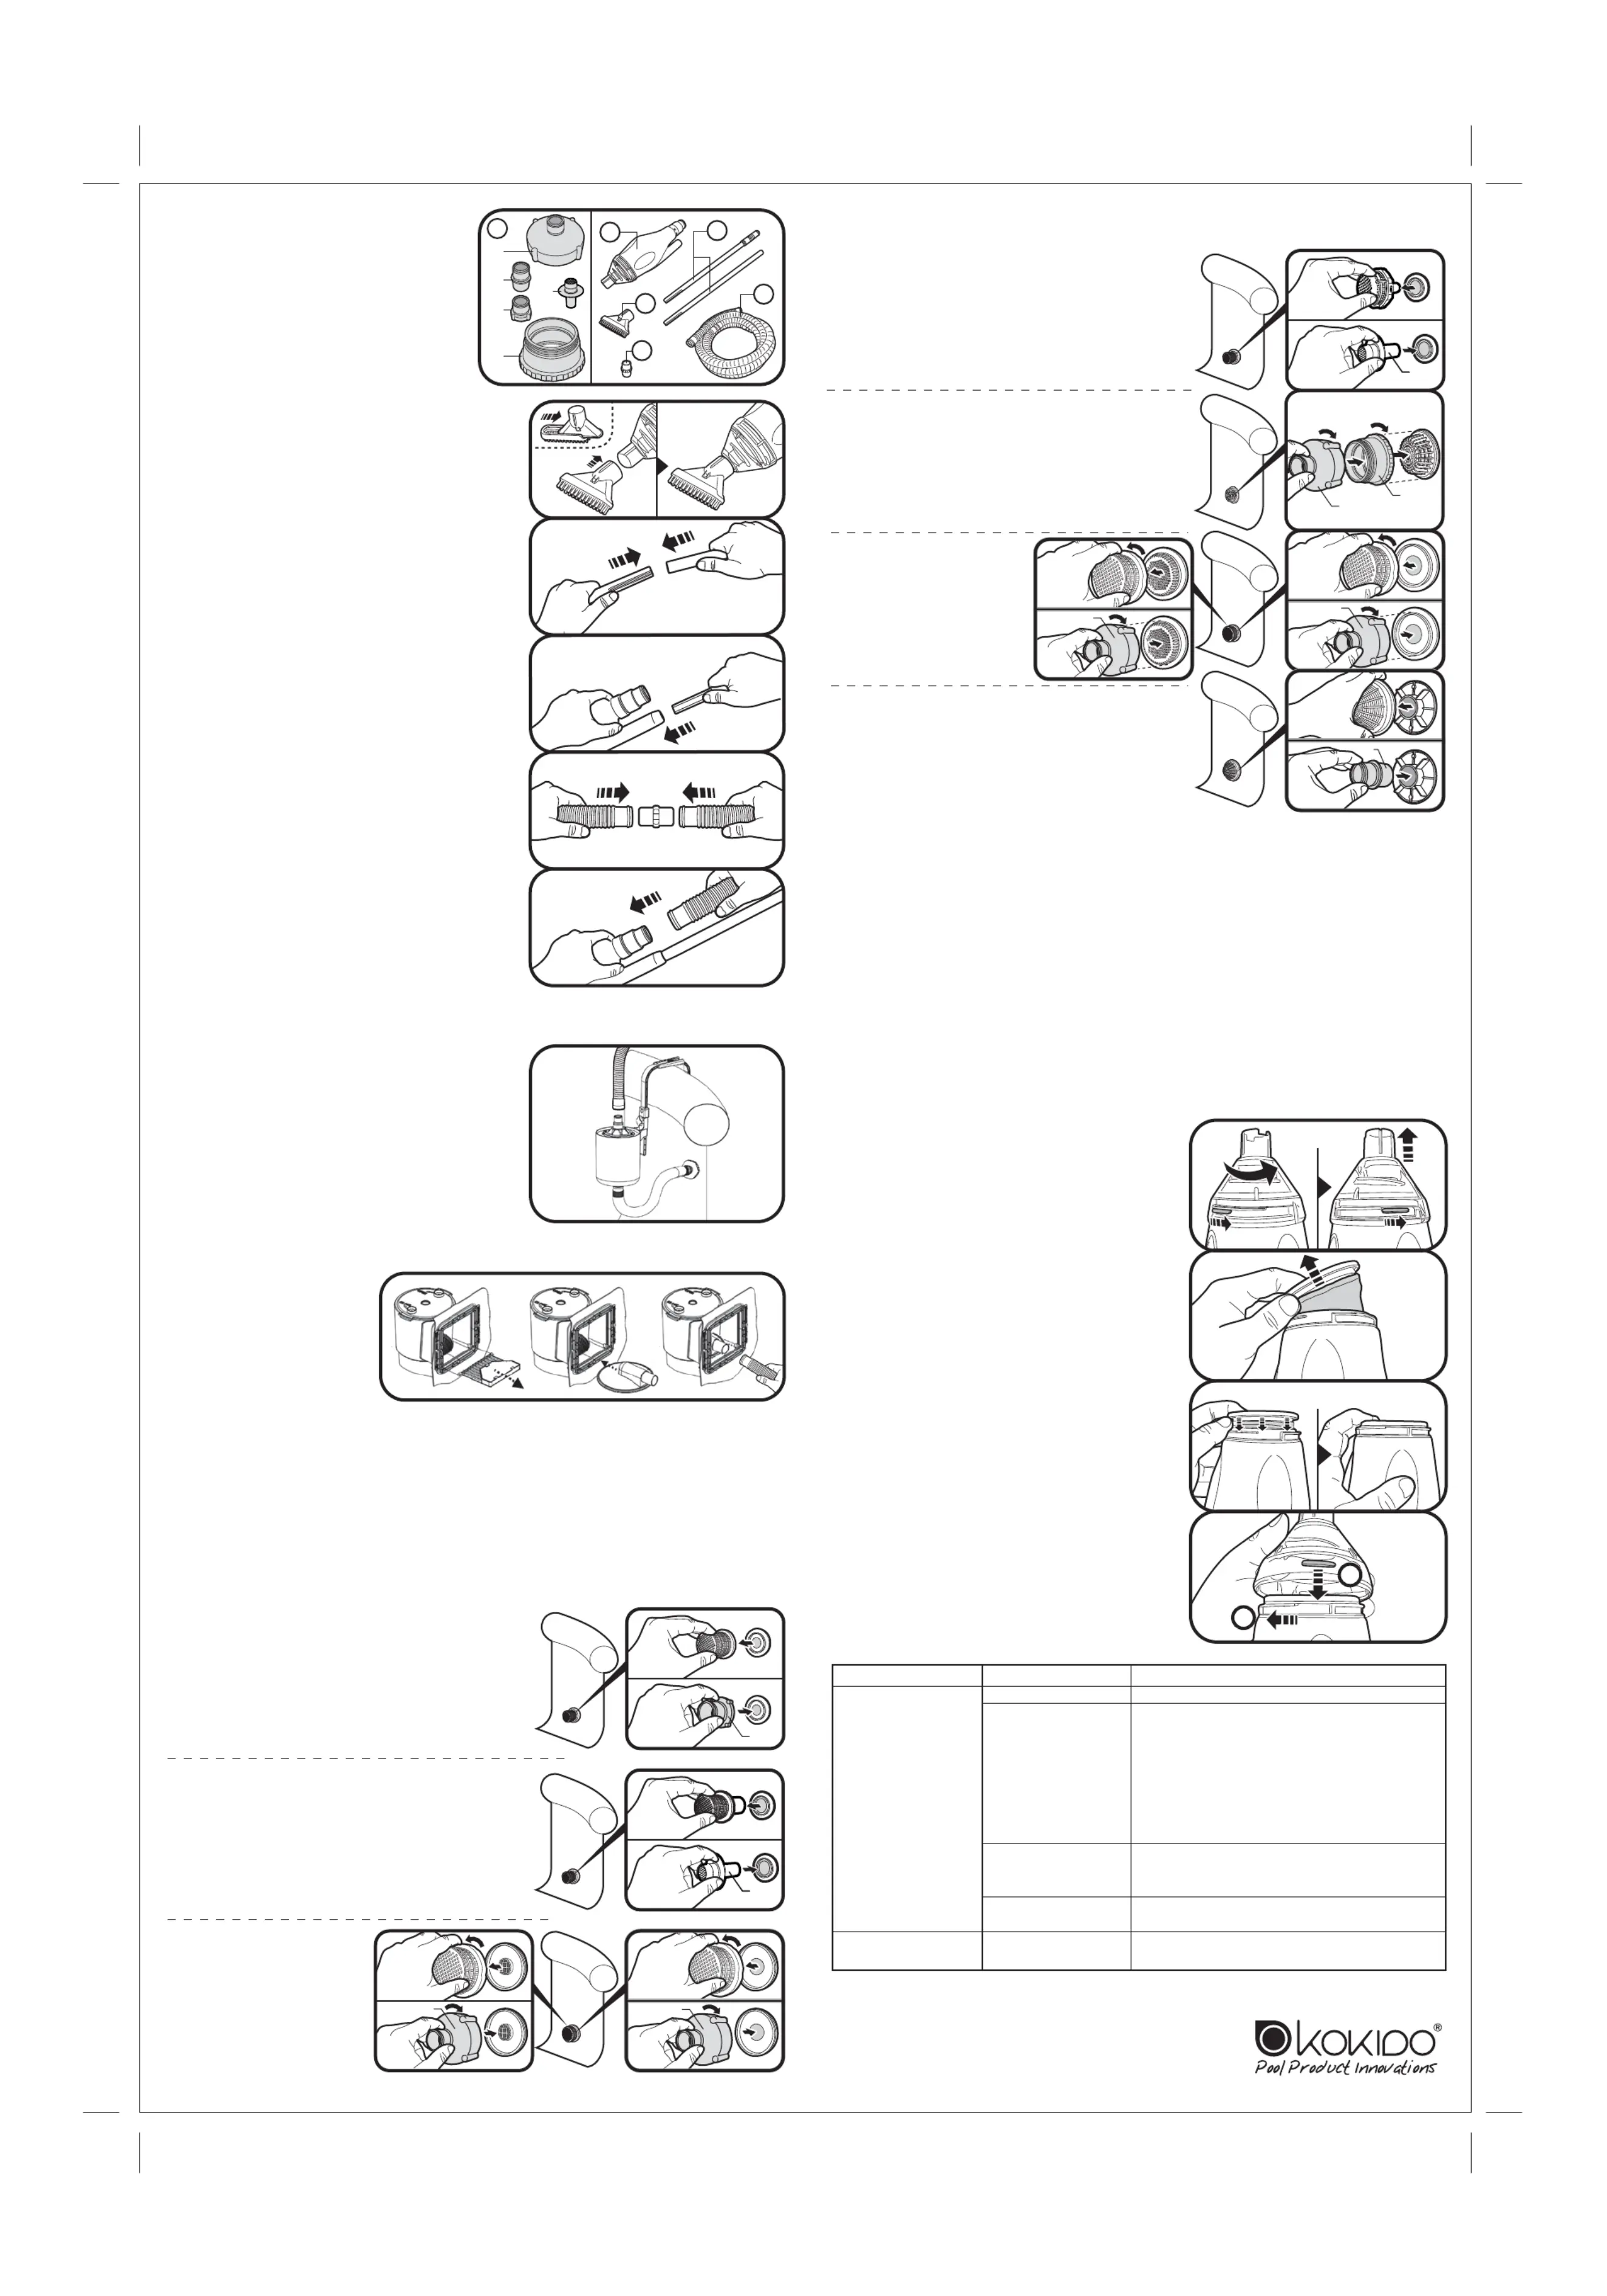
5 connectors () are provided in the kit to fit the 9 most common types of G1/G2/G3/G4/G5
strainer (see below) used in above ground pools. According to the strainer used in your
pool, select and attach the correct one to the strainer.
Tighten by hand only.
NOTE: For above ground pools with 2 pool water outlets, while connecting the cleaner to one of
the water outlets according to the cleaner instruction manual, follow pool instruction
manual to block the other water outlet. For example, use pool plug to block the outlet or
set the control valve (eg. plunger valve) if available to the closed position. Otherwise, it will
weaken the water flow inside the cleaner and then adversely affect the cleaner performance
such as capturing less debris.
WARNING!
Turn off the pump before
closing the water outlet.
POOL VACUUM KIT
Fig.8
Fig.10
Fig.9
Fig.11
© 2017 Kokido Development Ltd.
All rights reserved. No part of this document may be reproduced or transmitted
in any form or by any means, electronic, mechanical, photocopying, recording,
or otherwise, without prior written permission of Kokido Development Ltd.
Problem
Poor debris pick-up
Hose collapse
Possible Cause
Pre-filter bag is full.
Not enough suction
power.
Obstruction
somewhere in the
system.
Suction nozzle is
blocked.
Suction is too
strong.
Solution
Clean the pre-filter bag.
Make sure that your pool pump
power is at
least 45W, and minimum system flow rate is
2.0m³/hr (530 gal/hr). Make sure the hose is
free of punctures.
Check if there are two water outlets on your
pool and make sure the water outlet which is
connected with cleaner is opened and the
other water outlet is closed.
Clean the pump filter. Clean out any debris
from the hose. Replace a damaged pre-filter
bag that lets debris through.
Check and clean out any debris from the
nozzle.
Check if your pump power is over 0.5HP/ 375W
and /or filtration system flow is over 1,300gal/5m³.
1
2
Ø92mm (3
3
/5 in) Strainer
(with side thread)
Screw onto , and G1G4
then align and screw
G4 onto the strainer
Ø110mm (4
1
/3 in) Strainer
Unscrew the strainer cover
and screw onto the G1
middle thread of the strainer.
Ø36mm (1
2
/5 in) Strainer Hole
Detach the strainer cover and directly
insert into the strainer hole.G2
Take the open end of the hose, connect it onto
the connector and slide on as far as it can go.
G1
G2
G1
G3
Ø40mm (1
3
/5 in) Strainer plug with
removable grid cover
Detach the strainer cover and press on it.G3
Ø40mm (1
3
/5
in) Strainer plug with non-removable grid cover
Refer to pool instruction manual for how to remove the strainer
plug from the water outlet and then insert connector as shown.G5
Note: if your pool strainer plug is secured inside the pool water outlet
with pool hose together by hose clamp, you may need to loosen the
hose clamp to release the strainer plug. Pay attention not to let the
pool hose become detached from the water outlet when loosening
the hose clamp. Remove the plug and insert the connector into G5
water outlet as much as possible. Tighten the hose clamp to
secure the pool hose and the connector to the water outlet.
Ø80mm (3 in) Strainer plug
with removable grid cover
Unscrew the strainer
cover and screw on .G1
G5
G1
TROUBLE SHOOTING
G1
G4
HOW TO EMPTY THE PRE-FILTER BAG OF SKOOBA™
WARNING!
Turn off the pump before emptying the pre-filter bag.
1. Remove the hood from the cleaner by turning
it anticlockwise until it stops and then take it
off from the main body. (Fig.8)
2. Pull out the pre-filter bag from the cleaner and
remove the leaves and other debris. (Fig.9)
Rinse the cover and make sure its suction
hole is not clogged.
3. Put back the pre-filter bag into the cleaner.
Make sure the notch under the top ring covers
the edge around the opening of the cleaner.
If pre-filter bag is damaged, replace a (Fig.10)
new one before next operation.
4. Align the rid (on the inside surface of hood
bottom) to the slot on the opening of the main
body, press
down the hood and turn it clockwise
until it stops. Make sure the hood is secured
on the cleaner before next operation. (Fig.11)
G5
Ø80mm (3 in) Strainer plug with non-removable grid cover
Refer to pool instruction manual for how to remove the strainer
plug from the water outlet and then insert G5 connector as shown.
Note: if your pool strainer plug is secured inside the pool water outlet
with pool hose together by hose clamp, you may need to loosen the
hose clamp to release the strainer plug. Pay attention not to let the
pool hose become detached from the water outlet when loosening
the hose clamp. Remove the plug and insert the connector into G5
water outlet as much as possible. Tighten the hose clamp to
secure the pool hose and the connector to the water outlet.
Fig.7
G1
Fig.2
Fig.5
Fig.3
Fig.4
Fig.1
Fig.6
x1
x3
G4
G2
G3
G1
x2
6
3
1
4
5
2
G5
13 Sep 2017
K535CBX/18/EU & K535CBX/18/US IM (KOK)(GB)
size: W290 x L420mm
Product specificaties
| Merk: | Kokido |
| Categorie: | Stofzuiger |
| Model: | Skooba |
| Kleur van het product: | Grey, White |
| Gewicht verpakking: | 1850 g |
| Breedte verpakking: | 120 mm |
| Diepte verpakking: | 485 mm |
| Hoogte verpakking: | 340 mm |
| Type verpakking: | Doos |
| Geschikt voor: | Zwembad |
| Bedoeld voor: | Opbouwzwembad |
| Gebruiksvriendelijk: | Ja |
| Filter type: | Filterzak |
| (Buitenste) hoofdverpakking hoogte: | 355 mm |
| (Buitenste) hoofdverpakking breedte: | 500 mm |
| (Buitenste) hoofdverpakking brutogewicht: | 10700 g |
| (Buitenste) hoofdverpakking lengte: | 760 mm |
| Hoeveelheid per (buitenste) hoofdverpakking: | 6 stuk(s) |
| Type product: | Zuigende reiniging |
| Geschikt voor schoonmaken: | Bodem |
| Eenvoudig te monteren: | Ja |
| Pompkracht: | 45 W |
| Minimale pompcapaciteit: | 2 m³/uur |
| Filterzak: | Ja |
| Vacuum-pomp: | Ja |
| Lengte zwembad (max): | 4570 mm |
| Lengte handgreep (max): | 1780 mm |
| Lengte zuigslang: | 5 m |
Heb je hulp nodig?
Als je hulp nodig hebt met Kokido Skooba stel dan hieronder een vraag en andere gebruikers zullen je antwoorden
Handleiding Stofzuiger Kokido

27 April 2026
31 Maart 2025
31 Maart 2025
31 Maart 2025
27 Maart 2025
27 Maart 2025
17 November 2024
27 Maart 2024
27 Maart 2024
27 Maart 2024
Handleiding Stofzuiger
Nieuwste handleidingen voor Stofzuiger
28 April 2026
28 April 2026
28 April 2026
23 April 2026
22 April 2026
22 April 2026
22 April 2026
22 April 2026
21 April 2026