Klavis Mixwitch Handleiding
Klavis
Niet gecategoriseerd
Mixwitch
Bekijk gratis de handleiding van Klavis Mixwitch (11 pagina’s), behorend tot de categorie Niet gecategoriseerd. Deze gids werd als nuttig beoordeeld door 49 mensen en kreeg gemiddeld 4.6 sterren uit 25 reviews. Heb je een vraag over Klavis Mixwitch of wil je andere gebruikers van dit product iets vragen? Stel een vraag
Pagina 1/11

Mixwitch
Mixwitch
Mixwitch
Mixwitch Mixwitch user manual V1.1 Page of 1 11
M
M
M
MMix
ix
ix
ixixw
w
w
wwi
i
i
iitc
tc
tc
tctch
h
h
hh Mixer & Switcher
Voltage & clock-controlled analog switch with mixer
Introduction
Focused versatility seems an oxymoron when describing the features that led us to design the
Mixwitch. With only a pinch of mixing, inverting and controlled switching, we brew up a plethora
of combinations and uses. This is voltage processing magic!
Mixwitch
Mixwitch
Mixwitch
MixwitchMixwitch
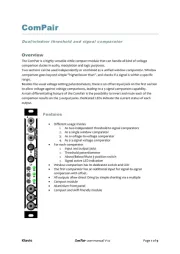
Features at a glance
Dual 2 to 1 mixers, normalized into 4 to 1
o C k-less mute per mixer lic
o Click-less polarity inversion per input with LED
indication
o Modulation vs. audio mode selection (lin/log) per
mixer, with change of potentiometer curve response
and LED indication.
o Two LEDs on each output showing the amplitude and
polarity of the output signal
o Unconnected inputs present a xed voltage to ease
oset creation
o Full range -coupled analog signal path DC
Switch /Selector
o Switch among 4 inputs, only 2, or disabled
o Select an input sequentially with a clock/trigger
o Select an input randomly with a clock/trigger
o Select an input in relation to a control voltage
o CV and clock control are audio rate capable
Settings retained over the power cycle
High-quality potentiometers with metal shaft
Ski-friendly compact module &

Mixwitch
Mixwitch
Mixwitch
Mixwitch Mixwitch user manual V1.1 Page of 2 11
Installation and security
Purpose
This module is meant for installation in a Eurorack-compliant chassis.
It adheres to Eurorack Doepfer mechanical and electrical specications.
Do not attempt using this module in other mechanical or electrical contexts.
Installation
Before the installation, disconnect the mains power supply from your modular system. Some
power supplies are not safely isolated; there is a risk of injury!
See in the specications if this module requires 5V from the supply . If 5V is needed and your rails
rack is not providing 5V, do not attempt connection!
Check that the current consumption requirements of this module, when added to your installed
set of modules do not exceed the available current from your supply. This is done by adding up
the current draw of all modules (mA) separately for each of 5V, 12V and -12V rails. If any of these 3
sums exceeds the available current of your supply for that voltage, do not connect the module to
your system; you need a stronger power supply.
The provided supply at cable can only be inserted in the appropriate orientation at the back of
the module, so there is no risk of error on that end. However, you should pay attention to the
orientation of the cable in the socket of the supply PCB inside your chassis. Cheap sockets
without shrouding may allow you to plug in the connector the wrong way!
The red stripe on the cable should match a stripe printed on the supply board. The stripe also
indicates the -12V side. In case there is no stripe, a -12V marking is a safe indication of the
orientation.
Double check that the connectors are fully inserted and correctly oriented before switching on
the power supply. In case of an anomaly, switch o the power supply immediately and check
everything again.

Mixwitch
Mixwitch
Mixwitch
Mixwitch Mixwitch user manual V1.1 Page of 3 11
Birth of the product
The Mixwitch design comes from a frustration with attenuvertors (bipolar attenuators-inverters)
whose o (neutral) position is dicult to retrieve, especially in live situations.
We went for a digitally-controlled analog path where polarity inversion would be at the touch of
a button. So, the usefulness of attenuating/inverting can be realized by turning the pot down,
swiftly pressing the inversion button and reopening the level. The zero level is where you expect
it, with the pot full down.
Once we had a clean polarity control, we easily added a mute function oering the benet of pre-
adjusted pot settings ready to be activated at will.
The next step was to bring something extra, useful and creative. There are plenty of analog
switches controlled by a clock; but arbitrarily selecting an input with a voltage is less common.
Having both control capabilities combined with our specic mixer features created a unique
fusion: welcome to the Mixwitch !
Module description
Mixers
The mixing section is made of two-input mixers. Each of mixers A & B works the same. a pair of
Each potentiometer controls the gain from zero to max. At maximum setting, the signal is
amplied slightly above x2.
Inputs
When an input is left unconnected, it defaults to a voltage. This allows easily osetting the signal
brought at the other input of the mixer. You can create osets up to plus/minus 10V.
Outputs
Outputs A and B are each summing the inputs 1 and 2 from their respective mixer. When no jack is
inserted in the mixer A output, its signal is added to the signal of output B, creating a 4 to 1 mixer.
Red and blue LEDs at each output indicate the strength and polarity of the outgoing signal.
Buttons
The +/- button and LEDs control the input signal polarity inversion.
The Log button and its LED apply to both inputs of mixer. It also changes the curve of a
the potentiometers from linear to logarithmic and reduces the overall gain by 6dB to
avoid audio clipping .
Linear is typically used to combine control voltages while log is t for audio signals.
Log can nevertheless be used for control voltages easing the setting of subtle levels.
The button applies to both inputs of a mixer. When a mixer is muted its polarity LEDs Off ,
are o.
Product specificaties
| Merk: | Klavis |
| Categorie: | Niet gecategoriseerd |
| Model: | Mixwitch |
Heb je hulp nodig?
Als je hulp nodig hebt met Klavis Mixwitch stel dan hieronder een vraag en andere gebruikers zullen je antwoorden
Handleiding Niet gecategoriseerd Klavis

30 Januari 2025
30 Januari 2025

3 Juli 2024

3 Juli 2024

1 Maart 2024

1 Maart 2024

1 Maart 2024

1 Maart 2024

9 November 2023

22 Mei 2023
Handleiding Niet gecategoriseerd
- Expressive E
- Moki
- Crest Audio
- Smart Strip
- Gram
- Medela
- Dream Power
- Zoofari
- FALLER
- Dahua Technology
- Cruz
- Scancool
- Alpenföhn
- Linn
- Playseat
Nieuwste handleidingen voor Niet gecategoriseerd

14 September 2025

14 September 2025

13 September 2025

13 September 2025

13 September 2025

13 September 2025

13 September 2025

13 September 2025

13 September 2025

13 September 2025