StarTech.com ST10GSPEXNDP2 Handleiding
StarTech.com Netwerkkaart/adapter ST10GSPEXNDP2
Bekijk gratis de handleiding van StarTech.com ST10GSPEXNDP2 (23 pagina’s), behorend tot de categorie Netwerkkaart/adapter. Deze gids werd als nuttig beoordeeld door 34 mensen en kreeg gemiddeld 4.2 sterren uit 9 reviews. Heb je een vraag over StarTech.com ST10GSPEXNDP2 of wil je andere gebruikers van dit product iets vragen? Stel een vraag
Pagina 1/23
Quick-Start Guide
To view manuals, FAQs, videos, drivers, downloads, technical drawings, and more, visit www.startech.com/support.
Manual Revision: July 12, 2022
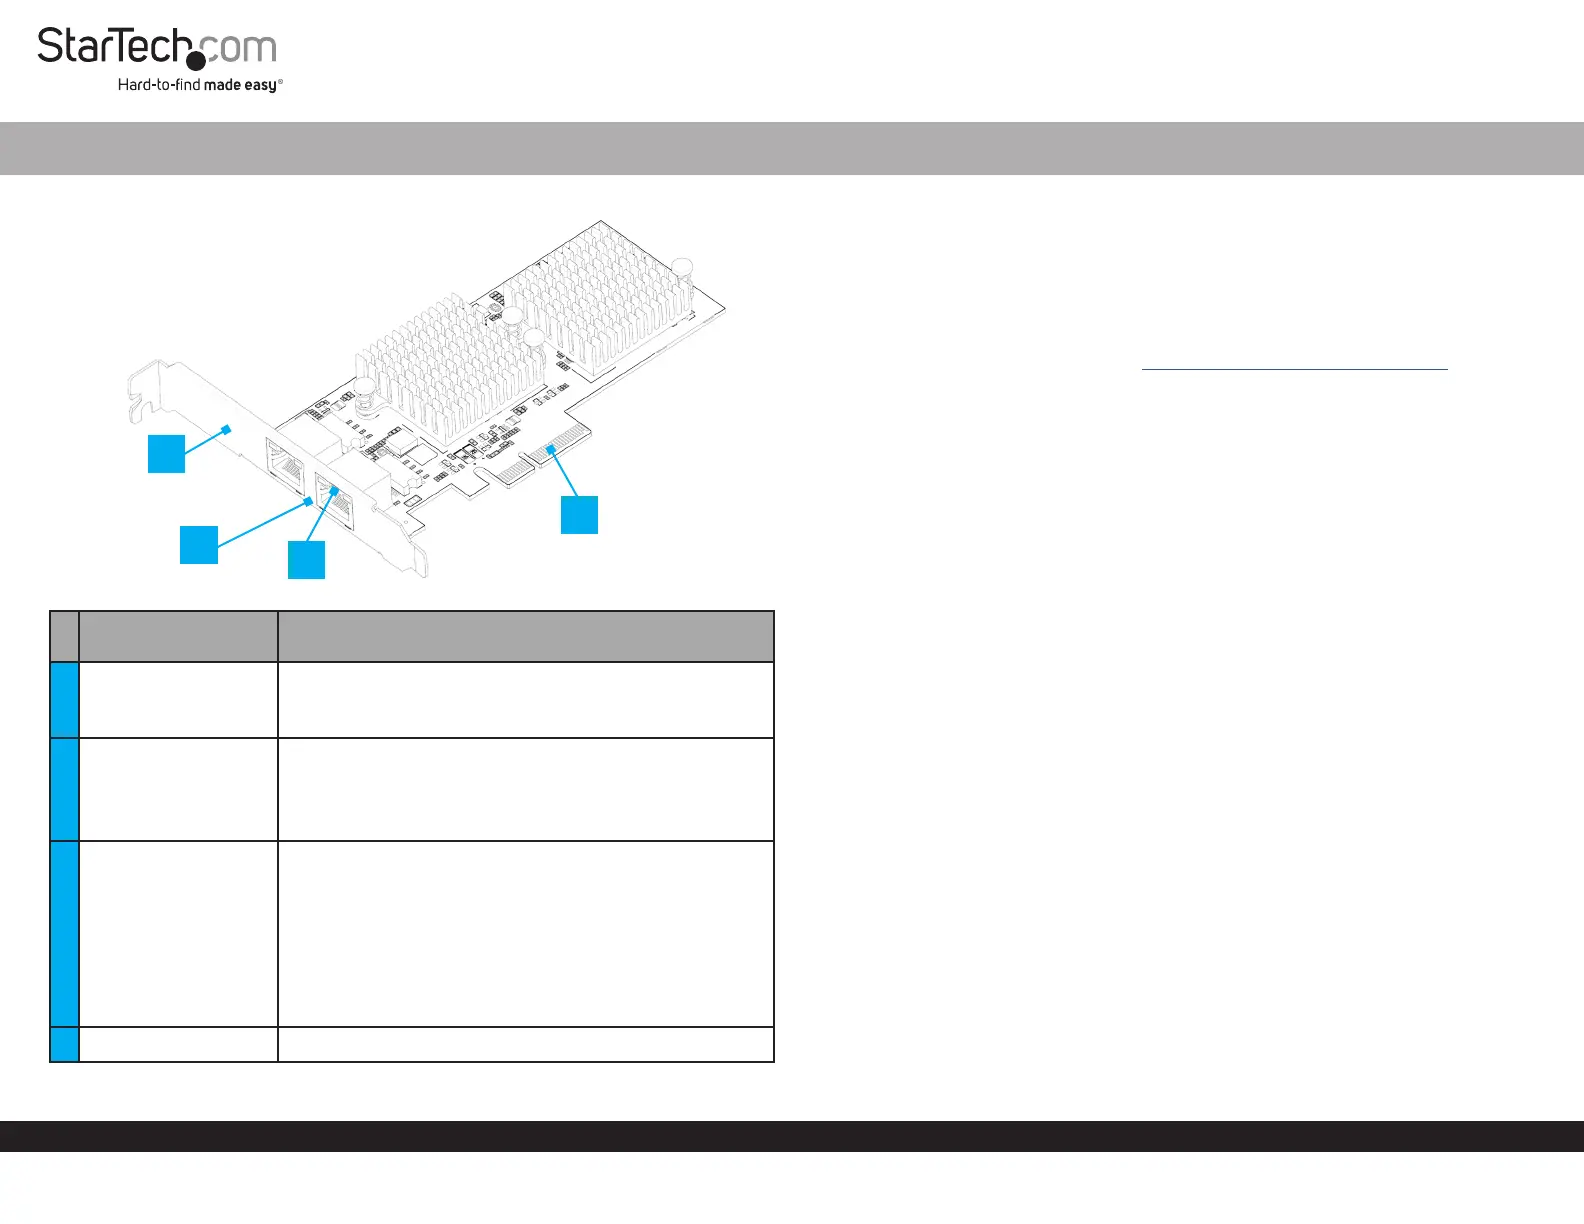
Product Diagram (ST10GSPEXNDP2)
Port/LED/ConnectorFunction
1Bracket
• Secures the card to the Computer Case
• The Full-Height Bracket comes pre-installed
• The Low-Prole Bracket is included
22x Ethernet Ports
• Connect a Network Cable to the Network Card
• Supports
10 Gbps/5 Gbps/2.5 Gbps/1 Gbps/100 Mbps/10 Mbps
For10 Gbps speeds Cat6 or higher cable is needed
3LED Indicators
• LeftLED Indicator is Link Speed
• Solid Green = 10 Gbps
• Solid Amber =
5 Gbps/2.5 Gbps/1 Gbps/100 Mbps/10 Mbps
• RightLED Indicator is Link Status
• Solid Green = Active link
• Flashing Green = Activity
4PCIe p1-x4 Connector• Insert into a PCI Express Slot on the Host Computer
2-Port 10GBase-T / NBase-T Ethernet Network Adapter Card - PCIe Ver 3.0 x4
Package Contents
• PCIe 10 Gbps Network Card x 1
• Low-prole Bracket x 1
• Quick-Start Guide x 1
Requirements
For the latest requirements, please visit www.startech.com/ST10GSPEXNDP2
• Computer with an available PCI Express Slot (x4, x8, or x16)
Installation
Install the PCI Express Card
WARNING!
Static Electricity can severely damage PCI Express Cards. Ensure that you are
adequately Grounded before you open your Computer Case or touch the PCI
Express Card. You should wear an Anti-Static Strap or use an Anti-Static Mat when
installing any computer component. If an Anti-Static Strap isn’t available, discharge
any built-up static electricity by touching a large Grounded Metal Surface for several
seconds. Only handle the PCI Express Card by its edges and don’t touch the gold
connectors.
1. Turn o the Computer and any Peripheral Devices that are connected to it (for
example, Printers, External Hard Drives, etc.).
2. Unplug the Power Cable from the back of the Computer.
3. Disconnect any Peripheral Devices that are connected to the Computer.
4. Remove the Cover from the Computer Case. Consult the documentation that came
with the Computer for details about doing this safely.
5. Locate an open PCI Express Slot and remove the corresponding Slot Cover Plate
from the back of the Computer Case. Consult the documentation that came with
the Computer for details about doing this safely. This card works in PCI Express x4,
x8, or x16Slots.
6. Gently insert the PCI Express Card into the open PCI Express Slot and fasten the
Bracket to the back of the Computer Case.
Note: If you install the PCI Express Card into a Small Form Factor or a Low-Prole
Desktop System, it may be necessary to replace the pre-installed standard
Full-Height Bracket with the included Low-Prole Bracket.
2
4
1
3
Product specificaties
| Merk: | StarTech.com |
| Categorie: | Netwerkkaart/adapter |
| Model: | ST10GSPEXNDP2 |
| Kleur van het product: | Zwart |
| Gewicht: | 116 g |
| Breedte: | 20 mm |
| Diepte: | 145 mm |
| Hoogte: | 65 mm |
| Gewicht verpakking: | 208 g |
| Breedte verpakking: | 145 mm |
| Diepte verpakking: | 215 mm |
| Hoogte verpakking: | 35 mm |
| LED-indicatoren: | Activity, Link, Status |
| Connectiviteitstechnologie: | Bedraad |
| Ethernet LAN: | Ja |
| Aantal Ethernet LAN (RJ-45)-poorten: | 2 |
| Interface: | Ethernet |
| Duurzaamheidscertificaten: | CE |
| Ethernet LAN, data-overdrachtsnelheden: | 10,100,1000,2500,5000,10000 Mbit/s |
| Bekabelingstechnologie: | 10GBase-T |
| Netwerkstandaard: | IEEE 802.3, IEEE 802.3an, IEEE 802.3az, IEEE 802.3bz, IEEE 802.3u |
| Temperatuur bij opslag: | -10 - 60 °C |
| Intern: | Ja |
| Naleving van duurzaamheid: | Ja |
| Ondersteunt Linux: | Ja |
| Snelle installatiehandleiding: | Ja |
| Ethernet interface type: | 2.5 Gigabit Ethernet, 5 Gigabit Ethernet, Fast Ethernet, Gigabit Ethernet |
| Hostinterface: | PCI Express |
| Maximale overdrachtssnelheid van gegevens: | 10000 Mbit/s |
| Maximale afstand: | 100 m |
| Ondersteunde server operating systems: | Windows Server 2012 R2, Windows Server 2016, Windows Server 2019 |
| Montagebeugels meegeleverd: | Ja |
| Jumbo Frames ondersteuning: | Ja |
| Full duplex: | Ja |
| Chipset: | Marvell AQC113CS |
| Component voor: | Pc/server |
| (Buitenste) hoofdverpakking hoogte: | 315 mm |
| (Buitenste) hoofdverpakking breedte: | 440 mm |
| (Buitenste) hoofdverpakking lengte: | 370 mm |
| Hoeveelheid per (buitenste) hoofdverpakking: | 40 stuk(s) |
| Auto MDIX IEEE: | Ja |
| Wake-on-LAN: | Ja |
| Bedrijfstemperatuur (T-T): | 5 - 50 °C |
| Relatieve vochtigheid in bedrijf (V-V): | 20 - 80 procent |
| Jumbo frames: | 16000 |
| PCI versie: | 3.0 |
| PCI Card form factor: | Full-height (low-profile) |
| VLAN-tagging: | Ja |
Heb je hulp nodig?
Als je hulp nodig hebt met StarTech.com ST10GSPEXNDP2 stel dan hieronder een vraag en andere gebruikers zullen je antwoorden
Handleiding Netwerkkaart/adapter StarTech.com

12 Maart 2026
21 November 2025
11 November 2025
30 Juni 2025
7 April 2025
17 Maart 2025
17 Maart 2025
14 Januari 2025
14 Januari 2025
30 November 2024
Handleiding Netwerkkaart/adapter
Nieuwste handleidingen voor Netwerkkaart/adapter
18 Mei 2026
12 Mei 2026
6 Mei 2026
4 Mei 2026
2 April 2026
31 Maart 2026
28 Maart 2026
27 Maart 2026
27 Maart 2026
27 Maart 2026