Star Micronics mC-Print3 Handleiding
Star Micronics Printer mC-Print3
Bekijk gratis de handleiding van Star Micronics mC-Print3 (3 pagina’s), behorend tot de categorie Printer. Deze gids werd als nuttig beoordeeld door 33 mensen en kreeg gemiddeld 4.5 sterren uit 2 reviews. Heb je een vraag over Star Micronics mC-Print3 of wil je andere gebruikers van dit product iets vragen? Stel een vraag
Pagina 1/3
3-AConnecting an Android terminal to the printer
Check the Supplied AccessoriesIf any of the package contents are missing or damaged, contact the dealer where the
product was purchased.* Accessories vary depending on the region where the printer was purchased.
This document explains the procedures for use of mC-Print3. Please store it carefully after reading it.
Introduction
Paper Roll
Guide
Paper RollEasy
Setup Guide
Safety
Instructions
This Manual
Power Cable*AC AdapterFlyer
(Q&A reference)
What the utility can do
The utility can be used to change the settings of the printer and peripheral devices.
Examples) • LAN settings • Memory switch changes, logo registration
• Sample printing • Checking if connected device supports USB PD (Power Delivery)
• Firmware update/diagnosis etc.
● To use the utility, download it from the site at right.
● To perform setup using this manual, proceed to Step1.
www.star-m.jp/mcprint3-oml.html
mC-Print3 Online Manual
In Case of Trouble
If you experience trouble with the setup procedure, refer to the Online Manual.
Place the enclosed yer close to the printer and use it when necessary.
MCP31C
Easy Setup Guide
www.star-m.jp/mcprint-app.html
mC-Print3 Utility Download
1
Installing the paper roll
Take the slack of the paper roll before paper
setting, insert the paper roll as shown in the
illustration.
Pull the end of the paper roll out straight ,
and use both hands to close the printer cover
.
3
4
4
2
1
Pull the open lever and open the printer
cover .
When using a 58 mm roll, install the pro-
vided paper roll guide.
B
A
1
2
With the notch part A (triangle mark) of the
paper roll guide facing down, angle the guide
to the right and insert it .
Position so that the notch part A is aligned
with the main unit rib B, then slide the guide
from the right .
When the slid paper roll guide stops, stand
it up vertical , and press until it clicks into
place .
To change the paper width, it is necessary
to change the memory switch setting. For
details, refer to the Online Manual.
3
4
2
Turning ON the main unit power
Press the power button and conrm that
the LED (blue) illuminates .
4
5
Connect the power cable to the AC adapter
, and connect the cable connector to the
printer as shown in the illustration . Insert
the plug into the outlet .
Place your nails into the gaps in the right and
left sides of the rear cover on the back of the
printer, and then remove the cover.
RESET
RESET
DC24V
LANCash Drawer
/Buzzer
0.5A 0.5A
iPa d
18W(USB PD)
1
3
2
USB Cable
(C-C)
80878690
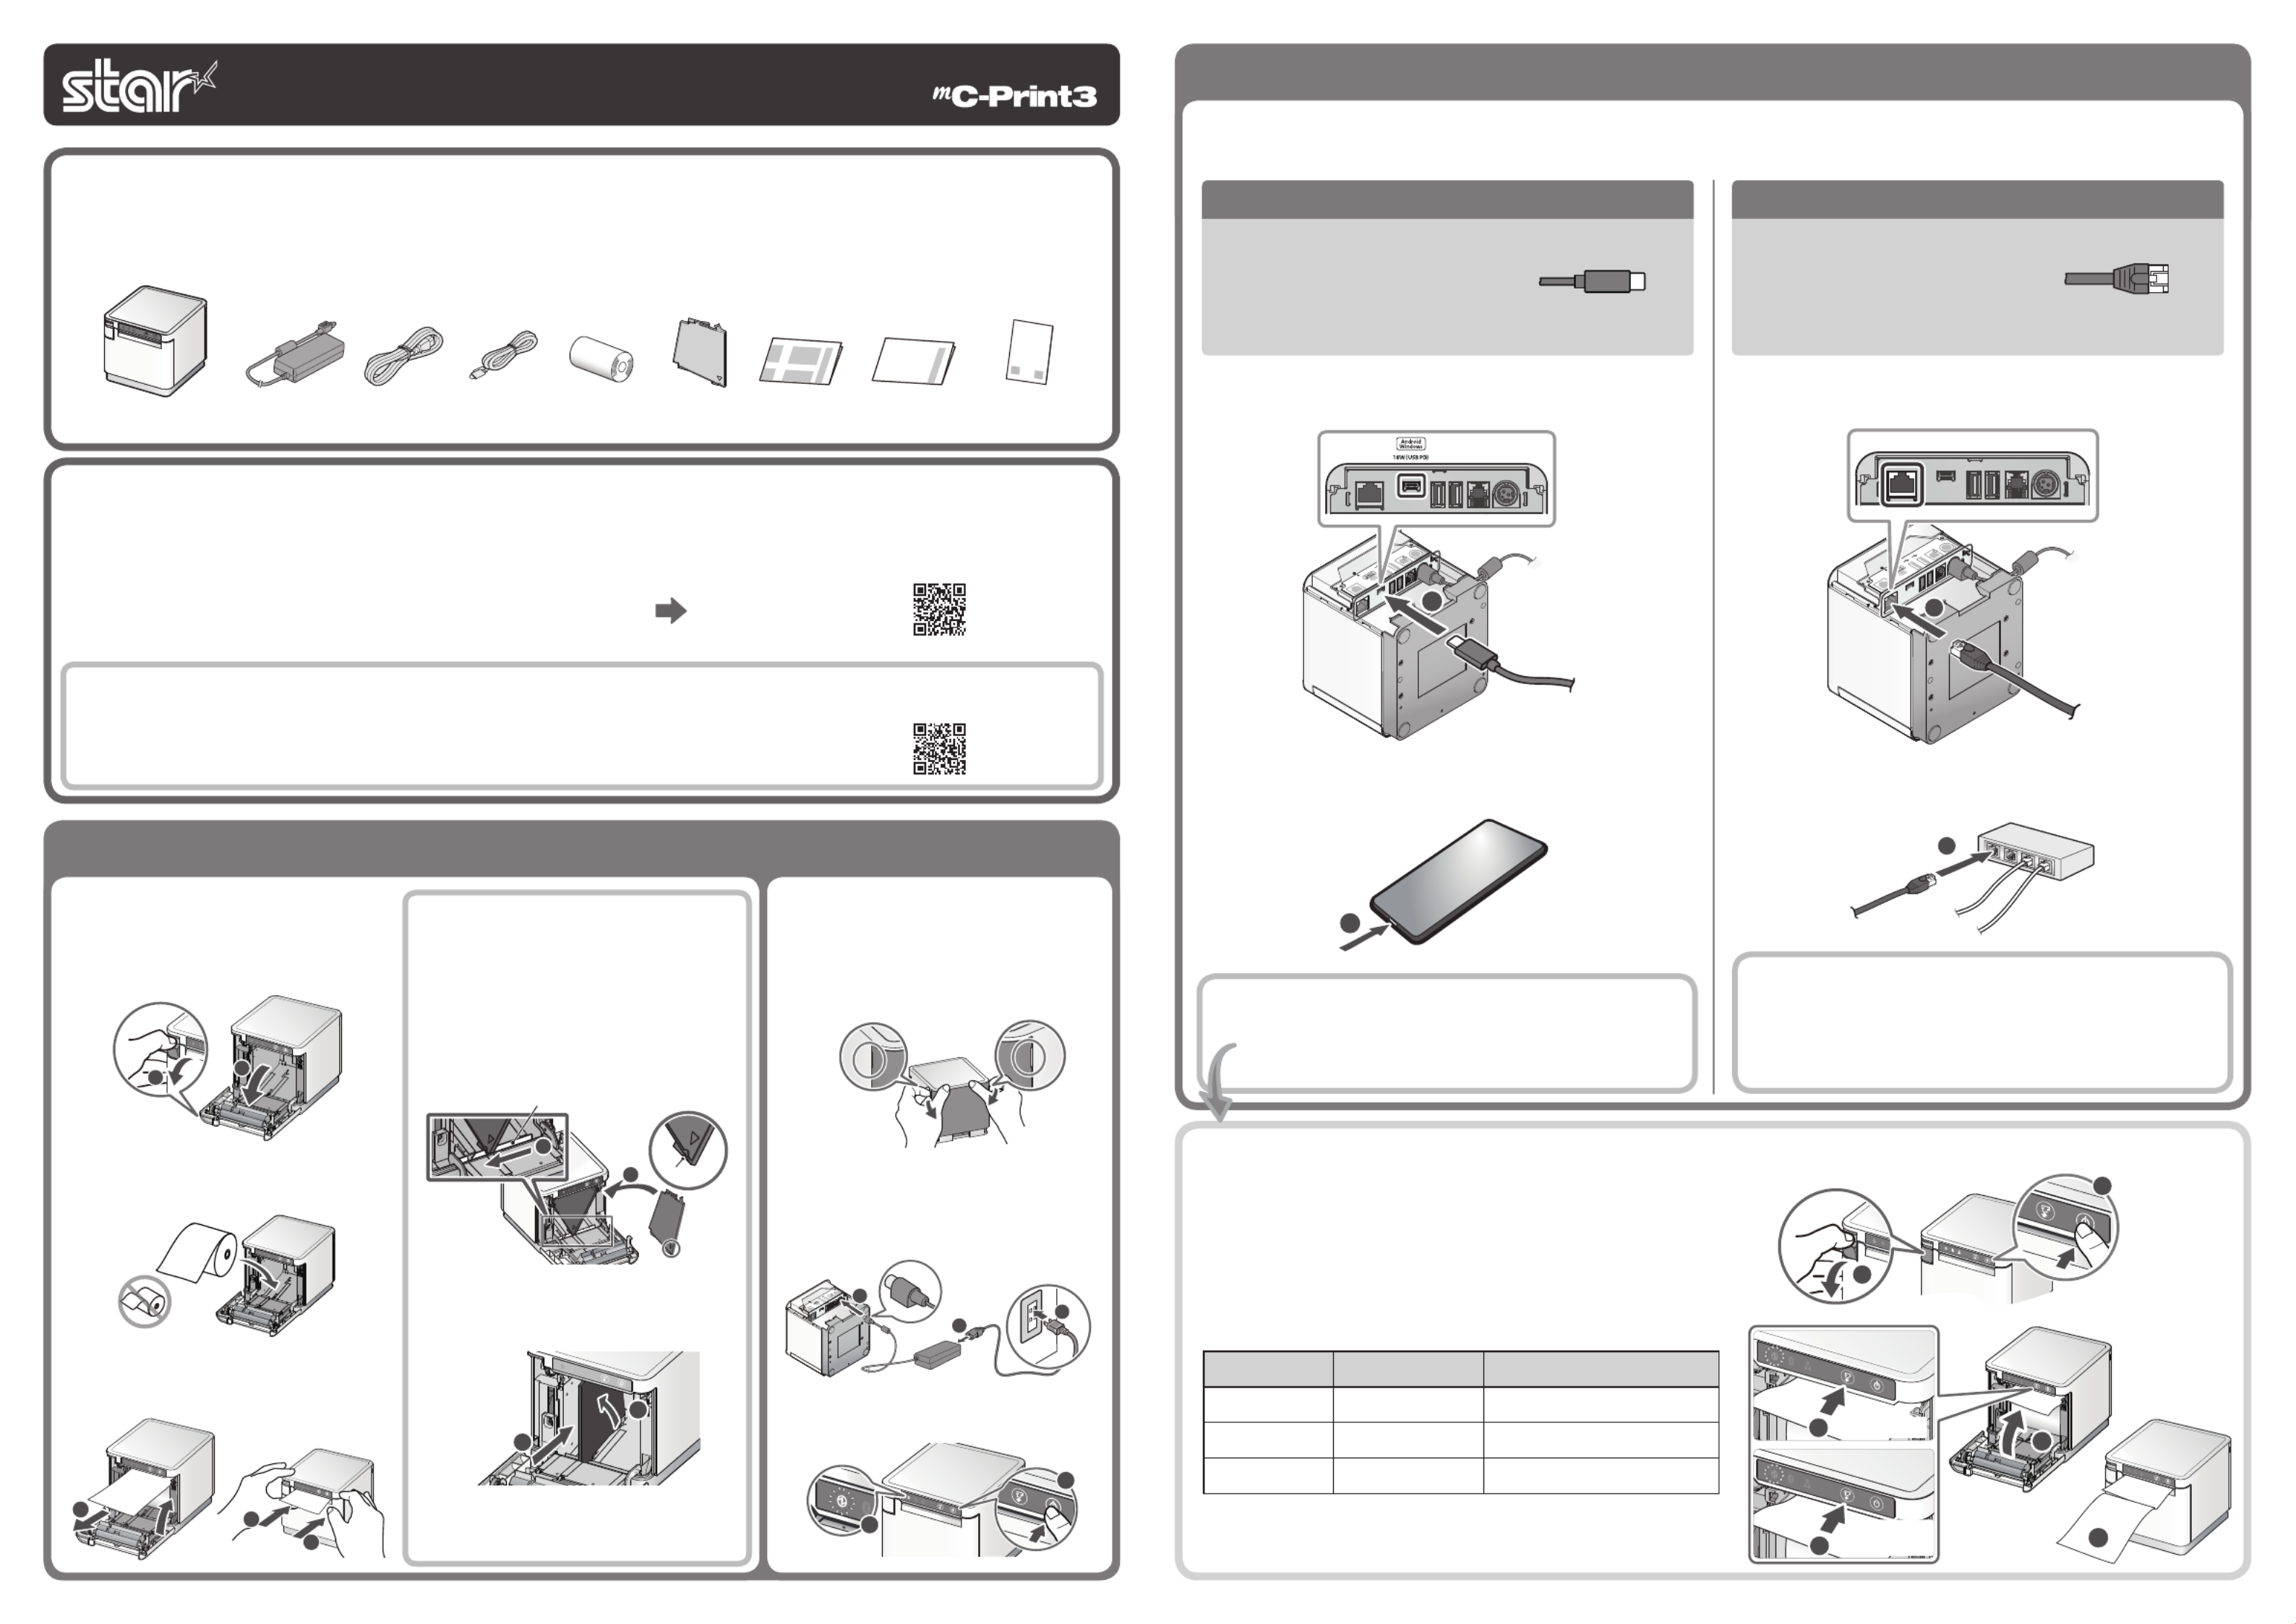
Connect the LAN cable to the printer LAN connector .
RESET
DC
24V
LAN
Cash Drawer
/Buzzer
0.5A 0.5A
d
18W(USB PD)
LAN
1
2
Connect the other plug to the connector of the router, hub, or other
LAN device .
Wired LANinterface
You will need:
• Commercially-available LAN cable
Printer-side plug
DHCP is enabled by default for the wired LAN settings. To
continually use the same IP address, set a static IP address
before use.
For the static IP address setting procedure, refer to the On-
line Manual.
USBinterface
Connect the USB cable to the printer USB-C® connector
.
You will need:
• USB cable (C-C)
provided with the printer
2
Printer-side plug
Connect the other plug to the smartphone/tablet .
RESET
DC
24V
LAN
Cash Drawer
/Buzzer
0 A
iP ad
18W(USB
1
Connecting a Tablet or PC to the Printer
Installing the Printer
If your Android device cannot connect to the printer, it may
not support USB PD (Power Delivery).
Follow the procedure below and switch the USB-C function
to “Data only”.
Switching the USB-C function manually (For using the USB interface)
If the communication connection is not successful, follow the procedure
below and switch the USB-C function.
Turn on the printer power.
Pull the open lever, and then open the printer cover.
Press the FEED button for 5 seconds (LED red ashes).
Press and release the FEED button to select the USB-C function.
Close the printer cover, and then save the selected function in step
.
➏ Check the status of the saved function on the test printing.
LEDUSB-C functionDescription of test printing
Red ashingData onlyUSB-C: Data Only
Blue ashingPower supply onlyUSB-C: Power Supply Only
Purple ashingPower supply
and dataUSB-C: Power Supply / Data
6
2
1
35 seconds
Press
and release
4
5
Product specificaties
| Merk: | Star Micronics |
| Categorie: | Printer |
| Model: | mC-Print3 |
| Kleur van het product: | Wit |
| Breedte: | 132 mm |
| Diepte: | 140 mm |
| Hoogte: | 125 mm |
| Soort: | POS-printer |
| Ondersteunde mobiele besturingssystemen: | Android |
| Bluetooth: | Ja |
| USB-poort: | Ja |
| Connectiviteitstechnologie: | Bedraad en draadloos |
| Ethernet LAN: | Ja |
| Type stroombron: | DC |
| Intern geheugen: | - MB |
| Ondersteunt Windows: | Ja |
| Maximale resolutie: | 203 x 203 DPI |
| Maximum roll diameter: | 83 mm |
| USB-connector: | USB Type-C |
| Printtechnologie: | Thermisch |
| Maximale print breedte: | 72 mm |
| Printsnelheid (metrisch): | 250 mm/sec |
| Wifi: | Nee |
| Ondersteunde papierwijdte: | 58, 80 mm |
| Snijder: | Ja |
| Autocutter duurzaamheid: | 2 miljoen delen |
| Dikte printermedia: | 0.053 – 0.075 µm |
| Tablet opladen & synchroniseren: | Ja |
| Papierbesparingsfunctie: | Ja |
Heb je hulp nodig?
Als je hulp nodig hebt met Star Micronics mC-Print3 stel dan hieronder een vraag en andere gebruikers zullen je antwoorden
Handleiding Printer Star Micronics

11 Augustus 2025
17 Juni 2025
5 Augustus 2024
5 Augustus 2024
7 Juli 2023
19 Juni 2023
16 Juni 2023
15 Juni 2023
15 Juni 2023
12 Juni 2023
Handleiding Printer
Nieuwste handleidingen voor Printer
31 Mei 2026
27 Mei 2026
27 Mei 2026
20 Mei 2026
13 Mei 2026
12 Mei 2026
12 Mei 2026
7 Mei 2026
6 Mei 2026
5 Mei 2026