Star Micronics mC-Label2 Handleiding
Star Micronics Printer mC-Label2
Bekijk gratis de handleiding van Star Micronics mC-Label2 (2 pagina’s), behorend tot de categorie Printer. Deze gids werd als nuttig beoordeeld door 23 mensen en kreeg gemiddeld 4.6 sterren uit 7 reviews. Heb je een vraag over Star Micronics mC-Label2 of wil je andere gebruikers van dit product iets vragen? Stel een vraag
Pagina 1/2
Communication
/Charging
Supported
OS
You will need:
Wired LAN
No restrictionsLAN cable
USB-C
®
iOS/Android
USB cable provided
with the tablet
PC
USB cable (A-C) in-
cluded with the printer
Communication
/Charging
Communication
When using a USB cable that is available commercially or that comes
with a smartphone or tablet, perform thorough operation verication.
Linerless
label
Die cut
label
Continuous
label
Receipt
paper
MCL21CI
✓
Defalt Setting
✓✓✓
MCL21CI LBL
×
✓
Defalt Setting
×
✓
Communication
1
1
2
3
2
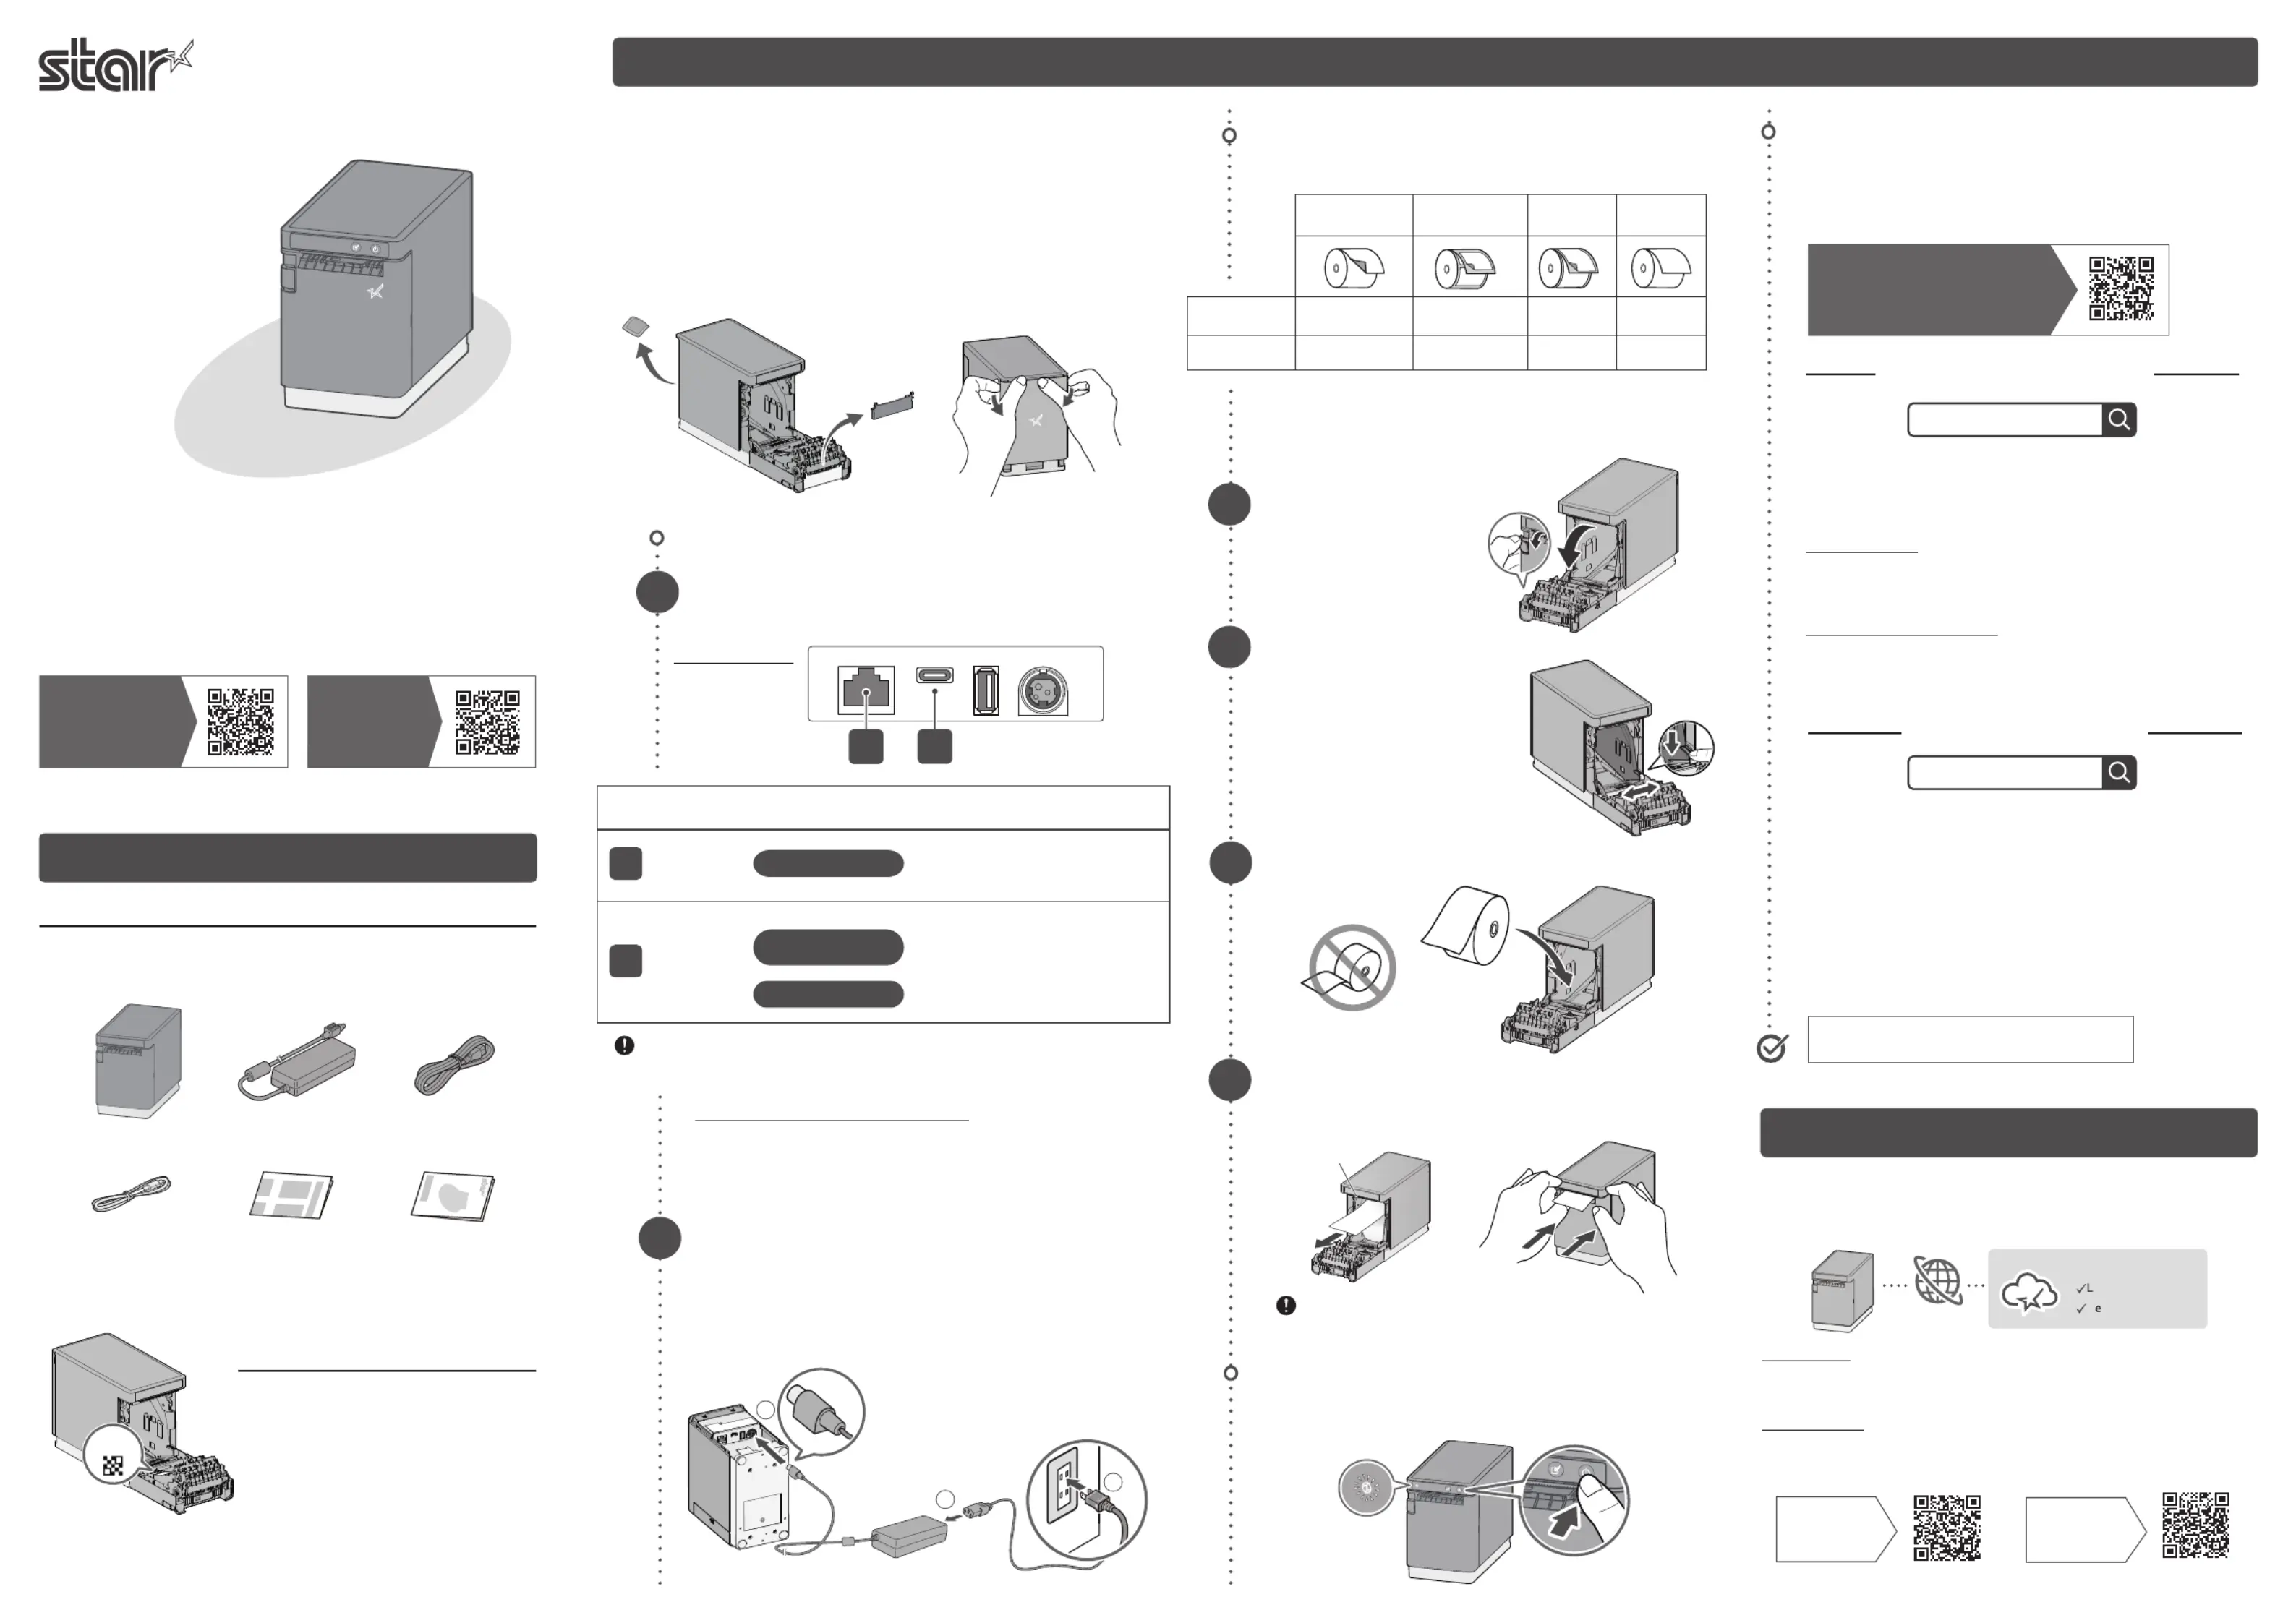
TurningOnthePower
3
1
2
21
4
Back of the printer
80879250
FAQ
Turn on the power and confirm that the Power LED
(blue) illuminates.
Pull the end of the paper roll out straight and close
the printer cover.
Insert a paper roll as shown in the illustration.
InstallingaPaperRoll
Installation
This sheetSafety Guide
Power cable*
mC-Label2
Check the Supplied Accessories
If any of the contents are missing or damaged, please contact
the dealer that sold you the printer.
Getting Started
Setup
This document explains the setup procedure for mC-Label2.
For further instructions and safety precautions, please refer to the
mC-Label2 online manual. Please read the instructions before
using the printer.
Easy Setup Guide
mC-Label2
How to Refer to FAQ
You can also see FAQ in the mC-La-
bel2 Online Manual from the QR code
on the inside of the printer.
USB cable (A-C)
2
1
・The rated nameplate label is attached to the bottom of the product.
* Accessories vary depending on the region where the printer was purchased.
Connect the tablet or PC to communicate with the
printer according to your environment.
AC adapter
BeforeUse
Please remove the protection parts inside the printer and the
silica gel inside the rear cover on the back of the printer. (Model
name: MCL21CI)
Insert your ngernails into the clearances on the left and right
sides of the rear cover, and pull out both sides one by one.
Be sure to mount the rear cover before using the printer.
Securely plug the provided power cable into the AC
adapter ①.
Plug the AC adapter in the correct vertical orientation
into the power connector (24 VDC) of the printer
②
.
Insert the power cable plug into the electrical outlet
③
.
Pull the cover opening lever
forward to open the printer
cover.
Types of paper roll that can be used and default settings
Adjust the paper guide.
While pulling down the paper
guide lever, slide the guide to
the left and right to adjust it to
the position of the paper width
to be used by referring to the
scale.
For a linerless label, be careful that the adhesive side
does not stick to the printer.
If paper other than the default is used, configure the media (paper
type) setting. The media setting can be changed using the congura-
tion app mentioned in Step 4 after connecting the printer.
Preparing/SettingUptheCongurationApp
4
When Using iOS/Android
When Using Windows
Use the conguration app to set up the printer from a
tablet or PC. Scan the QR code below or search the app
to access the download site.
Star Quick Setup Utility is an app that runs on iOS/
Android devices. It offers useful functions for check-
ing printer operations and conguring settings.
Initial settings
The printer settings appropriate for the operation situa-
tion are provided, such as the media (paper type) setting.
One Touch Label setting
You can easily print the stored original image on labels by sim-
ply pressing the Multi-function button on the printer.
Star Windows Software is software that runs on Windows
PCs, allowing users to check printer operations and con-
gure settings. It also contains the Windows printer driv-
er required for printing from Windows applications.
1) Download [ Star Windows Software ].
2) Select [Extract All...] to extract the downloaded software and exe-
cute "Setup.exe".
3) Follow the wizard instructions and complete software installation.
When conguring the network settings
Once a static IP address is assigned, the IP address will not
be changed due to the DHCP server, so the specied connec-
tion destination device can be used continuously once set.
Driver download site for macOS/Linux
https://www.star-m.jp/supportsite-wsw.html
Setting app
Download site
1
2
3
Tear bar
Use the tear bar to cut the paper manually.
Star Windows Software
Star Quick Setup Utility
mC-Label2
Online Manual
Check Video
of
Easy Setup
If you connect mC-Label2 to the internet and register it with Star
Micronics Cloud Services, helpful cloud services for operating your
store are available for free.
Sign Up for Star Micronics Cloud Services
Label Builder
Device Monitor
Star Micronics Cloud
Internet
Label Builder
It allows anyone to create label data intuitively.
The created data can be directly printed or registered to One Touch Label.
Device Monitor
You can check the status of the printer and set email notications for parts
cleaning and replacement.
Scan to
Learn More
Scan to
Register
Service site
Registration site
Copyright 2025 Star Micronics Co., Ltd.
For the owners of other companies' trademarks mentioned in this document, see
Trademarks on our website (https://www.star-m.jp/eng/trademarks.html).
Product specificaties
| Merk: | Star Micronics |
| Categorie: | Printer |
| Model: | mC-Label2 |
Heb je hulp nodig?
Als je hulp nodig hebt met Star Micronics mC-Label2 stel dan hieronder een vraag en andere gebruikers zullen je antwoorden
Handleiding Printer Star Micronics

11 Augustus 2025
17 Juni 2025
5 Augustus 2024
5 Augustus 2024
7 Juli 2023
19 Juni 2023
16 Juni 2023
15 Juni 2023
15 Juni 2023
12 Juni 2023
Handleiding Printer
Nieuwste handleidingen voor Printer
2 Mei 2026
2 Mei 2026
1 Mei 2026
1 Mei 2026
1 Mei 2026
1 Mei 2026
1 Mei 2026
30 April 2026
29 April 2026