Speco Technologies HTINT702TA Handleiding
Speco Technologies
Videocamera
HTINT702TA
Bekijk gratis de handleiding van Speco Technologies HTINT702TA (2 pagina’s), behorend tot de categorie Videocamera. Deze gids werd als nuttig beoordeeld door 49 mensen en kreeg gemiddeld 4.9 sterren uit 25 reviews. Heb je een vraag over Speco Technologies HTINT702TA of wil je andere gebruikers van dit product iets vragen? Stel een vraag
Pagina 1/2

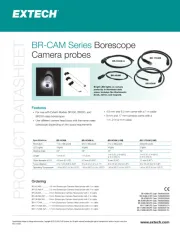
HD-TVI 2MP Intensier® Bullet Camera
QUICK INSTALLATION GUIDE
Special features
Sony 1/2.9 inch 2.1MP Exmor CMOS Sensor
5 ~ 50mm Motorized Zoom & Focus Control
Supports image resolution up to 1920 x 1080P 30fps @
Wide Dynamic Range (15fps)
Full OSD operation through on-board control and UTC
2D & 3D noise reduction
SENS- (Digital Slow Shutter) UP
Privacy masking (16zone)
Dynamic Motion Detection (4zone)
Defog
Surge Protect (DC 2KV / Video 3 KV)
DEAR CUSTOMERS!
By selecting this product, you have decided to use a professional device that
guarantees highest quality and reliability. We would like to thank you very much for
your condence and kindly ask you to read the following instructions carefully before
installation and operation in order to take full advantage of all quality features
regarding this product.
INFORMATION
This equipment has been tested and found to comply with limits for a Class A digital
device, pursuant to part 15 of the FCC Rules. These limits are designed to provide
reasonable protection against harmful interference when the equipment is operated
in a commercial environment. This equipment generates, uses, and can radiate radio
frequency energy and, if not installed and used in accordance with the instruction
manual, may cause harmful interference to radio communications.
Operation of this equipment in a residential area is likely to cause harmful interference
in which case the user will be required to correct the interference at his own expense.
WARNING
Changes or modications not expressly approved by the manufacturer could void
the user’s authority to operate the equipment.
CAUTION –To prevent electric shock and risk of the re hazards
Do NOT use power source other than that specied.
Do NOT expose this appliance to rain or moisture.
1. Precautions
Please read the manual carefully before the installation in order to make use the
camera to be set up correctly and to have the best picture quality.
Please keep the manual in good condition for your future reference and service
application.
Installation and services should only be carried out by an authorized personnel
according to local safety regulations.
If any liquid or solid matter gets into the housing, immediately disconnect the camera
from power supply and have it checked by your authorized dealer before reusing.
Avoid installing the camera at extremely hot or cold places.
If you are not a certied person, never try to dismantle the camera.
To avoid electric shock, never remove the screws or covers. There are no parts inside
that need maintenance by the user. All maintenance should be carried out by qualied
personnel.
Avoid installing the camera at a place of high humidity.
Avoid installing the camera at the place exposed to gas or oil.
Keep the top glass of the lens always clean in order to obtain the best picture quality
all the time. Be careful not to be stained by ngerprint.
Don't face the camera directly toward sunlight or sunlight reecting area.
CMOS may go defective at this condition.
Please give a special attention to keep the unit from dangerous drop or external shock
during the process of transportation or handling.
Never try to touch the camera in wet hand. It may cause an electric shock.
Do not expose the camera to radioactivity. It causes a serious damage on the CMOS.
2. Limitation of liability
This publication is provided “AS IS” without warranty of any kind, either express or
implied, including but not limited to, the implied warranties of merchantability, tness for
any particular purpose, or non-infringement of the third party's right.
This publication could include technical inaccuracies or typographical errors.
Changes are added to the information herein, at any time, for the improvements of this
publication and / or the corresponding product(s).
3. Disclaimer of warranty
In no event shall seller be liable to any party or any person, except for replacement or
reasonable maintenance of the product, for the cases, including but not limited to below :
(1) Any damage and loss, including without limitation, direct or indirect, special,
consequential or exemplary, arising out of or relating to the product.
(2) Personal injury or any damage caused by inappropriate use or negligent operation of
the user.
(3) Unauthorized disassemble, repair or modication of the product by the user.
(4) Inconvenience or any loss arising when images are not displayed, due to any reason
or cause including any failure or problem of the product.
(5) Any problem, consequential inconvenience, or loss or damage, arising out of the
system combined by the devices of third party.
(6) Any claim or action for damages, brought by any person or organization being
photogenic subject, due to violation of privacy with the result of that surveillance-
camera's picture, including saved data, for some reason, becomes public or is used
for the purpose other than surveillance.
4. Package
4. Package
- Junction Box
5. Installation
5-1. How to install on the Wall
Wall_Junction Box
Wall
① Drill four screw holes on the wall plate to x four plastic anchors (supplied) in the holes.
② Fix the plastic anchors in the holes.
③ Position the bracket on the screw points.
④ Fix the bracket by tightening the screws.
5- OSD cap detailed description 2.
Open the Closing Cap and fasten the Closing Cap well.
Tool-free 3-Axis
IP67 Weatherproof
12VDC / 24VAC Dual Input
Built-in Heater
The lighting ash with an arrowhead symbol, within an equilateral triangle
is intended to alert the user to the presence of non-insulated dangerous
voltage within the product’s enclosure that may be of sufficient magnitude to
constitute a risk of electric shock to persons.
The exclamation point within an equilateral triangle is intended to alert the
user to the presence of important operating and maintenance (servicing)
instructions in the literature accompanying the appliance.
This installation should be made by a qualied service person and should conform to
all local codes.
CAUTION
TO REDUCE THE RISK OF ELECTRLC SHOCK,
DO NOT REMOVE THE COVER (OR BACK).
NO USER SERVICEABLE PARTS INSIDE.
REFER SERVICING TO QUALIFIED PERSONNEL.
RISK OF ELECTRLC
SHOCK
DO NOT OPEN
CAUTION
HTINT702TA
Screw PH
M4 x 0.47in (4EA)
Tapping screw
Ø 4 x 1.18in (4EA)
Plastic anchor
(4EA)
Camera x 1
Manual x 1
Tapping screws x 4
Plastic anchor x 4
L-Wrench ( 16in) x 1 0.
L-Wrench ( in) x 1 0.10
Top Rubber x 1
Junction Box x 1
Sponge x1
Screw PH
(M4 x 0.47in) x 4
Tapping Screws
(Ø 4 x 1.18in) x 4
Plastic Anchor x 4
Closing Cap
F/W Writing Pin
OSD Switch
CVBS
L-Wrench (0.10in)
Closing Cap Open

5. Installation
5-3. Tool-free 3-Axis mounting mechanism
① Panning 360˚
Slightly loosen Pan Bracket nut then
adjust pan of the camera and
tighten the Bracket nut.
② Tilt 0˚ ~ 100˚
Slightly loosen Tilt bolt then
adjust tilt of the camera and
tighten the bolt rmly.
③ Rotation 360˚
Slightly loosen Tilt bolt then adjust rotation of the camera
and tighten the bolt rmly.
5-4 Application of TVI output .
6. Function and operation
6-1. On Screen Display (On board control and UTC)
PRESET MENU
INDOOR / OUTDOOR / LOW LIGHT / HALLWAY / LOBBY / ELEVATOR
SETUP
LENS
DC
MANUAL
EXPOSURE
BRIGHTNESS
SHUTTER
INTENSIFY
AGC
RETURN
WHITE BAL
AUTO
AWB
AWC-SET
MANUAL
BACKLIGHT
WDR
BLC
HLC
OFF
DAY&NIGHT
COLOR
B/W
AUTO
DNR
LOW
MIDDLE
HIGH
RETURN
IMAGE
SHARPNESS
ACE
GAMMA
DEFOG
COLOR GAIN
RETURN
MIRROR
FLIP
MOTION
ON
OFF
SYSTEM
ANALOG HD
COLOR BAR
RESET
FRAME RATE
LANGUAGE
RETURN
FREQ
CAM TITLE
IMAGE RANGE
CAM TITLE
COLOR SPACE
HEATER
EXIT
7. Troubleshooting
If there are problems in operating, please refer to the checklist below.
If the problem persists, please contact the agent where this product is purchased.
8 Dimension (mm) .
9. Specications
MODEL
HTINT702TA
Image sensor
Sony 1/2.9 inch 2.1MP Exmor CMOS Sensor
Total Pixel
2001(H) x 1121(V) 2.24M Pixels
Eective Pixels
1985(H) x 1105(V) 2.19M Pixels
Scanning system
Progressive scan
Video output
1920 x 1080 25p / 30p
Output
TVI / CVBS
S/N ratio
More than 52dB (AGC OFF / Weight ON)
Min. Illumination
0.01Lux
Privacy Mask
ON / OFF (16 zone)
Motion Detection
ON / OFF (4 zone)
NEG.Image
ON / OFF
Mirror / Flip
ON / OFF
White Balance
AUTO / AWB / AWB - SET / MANUAL
Shutter Speed
AUTO / MANUAL / FLICKER
Sens- up
AUTO / OFF (Selectable Limit p2-x2 ~ x32)
Backlight
OFF / HLC / BLC / WDR
2D / 3DNR
OFF / LOW / MIDDLE / HIGH
Gain Control
0 ~ 10 (Level adjustable)
Day & Night
AUTO / COLOR / B&W
Sharpness
0 ~ 10 (Level adjustable)
WDR
NORMAL / ROI
Lens Shading
ON / OFF
Defog
ON / OFF
Language
ENG, CHN, CHN(S), JPN, KOR
Lens
5 ~ mm DC Iris Varifocal MFZ Lens 50
Power Source
12VDC / 24VDC
Operating current
24 1200mA 10%(12VDC) / ±mA±10%(24VAC)
Operating
Temperature
-4F ~ 122F
Storage
Temperature
-4F ~ 122F
Operating Humidity
0%RH ~ 90%RH
Measurement ( ) in
Ø 98 x 10.3 Including Bracket .5
Weight(Approx. lbs)
2.31lbs (Camera Only)
Speci cations are subject to change without prior notice for better improvement. fi
Problems
Troubleshooting
Nothing appears on
the screen.
Please check that the power cord and line connection
between the camera and monitor are xed properly.
Please check that you have properly connected Video cable to
the camera Video output jack.
The dim image
on the screen.
Is lens stained with dirt? Clean your lens with soft, clean cloth.
Set the monitor to proper condition.
If the camera is exposed to too strong light, change the
camera position.
Please check if the power supply is within the specication &
cables.(Due to the voltage drop with distance and gauges,
L will light poor) ed
The dark image
on the screen.
Adjust the contrast feature of the monitor.
If there is an intermediate device, set the 75 -Z properly. Ω / Hi
(Please check the impedance)
The camera is not
working properly,
and the body of the
camera is hot.
Please check if the power supply is regulated and is within the
standard requirement of the products.
Color is not correct.
Please check the setting of White Balance setup.
The screen is
ickering.
Please check if the camera is facing directly towards sunlight
or uorescent light.
Coaxial
5C / 3C
TVI DVR
Monitor
Panning
360˚
Tilt
0°100°
Rotation
360°
Rotation
Tilt
Pan
L-Wrench
220104_SPECO_TVI
Federal Communications Commission (FCC) Statements
This device complies with Part 15 of the FCC Rules. Operation is subject to the following two conditions :
(1) This device may not cause harmful interference, and
(2) This device must accept any interference received, including interference that may cause undesired
operation.
FCC Responsible Party :
Speco Technologies
200 New Highway
Amityville, NY 11701
www.specotech.com
Product specificaties
| Merk: | Speco Technologies |
| Categorie: | Videocamera |
| Model: | HTINT702TA |
Heb je hulp nodig?
Als je hulp nodig hebt met Speco Technologies HTINT702TA stel dan hieronder een vraag en andere gebruikers zullen je antwoorden
Handleiding Videocamera Speco Technologies

16 Juni 2023

15 Juni 2023

14 Juni 2023

14 Juni 2023

13 Juni 2023

12 Juni 2023

9 Juni 2023

9 Juni 2023

8 Juni 2023

6 Juni 2023
Handleiding Videocamera
- Brinno
- Teslong
- Nikon
- Kogan
- Red Digital Cinema
- Bushnell
- IOPLEE
- DJI
- MD 80
- Toshiba
- Praktica
- Spypoint
- Vitek
- Konica Minolta
- Revier Manager
Nieuwste handleidingen voor Videocamera
26 Augustus 2025
6 Augustus 2025
29 Juli 2025
6 Juli 2025
2 Juli 2025

16 Juni 2025
15 Juni 2025
14 Juni 2025
10 Juni 2025
9 Juni 2025