Sony PS-LX3BT Handleiding
Sony Platenspeler PS-LX3BT
Bekijk gratis de handleiding van Sony PS-LX3BT (2 pagina’s), behorend tot de categorie Platenspeler. Deze gids werd als nuttig beoordeeld door 6 mensen en kreeg gemiddeld 4.1 sterren uit 3 reviews. Heb je een vraag over Sony PS-LX3BT of wil je andere gebruikers van dit product iets vragen? Stel een vraag
Pagina 1/2
YY2097C/YY2098C EN (EA3) 5-069-875-91(1)
Stereo Turntable System
Operating Instructions
In this Operating Instructions, PS-LX5BT is used for illustration purposes unless when otherwise
indicated.
PS-LX5BT and PS-LX3BT have different headshell shapes, but the operating procedure is the same.
© 2025 Sony Corporation
Printed in China
PS-LX5BT/ PS-LX3BT Model: YY2098C/ YY2097C
5-069-875-91(1)
To reduce the risk of fire or electric shock, do not
expose this product to dripping or splashing, and do
not place objects filled with liquids, such as vases, on
the product.
As the main plug of the AC adaptor is used to
disconnect the AC adaptor from the mains, connect
it to an easily accessible AC outlet. Should you notice
an abnormality in it, disconnect it from the AC outlet
immediately.
The nameplate and important information
concerning safety are attached in the following
locations:
• the bottom of the unit
This unit has been tested and found to comply with
the limits set out in the EMC regulation using a
connection cable shorter than 3 m.
To check the firmware version of your
turntable
You can check the firmware version of your turntable
on the computer. When a firmware update is
available, it will be provided on the Sony Support
Page. Download it to perform the update.
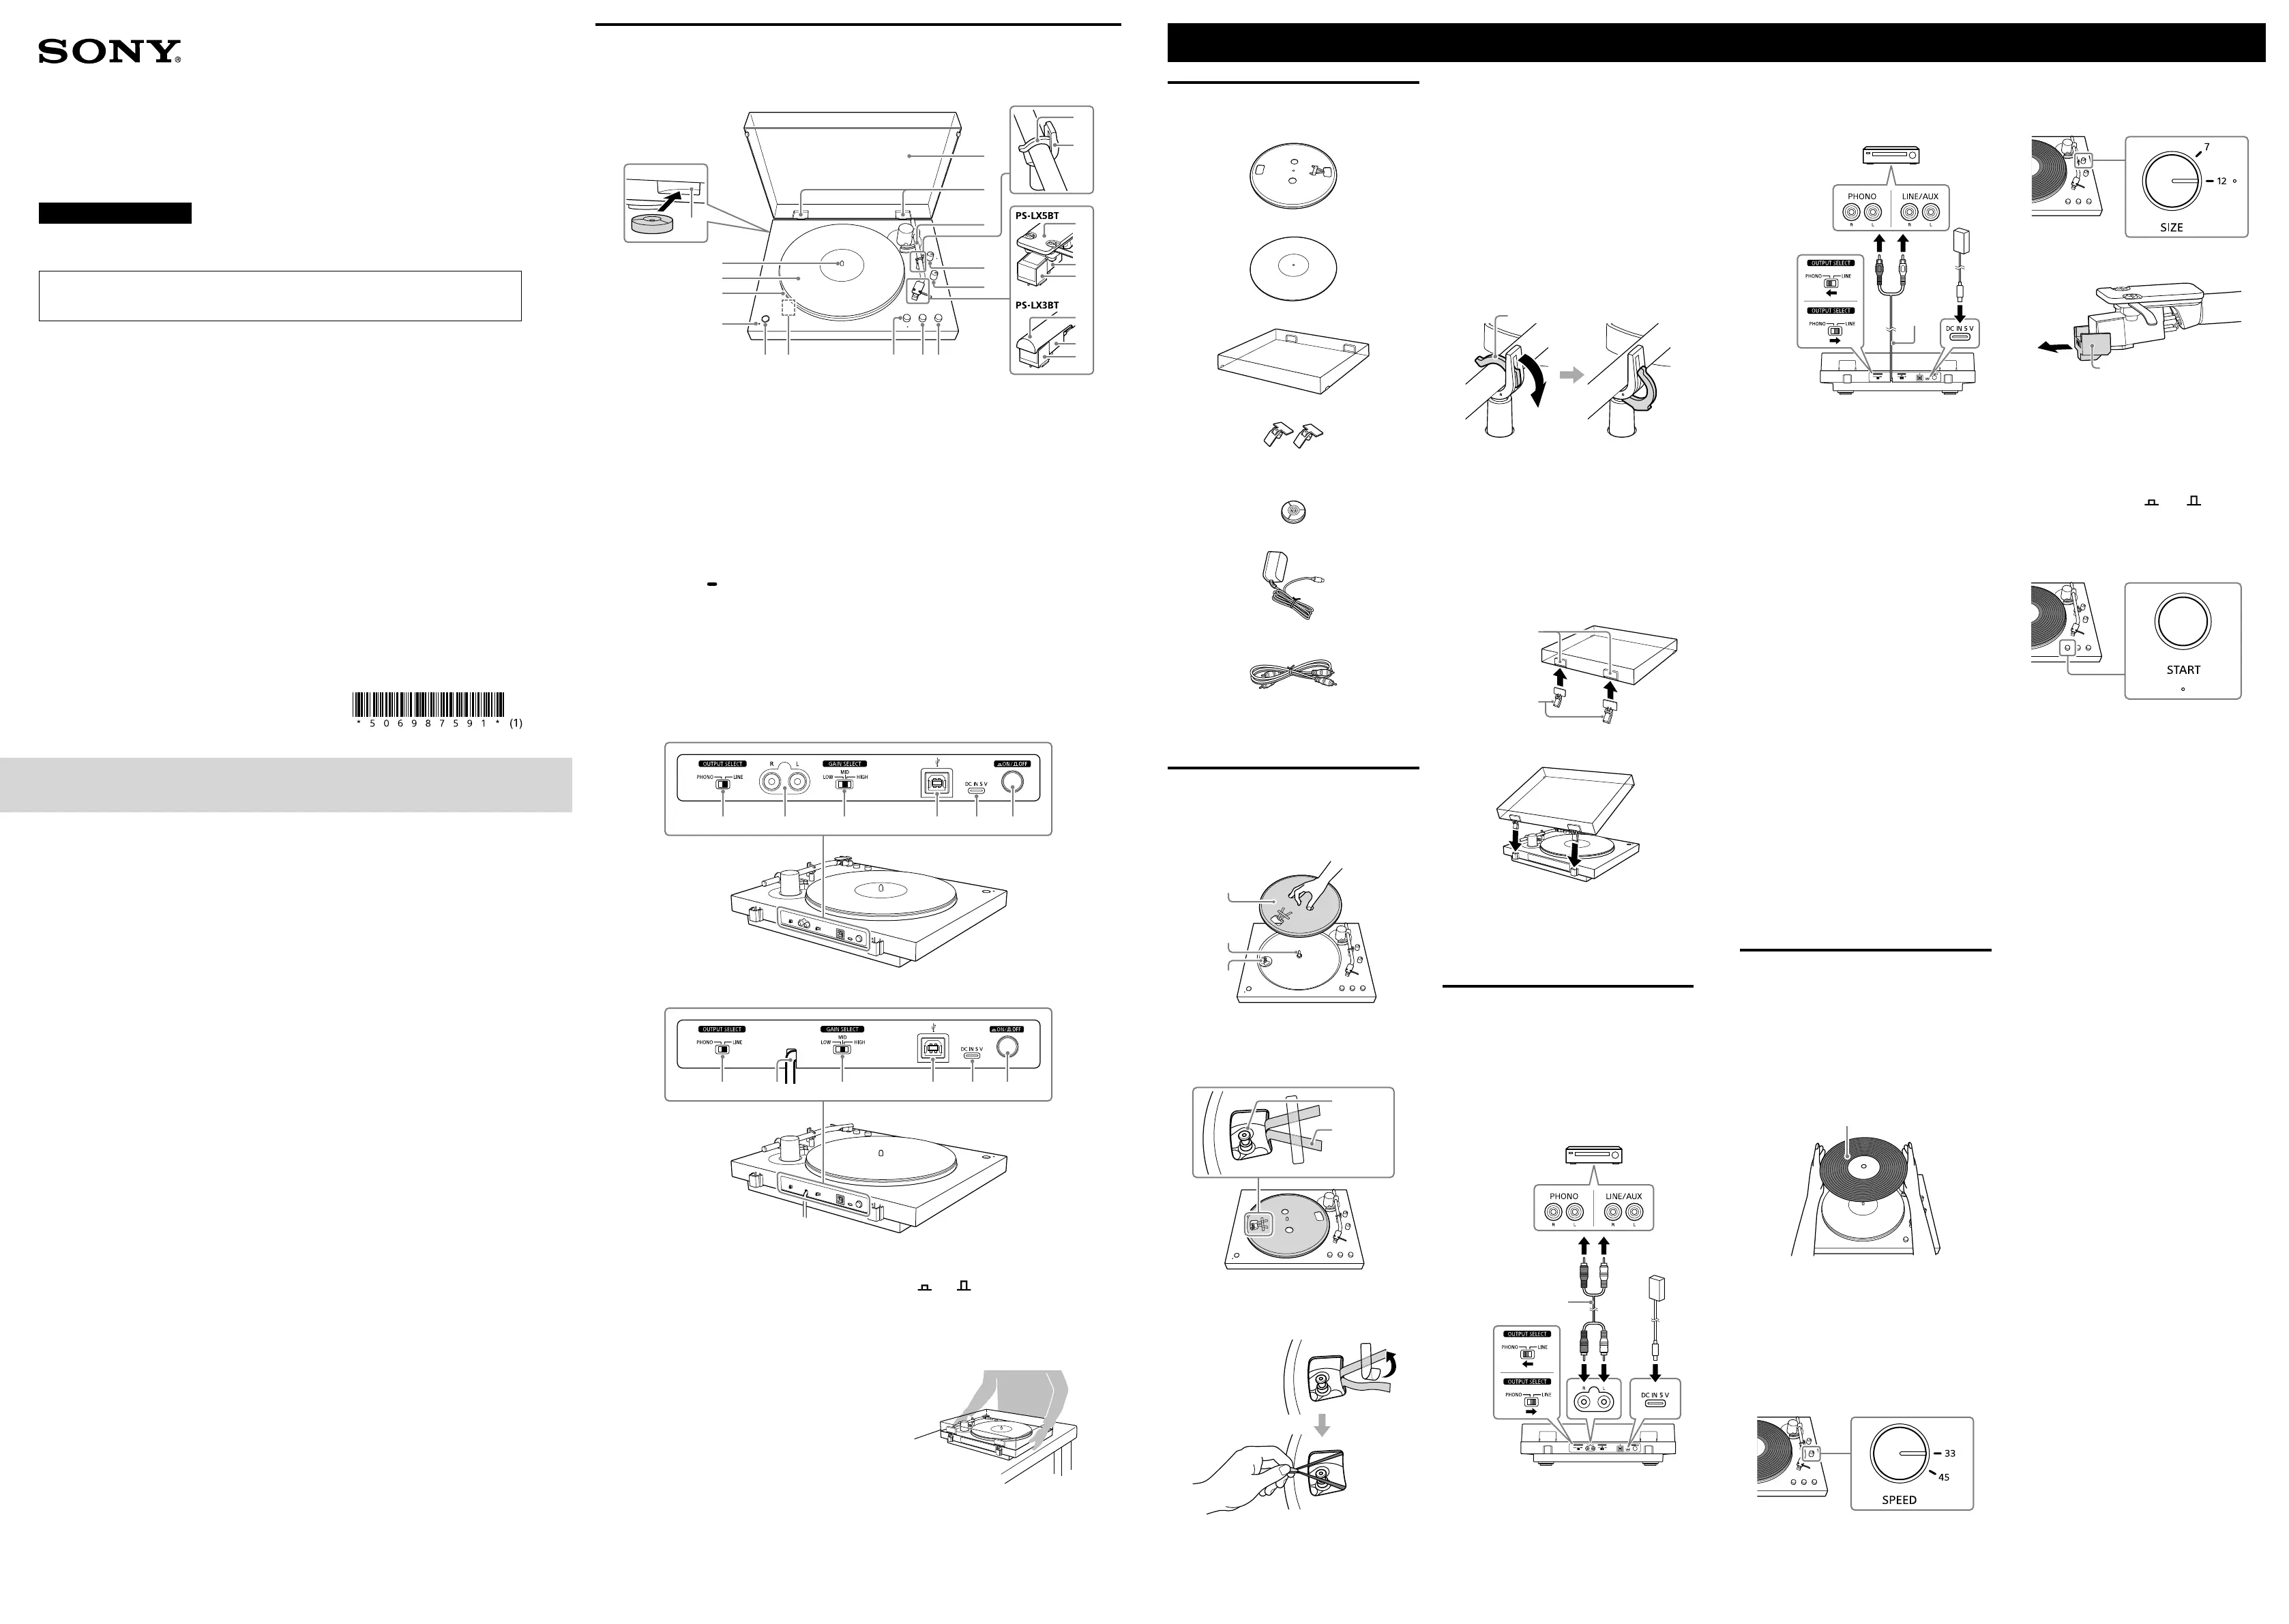
Names of Parts
Top/Side
Storage hole for the 45 rpm adaptor
Spindle
Mat for the platter
Platter
Place the platter on the spindle while you are
assembling your turntable. It has a drive belt
wound around on the back side.
BLUETOOTH indicator
Flashes rapidly in blue: Your turntable is in pairing
mode.
Lights up in blue: Your turntable is connected to a
BLUETOOTH device.
Lights up in orange: Your turntable is waiting to
connect to a paired device.
BLUETOOTH button/
PAIRING button
Micro USB port
The port is located inside your turntable when
the platter is removed. When a firmware update
is available, use a micro USB cable (not supplied)
to connect a computer to the port and update the
firmware.
For the firmware update, also refer to “To check
the firmware version of your turntable.”
Dust cover
Dust cover hinges
Tone arm
Tone arm lock
Lock the tone arm when not playing a vinyl record
to protect it from physical impact.
Tone arm rest
SIZE rotary switch knob*
SPEED rotary switch knob
Headshell
Cartridge body
Stylus
UP/DOWN button
STOP button
START button*
* A tactile dot is provided for each of the number “12” of the
SIZE rotary switch knob and the START button to assist with
identification during operation.
Back (PS-LX5BT)
Back (PS-LX3BT)
OUTPUT SELECT switch
Audio output jacks (PS-LX5BT)
Audio cable (PS-LX3BT)
GAIN SELECT switch
Adjusts the playback volume to compensate for
differences in volume levels recorded on vinyl
records. For vinyl records at low volume, move
this switch to the HIGH position to adjust the
playback volume to an appropriate level. For vinyl
records at high volume, playback with the switch
in the HIGH position may cause distortion in
sound. Change the switch position to match the
vinyl record.
This volume adjustment is effective when the
OUTPUT SELECT switch is in the LINE position,
and applies to the audio output, BLUETOOTH
playback, and computer recording volumes. It is
disabled when the OUTPUT SELECT switch is in
the PHONO position.
USB port (Type B)
DC IN 5 V jack
Power
ON/ OFF button
Note on carrying your turntable
When carrying the turntable, make sure that you
hold it firmly at the bottom and sides as illustrated
below. Inappropriate handling may cause the
turntable to fall, resulting in malfunctions or injury.
Getting Started
Checking the included items
• Stereo Turntable System (1)
• Platter (with drive belt) (1)
• Mat for the platter (1)
• Dust cover (1)
• Dust cover hinge (2)
• 45 rpm adaptor (1)
Place the 45rpm adaptor on the spindle to play a
7-inch (17 cm) vinyl record (EP record).
• AC adaptor (1)
• Audio cable (1)
Included only with PS-LX5BT
• Documents (1 set)
Note
Keep the packaging materials in case you need to
transport your turntable for repair.
Assembling the Turntable
Note
Place your turntable on a stable, level surface.
1 Place the platter on the spindle.
Platter
Spindle
Motor
pulley
2 Turn the platter to the position where you
can see the motor pulley through the
rectangular hole with the red ribbon ends
taped on the platter.
Motor pulley
Red ribbon
3 Peel off the adhesive tape, pull and hold
the red ribbon, and then hook the drive
belt around the motor pulley.
Note
• Be careful not to twist the drive belt.
• If the drive belt comes off the inner ring of the
platter during installation, remove the platter,
turn it upside down, and rewrap the drive belt
around the out circumference of the inner ring.
Then, restart the procedure from the beginning.
• Be sure to remove the red ribbon after you
place the drive belt around the motor pulley.
4 Place the mat for the platter onto the
platter.
If the mat has a recessed area in the center, place
it with that side facing up.
5 Unlock the tone arm by releasing the tone
arm lock.
Tone arm lock
6 Press the UP/DOWN button to lift the tone
arm and rotate the platter 10 times to
initialize the operating mechanism.
Note
Be careful not to bump your hand against the
tone arm while rotating.
After rotating the platter, press the UP/DOWN
button to lower the tone arm.
7 Insert the dust cover hinges to the hinge
pockets on the dust cover.
Hinge pockets
Dust cover hinges
8 Attach the dust cover to your turntable.
Note
Before moving your turntable after assembly, ensure
the following:
• Attach the stylus protective cover.
• Remove the platter.
• Secure the tone arm with the tone arm lock.
Connecting Your Turntable to a
Stereo System
Note
Be sure to turn off the stereo system (amplifier)
before making any connections.
PS-LX5BT
: When connecting to the PHONO input jack
: When connecting to the LINE/AUX input jack or
similar input
Audio cable (supplied)
Stereo system (amplifier)
or other devices
PS-LX3BT
: When connecting to the PHONO input jack
: When connecting to the LINE/AUX input jack or
similar input
Audio
cable
Stereo system (amplifier)
or other devices
1 Use the audio cable to connect your
turntable and the PHONO input jack or
LINE/AUX input jack on the stereo system
(amplifier).
• PS-LX5BT comes with the audio cable. Use it to
connect to the audio output jacks on the back.
For PS-LX3BT, the audio cable comes out from
the back.
• Connect the white plug of the audio cable to
the white (L) jack, and the red plug to the red
(R) jack.
2 Move the OUTPUT SELECT switch on the
back of your turntable to match the input
jacks on the stereo system (amplifier).
•
: When connecting the audio cable to the
PHONO input jacks
Move the switch to the PHONO position. The
audio signal from the MM cartridge is output
through the audio cable, bypassing the built-in
phono equalizer amplifier. The phono equalizer
amplifier of the stereo system (amplifier) is
used instead.
•
: When connecting the audio cable to the
LINE/AUX input jacks or similar input
Move the switch to the LINE position. The
audio signal is output through the audio cable,
processed through the built-in phono equalizer
amplifier.
Note
• If using your turntable with the BLUETOOTH
connection only, ensure that the metal parts at
the ends of the audio cable do not come into
contact with each other or with metal parts of
the rack or other devices. Move the OUTPUT
SELECT switch to the LINE position before use.
• When connecting to the PHONO input jacks of
the stereo system (amplifier), be sure to move
the OUTPUT SELECT switch to the PHONO
position. Moving the switch to the LINE position
may cause damage to the amplifier or speakers.
Playing a Vinyl Record
Note
Turn down the volume of the stereo system
(amplifier) before playing a vinyl record. When the
tone arm drops and the stylus touches the record, a
loud noise (such as a thump) may occur, which could
cause damage to the stereo system (amplifier) or
speakers. Adjust the volume only after the stylus has
lowered onto the record.
1 Place a vinyl record onto the platter.
Vinyl record
To play 7-inch (17 cm) vinyl records (EP
records)
Place the supplied 45 rpm adaptor on the spindle to
play 7-inch (17 cm) vinyl records (EP records).
When you have finished using the 45 rpm adaptor,
keep it in its storage hole.
2 Use the SPEED rotary switch knob to select
the rotation speed appropriate for the vinyl
record.
3 Use the SIZE rotary switch knob to select
the size of the vinyl record.
Set it to “12” for LP records, or “7” for EP records.
4 Remove the stylus protective cover.
Stylus protective cover
Note
Remove the stylus protective cover with care so
as not to damage the stylus.
5 Unlock the tone arm by releasing the tone
arm lock.
6 Connect the AC adaptor to a power outlet
and press the power
ON/ OFF button
on the back of your turntable to turn on
the turntable.
7 Press the START button.
Note
• Close the dust cover slowly to prevent
vibrations that could cause the stylus to skip.
• During playback, keep your hands away from
the tone arm and the spinning vinyl record.
• During playback, do not move the switches on
the back of your turntable.
8 Adjust the volume using the stereo system
(amplifier).
To stop playback
Press the STOP button. The tone arm returns to the
tone arm rest. The platter stops rotating.
To pause playback
Press the UP/DOWN button. The tone arm rises
above the vinyl record. The platter keeps rotating.
When playback is finished
The tone arm returns to the tone arm rest
automatically, then the platter stops rotating.
To play a different part of the vinyl record
1 After performing step 6, press the UP/
DOWN button to lift the tone arm.
Manually move the tone arm to the desired
starting position.
2 Press the UP/DOWN button to lower the
tone arm.
Product specificaties
| Merk: | Sony |
| Categorie: | Platenspeler |
| Model: | PS-LX3BT |
Heb je hulp nodig?
Als je hulp nodig hebt met Sony PS-LX3BT stel dan hieronder een vraag en andere gebruikers zullen je antwoorden
Handleiding Platenspeler Sony

18 Maart 2026
9 Maart 2026
13 April 2024
4 September 2023
9 Juni 2023
15 Mei 2023
20 Februari 2023
Handleiding Platenspeler
Nieuwste handleidingen voor Platenspeler
2 Mei 2026
2 Mei 2026
30 April 2026
22 April 2026
21 April 2026
6 April 2026
3 April 2026
3 April 2026
1 April 2026
16 Maart 2026