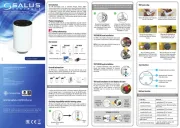
Salus KL04RF Handleiding
Salus
Smarth home
KL04RF
Bekijk gratis de handleiding van Salus KL04RF (2 pagina’s), behorend tot de categorie Smarth home. Deze gids werd als nuttig beoordeeld door 114 mensen en kreeg gemiddeld 5.0 sterren uit 57.5 reviews. Heb je een vraag over Salus KL04RF of wil je andere gebruikers van dit product iets vragen? Stel een vraag
Pagina 1/2

KL04RF
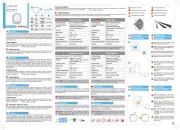
Installation and Wiring Guide
www salus-controls com Technical Helpline +44 (0) 1226 323 961
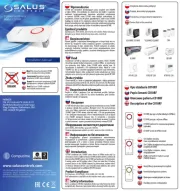
These instructions apply to the SALUS model stated above.
Warning
This product must be fitted by a competent person, and
installation must comply with the guidance, standards and
regulations applicable to the country or state where the
product is installed. Failure to comply with the requirements of
the relevant guidance, standards and regulations could lead to
injury, death or prosecution.
Warning
Always isolate the AC mains supply before installing or working
on any components that require 230 VAC 50Hz supply.
For PDF Installation guide go to www.salus-controls.com
Warning
The earth terminals on the KL04RF are for earth parking only.
These terminals provide no earth protection.
Meets the following EC Directives
• Electro-Magntic Compatibility directive 2004 / 108 / EC
• Low-voltage Directive 2006/95/EC
Maintaining a policy of continued product development SALUS Controls plc reserves the right to change
specication, design and materials of products listed on this installation guide without prior notice.
Issue Date: November 2014 Document Number 00106
GROUP 2
GROUP 2
THERMOSTAT
HTRS-RF(30)
GROUP 2
THERMOSTAT
HTRS-RF(30)
GROUP 2
THERMOSTAT
HTRS-RF(30)
GROUP 2
THERMOSTAT
HTRP-RF (50)
SUPPLIED CABLES
UNDERF OR HEATING MANIFOLDLO
HTRS-RF
(
30
)
H
TRS-RF
(
30
)
HTRS-RF
(
3
0
0
)
HTRP-RF
(
5
0
0)
NL

KL04RF
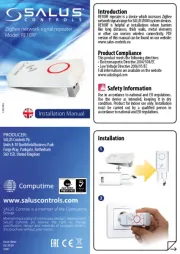
Installation and Wiring Guide
Installing and Connecting the KL04RF
7Attach the white strain-relief
using the two screws to
secure the power wires.
10 Attach the short ribbon cable
between the KL08RF and KL04RF
for side installation otherwise
use the long ribbon cable.
The following shows the side
installation:
2Remove the white terminal
connection board.
9Remove the plastic cover on the
KL08RF.
Attach the back of the KL04RF
to the DIN rail or wall. If you are
tting the KL04RF to the side of
the KL08RF, use the short ribbon cable
otherwise use the long ribbon cable
(see step 10). The following shows the
side-mounted, wall installation:
8Push the actuator wires into
the holes at the bottom of the
KL04NSB. You can connect up to
four actuators in each zone.
11 Push out the cutout on the
bottom of the cover of the
KL04RF.
4Cut the power and device cables
to length.
5Replace the white
connection board.
13 Switch on mains power
supply to the unit. The red
LED comes on.
www salus-controls com Technical Helpline +44 (0) 1226 323 961
3
Use the KL04RF wireless wiring centre extension to simply and safely connect an additional four thermostats and actuators. Use the KL04RF only together with the KL08RF wireless
wiring centre. Install the KL04RF only in dry and closed interior rooms. Relative air humidity in the room may not exceed 95%. Clean the KL04RF only with a dry and soft cloth.
Do not use solvents or aggressive cleaning agents.
LED indications
Name Colour Meaning
Connection
•
KL04RF is connected to the KL08RF
Power
•
KL04RF is supplied with 230V power
Zone 9 actuators
•
Demand from zone 9 thermostat, actuator open
Zone 10 actuators
•
Demand from zone 10 thermostat: actuator open
Zone 11 actuators
•
Demand from zone 11 thermostat: actuator open
Zone 12 actuators
•
Demand from zone 12 thermostat: actuator open
6Push in the power wires. 12 Replace the plastic cover on
the KL08RF and KL04RF.
Device
Power 50mm
110mm
10mm
10mm
Remove the plastic cover. Open
(and close) the four white screws
with a quarter turn only. Note that
screws on opposite sides turn in the
opposite direction.
1
Pairing Thermostats with the KL04RF
This is done on the KL08RF wiring centre because the CO10RF
coordinator is plugged in there.
If you connect the KL04RF to the KL08RF at rst installation, all
thermostats on both wiring centres will be paired.
If you later connect the KL04RF to the KL08RF after
thermostats have already been paired with the KL08RF, you
must pair thermostats with the KL04RF. To do this:
1. Shut down power to the KL08RF.
2. Connect the KL04RF to the KL08RF.
3. Power on the KL08RF and KL04RF.
4. Remove the front cover of the KL08RF and press
and hold the coordinator button for ve seconds.
5. Pair the thermostats in zones 9 to 12.
6. Press and hold the coordinator button again for
ve seconds.
7. Replace the front cover of the KL08RF.
For more details on pairing, see the KL08RF Installation and
Wiring Guide.
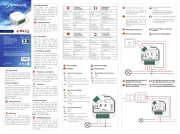
Product specificaties
| Merk: | Salus |
| Categorie: | Smarth home |
| Model: | KL04RF |
Heb je hulp nodig?
Als je hulp nodig hebt met Salus KL04RF stel dan hieronder een vraag en andere gebruikers zullen je antwoorden
Handleiding Smarth home Salus
28 Juli 2025
28 Juli 2025

28 Juli 2025
28 Juli 2025
28 Juli 2025
28 Juli 2025
28 Juli 2025

11 Mei 2023

26 April 2023

19 April 2023
Handleiding Smarth home
- Easy Home
- Perel
- Cisco
- Logicom
- Sanus
- Paulmann
- Silvercrest
- Chuango
- CyberPower
- Totolink
- Blumfeldt
- Inkbird
- TP Link
- Brilliant
- Energenie
Nieuwste handleidingen voor Smarth home

29 Juli 2025

28 Juli 2025
15 Juli 2025
14 Juli 2025

14 Juli 2025

6 Juli 2025

5 Juli 2025
5 Juli 2025
5 Juli 2025

5 Juli 2025