Noctua NH-D9 DX-3647 4U Handleiding
Noctua Hardwarekoeling NH-D9 DX-3647 4U
Bekijk gratis de handleiding van Noctua NH-D9 DX-3647 4U (3 pagina’s), behorend tot de categorie Hardwarekoeling. Deze gids werd als nuttig beoordeeld door 60 mensen en kreeg gemiddeld 4.1 sterren uit 7 reviews. Heb je een vraag over Noctua NH-D9 DX-3647 4U of wil je andere gebruikers van dit product iets vragen? Stel een vraag
Pagina 1/3
Dear customer,
Congratulations on choosing the Noctua NH-D9 DX-3647 4U.
Our DX line of coolers has become a default choice in high perfor-
mance quiet cooling solutions for Intel Xeon CPUs and the latest
DX-3647 revision supports LGA3647 (both Square and Narrow ILM)
based Xeon platforms. Each Noctua product is double checked for
flawless operation by our quality control team before it leaves the
factory and I’m confident that you will be able to sense some of
the research, attention and care we’ve put into making this product.
Enjoy your NH-D9 DX-3647 4U!
Yours sincerely,
Roland Mossig, Noctua CEO
This manual will guide you through the installation process of the
SecuFirm2™ mounting system step by step.
Prior to installing the cooler, please consult the compatibility list
on our website (www.noctua.at/compatibility) and verify that the
cooler is fully compatible with your motherboard. Please also make
sure that your PC case offers sufficient clearance for the cooler and
that there are no compatibility issues with any other components
(e.g. tall RAM modules). Double check that the heatsink and fan
clips do not make contact with the VGA card or other PCIe cards.
Noctua cannot be held responsible for any damage or losses caused
by compatibility issues.
Should you encounter any difficulties, please check the FAQs on
our website (www.noctua.at/faqs) and don’t hesitate to contact
our support team at support@noctua.at.
Multilingual versions of this manual are available on our
website: www.noctua.at/manuals
Noctua NH-D9 DX-3647 4U |
Installation Manual | LGA3647
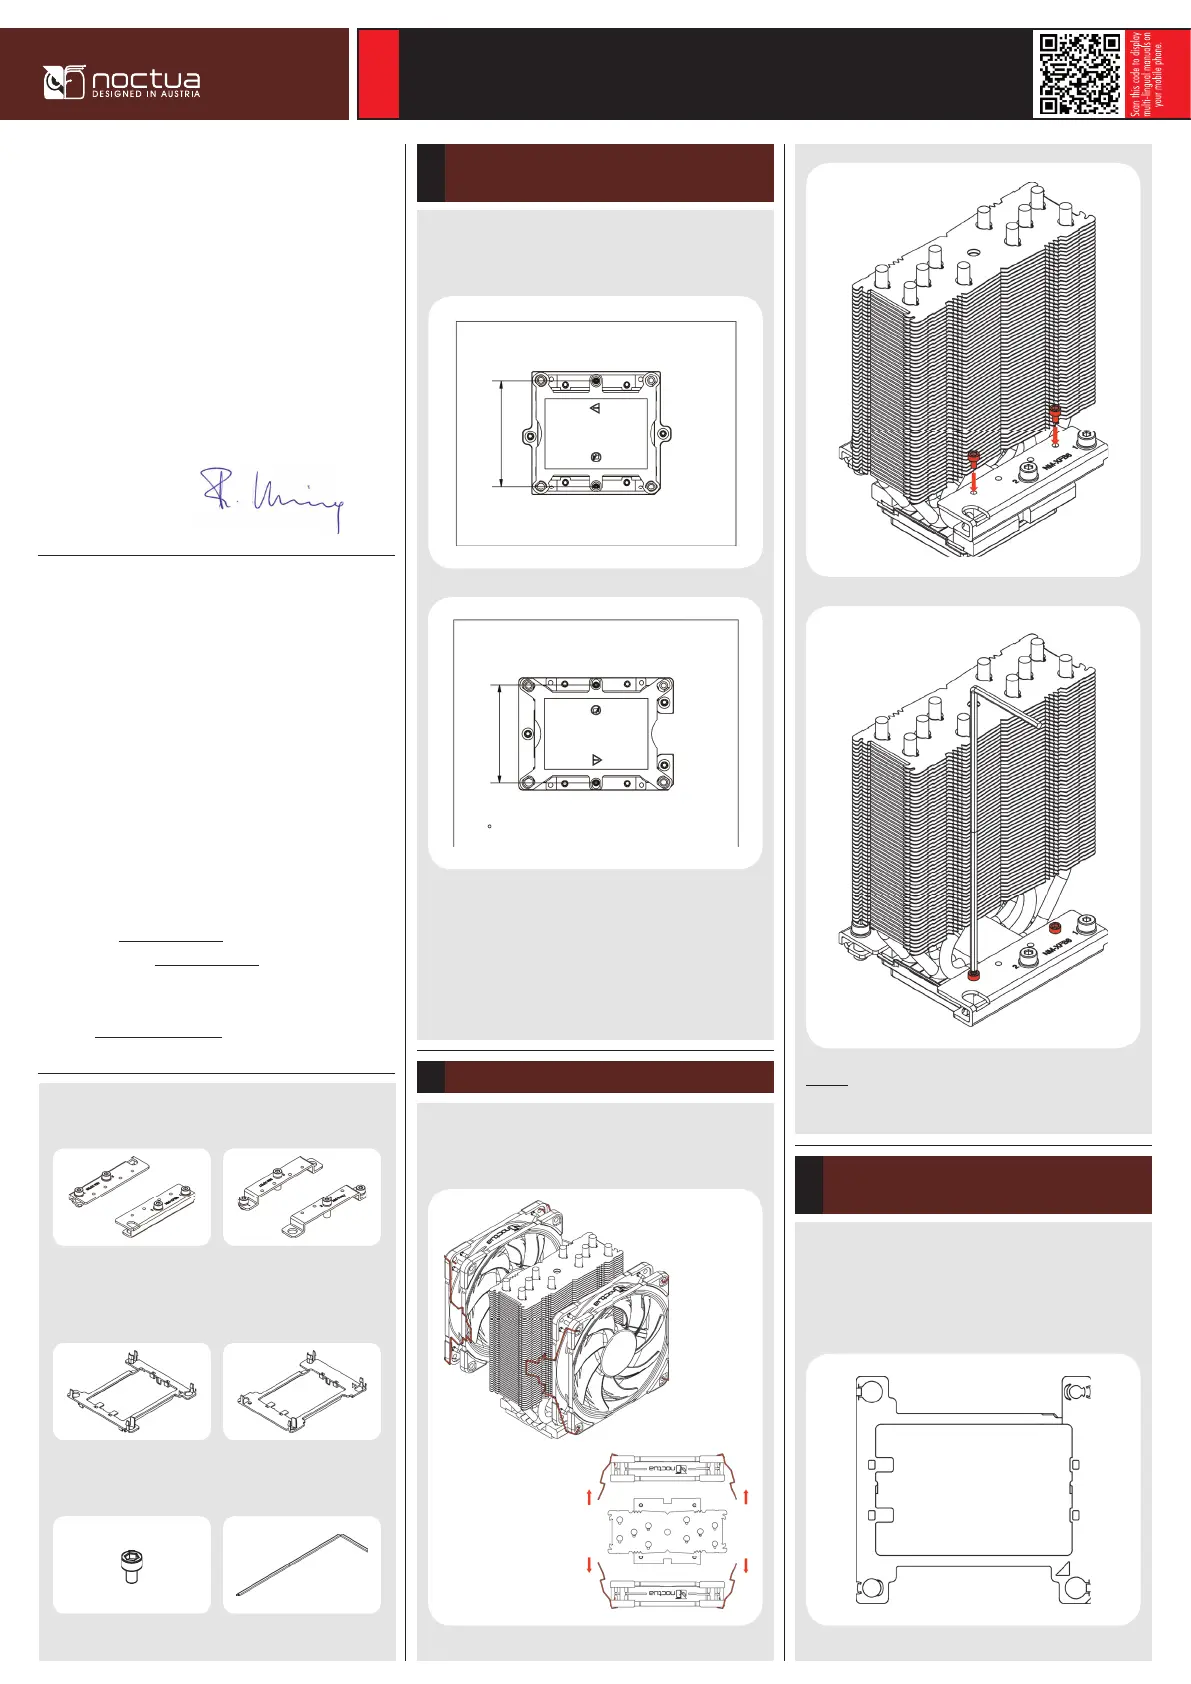
LGA3647
Take the fans off the cooler. Use the included mounting tool and
the short screws to install the appropriate brackets to the cooler.
Required mounting parts:
Determining the socket type (square vs narrow)
and selecting the appropriate brackets
1
Please first check if your motherboard uses square or narrow type
socket(s):
Select the NM-XFB6 brackets for square type sockets and the
NM-XFB7 brackets for narrow type sockets.
This manual shows the installation procedure on square type
sockets, but the procedure is identical on narrow type platforms.
Installing the brackets2
2x NM-XFB6
brackets for square type sockets
2x NM-XFB7
brackets for square type sockets
Plastic processor clip square typePlastic processor clip narrow type
4x NM-SSC2 Short screwsNM-SMT4 mounting tool
75,25 mm
69,00 mm
Caution: Gently tighten the screws until they stop, but don’t use
excessive force (max. torque xx Nm).
The LGA3647 platform uses a plastic clip that fixes the CPU to the
heatsink and ensures that it is properly inserted into the socket.
There are different clips for square and narrow type sockets. Please
first select the clip that matches your socket type.
Putting the CPU into the processor clip and
fixing It to the heatsink
3
Product specificaties
| Merk: | Noctua |
| Categorie: | Hardwarekoeling |
| Model: | NH-D9 DX-3647 4U |
| Kleur van het product: | Beige, Brown |
| Gewicht: | 769 g |
| Breedte: | 95 mm |
| Diepte: | 120 mm |
| Hoogte: | 134 mm |
| Soort: | Luchtkoeler |
| Geluidsniveau (hoge snelheid: | 30.6 dB |
| Type verpakking: | Doos |
| Montage gereedschap: | Ja |
| Meegeleverde kabels: | 4-pin |
| Materiaal: | Aluminium, Copper |
| Luchtstroom: | 96.3 m³/uur |
| Aantal per verpakking: | 1 stuk(s) |
| Aantal ventilatoren: | 2 ventilator(en) |
| Rotatiesnelheid ( max): | 2500 RPM |
| Rotatiesnelheid ( min): | 400 RPM |
| Geschikte locatie: | Processor |
| Basis plaat materiaal: | Koper |
| Ventilator diameter: | 92 mm |
| Ventilator 2 diameter: | 92 mm |
| Fan voltage: | 12 V |
| Supported processor sockets: | LGA3647-0 (Socket P0) |
| Type lager: | Self-Stabilising Oil-pressure Bearing (SSO) |
| Materiaal vinnen: | Aluminium |
| Aantal warmte pijpen: | 4 |
| Maten ventilator (b x d x h): | 92 x 92 x 25 mm |
| Fan connector: | 4-pin |
| Radiator materiaal: | Aluminium |
| Fan dikheid: | 25 mm |
| Radiator breedte: | 95 mm |
| Radiator diepte: | 95 mm |
| Radiator hoogte: | 134 mm |
| Stroomverbruik ventilatie: | 1.68 W |
| Ventilator 2 afmetingen (BxDxH): | 92 x 92 x 25 mm |
| Ventilator 2 rotatiesnelheid (min): | 400 RPM |
| Ventilator 2 rotatiesnelheid (max): | 2500 RPM |
| Ventilator 2 geluidsniveau (hoge snelheid): | 30.6 dB |
Heb je hulp nodig?
Als je hulp nodig hebt met Noctua NH-D9 DX-3647 4U stel dan hieronder een vraag en andere gebruikers zullen je antwoorden
Handleiding Hardwarekoeling Noctua

14 Juli 2025
14 April 2025
14 April 2025
14 April 2025
14 April 2025
9 April 2025
20 November 2024
22 Oktober 2024
22 Oktober 2024
25 September 2024
Handleiding Hardwarekoeling
Nieuwste handleidingen voor Hardwarekoeling
26 Mei 2026
19 Mei 2026
18 Mei 2026
14 Mei 2026
14 Mei 2026
12 Mei 2026
10 Mei 2026
8 Mei 2026