NightStick USB-4510M Handleiding
NightStick Zaklamp USB-4510M
Bekijk gratis de handleiding van NightStick USB-4510M (2 pagina’s), behorend tot de categorie Zaklamp. Deze gids werd als nuttig beoordeeld door 13 mensen en kreeg gemiddeld 4.4 sterren uit 9 reviews. Heb je een vraag over NightStick USB-4510M of wil je andere gebruikers van dit product iets vragen? Stel een vraag
Pagina 1/2
Bayco Products Inc. (BPI)
640 South Sanden Blvd. • Wylie, TX 75098 • USA
1-800-233-2155 • 1-469-326-9400
www.nightstick.com
EU AUTHORIZED REPRESENTATIVE:
Clever Rep AB, Box 1898 11674 Stockholm, Sweden
USB-4510 Series
Instruction Manual
EN
WARNINGS
yNOT FOR USE IN HAZARDOUS ENVIRONMENTS
yDO NOT use in explosive atmospheres, near ammable liquids, or where
explosion proof lamps are required.
yDO NOT use in the proximity of vehicles or equipment when there is a
risk of ammable liquids coming into contact with the ashlight.
yDO NOT expose the battery to water or salt water, or allow the battery
to get wet.
yKeep out of the reach of children.
CHARGING THE LIGHT
CHARGER INPUT: 5 VDC Max
WARNING: TO PREVENT IGNITION OF A HAZARDOUS ATMOSPHERE,
DO NOT ATTEMPT TO CHARGE THIS PRODUCT IN THE HAZARDOUS
ENVIRONMENT. THIS TASK MUST ONLY BE PERFORMED IN AN AREA
KNOWN TO BE NON-HAZARDOUS.
Fully charge the light before the rst use, if the battery is new or has not
been used for several months. For best performance, charge the light when the
headlamp beam starts to dim.
yUse only the supplied Nightstick USB cable.
yLocate the USB port on the side of the headlamp, remove the rubber
USB port cover, and plug the USB cable into the headlamp’s USB port.
yThe total time to full charge varies depending on the remaining charge
in the battery pack.
yWhen the USB cable is connected, the charging indicator lights on the
top will glow red while the light is charging and then turn green when it is
fully charged. When the cable is disconnected, the charging indicator lights
will turn off.
OPERATION
The two switches control all functions on the headlamp. The below
instructions apply while wearing the headlamp.
WHITE FLOODLIGHT SWITCH - RIGHT SIDE
yPress and release to turn the oodlight to low-brightness.
yPress quickly a second time (within 1.5 seconds) to change the oodlight
to high-brightness.
yPress and release from any mode after it has been on for more than 1.5
seconds to turn the oodlight off.
RED/GREEN FLOODLIGHT SWITCH - LEFT SIDE
yPress and release to turn the red oodlight on.
yPress quickly a second time (within 1.5 seconds) to change the oodlight
to green.
yPress and release from any mode after it has been on for more than 1.5
seconds to turn the oodlight off.
WHITE BLINKING LIGHT - RIGHT SIDE
yWorks with light on, off or any mode.
yPress and hold for 3 seconds.
BATTERY SHUT OFF MODE
yPress and hold both switches at the same time for 3 seconds to enable
or disable battery shut off mode.
yAfter three seconds the white oodlight will ash on and off 1 time to
conrm a change in the battery safe mode.
NOTE: The battery safe mode reverts to disabled when battery is fully
discharged.
MOUNTING INSTRUCTIONS
MOUNTING (USB-4510M)
ySqueeze the sides of the spring clip to open.
yFor thin strap material, weave it through the retention slot on the back of
the clip for a more secure hold.
ySlide upward on a tactical vest, backpack, or accessory using a MOLLE
or PALS system and close the clip to secure it in place.
PSA MOUNTING (USB-4510B/F)
yEnsure mounting surface is clean and oil-free. Use included alcohol wipe
to clean the surface.
yDetermine best location that does not interfere with brim.
yRemove adhesive backing.
yFirmly press mount into place and hold for 30-60 seconds.
IMPORTANT: WAIT 24 HOURS FOR ADHESIVE TO REACH MAXIMUM
STRENGTH.
2 YEAR WARRANTY
Bayco Products, Inc. warrants this product to be free from defects in
workmanship and materials to the original purchaser for 2 years from the date
of purchase, and includes the LEDs, housing, lenses, electronics, switches,
rechargeable batteries and chargers. Bulbs (other than LEDs) are covered for 90
days from the date of purchase.
We will repair or replace this product should we determine it to be defective.
This is the only warranty, expressed or implied, including any warranty of
merchantability or tness for a particular purpose.
For a complete copy of the warranty, go to www.baycoproducts.com/bayco-
product-support/warranties. Retain your receipt for proof of purchase.
FR
AVERTISSEMENTS
yNE PAS UTILISER AU-DESSUS D’ENDROITS DANGEREUX.
yNE PAS utiliser ce produit dans une atmosphère explosive, à proximité
de liquides inammables, ou dans des endroits exigeant un éclairage
antidéagrant.
yNE PAS utiliser ce produit à proximité de véhicules ou d’équipement
quand des liquides inammables pourraient entrer en contact avec la
lampe torche.
yNE PAS exposer la batterie à l’eau ou à l’eau salée, et ne pas laisser la
batterie se mouiller.
yNe pas laisser pas à la portée des enfants
CHARGER LA LAMPE
ENTRÉE CHARGEUR: 5 VDC Max
AVERTISSEMENT : POUR ÉVITER L’INFLAMMATION D’ATMOSPHÈRE
DANGEREUSE, NE PAS ESSAYER DE CHARGER CE PRODUIT DANS
UNE ZONE DANGEREUSE. CETTE TÂCHE DOIT ÊTRE EFFECTUÉE
UNIQUEMENT DANS UNE ZONE NON DANGEREUSE.
Charger complètement la lampe avant la première utilisation ou si la pile
est neuve ou n’a pas été utilisée pendant plusieurs mois. Pour de meilleurs
résultats, charger la lampe lorsque le faisceau de lumière commence à faiblir.
yUtiliser uniquement le cable USB Nightstick.
yLocalisez le port USB sur le côté de la lampe frontale, retirez le
couvercle en caoutchouc du port USB et branchez le câble USB dans le
port USB de la lampe frontale.
INS-USB-4510Series-25
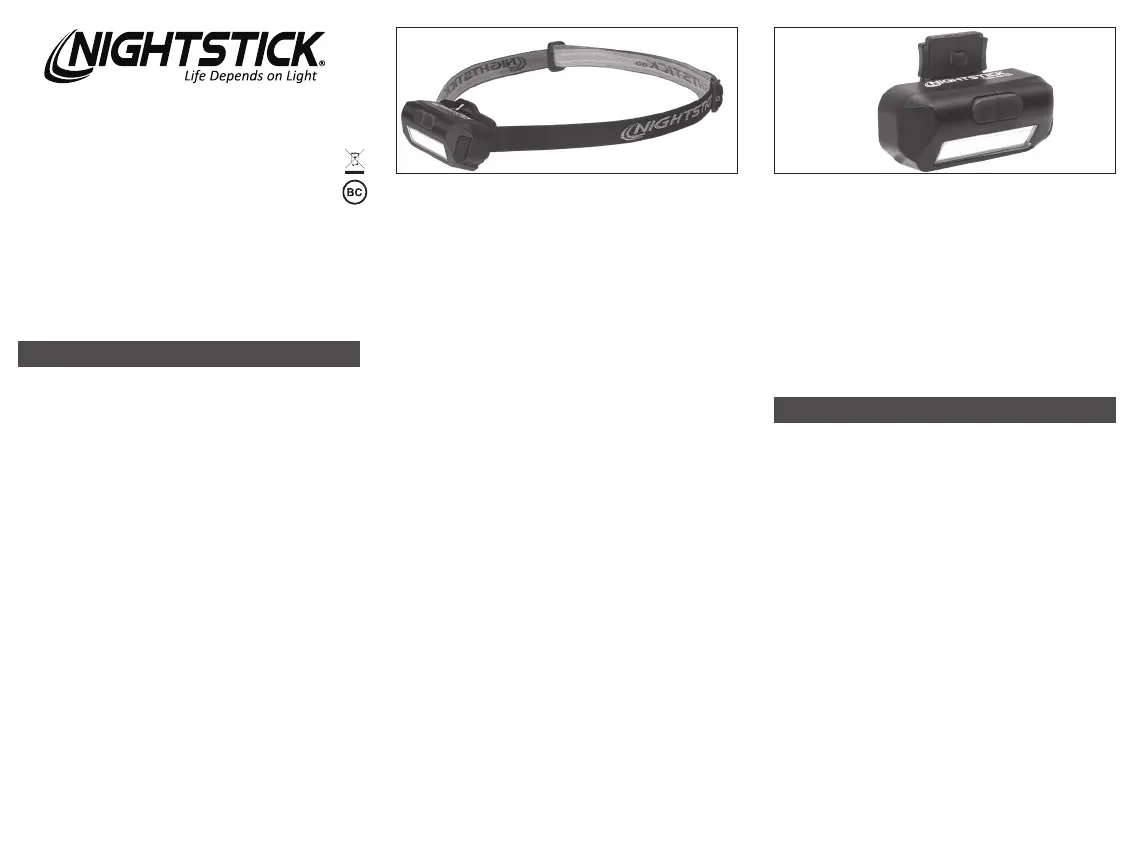
USB-4510M
USB-4510B / USB-4510F
Product specificaties
| Merk: | NightStick |
| Categorie: | Zaklamp |
| Model: | USB-4510M |
Heb je hulp nodig?
Als je hulp nodig hebt met NightStick USB-4510M stel dan hieronder een vraag en andere gebruikers zullen je antwoorden
Handleiding Zaklamp NightStick

14 Juli 2026
21 Maart 2026
6 Januari 2026
5 Januari 2026
21 December 2025
20 December 2025
19 December 2025
19 December 2025
18 December 2025
18 December 2025
Handleiding Zaklamp
Nieuwste handleidingen voor Zaklamp
13 Juli 2026
10 Juli 2026
9 Juli 2026
29 Juni 2026
26 Juni 2026
24 Juni 2026
24 Juni 2026
23 Juni 2026
23 Juni 2026
23 Juni 2026