NightStick FORTEM XPP-5466 Handleiding
NightStick Zaklamp FORTEM XPP-5466
Bekijk gratis de handleiding van NightStick FORTEM XPP-5466 (2 pagina’s), behorend tot de categorie Zaklamp. Deze gids werd als nuttig beoordeeld door 25 mensen en kreeg gemiddeld 5.0 sterren uit 4 reviews. Heb je een vraag over NightStick FORTEM XPP-5466 of wil je andere gebruikers van dit product iets vragen? Stel een vraag
Pagina 1/2
Bayco Products Inc. (BPI)
640 South Sanden Blvd. • Wylie, TX 75098 • USA
1-800-233-2155 • 1-469-326-9400
www.nightstick.com
Instruction Manual
FORTEM
®
XPP-5466
US Patent 9,713,217 and 11,019,868
EN
WARNINGS - INTRINSICALLY SAFE
yUse only the approved non-rechargeable batteries listed below.
yDo not use rechargeable CR123A batteries with this light.
yTo prevent ignition of a hazardous atmosphere, do not open the battery
compartment in the hazardous environment. This task must only be
performed in an area known to be non-hazardous.
y:When exchanging batteries, use only ENERGIZER CR123A BATTERIES.
yTo prevent ignition of a hazardous atmosphere, the CR123A batteries
must only be exchanged in an area known to be non-hazardous.
yTo reduce the risk of explosion, do not mix new non-rechargeable
batteries with used non-rechargeable batteries, or mix non-rechargeable
batteries from different manufacturers.
ySubstitution of components may impair intrinsic safety.
yFor personal safety, always conrm the rating of any known hazardous
or potentially hazardous location where the light is to be used.
STROBE WARNING
Strobing lights may cause dizziness, disorientation, nausea, or, in rare cases,
seizures in individuals with photosensitive epilepsy. Visit epilepsy.com for more
information. Consult a doctor before use if unsure.
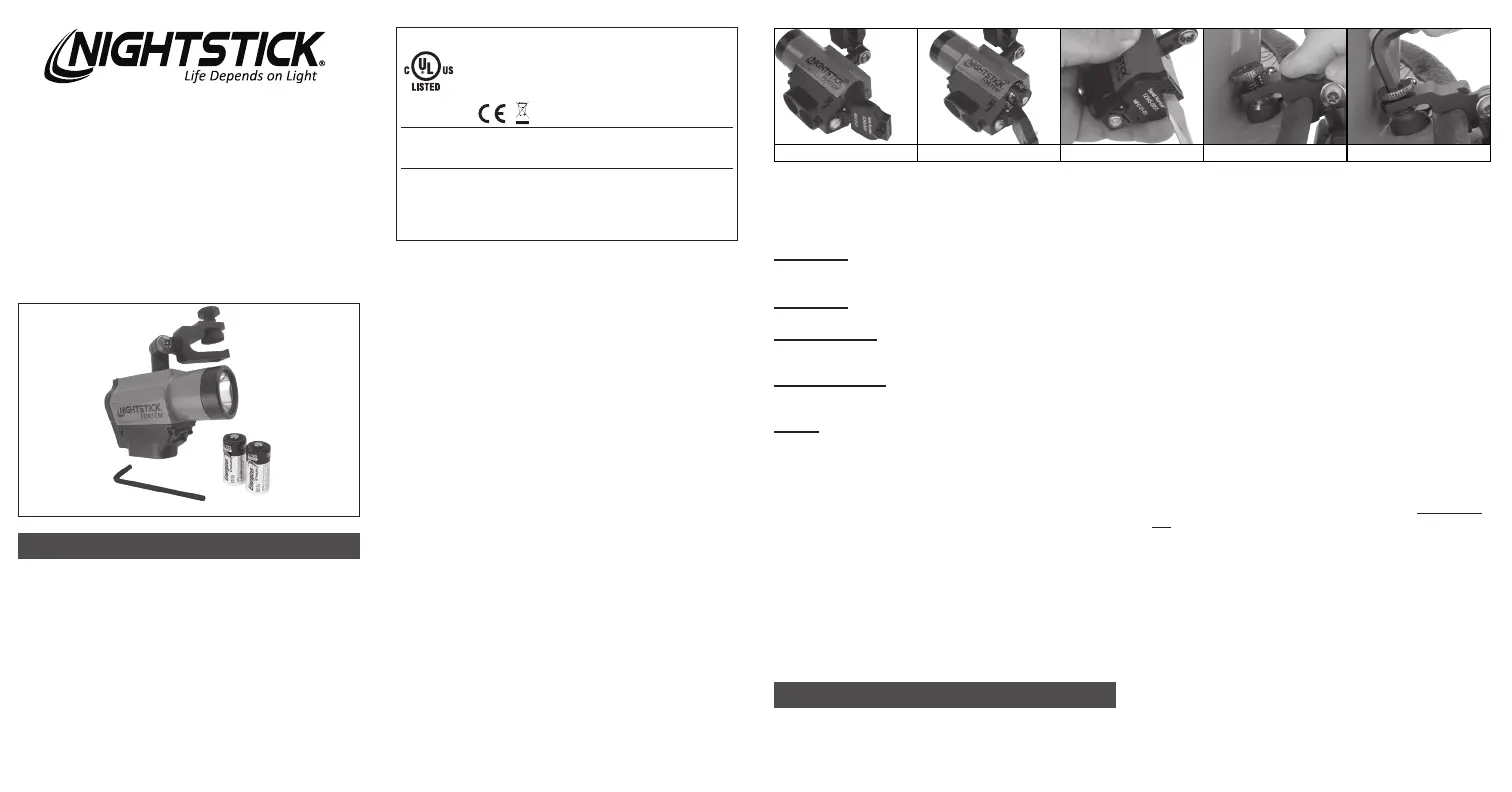
INSTALLING BATTERIES INTO THE FORTEM
yTo install the included CR123A Lithium Batteries in the FORTEM, begin
by unscrewing the screw on the battery compartment door. (Image 1)
yInsert both batteries into the battery compartment paying attention to the
battery orientation marked on the back of the battery compartment door.
(Image 2)
yRe-install the battery compartment screw by pressing the door fully
closed and then tightening the screw until it is hand tight. CAUTION: Do not
cross-tread or strip the screw threads. (Image 3)
yTest the operation of the light (see OPERATION below).
INSTALLING THE FORTEM ON TO THE HELMET
yChoose the side of the helmet you wish to mount the light on.
yRotate the mount to orient the clamp with thumbscrew on top.
yOpen the clamp completely and fully seat over helmet brim, ensuring the
clamp clears any rubber helmet trim. (Image 4)
yTighten the clamp rmly with included Allen wrench. (Image 5)
SETTING THE ANGLE OF THE LIGHT
yTwist the light left or right on the vertical pivot until beam pattern is in an
ideal position.
yThe tension on the mount is meant to be rm to maintain the aim.
yOnce aimed, the mount allows the user to position light above or below
the brim by rotating up or down as needed.
OPERATION
The FORTEM has two switches, the ashlight switch (closest to the front
of the light) and the oodlight switch (closest to the rear of the light) providing
access to all modes.
Flashlight Switch
Constant On – Full press, click, and release to turn on/off.
Strobe - Double click and release
Floodlight Switch
Constant On – Full press, click, and release to turn on/off.
Select Brightness Level
Press and hold and the light will cycle from high to medium to low and back at
a rate of approximately one mode per second. Relase to select desired mode.
Strobe - Flashlight Switch
Double click the ashlight switch to activate strobe. Press and release to
turn off.
Dual-Light
Turn on both the spotlight and the oodlight at the same time. Press either
switch to turn the respective light off.
LIMITED LIFETIME WARRANTY
BPI. warrants this product to be free from defects in workmanship and
materials for the original purchaser’s lifetime. The Limited Lifetime Warranty
includes the LEDs, housing and lenses. Rechargeable batteries, chargers,
switches, electronics and included accessories are warranted for a period
of two years with proof of purchase. Normal wear and failures which are
caused by accidents, misuse, abuse, faulty installation and lightning damage
are excluded.
We will repair or replace this product should we determine it to be defective.
This is the only warranty, expressed or implied, including any warranty of
merchantability or tness for a particular purpose.
For a complete copy of the warranty, go to www.nightstick.com/nightstick-
product-support/warranties. Retain your receipt for proof of purchase.
FR
AVERTISSEMENTS: SÉCURITÉ INTRINSÈQUE
yUtiliser seulement les piles non rechargeables approuvées et énumérées
ci-dessous.
INS-XPP-5466-LG-25_072425
CLASS I DIV 1 GRPS A-D T4
CLASS II & III DIV 1 GRPS E-G T135°C
CLASS I ZONE 0 AEx ia IIC T4 Ga
CLASS I ZONE 0 Ex ia IIC T4
-20ºC ≤ Tamb ≤ +40ºC
3.0V/Cell / Energizer 123
E 467756
INTRINSICALLY SAFE
SECURITE INTRINSEQUE
Conforms to:
ANSI/UL STD 913, ANSI/UL 60079-0
Certified to:
CAN/CSA STD C22.2 No 157
CAN/CSA STD C22.2 No 60079-0
CAN/CSA STD C22.2 No 60079-11
CSA STD C22.2 No 25
Bayco Products, Inc. XPP-5466
WARNINGS:
Do not change batteries in hazardous location.
Use only Energizer 123 Batteries
ID 5012927
Image 1Image 2Image 3Image 4Image 5
yNE PAS essayer d’utiliser des piles rechargeables CR123A avec cette
lampe de poche.
yPour éviter l’inammation d’atmosphère dangereuse, ne pas ouvrir le
compartiment de pile dans un endroit dangereux. Cette tâche doit être
effectuée UNIQUEMENT dans une zone non dangereuse.
yLorsque vous remplacer les piles, utiliser uniquement les PILES
ENERGIZER CR123A.
yPour éviter l’inammation d’atmosphère dangereuse, les piles CR123A
doivent être remplacées dans une zone non dangereuse.
yPour réduire les risques d’explosion, ne pas mélanger les piles neuves
non rechargeables avec des piles non rechargeables utilisées, ou mélanger
les piles non rechargeables de différents fabricants.
yAvertissement : la substitution de composants peut compromettre la
sécurité intrinsèque.
yPour votre propre sécurité, toujours conrmer la charge d’une zone
dangereuse ou potentiellement dangereuse quand la lampe de poche
est utilisée.
AVERTISSEMENT STROBOSCOPIQUE
Les lampe stroboscopiques peuvent provoquer des étourdissements,
une désorientation, des nausées ou, dans de rares cas, des crises chez
les personnes atteintes d’épilepsie photosensible. Visitez www.epilepsy.
com pour plus d’informations. En cas de doute, consultez un médecin
avant utilisation.
INSTALLATION DES PILES DANS LA LAMPE FORTEM
yPour installer les piles au lithium CR123A dans la lampe FORTEM,
commencer par dévisser la vis de la porte du compartiment à piles. (Image 1)
yInsérer les deux piles dans le compartiment à piles en vous assurant de
porter une attention particulière à l’orientation des bornes inscrites au verso
de la porte du compartiment à piles. (Image 2)
yInstaller de nouveau la vis du compartiment à piles en appuyant sur la
porte complètement fermée puis en serrant la vis jusqu’à ce qu’elle soit
serrée à la main. AVERTISSEMENT : Ne pas fausser le letage ou briser
les lets de la vis. (Image 3)
yTester par la suite le fonctionnement de votre lampe de poche (Voir
FONCTIONNEMENT ci-dessous)
Product specificaties
| Merk: | NightStick |
| Categorie: | Zaklamp |
| Model: | FORTEM XPP-5466 |
Heb je hulp nodig?
Als je hulp nodig hebt met NightStick FORTEM XPP-5466 stel dan hieronder een vraag en andere gebruikers zullen je antwoorden
Handleiding Zaklamp NightStick

14 Juli 2026
21 Maart 2026
6 Januari 2026
5 Januari 2026
21 December 2025
20 December 2025
19 December 2025
19 December 2025
18 December 2025
18 December 2025
Handleiding Zaklamp
Nieuwste handleidingen voor Zaklamp
13 Juli 2026
10 Juli 2026
9 Juli 2026
29 Juni 2026
26 Juni 2026
24 Juni 2026
24 Juni 2026
23 Juni 2026
23 Juni 2026
23 Juni 2026