Marvel Avengers End Game M004162 Handleiding
Bekijk gratis de handleiding van Marvel Avengers End Game M004162 (1 pagina’s), behorend tot de categorie Fiets. Deze gids werd als nuttig beoordeeld door 48 mensen en kreeg gemiddeld 4.3 sterren uit 6 reviews. Heb je een vraag over Marvel Avengers End Game M004162 of wil je andere gebruikers van dit product iets vragen? Stel een vraag
Pagina 1/1
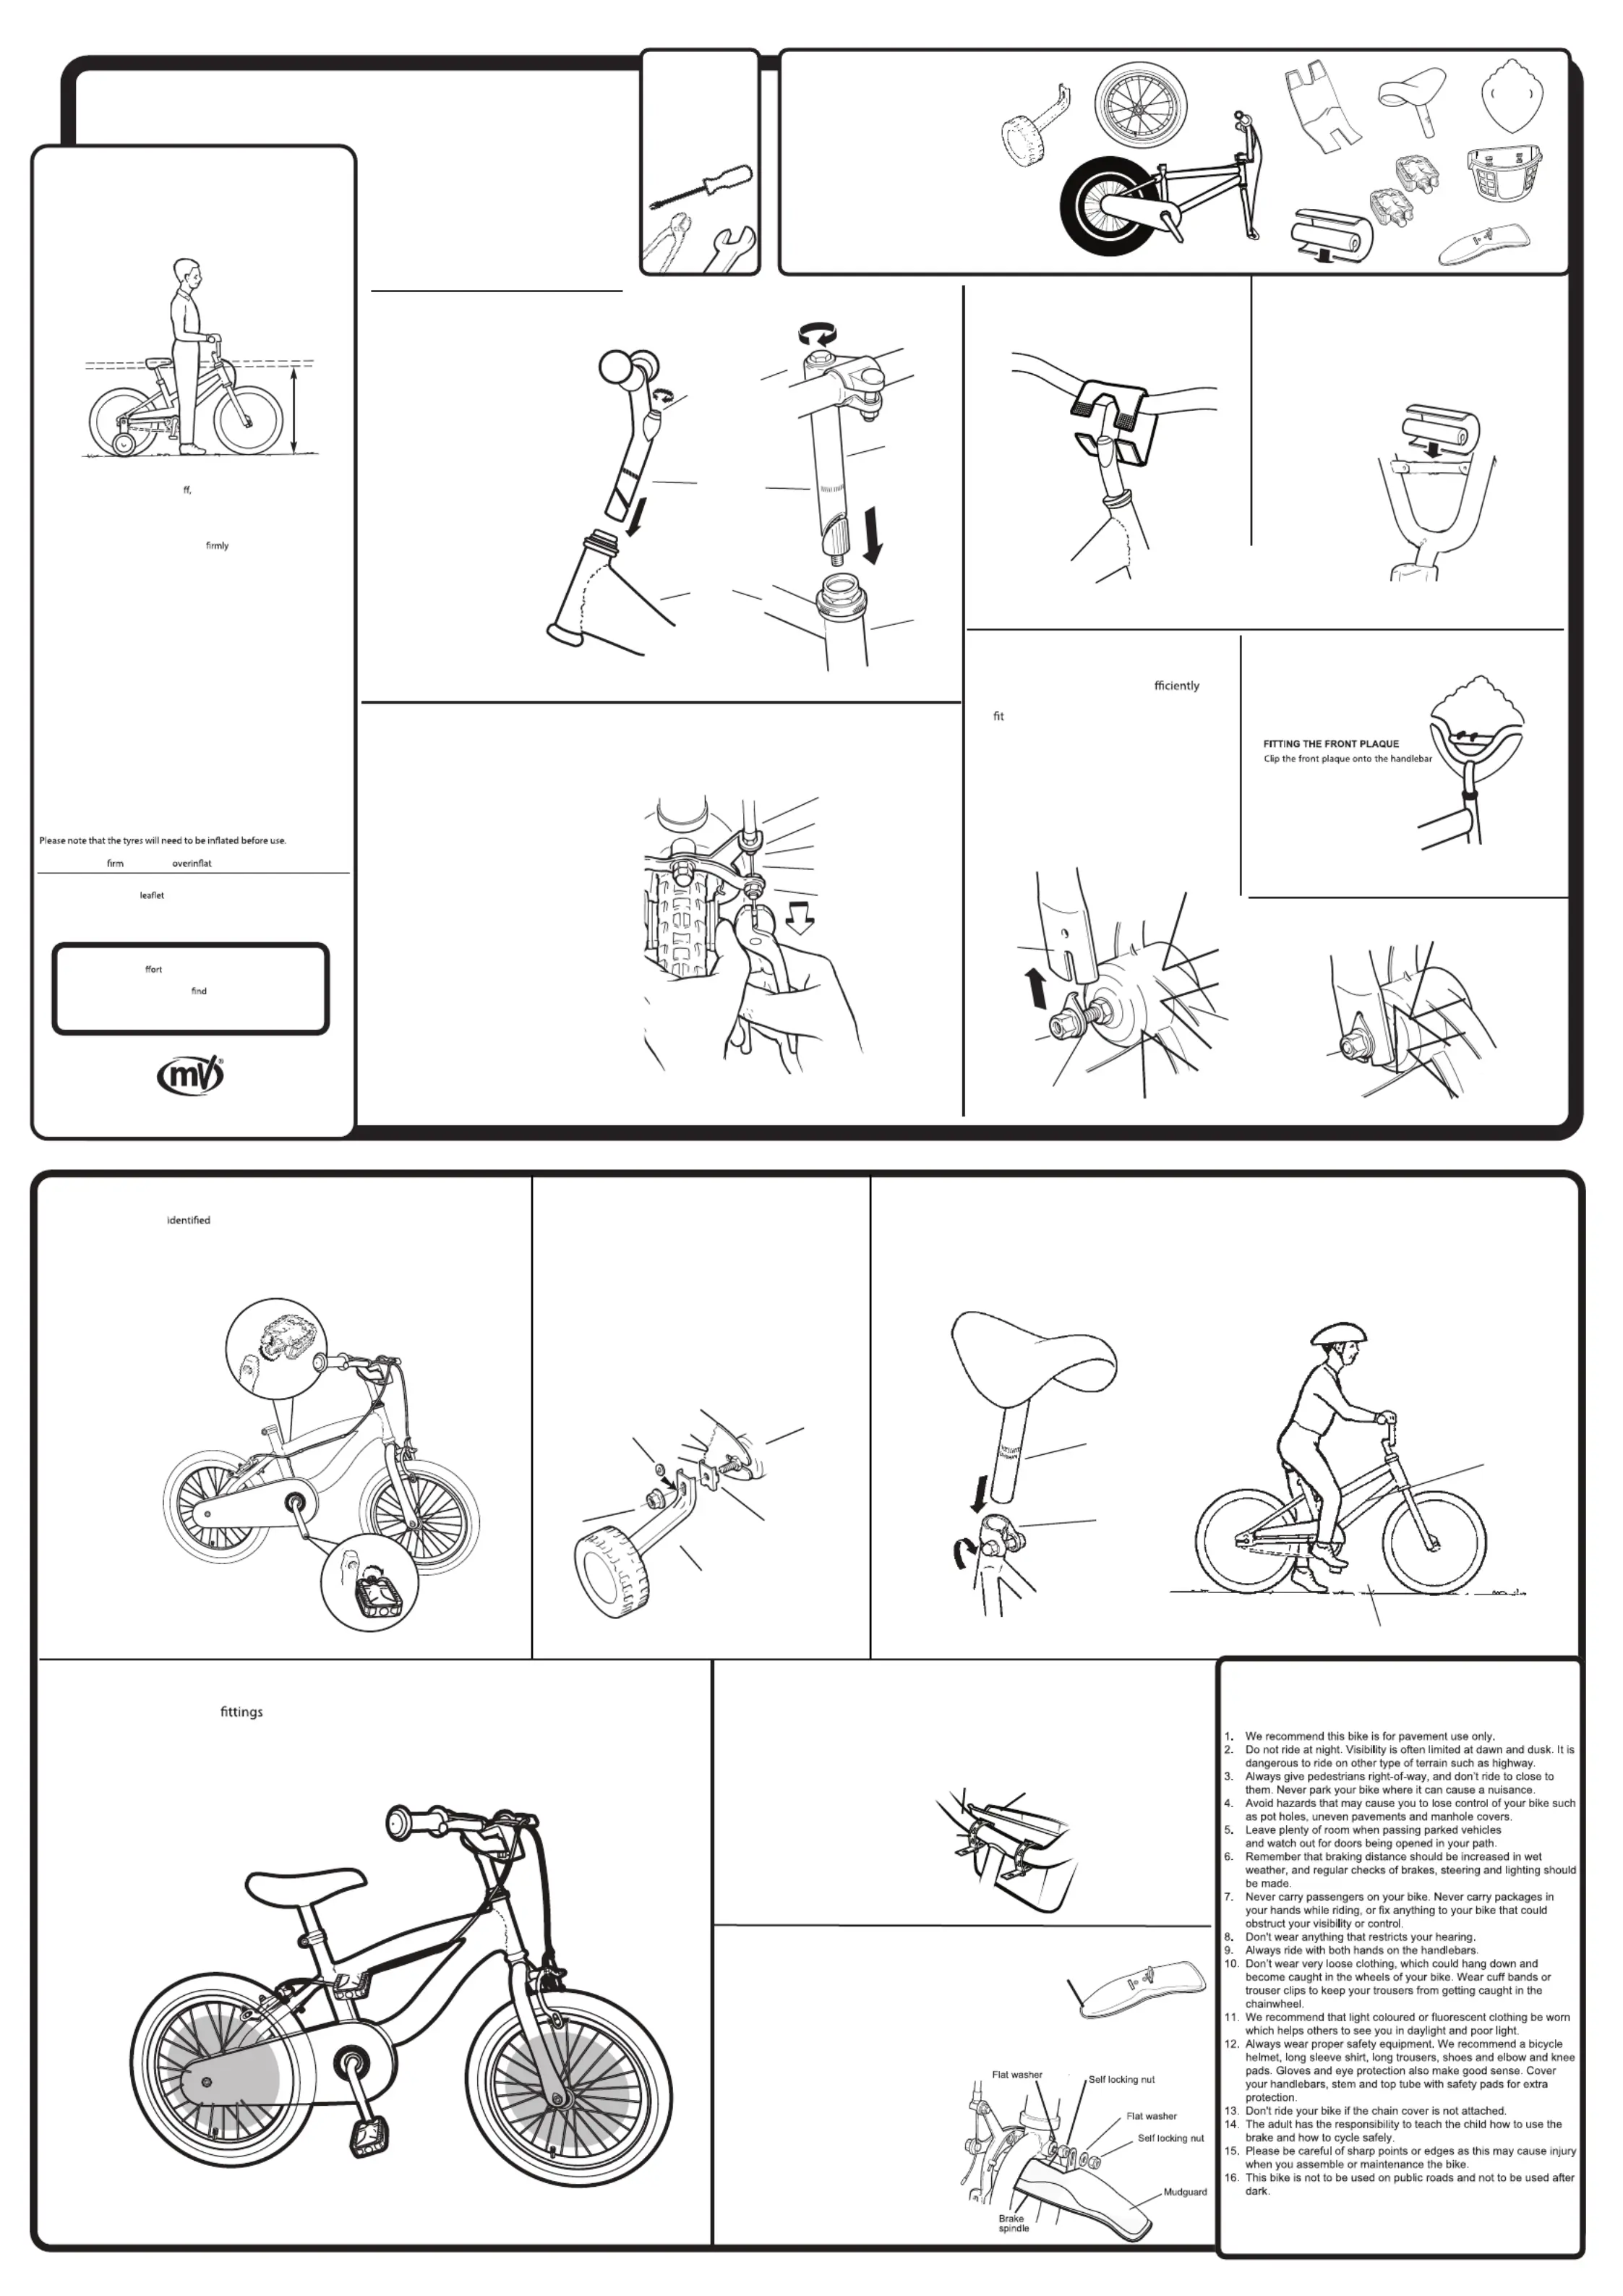
AGUIDE TO SAFE CYCLING
.
PLEASE REFER TO THE HIGHWAYCODE REGARDING
RULES FOR CYCLISTS.
ASSEMBLED BIKE
Please check all screws and are secure before giving to your child.
MV recommends the use of protective pads bicycle and helmet
when using this product.
DO NOT LEAVE OUTSIDE
Pedal in lowest position
Knee
slightly
bent
FITTING THE SADDLE
1.Push the saddle pillar into the down tube at
least as far as the Minimum insertion mark.
2.Align the saddle with the bike frame and
tighten the clamp.
Clamp
Minimum
insertion
mark
PROPER SEAT HEIGHT
* Under no circumstances should the seat
post project from the frame beyond its
Minimum Insertion mark. If your seat post
projects from the frame beyond these markings,
the seat post or frame may break, which could
cause you to lose control and fall.
03.2015 - ISSUE1
(NOTE: illustration may differ to actual bike.)
NOTE: Line up the pedal carefully with the hole in the wheel crank ensuring that
it does not become cross threaded
16" Bicycle
Please retain this for reference to the manufacturer.
Design and spec may vary
Made in t Phillippines to European Safety Standards.he
Conforms to ISO 8098
MV SPORTS & LEISURE LTD
35 Tameside Drive Castle Bromwich Birmingham B35 7AG UK••••
www.mvsports.com
DISTRIBUTED BY
PLEASE READ BEFORE ASSEMBLY
03.2015 - ISSUE 2
CS:ONTENT
TOOLS
RREDEQUI
1. Frame Assembly (shape may dier)
2. Front Wheel
3. Front Forks
4. Handlebars (shape may dier)
5. Saddle
6. Pedals (x2)
7. Stem Pads (optional)*
8. Crash pad (optional)*
9. Plastic basket (optional)*
10. Mudguard (optional)*
Spanner sizes:
10mm for brakes
13mm for saddle
14mm for stabilisers
15mm for pedals
Screwdriver
Pliers
Import or’s informationtanwne
Pleareathibeforallowinyouchilidse d s e g r d to re the bicycle.
COECT BICYCLE ZERRSI
Me sure e ble you he t is the crect size r the child.akthicycavboughorfo
The rider’s crotch should be 25mm higher than the top tube of the bicycle.
BICYCLE SET-UP
It is eenl that, ore moving osstiabef
the rir is tly eddecomforabseat
on e bile and not stting rd to ach e drs.thcycrechfowarrethhanleba
Reck the itons n r the insllation of e le.e-chnsructigivefotathsadd
FOYOILFETR UR CHDA’S SY
Rheck t l scs, nuts and bolts are ttened.ecthaalrewigh
Make sure that your ild is le of rig ts cycle.chcapabdinhibi
Do t aow yr child to ride witht sion.nollouousupervi
BAMANANSIC INTECE
Cinha shoulhad ve aatelmticalntpproximy 10m of ver moveme
whcken cheed itttrtn he cenre beween the fon anr.d rear spocket
Tadjo ust tha tensionnoahl rnutshe cin, loose tw rer weeetaiing n
andth move e reaxrrds or ale eher foitwar bo adjuse tensackwards tth tion.
Rthuts oorrt tensiiid.e-igten nnce cecon s acheve
Bke bcks must be ked by an ult at ur . It isralochecadreglaintervals
recommenbrablocded that the ke ks are ced if y come ssreplathebele
than 3mm.
Lubricate mg ptovinar
s with lht maine oil at r s origchregulainterval
whsaen necesry.
ROD TECMMENDEOROLERANCQUE TES (Nm - Newton Meter)
Tyre presresisu35psi - 40 p
Ere tys are nsure
t do t ebuno
hctorC
tnemerusaem
TRANSIT PROTECTORS
Remove frame protectors
and dispose of safely.
5
R
L
FRONT WHEEL ASSEMBLY
1.Loosen the front wheel nuts su
to allow the tabbed locating washers to
outside the fork end.
2.Insert the front wheel into the front forks,
sliding the wheel spindle into the slots in
the fork end.
3.Ensure that the locating washer tabs are
inserted into the holes in the fork end.
4.Check that the wheel rim is central between
the forks and tighten the wheel nuts.
Wheel
spindle
forked
Plate
Tabbed locating washer
Wheel
nut
CUSTOMER SERVICES
We make every e to ensure that this product reaches
you in satisfactory condition. However if you have any
queries, need assistance, or
this product defective,
please contact our Customer Services:
customer[email protected]. Alternatively, you can
call on 0870 8404255
Plginuneaskeeackae p the pg til you have
comly ed the le.pleteassemblbicyc
Thibibldus cycassemle is to be ed by an alt
Chk the cnts and y ove theeconteonlrem
proive pg om h im as andtectackaginfreacte
when it is to be fied.tt
Permissible total weight of the rider plus
luggage should be 40kg and the maximum
total weight should be 50kg.
Anyandar wear te onynrak tres, tubes ad be fs musriction-componentte b
chckeedy auPsol bn adlt. leae nte heple umber epinnro frlaacement prts.
Only use genuine replecement parts for safety-critical components.
Brake cable
Cable adjuster screw
Cable adjuster lock nut
Brake cable wire
Anchor bolt and nut
ADJUSTING THE BRAKE
2.On the brake arm, loosen the anchor nut and bolt.
1.Ensure the brake callipers are secure to the frame.
3.Squeeze the brake shoes together and using a pair of
pliers, pull the inner brake cable tight.
4.Re-tighten the cable anchor nut and bolt.
5.Using the cable adjuster, adjust the brakes to give 1.5mm
clearance between the brake blocks and the wheel rim
6.Tighten the cable adjuster lock nut.
7. Check that the brake blocks make contact with the
wheel rim and not the tyre.
FITTING THE HANDLEBARS
1.Slide the handlebar
stem into frame
head as far as the
minimum insertion
marks.
2.Align the handlebars
with the front forks
and tighten the bolt.
NOTE: Please ensure the brake levers do not swivel on the handlebar tube.
Position levers once handlebar is fixed and tighten.
Frame
16’’ Generic Bike / Boy and Girl
FITTING A STEM PAD (optional)
1.If your bike includes a stem pad wrap it around
the handlebars and secure.
NOTE: The left hand brake lever operates the rear brake and the right hand brake lever operates the front brake.
Handlebar Expander Bolt 15-17 Nm
Handlebar Clamp Bolt 16-18 Nm
Seat Post Bolt 16-18 Nm
Front Wheel 22-25 Nm
Rear Wheel 25-29 Nm
ATTACHING A CRASHPAD (optional)
If your bike includes a crash pad wrap
the foam tube around the cross bar.
Wrap the outer layer of
the crash pad ensuring
the fastening points
meet underneath.
Head
tube
Handlebar
stem
10*
11*
6
7*
9*
2
1
4
3
Minimum
insertion
mark
Handlebar
securing bolt
Handlebar design will change depending
on style of bike.
Wheel
nut
(NOTE: depending on bike style.)
ATTACHING THE BASKET (optional)
FITTING THE MUDGUARD (optional)
Basket
Handlebars
Strap
(NOTE: depending on bike style.)
(NOTE: depending on bike style.)
(NOTE: depending on bike style.)
W st t sraprapsaroundhandlebarenering strapend
inoneheavailableshapedholeonto of t ‘T’ s the
prorudingpiecerapunderneaecurt ostf tho t se
t .hebaskeint place
1. Remove the first self locking nut and flat washer
from the brake spindle.
2. Fit the front mudguard support bracket onto
the brake spindle.
3. Refit the flat washer and self locking nut and
tighten securely.
NOTE: Please check the brake assembly
operates correctly after re-assembly
FRONT
(NOTE: illustrations may difer to actual bike/depending
on the bike style.)
*Some models do not have optional component.
*Some models do not have this optional component.
*Some models do not have this optional component.
(NOTE: depending on bike style.)
*Some models do not have this optional component.
*Some models do not have this optional component.
*Some models do not have this optional component.
NOT SUPPLIED
FITTING THE STABILISERS (optional)
1.Remove the nut and washer from the rear axle frame assembly
leaving the stabiliser frame bracket in position.
2.Slide the stabiliser over the threaded axle spindle end.
3.Replace nut and washer and tighten.
4.To adjust the stabiliser wheel height, loosen the nut, slide
the stabiliser up or down to adjust the wheel height and
retighten the nut.
* It is very important to check the stabiliser
connection to the bicycle. Failure to properly
tighten may cause the stabilser to dislodge.
Pay attention for risk when using stabiliser.
When the stabilisers are removed please be
sure to replace the bracket and nut to cover
the end of the axle.
Frame
Stabiliser
Stabiliser frame
bracket
Nut
Washer
FITTING THE PEDALS
NOTE:The pedals are as right
hand or left hand by an 'R' or 'L' on the
spindle end.
1.Screw the pedal marked 'R' clockwise
into the right hand chain wheel crank
(side with chainguard) and tighten
securely.
2.Screw the pedal marked 'L'
anti-clockwise into left hand
crank and tighten securely.
11. Stabiliser arm and wheel p1-x2 (optional)*
12*
12. Front Plaque (optional)*
ATTACHING THE PLAQUE (optional)
8*
Product specificaties
| Merk: | Marvel |
| Categorie: | Fiets |
| Model: | Avengers End Game M004162 |
Heb je hulp nodig?
Als je hulp nodig hebt met Marvel Avengers End Game M004162 stel dan hieronder een vraag en andere gebruikers zullen je antwoorden
Handleiding Fiets Marvel

18 November 2024
27 Juli 2023
27 Juli 2023
Handleiding Fiets
Nieuwste handleidingen voor Fiets
13 April 2026
7 April 2026
6 April 2026
6 April 2026
6 April 2026
6 April 2026
2 Maart 2026
2 Maart 2026
1 Maart 2026
1 Maart 2026