Kuzco Sirius CH14348 Handleiding
Bekijk gratis de handleiding van Kuzco Sirius CH14348 (1 pagina’s), behorend tot de categorie Lamp. Deze gids werd als nuttig beoordeeld door 2 mensen en kreeg gemiddeld 4.9 sterren uit 7 reviews. Heb je een vraag over Kuzco Sirius CH14348 of wil je andere gebruikers van dit product iets vragen? Stel een vraag
Pagina 1/1
INSTALLATION SHEET
CH14348
Ceiling LED Chandelier
START FROM HERE
•
Make sure power is completely off at the fuse box.
•
Have your fixture installed by a qualified licensed electrician
•
Prepare everything in a clear area.
•
Wear gloves at all times during this installation.
•
Read instructions carefully before you start assembly.
•
Keep this instruction sheet for future reference.
Technical Support: 1-855-855-8926
19054 28th Avenue Surrey, BC Canada V3Z 6M3
T: 604 538 7162 TF: 1-855 85 KUZCO F: 604 538 7196
W: kuzcolighting.com
20220816
Please Note:
• This Kuzco LED fixture comes with pre-wired LED module(s).
• Unless instructed to do so, please do not touch any part of the LED module(s) as any
unnecessary contact with the module could cause permanent damage.
• For dimming, an ELV (Electronic Low Voltage) or TRIAC type of dimmer is required.
• 120V input
V+
V-
DC
Driver
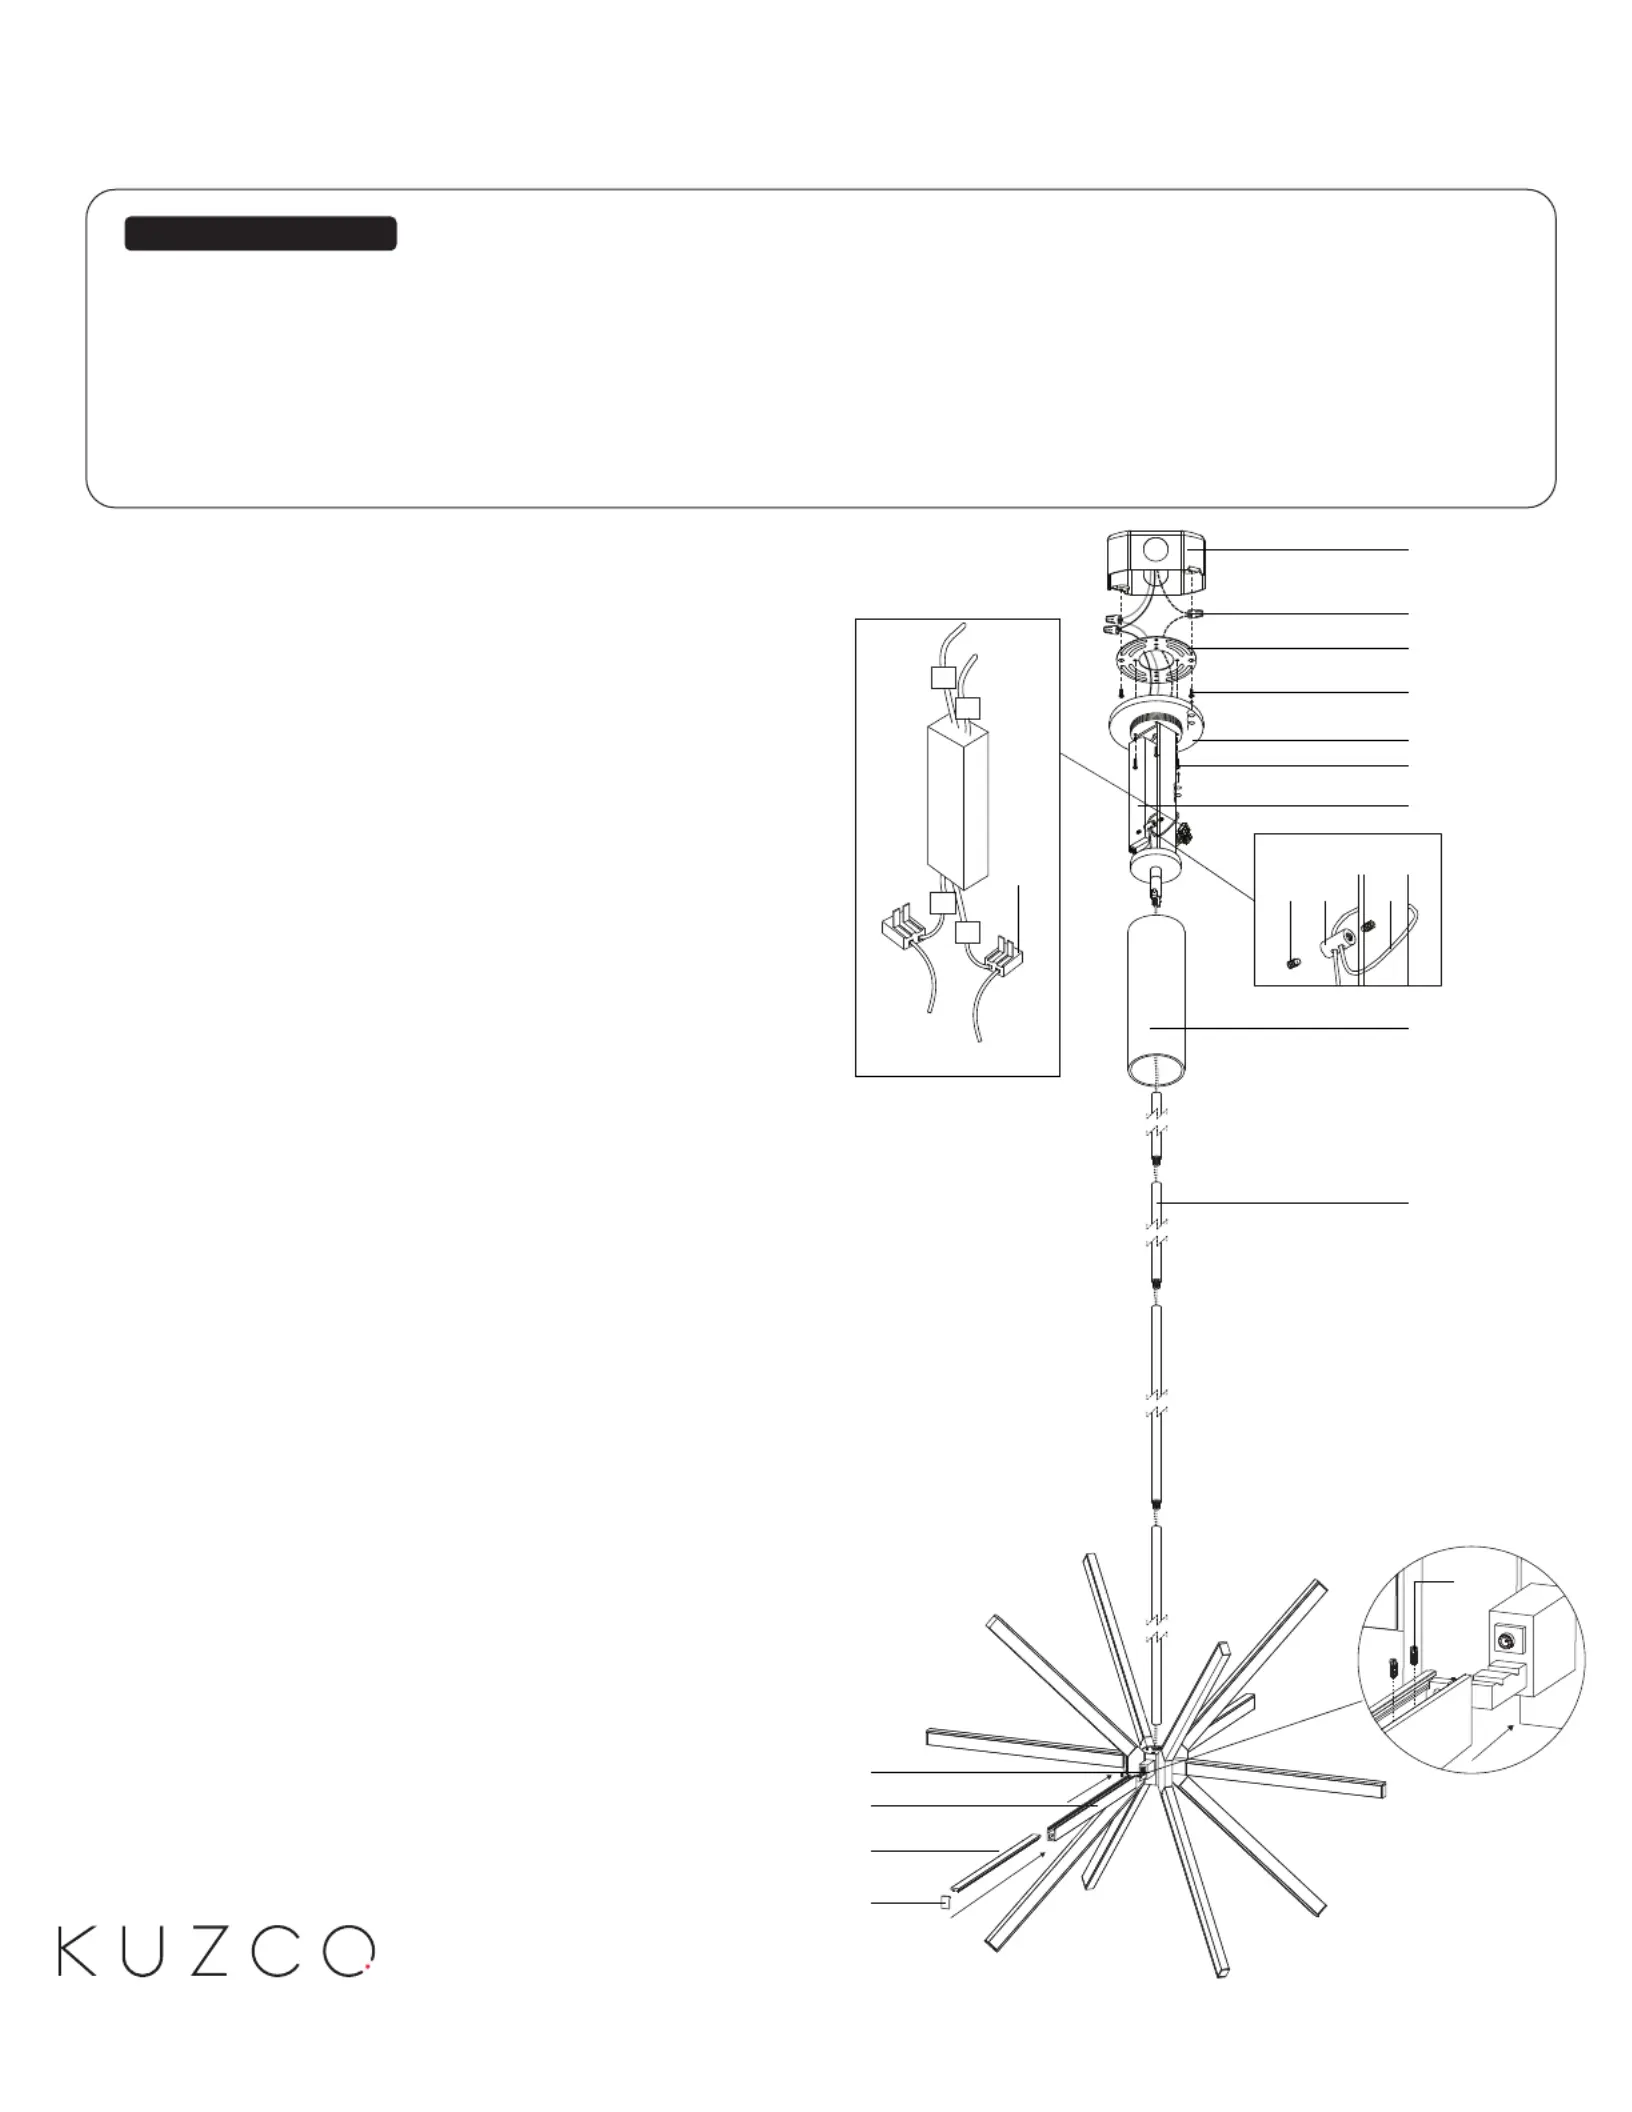
Illustration 1
Illustration 2
+
-
L
N
Low Voltage
120V
2e.
1a.
1b.
1c.
1e.
2a.
5a.
2g.
4b.4a.4c.
2d.
2b.
3b.
3c.
3d.
3a.
3e.
Illustration 3
1.
9.
4.
5.
6.
7.
8.
2.
3.
Remove the fixture from its original packaging.
Secure the mounting plate to the junction box (1c)(1a) with
junction box screwsprovided in the hardware (1e)
package.
Remove the driver cover from the canopy by (2d) (2a)
turning counter clockwise.
Pull aircraft cable into canopy and loop it through (4a)(2a)
canopy frame and secure aircraft cable in wire gripper (4a)
(4b)(4c) with screws (Illustration 2).
Determine hanging height of fixture by securing rods (2e)
to canopy and fixture hubafter feeding fixture (2a) (3a)
wires (LED+ and LED-) through rods.
Make proper electrical connections between LED and DC
driver, LED- Negative, LED+ Positive using wago
connector provided (2g) (See Illustration 1 and refer to
diagram on driver).
Make proper electrical connections ( to blackhot “L”,
whiteground“GND”) to “N”, neutral to with wire nuts
(1b) provided in hardware package
Attach canopyto mounting plate with canopy (2a) (1c)
screws (2b) and close canopy with driver cover (2d) by
turning clockwise.
Attach LED spoke to fixture hub and secure with (3b)(3a)
set screws . Attach connector from (3e) (See Illustration 3)
LED spoke to fixture hub connector. Slide diffuser (3b)(3a)
(3c)(3b)(3d) to close LED spoke and secure with end-cap
(use a rubber mallet if necessary, not provided).
Product specificaties
| Merk: | Kuzco |
| Categorie: | Lamp |
| Model: | Sirius CH14348 |
Heb je hulp nodig?
Als je hulp nodig hebt met Kuzco Sirius CH14348 stel dan hieronder een vraag en andere gebruikers zullen je antwoorden
Handleiding Lamp Kuzco

25 Februari 2026
24 Februari 2026
24 Februari 2026
24 Februari 2026
24 Februari 2026
24 Februari 2026
24 Februari 2026
24 Februari 2026
24 Februari 2026
24 Februari 2026
Handleiding Lamp
Nieuwste handleidingen voor Lamp
25 Februari 2026
24 Februari 2026
24 Februari 2026
24 Februari 2026
24 Februari 2026
24 Februari 2026
24 Februari 2026
24 Februari 2026
24 Februari 2026
24 Februari 2026