JVC KW-M180DBT Handleiding
JVC
Niet gecategoriseerd
KW-M180DBT
Bekijk gratis de handleiding van JVC KW-M180DBT (32 pagina’s), behorend tot de categorie Niet gecategoriseerd. Deze gids werd als nuttig beoordeeld door 36 mensen en kreeg gemiddeld 4.6 sterren uit 18.5 reviews. Heb je een vraag over JVC KW-M180DBT of wil je andere gebruikers van dit product iets vragen? Stel een vraag
Pagina 1/32

• Updated information (the latest Instruction Manual, etc.) is available from
<https://www.jvc.net/cs/car/>.
B5K-1095_ref_E_En_03
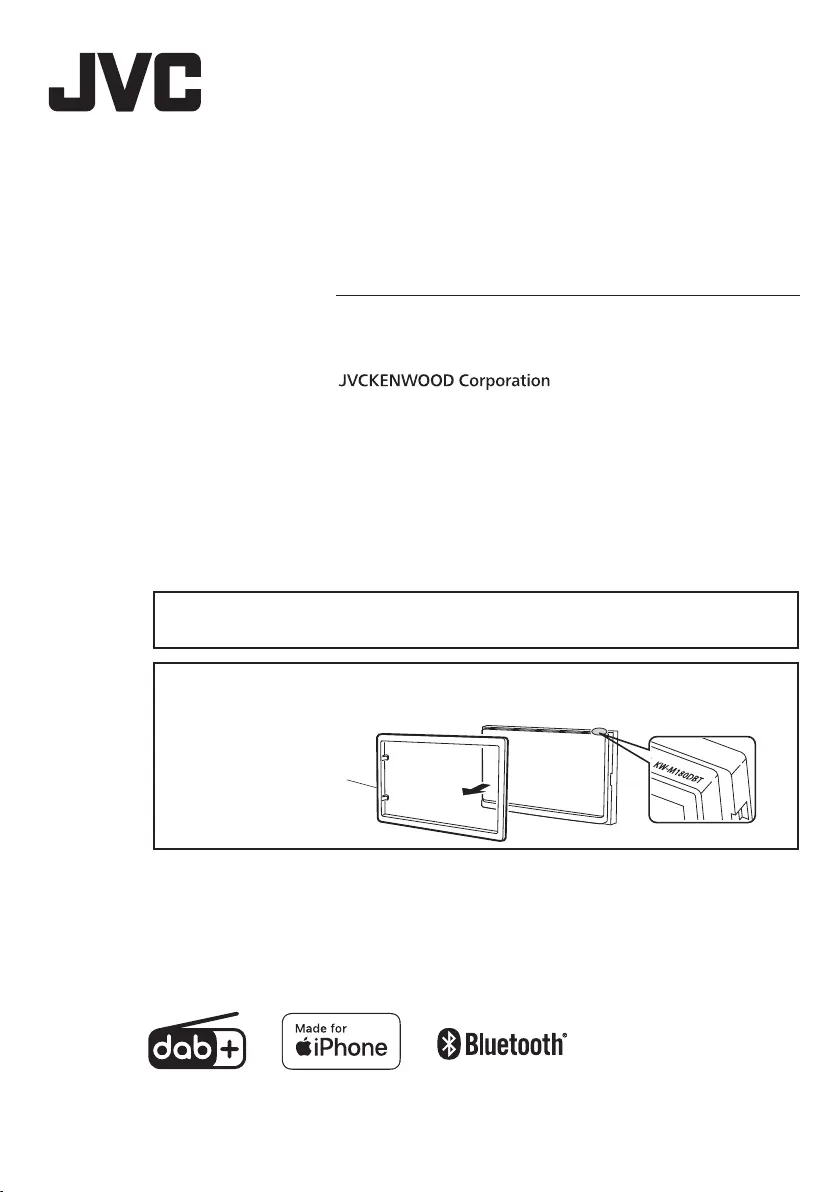
Model name indication position
See “Removing the trim plate” (P.21)
Trim plate
KW-M180DBT
KW-M180BT
MONITOR WITH RECEIVER
INSTRUCTION MANUAL
© 2023 JVCKENWOOD Corporation
3-12, Moriyacho, Kanagawa-ku, Yokohama-shi, Kanagawa, 221-0022, Japan

2
Before use ................................................................................. 2
How to read this manual 2 ...................................................................................
Precautions ................................................................................................................ 2
Getting Started 3 .......................................................................
Clock settings ........................................................................................................... 3
Basics .......................................................................................... 4
Functions of the Buttons on the Front Panel 4 ......................................
Common operations ........................................................................................... 4
HOME screen descriptions .............................................................................. 5
Source control screen 5 .........................................................................................
Digital Radio ............................................................................ 6
Digital Radio Basic Operation ........................................................................ 6
Digital Radio Setup ............................................................................................... 6
Tuner ...........................................................................................7
Tuner Basic Operation......................................................................................... 7
Presetting stations ................................................................................................ 7
Tuner Setup ................................................................................................................ 7
USB .............................................................................................. 8
Preparation ................................................................................................................. 8
Playback operations ............................................................................................. 8
iPhone ........................................................................................9
Preparation ................................................................................................................. 9
Playback operations ............................................................................................. 9
Mirroring .................................................................................10
Preparation ...............................................................................................................10
Mirroring operations..........................................................................................10
External Components ........................................................ 11
Using external audio/video players ......................................................... 11
Rear view camera .................................................................................................11
Learning function of steering remote....................................................12
Reverse with ATT ..................................................................................................12
Bluetooth ................................................................................ 13
Register your smartphone to the unit ...................................................13
Bluetooth Setup ....................................................................................................13
Receive a phone call ..........................................................................................14
Make a phone call ................................................................................................14
Playing Bluetooth Audio Device ................................................................15
Controlling Audio ................................................................ 16
Controlling General Audio .............................................................................16
Equalizer Control ..................................................................................................16
Speaker / X’over setup ...................................................................................... 17
Listening Position DTA ......................................................................................17
Sound Eect ............................................................................................................17
Remote control .....................................................................18
Battery Installation ..............................................................................................18
Functions of the Remote control Buttons ...........................................18
Installation ..............................................................................19
Before Installation ................................................................................................19
Installing the unit .................................................................................................20
About this Unit ......................................................................24
More information .................................................................................................24
Troubleshooting .................................................................................................. 25
Copyrights ................................................................................................................26
Specications .........................................................................................................27
Contents
How to read this manual
• The panels shown in this guide are examples used to
provide clear explanations of the operations. For this
reason, they may be dierent from the actual panels.
• In operation procedures, bracket shape indicates the
key or button you should control.
< >: indicates the name of panel buttons.
[ ]: indicates the name of touch keys
! This symbol on the product means there
are important operating and maintenance
instructions in this manual.
Be sure to carefully read instructions in this
manual.
Precautions
#WARNING
Ñ To prevent injury or re, take the following
precautions:
• To prevent a short circuit, never put or leave any
metallic objects (such as coins or metal tools)
inside the unit.
• Do not watch or x your eyes on the unit’s display
when you are driving for any extended period.
• If you experience problems during installation,
consult your JVC dealer.
Ñ Precautions on using this unit
• When you purchase optional accessories, check
with your JVC dealer to make sure that they work
with your model and in your area.
• You can select a language to display menus, audio
le tags, etc. See Getting Started (P.3)
• The Radio Data System or Radio Broadcast Data
System feature won’t work where the service is
not supported by any broadcasting station.
Ñ Protecting the monitor
• To protect the monitor from damage, do not
operate the monitor using a ballpoint pen or
similar tool with the sharp tip.
Ñ Cleaning the Unit
If the front panel of this unit is stained, wipe it with
a dry soft cloth such as a silicon cloth. If the front
panel is stained badly, wipe the stain o with a
cloth moistened with neutral cleaner, then wipe it
again with a clean soft dry cloth.
! CAUTION
• Applaying spray cleaner directly to the unit may
aect its mechanical parts. Wiping the front panel
with a hard cloth or using a volatile liquid such as
thinner or alcohol may scratch the surface or erase
screened print.
Ñ How to reset your unit
If the unit or the connected unit fails to operate
properly, reset the unit.
Reset button
Before use

3English |
Getting Started
1 Turn the ignition key of your car to ACC.
The unit is turned on, please read the warning and
press “Agree” to enter the screen.
2 Press the < > button.
3 Touch [ ].
4 Touch the corresponding key and set the value.
[System]
[Beep Tone]
Activates or deactivates the key-touch tone.
“ON” (Default), “OFF”
[Language]
Select the language used for the control screen
and setting items. Default is “English”.
[Time/Date]
Adjust the clock time. (P.3)
[Clock Mode]
Select the time display format.
[12hr] / [24hr] (Default)
[Steering Remote]
Sets the desired function in the steering remote
controller. See Learning function of steering
remote (P.12)
[Parking Guidelines]
You can display parking guidelines to enable
easier parking when you shift the gear to the
reverse (R) position. Default is “ON”.
[Guidelines SETUP]
If you select [ON] for [Parking Guidelines], you can
adjust the parking guidelines. See To adjust the
parking guidelines (P.12)
[Reverse with ATT (-20dB)]
When the gear is shifted to the reverse (R)
position, the volume of the device is adjusted.
Default is “ON”. See To adjust the Reverse with
ATT (P.12)
[System Reset]
Touch [System Reset] and then touch [YES] to set
all the settings to the initial default settings.
[Bluetooth]
Displays the Bluetooth Settings screen. (P.13)
[Screen]
[Dimmer]
Select the dimmer mode.
“High” (Default) / “Mid” / “Low”
[Demo]
Select the demonstration mode. Default is “ON”.
[Information]
Displays the software version and model number
of this unit
5 Touch [6].
Clock settings
Ñ Synchronizing the clock time with FM
RDS
Activate [RDS Clock Sync].
See Tuner Setup (P.7).
Ñ Adjusting the clock manually
✎NOTE
• Deactivate [RDS Clock Sync] before adjusting the
clock.
1 Press the < > button.
2 Touch [ ].
3 Touch [System].
4 Touch [Time/Date].
Clock screen appears.
5 Touch [R] or [S] to set the clock time.
6 Touch [6].
Product specificaties
Merk: | JVC |
Categorie: | Niet gecategoriseerd |
Model: | KW-M180DBT |
Kleur van het product: | Zwart |
Ingebouwd display: | Ja |
Gewicht: | 1300 g |
Breedte: | 178 mm |
Diepte: | 75 mm |
Hoogte: | 100 mm |
Installatie compartiment breedte: | 182 mm |
Installatie compartiment diepte: | 75 mm |
Installatie compartiment hoogte: | 112 mm |
Bluetooth: | Ja |
Beeldschermdiagonaal: | 6.8 " |
Resolutie: | 800 x 480 Pixels |
Touchscreen: | Ja |
Bluetooth-versie: | 5.0 |
Bluetooth-profielen: | A2DP, AAC, AVRCP, HFP, PBAP, SBC |
Ondersteund audioformaat: | AAC, FLAC, MP3, WAV, WMA |
Ondersteunde videoformaten: | AVI, H.264, MKV, MPEG1, MPEG2, MPEG4 |
USB-poort: | Ja |
Touch screen type: | Capacitief |
LED backlight: | Ja |
Aantal USB-aansluitingen: | 1 |
USB-versie: | 2.0 |
Equalizer-instellingen: | Ja |
Uitgangsvermogen: | 180 W |
Impedantie: | 4 Ohm |
Display verlichting: | Ja |
Kleur van de verlichting: | Blauw |
Audio-uitgangskanalen: | - kanalen |
Frequentiebereik: | 20 - 20000 Hz |
AV-ingang: | Ja |
Aantal banden equalizer: | 13 |
MP3 afspelen: | Ja |
Optische drive type: | Nee |
Ondersteunde frequentiebanden: | AM, DAB, DAB+, FM |
Aantal voorkeurszenders: | 30 |
Inclusief RDS tuner: | Ja |
Subwoofer uit: | Ja |
USB direct afspelen: | Ja |
Dimmer: | Ja |
FM-band: | 87.5 - 108 MHz |
CD-R afspelen: | Nee |
Te gebruiken met een iPod: | Ja |
Type beeldscherm: | TFT |
AM band bereik: | 531 - 1611 kHz |
Bas boost-technologie: | Ja |
iPod-connectiviteit: | Ja |
Ingebouwde audio D/A-converter (DAC): | Ja |
Maximaal vermogen per kanaal: | 45 W |
Widescreen: | Ja |
Handsfree bellen: | Ja |
High pass filter: | Ja |
Low pass filter: | Ja |
Pre out poort: | Ja |
Bluetooth-functies: | Automatic pairing for Android, Handsfree calling |
Positie USB-poort: | Achter |
Achteruitkijk camera klaar: | Ja |
DAB tuner: | DAB+ |
Geluidssterkteregeling: | Ja |
Audio rechtsachter uit: | Ja |
Audio linksachter uit: | Ja |
Audio rechtsvoor uit: | Ja |
Audio linksvoor uit: | Ja |
Heb je hulp nodig?
Als je hulp nodig hebt met JVC KW-M180DBT stel dan hieronder een vraag en andere gebruikers zullen je antwoorden
Handleiding Niet gecategoriseerd JVC
30 Januari 2025
14 November 2024
17 Mei 2024
31 Maart 2024
26 Maart 2024
18 Maart 2024
11 Maart 2024
20 Februari 2024
18 December 2023
28 Juni 2023
Handleiding Niet gecategoriseerd
- Black Line
- Polarlite
- ButtKicker
- Cyrus
- HealthPostures
- Vaddio
- Hoshizaki
- Thomas
- Zega
- Sachtler
- Jata
- SeaLife
- Powersoft
- DMax
- Studiologic
Nieuwste handleidingen voor Niet gecategoriseerd
19 Juni 2025
19 Juni 2025
19 Juni 2025
19 Juni 2025
19 Juni 2025
19 Juni 2025
19 Juni 2025
19 Juni 2025
19 Juni 2025
19 Juni 2025