Hella Marine NaviLED PRO 2 Handleiding
Hella Marine
Verlichting
NaviLED PRO 2
Bekijk gratis de handleiding van Hella Marine NaviLED PRO 2 (12 pagina’s), behorend tot de categorie Verlichting. Deze gids werd als nuttig beoordeeld door 46 mensen en kreeg gemiddeld 3.6 sterren uit 23.5 reviews. Heb je een vraag over Hella Marine NaviLED PRO 2 of wil je andere gebruikers van dit product iets vragen? Stel een vraag
Pagina 1/12

Hella marine LED Navigation Lamps offer many advantages over conventional bulb lamps.
Signicantly reduced power consumption, ultra long life and high tolerance to shock and
vibration make the LED lamps the ideal choice for the harsh marine environment.
The Hella marine NaviLED PRO series are Precision Optical Instruments, tested and type
approved to comply with international maritime regulations. They are covered by a 5 year
warranty.
Electromagnetic Compatibility (EMC)
This LED lamp is an electronic device. The electrical circuits contain components that
suppress possible interference, both emission as well as susceptibility, to the limits
prescribed in international regulations.
Protection against damage due to voltage spikes
This lamp is protected against reverse polarity connection and negative voltage spikes of
up to 700 volts.
For general comments about Hella's products please e-mail techfeedback@hellamarine.com
Congratulations! The product you have selected comes from Hella - one of the world's
leading manufacturers of lighting products. The product comes with a 5 year warranty
from end user purchase covering faults in materials, components or workmanship.
In the unlikely event that you should experience a conrmed warranty related problem with your
purchase, Hella will, at its discretion, either repair, replace or refund the purchase price of the
product.
Warranty services may be obtained by returning the product within the warranty period to the
Hella Dealer where the product was originally purchased.
This warranty is in addition to and does not preclude any other rights or remedies available to the
consumer under any local legislation related to the provision of goods or services.
Our goods come with guarantees that cannot be excluded under the Australian Consumer Law.
You are entitled to a replacement or refund for a major failure and for compensation for any other
reasonably foreseeable loss or damage. You are also entitled to have the goods repaired or
replaced if the goods fail to be of acceptable quality and the failure does not amount to a major
failure.
This warranty does not cover:
1.) Claim/s as a result of normal wear and tear or of any modications and / or alterations to the product in any
shape or form.
2.) Claim/s as a result of non-compliance of the assembly, service and operating instructions and/or any unt or
improper use.
3.) Any expenses incurred in the process of making the claim.
Note: For lamps sold in Australia warranty services are provided by
Hella Australia Pty Ltd, 54-76 Southern Rd, Mentone VIC 3194.
Customer Service 1800 061 729 custservice@ha.hella.com,
http://www.hella.com/hella-au/21.html
Dimensions
a = 87mm / 3.43”
b = 90mm / 3.54”
c = 57mm / 2.25”
d = 50mm / 1.97”
ca
b
d
959 149-64 V04 (ENG-GER-FR)
Material Description UV resistant lens, high impact shroud
Minimum Visible Distance 2 Nautical Miles
Cable Pre-wired with 2.5m of marine cable
Operating Voltage Multivolt 9-33V DC
Voltage Protection Spike protected to +500 volts
Reverse polarity protected to -700 volts
Power Consumption Less than 2W (0.14A@12V/0.08A@24V)
Degree of Protection IP67 - Completely sealed
Weight 150g (including cable)


LED modules are polarity conscious.
Reverse polarity will not damage this product but will
inhibit its function.
Hella recommends wire connections be soldered, and heat
shrink tubing applied to seal the joint.
Note: Lamp must be protected by a fuse rated at 5
amperes maximum.
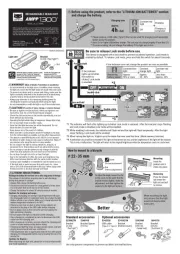
Assembly
Shroud
Optic Assembly
Step 3 - Insert the Optic Assembly
Note - Arrow on top of shroud and arrow on top of
optic assembly must point in the same direction
3.1 Feed power cable
3.2 Push optic assembly into shroud
3.3 Connect power
Step 2 - Mount the Shroud
2.1 Shroud must be installed with markings on
the TOP horizontal surface.
2.2 Arrow on top of shroud must point straight
ahead for port, starboard, masthead and
bi-colour lights and aft for stern lights.
Markings
Step 1
Make Provision for the power cable
Allow for
cable
Step 2
Pull optic assembly out
Step 1
Insert screw driver between optic
assembly and shroud
Removal
Colour Connect to
Black Negative (-ve)
Red Signal (+ve)
Note: Do not open. No servicable
parts inside.
E.g. - Port Lamp
Port and Starboard Lamps:
Parallel to the vessels centre line. (see Fig.1)
Vertical to the vessels centre line. (see Fig.2)
Stern Lamps:
Right angles to the vessels centre line.
Vertical to the vessels centre line. (see Fig.2)
Signal direction arrow:
The arrow should point -
- right ahead for port / starboard lamps (side lamps)
- right astern for stern lamps.
Obstructions to the light output:
When the lamp is operating, the light should not
be obstructed or concealed by superstructures or
other objects.
Port / Starboard (Side Lamps):
Must be mounted in the same thwartships position
and at the same height above the construction
water line (CWL), but at least 1 metre lower than
the masthead lamp and mark the effective beam
of the vessel.
If this is not possible, the distance between the
side lamps should not be less than 85% of the
maximum beam of the vessel.
Fig. 1 Parallel to the vessels centre line.
Fig.2 Vertical to the vessels centre line.
E.g. - Port Lamp
Top
view
Bow on view
Product specificaties
| Merk: | Hella Marine |
| Categorie: | Verlichting |
| Model: | NaviLED PRO 2 |
Heb je hulp nodig?
Als je hulp nodig hebt met Hella Marine NaviLED PRO 2 stel dan hieronder een vraag en andere gebruikers zullen je antwoorden
Handleiding Verlichting Hella Marine

2 Februari 2024
Handleiding Verlichting
- Auriol
- SSV Works
- Normann
- Zuiver
- Maxxworld
- Yamazen
- Dymond
- Ibiza Sound
- Nordride
- Obsidian
- Ikelite
- GoGEN
- HERA
- Varta
- Stairville
Nieuwste handleidingen voor Verlichting
6 Augustus 2025

5 Augustus 2025

5 Augustus 2025
5 Augustus 2025
5 Augustus 2025
5 Augustus 2025
5 Augustus 2025
5 Augustus 2025
5 Augustus 2025
5 Augustus 2025