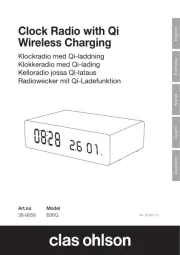
HANNLOMAX HX-202Qi Handleiding
HANNLOMAX
Wekkerradio
HX-202Qi
Bekijk gratis de handleiding van HANNLOMAX HX-202Qi (4 pagina’s), behorend tot de categorie Wekkerradio. Deze gids werd als nuttig beoordeeld door 10 mensen en kreeg gemiddeld 4.0 sterren uit 5.5 reviews. Heb je een vraag over HANNLOMAX HX-202Qi of wil je andere gebruikers van dit product iets vragen? Stel een vraag
Pagina 1/4

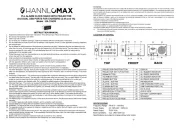
PLL ALARM CLOCK RADIO WITH WIRELESS QI CHARGER,
USB PORT FOR CHARGING, MP3 PLAYBACK AND BLUETOOTH
Model : HX-202Qi
(Bluetooth pairing code: HX-202Qi HANNLOMAX)
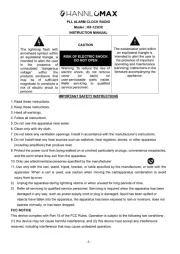
IMPORTANT SAFETY INSTRUCTIONS
1. Read these instructions.
2. Keep these instructions.
3. Heed all warnings.
4. Follow all instructions.
5. Do not use this apparatus near water.
6. Clean only with dry cloth.
7. Do not block any ventilation openings. Install in accordance with the manufacturer’s instructions.
8. Do not install near any heat sources such as radiators, heat registers, stoves, or other apparatus (including amplifiers)
that produce heat.
9. Do not defeat the safety purpose of the polarized or grounding-type plug. A polarized plug has two blades with one wider
than the other. A grounding type plug has two blades and a third grounding prong. The wide blade or the third prong are
provided for your safety. If the provided plug does not fit into your outlet, consult an electrician for replacement of the
obsolete outlet.
10. Do not defeat the safety purpose of the polarized or grounding-type plug. A polarized plug has two blades with one wider
than the other. A grounding type plug has two blades and a third grounding prong. The wide blade or the third prong are
provided for your safety. If the provided plug does not fit into your outlet, consult an electrician for replacement of the
obsolete outlet.
11. Protect the power cord from being walked on or pinched particularly at plugs, convenience receptacles, and the point
where they exit from the apparatus.
12. Only use attachments/accessories specified by the manufacturer.
13. Use only with the cart, stand, tripod, bracket, or table specified by the manufacturer, or sold with the
apparatus. When a cart is used, use caution when moving the cart/apparatus combination to avoid injury
from tip-over.
14. Unplug this apparatus during lightning storms or when unused for long periods of time.
15. Refer all servicing to qualified service personnel. Servicing is required when the apparatus has been damaged in any way,
such as power-supply cord or plug is damaged, liquid has been spilled or objects have fallen into the apparatus, the
apparatus has been exposed to rain or moisture, does not operate normally, or has been dropped.
FCC NOTICE
This device complies with part 15 of the FCC Rules. Operation is subject to the following two conditions :
(1) This device may not cause harmful interference, and (2) this device must accept any interference received, including
interference that may cause undesired operation.
SPECIFICATIONS
Frequency Range: FM 87.5 – 108 MHz
Power Supply: AC 100-240V ~ 60/50 Hz
Rated Output DC9V / 3.5A
Backup Battery: CR2032 X 1 pc
Specifications are subject to change without prior notice.
-1-
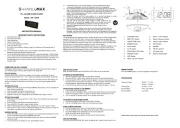
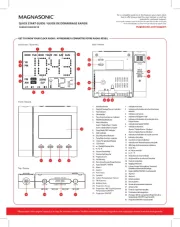
LOCATION OF CONTROL
1 Phone Support ( for Qi charging)
2 STANDBY BUTTON
3
4
VOL + BUTTON
TIME/M+/+10 BUTTON
5 FUNC BUTTON
6
7
VOL – BUTTON
ALARM ON/OFF BUTTON
8 SNOOZE / DIMMER BUTTON /
NIGHT LIGHT
9
/ FM SCAN/ BT UNPAIR Button
10 PRESET / ■ BUTTON
11 SKIP+/TU+/ LIGHT + BUTTON
12 TIME ZONE BUTTON
13 SLEEP/TEMPERATURE BUTTON
14 SKIP-/TU-/LIGHT- BUTTON
15 LCD DISPLAY
16 USB PORT FOR CHARGING (1A)
17 Wireless Charging Status Indicator
18 USB PORT FOR CHARGING (1A) AND
PLAYBACK
19 Speaker
20 FM Antenna
21 DC JACK
22 AUX-in JACK
23
24
BACKUP BATTERY COMPARTMENT
TEMPERATURE SENSOR
LCD DISPLAY
-2-

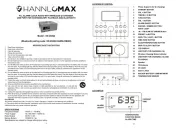
CONNECTING THE UNIT TO POWER
AC OPERATION
Plug one end of the AC adaptor into the DC power Input, and then plug the other end into AC wall outlet.
Before switching on the unit, make sure that the voltage of your electricity supply is the same on the rating
plate.
BACK-UP BATTERY
The unit has pre-installed a CR-2032 lithium battery inside the back-up battery compartment. In case of power
failure or interrupted AC power, the current time, alarm time and the stored radio stations are preserved in the
memory of the unit by means of battery back-up function.
OPERATE THE CLOCK
When the clock is plugged in, the correct time will be displayed after a few seconds. (Note : The default Time
Zone is set on Zone 2 - Eastern Time). The clock will automatically indicate the AM (A) or PM(P) time on the
display.
SELECT THE TIME ZONE
There are 7 time zones programmed as follows:
ZONE 1 – Atlantic Time
ZONE 2 – Eastern Time (Default Setting)
ZONE 3 – Central Time
ZONE 4 – Mountain Time
ZONE 5 – Pacific Time
ZONE 6 – Yukon Time
ZONE 7 – Hawaiian Time
CHANGE THE TIME ZONE
Make sure that the unit is in STANDBY mode. To confirm, press the STANDBY Button
While the unit is in STANDBY mode, press the TIME ZONE Button, the display will show the current time zone
number.
Press the Button repeatedly to select your time zone. When the desire time zone is selected, TIME ZONE
release the Button, the time zone will store in the memory after 1-2 seconds.
When you moved to a different time zone, simply change the time zone to the new time zone, the unit will store
the new time zone in the memory.
-3-
SETTING THE CLOCK AND DATE
1. You can only set the Clock and Date when the unit is in STANDBY mode,
( When the unit is in STANDBY mode, there will be function modes) NO
2. : Press and hold the 12 HOURS/ 24 HOURS SETIING TIME/M+/+10
Button for about 1 second, (The display will show or 12HR 24 HR )
3. Press the SKIP+/TU+/LIGHT+ SKIP−/TU-/LIGHT- or Button to select the
desired setting. Press Button to confirm. TIME
4. After 12HR / 24 Setting, the digit will flash. HOUR
5. Press the SKIP+/TU+/LIGHT+ or SKIP−/TU-/LIGHT- Button to adjust the
hour. (In 12 HOUR setting, there will be “A” indicating AM and ‘ ” P
indicating PM)
6. When the hour is selected, press the TIME MINUTE Button again, the
digit will begin to flash on the display.
7. Press the SKIP+/TU+/LIGHT+ or SKIP−/TU-/LIGHT- Button to adjust the
minute.
8. When the minute is selected, press the TIME Button again, the YEAR will
show on the display and flash.
9. Press the SKIP+/TU+/LIGHT+ or SKIP−/TU-/LIGHT- Button to adjust the
year.
10. When the year is selected, press the Button again, the TIME MONTH will show on the display and flash.
11. Press the SKIP+/TU+/LIGHT+ or SKIP−/TU-/LIGHT- Button to adjust the MONTH.
12. When the MONTH is selected, press the TIME Button again, the DAY will show on the display and flash
13. Press the SKIP+/TU+/LIGHT+ or SKIP−/TU-/LIGHT- Button to adjust the DAY.
14. When the DAY is selected, press the TIME Button again. The display will back to the CLOCK display.
SETTING THE ALARMS
1. You can set up the alarm when the unit is STANDBY mode.
2. Press the ALARM ON/OFF Button. The display will show : ALARM ON” and the default alarm time.
3. Press and hold the ALARM ON/OFF Button. The alarm hour will flash
4. Press the SKIP+/TU+/LIGHT+ or SKIP−/TU-/LIGHT-Button to select the alarm hour.
5. When the desired alarm hour is selected, press the ALARM ON/OFF Button again, the alarm minute digit
will flash.
6. Press the SKIP+/TU+/LIGHT+ or SKIP−/TU-/LIGHT- Button to select the alarm minute.
7. When the desired alarm minute is selected, press the ALARM ON /OFF Button again, the alarm mode will
flash.
8. Press the SKIP+/TU+/LIGHT+ or SKIP−/TU-/LIGHT-Button to select the alarm modes.
There are three alarm modes:
US USB **: Alarm wake up mode is
rA: Alarm wake up mode is FM radio
bU Alarm wake up mode is buzzer
9. When the desired alarm mode is selected, press the ALARM ON /OFF Button again to complete the alarm
setting. The desired alarm time will remain on the display.
10. If you want to turn off the alarm, press the ALARM ON/OFF Button. The display will show “ALARM OFF”.
**Note: For Wake to USB, please make sure a USB device is inserted and can be properly played, otherwise
the unit will default to the buzzer alarm mode automatically.
-4-

SNOOZE FUNCTION
1. Whenever the alarm activates, it can be temporarily suspended for a short period of 9 minutes by pressing
the SNOOZE/DIMMER Button once. The “ALARM ON” on the display will keep flashing.
2. The alarm will then automatically activate again after the 9 minutes SNOOZE period has ended.
3. This procedure can be repeated for up to approximately one hour.
FUNCTION MODES
1. Press STANDBY Button to turn on the Function mode.
2. Press the FUNC. Button to select different function modes.
There are four function modes:
BLUETOOTH -> USB -> AUX-in -> FM RADIO
FM RADIO OPERATION
1. Press STANDBY Button to turn on the Function mode .
2. Press the FUNC. Button to select mode. The display will show radio frequency. Radio
FULL SCAN:
1. Press the
/ FM SCAN/ BT UNPAIR Button to perform a full FM
radio scan
Note: When first used, your radio scanned the FM band for available
stations. The station services found were then stored in your radio’s
memory. You can rescan the band at anytime if you move to a different
area or just refresh the stored list of available stations. The scanning
process will take a few minutes.
2. After the full scan, the radio will automatically store the first 20 FM
stations as presets for instant access to your favorite stations.
3. Use the TIME/M+/+10 Button to skip to the next stored radio station. (From station: P1 to P20)
AUTO SCAN:
Press and hold the SKIP+/TU+/LIGHT+ or SKIP−/TU-/LIGHT- Button for
approx.1 second, it will start to search the next radio station in the
direction of the search. The search operation simply finds stations with
strong signals. Stations with weak signal can only be tuned in manually.
MANUAL TUNNING
Press the SKIP+/TU+/LIGHT+ or SKIP−/TU-/LIGHT- Buttons to tune
down or up the frequency by 0.1MHz.
ANTENNA
For best reception, fully extend the FM wire antenna to receive FM stations. .
SAVING RADIO STATIONS IN THE MEMORY
1. Tune to the desired stations.
2. Press and hold the Button for approx. 1 second, the display will show ‘ ’ and flashing, PRESET / ■ PXX
where ‘ ’ is the next memory station number. XX
3. Press the SKIP+/TU+/LIGHT+ or SKIP−/TU-/LIGHT- Button to select the desired memory station number.
4. Press the PRESET / ■ Button again to store the station in the memory.
5. Repeat step 2 to 4 to store more radio stations in the memory.
6. Up to maximum 20 FM radio stations can be stored in the memory.
-5-
SELECT A STORED RADIO STATION IN THE MEMORY
1. Press the TIME/M+/+10 Button to select the stored radio station. (From station: P1 to P20 )
2. Press the SKIP+/TU+/LIGHT+ or SKIP−/TU-/LIGHT- Button to select the desired memory station number.
TURN OFF THE RADIO
To turn off the radio. press STANDBY Button to return to STANDBY mode.
AUX IN CONNECTION
1. Press STANDBY Button to turn on the Function mode.
2. Press Button to select the FUNC AUX-in mode. The display will show “ ” AUH
3. Insert one side of the audio cable (requires 3.5mm stereo plug, not supplied) into the line-out jack or
phones jack on your MP3 player and the other side to the aux-in jack at the back of the unit.
4. Turn on your MP3 player/device and follow the playback instruction.
5. Press Button to increase the volume. Press VOL+ VOL- Button decrease the volume.
6. To stop this function, simply turned off your MP3 player or press STANDBY Button to return to STANDBY
mode.
BLUETOOTH OPERATION
Connecting BLUETOOTH
1. Press STANDBY Button to turn on the Function mode.
2. Press the FUNC. Button to select BLUETOOTH mode. The display will show “bT”.
3. Turn on the Bluetooth of your device and search the unit for connection. Your Bluetooth device should find
“HX-202Qi HANNLOMAX”. Select this for connection.
4. If connection is successful, your Bluetooth device will show Bluetooth is connected.
5. Select and play the audio file though your Bluetooth device.
6. You can use the SKIP+/TU+/LIGHT+ Button to go to the next track or press the SKIP-/TU-/LIGHT- Button
to go back to the previous track. Press the SKIP-/TU-/LIGHT- Button twice to go back to the previous
track.
7. Press the
/ FM SCAN/ BT UNPAIR Button to temporarily pause playing. To resume, press the
/
FM SCAN/ BT UNPAIR Button again.
8. Press Button to increase the volume. Press VOL+ VOL-
Button to decrease the volume.
Bluetooth Auto paring
Once the unit paired with the Bluetooth device, it will automatically
pair with that device next time when you turn on the unit and that
Bluetooth device.
Bluetooth Unpairing
To unpair the Bluetooth device, press and hold BT UNPAIR Button. The unit will start to search for a new
connection.
Stop the BLUETOOTH streaming
To turn off the Bluetooth streaming, press STANDBY Button to return to STANDBY mode.
-6-
Product specificaties
| Merk: | HANNLOMAX |
| Categorie: | Wekkerradio |
| Model: | HX-202Qi |
Heb je hulp nodig?
Als je hulp nodig hebt met HANNLOMAX HX-202Qi stel dan hieronder een vraag en andere gebruikers zullen je antwoorden
Handleiding Wekkerradio HANNLOMAX
18 Juni 2025
17 Juni 2025

16 Juni 2025
16 Juni 2025
16 Juni 2025
16 Juni 2025
16 Juni 2025
16 Juni 2025

16 Juni 2025
16 Juni 2025
Handleiding Wekkerradio
- NGS
- ECG
- Karcher Audio
- Logik
- Balance
- Altec Lansing
- AXIL
- Aiwa
- Hama
- Mitsai
- Caliber
- Conair
- Eurochron
- Manta
- JBL
Nieuwste handleidingen voor Wekkerradio
2 Augustus 2025
29 Juli 2025

14 Juli 2025
14 Juli 2025
14 Juli 2025
5 Juli 2025

4 Juli 2025
29 Juni 2025

29 Juni 2025
28 Juni 2025