HANNLOMAX HX-1079BT Handleiding
HANNLOMAX
Wekkerradio
HX-1079BT
Bekijk gratis de handleiding van HANNLOMAX HX-1079BT (4 pagina’s), behorend tot de categorie Wekkerradio. Deze gids werd als nuttig beoordeeld door 12 mensen en kreeg gemiddeld 4.8 sterren uit 6.5 reviews. Heb je een vraag over HANNLOMAX HX-1079BT of wil je andere gebruikers van dit product iets vragen? Stel een vraag
Pagina 1/4

CD micro system with Radio and Bluetooth
Model : HX-1079BT
(Bluetooth pairing code : SRCD1079BT)
INSTRUCTION MANUAL
Note: Please read and follow these instructions before using your unit.
1. Read these instructions. Keep these instructions. Heed all warnings. Follow all instructions.
2. Do not use this apparatus near water.
3. Clean only with dry cloth.
4. Do not block any ventilation openings. Install in accordance with the manufacturer’s instructions.
5. Do not install near any heat sources such as radiators, heat registers, stoves, or other apparatus (including amplifiers) that produce heat.
6. Do not defeat the safety purpose of the polarized or grounding-type plug. A polarized plug has two blades with one wider than the other. A
grounding type plug has two blades and a third grounding prong. The wide blade or the third prong are provided for your safety. If the
provided plug does not fit into your outlet, consult an electrician for replacement of the obsolete outlet.
7. Protect the power cord from being walked on or pinched particularly at plugs, convenience receptacles, and the point where they exit from
the apparatus.
8. Only use attachments/accessories specified by the manufacturer.
9. Use only with the cart, stand, tripod, bracket, or table specified by the manufacturer, or sold with the apparatus.
When a cart is used, use caution when moving the cart/apparatus combination to avoid injury from tip-over.
10. Unplug this apparatus during lightning storms or when unused for long periods of time.
11. Refer all servicing to qualified service personnel. Servicing is required when the apparatus has been damaged in
any way, such as power-supply cord or plug is damaged, liquid has been spilled or objects have fallen into the
apparatus, the apparatus has been exposed to rain or moisture, does not operate normally, or has been dropped.
12. Grounding or Polarization – This product may be equipped with a polarized alternating-current line plug (a plug having one blade wider
than the other). This plug will fit into the power outlet only one way. This is a safety feature. If you are unable to insert the plug fully into the
outlet, try reversing the plug. If the plug should still fail to fit, contact your electrician to replace your obsolete outlet. Do not defeat the
safety purpose of the polarized plug.
13. Alternate Warnings – This product is equipped with a three-wire ground-type plug, a plug having a third (grounding) pin. This plug will only
into a grounding-type power outlet. This is a safety feature. If you are unable to insert the plug into the outlet, contact your electrician to
replace your obsolete outlet. Do not defeat the safety purpose of the grounding-type plug.
14. Ventilation – Slots and openings in the cabinet are provided for ventilation and to ensure reliable operation of the product and to protect it
from overheating, and these openings must not be blocked or covered. The openings should never be blocked by placing the product on
a bed, sofa, rug, or other similar surface. This product should not be placed in a built-in installation such as a bookcase or rack unless
proper ventilation is provided or the manufacturer’s instructions have been adhered to.
15. The MAINS plug or an appliance coupler is used as the disconnect device, the disconnect device shall remain readily operable.
16. : CLASS II apparatus with double insulation, and no protective earth provided. 回
17. Caution Marking and rating plate was located at bottom enclosure of the apparatus.
18. To reduce the risk of fire or electric shock, do not expose this apparatus to rain or moisture.
19. The apparatus shall not be exposed to dripping or splashing and that no objects filled with liquids, such as vases, shall be placed on
apparatus.
20. The mains plug is used as disconnect device. The mains plug of apparatus should not be obstructed OR should be easily accessed
during intended use. To be completely disconnect the power input, the mains plug or apparatus shall be disconnected from the mains.
21. Battery shall not be exposed to excessive heat such as sunshine, fire or the like.
22. Excessive sound pressure from earphones and headphone can cause hearing loss.
FCC NOTICE
This equipment has been tested and found to comply with the limits for a Class B digital device, pursuant to Part 15 of the FCC Rules. These
limits are designed to provide reasonable protection against harmful interference in a residential installation. This equipment generates, uses
and can radiate radio frequency energy and, if not installed and used in accordance with the instructions, may cause harmful interference to
radio communications.
-1-
However, there is no guarantee that interference will not occur in a particular installation. If this equipment does cause harmful interference to
radio or television reception, which can be determined by turning the equipment off and on, the user is encouraged to try to correct the
interference by one or more of the following measures:
– Reorient or relocate the receiving antenna.
– Increase the separation between the equipment and receiver.
– Connect the equipment into an outlet on a circuit different from that to which the receiver is needed.
– Consult the dealer or an experienced radio/TV technician for help.
This device complies with part 15 of the FCC Rules. Operation is subject to the following two conditions :
(1) This device may not cause harmful interference, and (2) this device must accept any interference received, including interference that
may cause undesired operation.
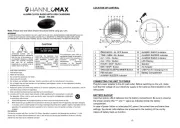
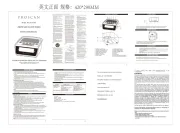
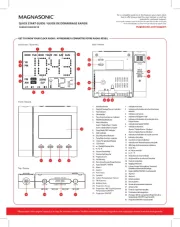
LOCATION OF CONTROLS
1.
Speakers 16.
CD Door OPEN Button
2.
POWER/AL. OFF Button 17.
CD Door
3.
PLAY/PAUSE Button 18.
Display
4.
FUNC./CL. ADJ. Button 19.
Remote Sensor
5.
SKIP−/TUNE− Button 20.
CD Compartment Back Light
6.
SKIP+/TUNE+ Button 21.
FM Wire Antenna
7.
MEM−/AL 1 Button 22.
R-SP Jack
8.
MEM+/AL 2 Button 23.
L-SP Jack
9.
P-MODE/MONO Button 24.
AUX-IN Jack
10.
SLEEP Button 25.
DC-IN Jack
11.
SNOOZE Button 26.
Remote
12.
STOP Button .
13.
PROG/MEM Button
14.
VOL− Button
15.
VOL+ Button
- 2 -

CONNECTING THE UNIT TO POWER
Plug one end of the AC/DC adaptor into the DC-In jack, and then plug the other end into AC
wall outlet. Before switching on the unit, make sure that the voltage of your electricity supply is
the same as that indicated on the rating plate.
CONNECTING THE LOUDSPEAKERS
Connect the cables of the two loudspeakers to the corresponding input (R) for the right speaker
and input (L) for the left speaker, located at the rear side of the unit.
Warning: Connect the loudspeakers before powering the unit. The unit may not work
properly or get damaged if you use speakers different than the ones supplied with the unit.
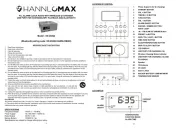
SETTING THE TIME
Before starting to set the time, make sure that the unit is in POWER OFF Mode.
1. Press and hold the FUNC/CL ADJ button for 1-2 seconds, (you can also press and hold the
CL.ADJ. button for 1-2 second on the remote control), the hour digit in the display will start
flashing.
2. Use the SKIP+/TUNE+ or SKIP−/TUNE− button to adjust the hour.
3. When the correct hour is selected, press the FUNC/CL.ADJ. button again, the minute digit
in the display will start flashing.
4. Use the SKIP+/TUNE+ or SKIP−/TUNE− button to adjust the minute.
5. When the correct time is selected, press the FUNC/CL ADJ button to store the time in the
memory.
SETTING THE ALARM TIME
Before starting to set the alarm time, make sure that the unit is in POWER OFF mode.
1. Press the MEM−/AL1 or MEM+/AL2 button on the unit once and the AL1 or AL2 icon will
appear in the display.
2. Press the FUNC/CL. ADJ. button to select the alarm wake up source. The options are
buzzer, Radio or CD.
3. Press the VOL+ or the VOL− to adjust the wake up sound level.
4. Press and hold the MEM−/AL1 or MEM+/AL2 button on the unit for 1-2 seconds, the alarm
hour digit will begin flashing.
5. Use the SKIP+/TUNE+ or SKIP−/TUNE− button on the unit to adjust the alarm hour.
6. When the desired alarm hour is selected, press the MEM−/AL1 or MEM+/AL2 button again,
the alarm minute digit will begin flashing.
7. Use the SKIP+/TUNE+ or SKIP−/TUNE− button on the unit to adjust the alarm minute.
8. When the desired alarm time is selected, press the MEM−/AL1 or MEM+/AL2 button again
to confirm.
TURN OFF THE ALARM
When the alarm activate, press the POWER/AL.OFF button to turn off the alarm.
SNOOZE FUNCTION
1. Whenever the alarm activate, it can be temporarily suspended for a short period of 9
minutes by pressing the SNOOZE button.
2. The alarm will automatically activate again after the 9 minutes SNOOZE period has ended.
3. This procedure can be repeated for up to approximately one hour.
- 3 -
RADIO OPERATION
1. Press the POWER/AL OFF button (or press the POWER button on the remote) to turn on
the unit.
2. Press the FUNC./CL.ADJ button (or press the FUNC button on the remote control) to
select the FM RADIO mode.
3. Press and hold the SKIP+/TUNE+ or SKIP−/TUNE− button on the unit for approx. 1
second, it will start to search the next available radio station in the direction of the search.
The search operation simply finds stations with strong signals. Stations with weak signal
can only be tuned in manually.
4. Use the P-MODE/MONO button (or use the MONO button on the remote) to select stereo
or mono broadcasting.
5. Press VOL+ or VOL− button to adjust the volume to the desired listening level.
SAVING RADIO STATIONS IN THE MEMORY
Note : If you use this unit in the first time, or after plug off the AC/DC adaptor from a wall outlet,
the unit memory number will be starting from P01.
1. Tune to the desired stations.
2. Press the PROG/MEM button (or press the MEM button on the remote control), the display
will show the next memory station number and flash continuously.
3. Press the SKIP+/TUNE+ or SKIP−/TUNE− button on the unit to select memory number
(you can also use the M+ or M− on the remote control), then press PROG/MEM button on
the unit or the MEM button on the remote control again to store the station into the memory.
4. Repeat step 1 to 3 to store more radio stations in the memory.
5. Up to maximum 20 radio stations can be stored in the memory.
TO SELECT A STORED RADIO STATION IN THE MEMORY
Use the MEM+/AL2 or MEM−/AL1 button on the unit or the M+ or M− button on the remote
control to select the stored radio station.
Press the MEM+/AL2 button on the unit or the M+ button on the remote control to skip up to the
next stored station in the memory.
Press the MEM−/AL1 button on the unit or the M− button on the remote control to go back to
the previous stored station in the memory.
CD OPERATION
1. Press the POWER/AL OFF button to turn on the unit.
2. Press the FUNC/CL.ADJ button to select the CD mode.
3. Insert a CD disc in the CD compartment and close the CD door, the unit will start reading
the disc, it will play the first track of the entire disc after reading.
4. Press VOL+ or VOL− button to adjust the volume to the desired listening level.
5. During playing, press the PLAY/PAUSE button to temporarily pause playing. To resume,
press the PLAY/PAUSE button again.
6. To stop playing, press the STOP button.
- 4 -

Skip Mode
1. During play or pause mode, press the SKIP+/TUNE+ button to go to the next track.
2. During play, press the SKIP−/TUNE− button on the unit once to go back to the beginning of
the track. Press the SKIP−/TUNE− button twice to go back to the previous track.
3. In pause mode, press the SKIP−/TUNE− button to go back to the previous track.
Search Mode
1. Press and hold the SKIP+/TUNE+ or SKIP−/TUNE− button on the unit to quickly advance
or reverse through the track at high speed.
2. Release the button to return to normal play.
Different Play Mode
Press the P-MODE/MONO button to select different kinds of play mode with the following
sequence.
(You can also use the REPAT button on the remote for the REPEAT function or use the
RANDOM button on the remote for the RANDOM function)
REPEAT ONE REPEAT ALL RANDOM NORMAL
REPEAT - the track being played and will repeat continuously.
REPEAT ALL - the whole disc will repeat continuously.
RANDOM – the tracks in the disc will be played in random sequence.
Programming
The programming should be done during STOP mode
1. Press the PROG/MEM button on the unit or the PROG button on the remote control, the
LCD display will show flash continuously. P01 PROG
2. Use the SKIP+/TUNE+ or SKIP−/TUNE− button to select the desired track.
3. Press the PROG/MEM button on the unit or the PROG button on the remote control again
to store the selected track in the memory, the LCD display will show and flash P02 PROG
continuously.
4. Repeat steps 2 to 3 to store more tracks in the memory. You can store up to 20 tracks in
the memory.
5. Press the PLAY/PAUSE button to start playing the disc in the programmed order.
6. To stop playing, press the STOP button.
7. To cancel the programming list, press the STOP button and open the CD compartment
door or select a different function RADIO AUXor .
AUX-IN CONNECTION
1. Press the POWER/AL OFF button to turn on the unit.
2. Press the FUNC./CL.ADJ button to select the Aux mode.
3. Insert one side of the audio cable (not included) into the Line-Out or Phone Jack on your
MP3 Player or audio device and the other side into the AUX-IN jack of the unit.
4. Turn on your MP3 player or audio device and follow its playback instructions.
- 5 -
SLEEP TO MUSIC FUNCTION
1. This function allows you to listen to the radio, iPhone/iPod or CD while you fall asleep.
2. Press the SLEEP button, the display will show the default sleep time of 90 minutes. Press
the SLEEP button again to select the sleep time with decrement of 10 minutes.
3. When the correct sleep time is selected, stop pressing the SLEEP button, the unit will go to
the sleep mode in about 5 seconds with SLEEP appear in the display.
4. Now you can enjoy listening to the selected music for the pre-set period of sleep time.
5. After this pre-set time has elapsed, the unit will switch off automatically.
BLUETOOTH OPERATION
Connecting BLUETOOTH
1. Press the FUNC/CL.ADJ button to select BLUETOOTH, will show in the LCD display. bt
2. Turn on the Bluetooth of your Bluetooth device and search the unit for connection. Your
Bluetooth device should find “ ”.If password is needed for connection, please SRCD1079BT
enter “0000”.
3. Pair your Bluetooth device with the unit.
4. Select and play the audio file though your Bluetooth device.
Auto Paring
The unit has auto pairing function. Once the unit paired with the Bluetooth device, it will
automatically pair with that device next time when you turn on the unit and that Bluetooth
device.
In BLUETOOTH mode, press and hold the PLAY/PAUSE button for approximate 2 seconds, the
existing pairing will released and you can pair the unit with your other Bluetooth device.
Turn Off the Bluetooth Operation
To turn off the BLUETOOTH operation, press the FUNC/CL.ADJ button (or the FUNC button on
the remote control) to select other functions (CD, FM RADIO or AUX)
- 6 -
Product specificaties
| Merk: | HANNLOMAX |
| Categorie: | Wekkerradio |
| Model: | HX-1079BT |
Heb je hulp nodig?
Als je hulp nodig hebt met HANNLOMAX HX-1079BT stel dan hieronder een vraag en andere gebruikers zullen je antwoorden
Handleiding Wekkerradio HANNLOMAX
18 Juni 2025
17 Juni 2025

16 Juni 2025
16 Juni 2025
16 Juni 2025
16 Juni 2025
16 Juni 2025
16 Juni 2025

16 Juni 2025
16 Juni 2025
Handleiding Wekkerradio
- Kunft
- Ade
- Adler
- Bigben
- Prologue
- First Austria
- Xiron
- AIC
- Arcelik
- Soundmaster
- Mesqool
- Seg
- Timex
- Technoline
- Alba
Nieuwste handleidingen voor Wekkerradio
2 Augustus 2025
29 Juli 2025
14 Juli 2025
14 Juli 2025
14 Juli 2025
5 Juli 2025

4 Juli 2025
29 Juni 2025
29 Juni 2025

28 Juni 2025