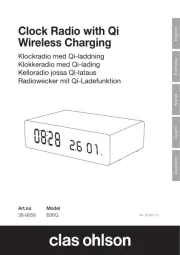
HANNLOMAX HX-123CR Handleiding
HANNLOMAX
Wekkerradio
HX-123CR
Bekijk gratis de handleiding van HANNLOMAX HX-123CR (4 pagina’s), behorend tot de categorie Wekkerradio. Deze gids werd als nuttig beoordeeld door 17 mensen en kreeg gemiddeld 4.8 sterren uit 9 reviews. Heb je een vraag over HANNLOMAX HX-123CR of wil je andere gebruikers van dit product iets vragen? Stel een vraag
Pagina 1/4

PLL ALARM CLOCK RADIO
Model : HX-123CR
INSTRUCTION MANUAL
CAUTION
RISK OF ELECTRIC SHOCK
DO NOT OPEN
The lightning flash with
arrowhead symbol, within
an equilateral triangle, is
intended to alert the user
to the presence of
uninsulated “dangerous
voltage” within the
products enclosure that
may be of sufficient
magnitude to constitute a
risk of electric shock to
persons.
Warning: To reduce the rise of
electric shock, do not remove
cover (or back) no
user-serviceable parts inside.
Refer servicing to qualified
service personnel.
The exclamation point within
an equilateral triangle is
intended to alert the user to
the presence of important
operating and maintenance
(servicing) instructions in the
literature accompanying the
appliance.
IMPORTANT SAFETY INSTRUCTIONS
1. Read these instructions.
2. Keep these instructions.
3. Heed all warnings.
4. Follow all instructions.
5. Do not use this apparatus near water.
6. Clean only with dry cloth.
7. Do not block any ventilation openings. Install in accordance with the manufacturer’s instructions.
8. Do not install near any heat sources such as radiators, heat registers, stoves, or other apparatus
(including amplifiers) that produce heat.
9. Protect the power cord from being walked on or pinched particularly at plugs, convenience receptacles,
and the point where they exit from the apparatus.
10. Only use attachments/accessories specified by the manufacturer.
11. Use only with the cart, stand, tripod, bracket, or table specified by the manufacturer, or sold with the
apparatus. When a cart is used, use caution when moving the cart/apparatus combination to avoid
injury from tip-over.
2) Unplug the apparatus during lightning storms or when unused for long periods of time.
3) Refer all servicing to qualified service personnel. Servicing is required when the apparatus has been
damaged in any way, such as power-supply cord or plug is damaged, liquid has been spilled or
objects have fallen into the apparatus, the apparatus has been exposed to rain or moisture, does not
operate normally, or has been dropped.
FCC NOTICE
This device compiles with Part 15 of the FCC Rules. Operation is subject to the following two conditions :
(1) this device may not cause harmful interference, and (2) this device must accept any interference
received, including interference that may cause undesired operation.
-1-

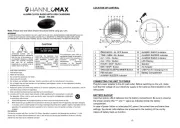
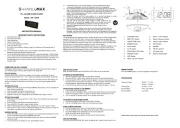
QUICK REFERENCE
1. CLK / MEM
•
Use this button to set the clock
•
Use this button to store radio stations in the memory.
•
Use this button to select the stored radio stations in the memory.
2. MIN /
•
Use this button to adjust the minute in CLOCK or ALARM time
•
Use this button to search the radio station in backward direction.
3. HOUR /
•
Use this button to adjust the hour in CLOCK or ALARM time.
•
Use this button to search the radio station in forward direction.
4. DIMMER ( Use this button to adjust the brightness of the display.)
5. AL2 / − (VOLUME)
•
Use this button to set the alarm time in ALARM 2
•
Use this button to decrease the volume.
6. AL1 / + (VOLUME)
•
Use this button to set the alarm time in ALARM 1
•
Use this button to increase the volume.
7. SOURCE / AL. OFF /
•
Use this button to turn on the unit.
•
Use this button to select AM, FM or AUX mode
•
Use this button to turn the ALARM off after Alarm activates.
8. SNOOZE (SLEEP)
•
Use this button to temporarily suspend the ALARM for a short period.
•
Use this button to set the sleep time.
9. PM INDICATOR
10. ALARM 1 BUZZER INDICATOR (This indicator shows that the unit is in ALARM 1 buzzer mode.)
11. ALARM 1 RADIO INDICATOR(This indicator shows that the unit is in ALARM 1 radio mode.)
12. ALARM 2 BUZZER INDICATOR (This indicator shows that the unit is in ALARM 2 buzzer mode.)
13. ALARM 2 RADIO INDICATOR (This indicator shows that the unit is in ALARM 2 radio mode.)
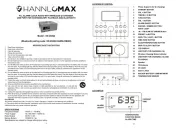
14. LED DISPLAY
15. DC JACK ( Connect the unit to the AC/DC adaptor.)
16. FM WIRE ANTENNA (Extent this wire antenna to obtain better FM broadcasting.)
17. BATTERY COMPARTMENT (Compartment for the back-up battery.)
-2-

SETTING THE CLOCK
1. With the unit in CLOCK mode, press and hold the button for about 1 second, the time will CLK / MEM
begin to flash on the display.
2. Press the HOUR /
button to adjust the hour.
3. Press the MIN /
button to adjust the minute.
4. When the correct time is selected, press the button again to confirm. CLK / MEM
SETTING THE ALARMS
1. With the unit in CLOCK mode, press the AL1/+ AL2/− or button. The ALARM time will begin to flash on
the display.
2. Press the HOUR /
button to adjust the alarm hour.
3. Press the MIN /
button to adjust the alarm minute.
4. When the desired alarm time is selected, press the AL1/+ AL2/− or button to confirm.
5. Press the AL1/+ AL2/− or button to select the ALARM sound mode - buzzer or currently set radio
station. The alarm buzzer or radio indicator will light up.
SNOOZE FUNCTION
1. Whenever the alarm (radio or buzzer) activates, it can be temporarily suspended for a short period of 9
minutes by pressing the button once. SNOOZE
2. The buzzer or radio will then automatically activate again after the 9 minutes SNOOZE period has
ended.
3. This procedure can be repeated for up to approximately one hour.
TURN OFF THE ALARM
When the Alarm activate, press the SOURCE / AL. OFF / button to turn off the Alarm.
LISTENING TO THE AM/FM RADIO
1. Press the SOURCE / AL. OFF / to select AM or FM band.
2. Press the HOUR /
MIN / or
button step by step to tune to the desired radio stations.
3. Press and hold the HOUR /
MIN / or
button for approx.1 second, it will start to search the next
radio station in the direction of the search. The search operation simply finds stations with strong signals.
Stations with weak reception can only be tuned in manually.
4. To turn off the radio, press and hold the SOURCE / AL. OFF / button for approx.. 1 second.
SETTING THE CLOCK
1. With the unit in CLOCK mode, press and hold the button for about 1 second, the time will CLK / MEM
begin to flash on the display.
2. Press the HOUR /
button to adjust the hour.
3. Press the MIN /
button to adjust the minute.
4. When the correct time is selected, press the button again to confirm. CLK / MEM
SETTING THE ALARMS
1. With the unit in CLOCK mode, press the AL1/+ AL2/− or button. The ALARM time will begin to flash on
the display.
2. Press the HOUR /
button to adjust the alarm hour.
3. Press the MIN /
button to adjust the alarm minute.
4. When the desired alarm time is selected, press the AL1/+ AL2/− or button to confirm.
5. Press the AL1/+ AL2/− or button to select the ALARM sound mode - buzzer or currently set radio
station. The alarm buzzer or radio indicator will light up.
-3-
Product specificaties
| Merk: | HANNLOMAX |
| Categorie: | Wekkerradio |
| Model: | HX-123CR |
Heb je hulp nodig?
Als je hulp nodig hebt met HANNLOMAX HX-123CR stel dan hieronder een vraag en andere gebruikers zullen je antwoorden
Handleiding Wekkerradio HANNLOMAX
18 Juni 2025
17 Juni 2025

16 Juni 2025
16 Juni 2025
16 Juni 2025
16 Juni 2025
16 Juni 2025
16 Juni 2025

16 Juni 2025
16 Juni 2025
Handleiding Wekkerradio
- Reflexion
- Karcher
- Smartwares
- Vimar
- Tristar
- Balance
- Cresta
- Dual
- Bresser
- Daewoo
- Mebus
- Lexibook
- Altec Lansing
- Braun
- Terris
Nieuwste handleidingen voor Wekkerradio

5 Augustus 2025
5 Augustus 2025
2 Augustus 2025
29 Juli 2025
14 Juli 2025
14 Juli 2025
14 Juli 2025
5 Juli 2025

4 Juli 2025
29 Juni 2025