EtherWAN EasyLink Pro Handleiding
EtherWAN Niet gecategoriseerd EasyLink Pro
Bekijk gratis de handleiding van EtherWAN EasyLink Pro (2 pagina’s), behorend tot de categorie Niet gecategoriseerd. Deze gids werd als nuttig beoordeeld door 191 mensen en kreeg gemiddeld 4.1 sterren uit 2 reviews. Heb je een vraag over EtherWAN EasyLink Pro of wil je andere gebruikers van dit product iets vragen? Stel een vraag
Pagina 1/2
EasyLink Pro Hardened Wireless Bridge
Installation Guide
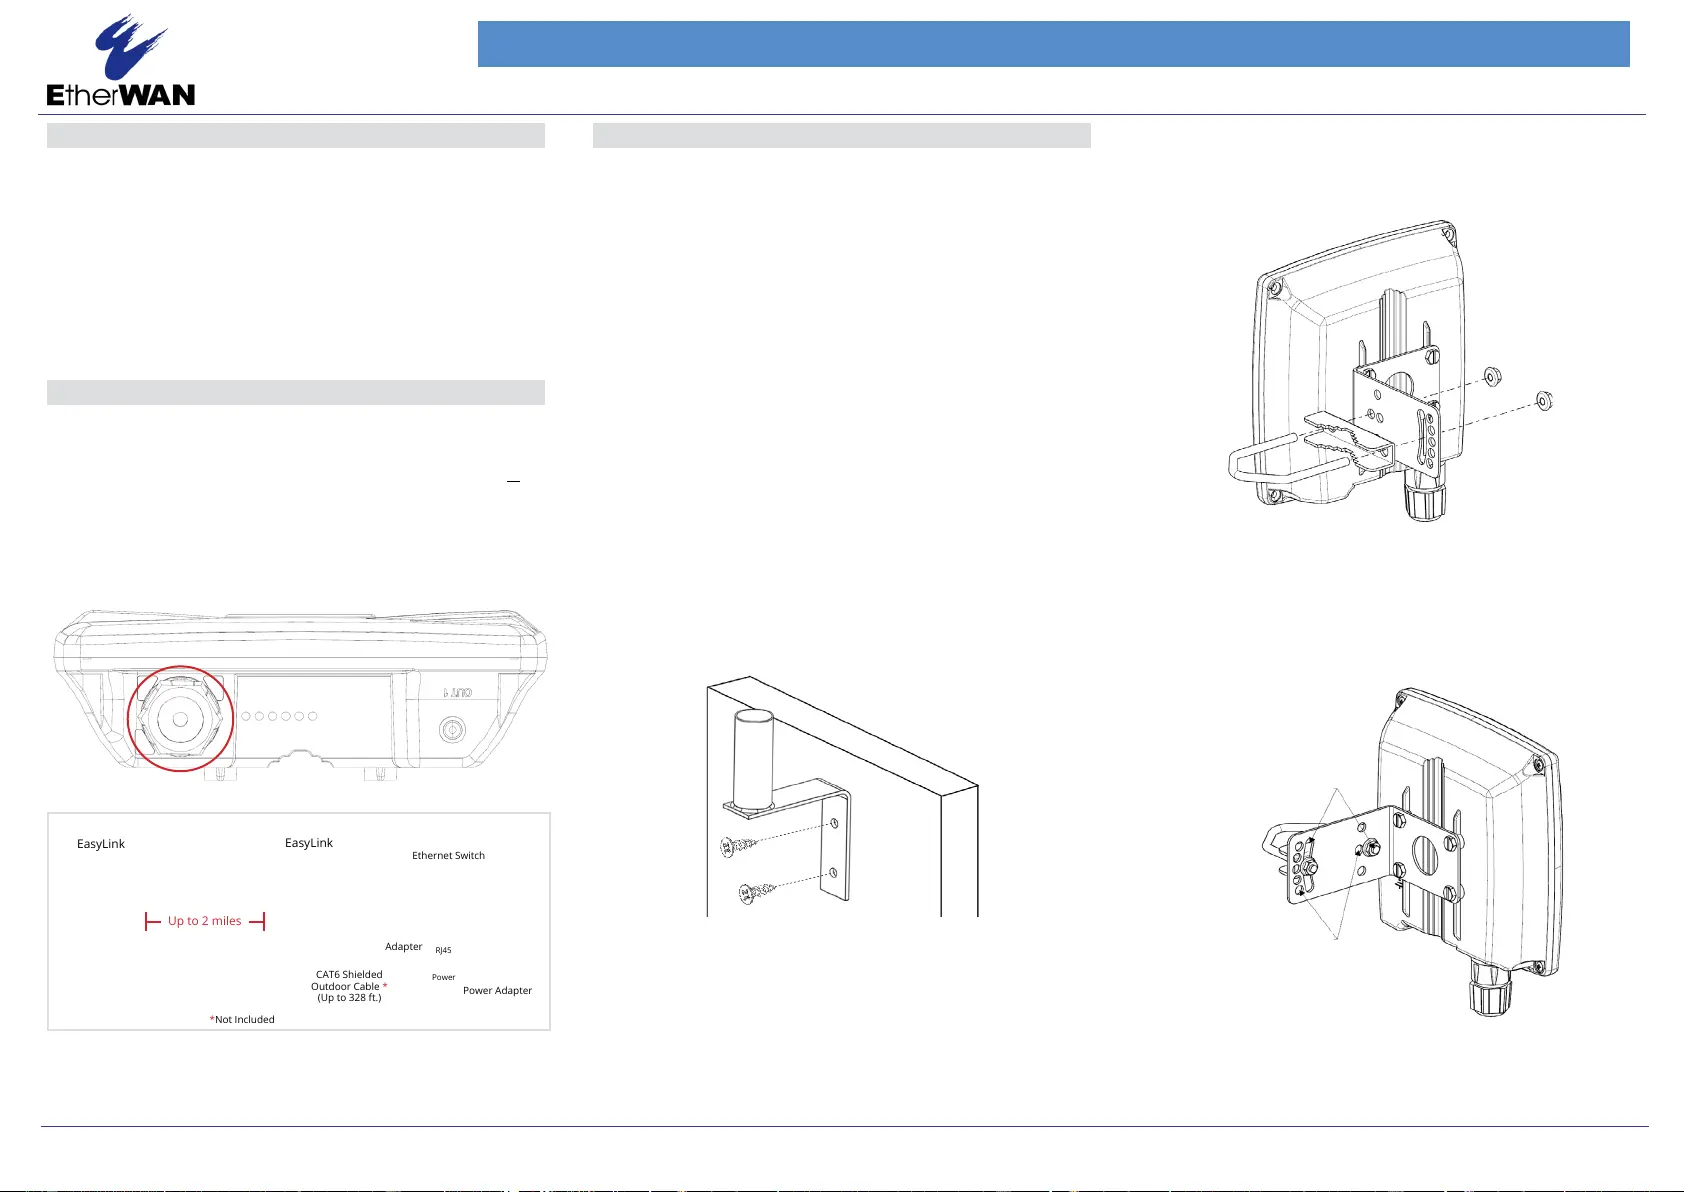
1Unpacking
Open the carton and unpack the items. Your package should include:
•1 x EasyLink A outdoor-rated wireless bridge Unit
•1 x EasyLink B outdoor-rated wireless bridge Unit
•2 x Passive PoE Injectors
•2 x Power Supplies
•2 x Active to Passive PoE Converters (for use with a PoE Switch)
•2 x Pole Mount kits
•2 x Wall Mount Poles
If any items are missing or damaged, notify your EtherWAN representative.
2Supplying Power
All EasyLink series models are Passive PoE Powered Devices and
no AC or DC power socket. Power is supplied through an Ethernet cable
plugged into the RJ45 port (shown in the figure below). The cable must be
connected to the included inline PoE power injector and power supply or
the active PoE to passive PoE converter (supplied) with a standard PoE
switch. The maximum powerconsumption is 12 watts. The power supplies
that come with the EasyLinkare 24VDC, 36W,and have been tested over
ethernet up to 328 feet (100 meters) distance. The EasyLink units them-
selves support DC input from8-30V for customer supplied power options.
RJ-45 PoE Port
Up to 2 miles
3Physical Installation
NOTE: It is recommended to test all wireless devices before the nal
installation. This includes bench testing and signal testing of the EasyLink
unit in the positions where they will be mounted. Loosely mount EasyLink
units in the intended installation spots and ensure that the transmission
signal is strong enough for the intended application.
The minimum and maximum recommended distance between EasyLink A
and EasyLink B are 100 feet minimum to 2 miles maximum.
This product is designed for outdoor installation on a pole or wall. It is
recommended to install the EasyLink at a height of at least 15 feet. A
higher mounting position will result in a stronger signal, especially at
longer distances. If there are obstacles between the EasyLinks, mount the
EasyLinks at a higher distance to avoid the obstacles. Mount the EasyLink
with the ethernet port and LEDs facing down.
The EasyLink Kit comes with two mounting Options. Pole mount and wall
mount.
Wall Mount
The mall mount pole is used when a mounting pole is not already in place.
Attach the wall mount pole to the location where the EasyLink will be
mounted (see figure below). Be sure to use mounting bolts appropriate for
the location the Pole will be mounted. Once the wall mount pole is in place,
use the EasyLink pole mount kit to attach the EasyLink to the wall mount
pole.
Pole Mount
1. Align the four holes on the housing bracket with those on the back face
of the housing and use the four screws and lock washers to attach the
bracket to the housing.
1.
2.Position the Wireless unit and mount on the pole. Use the supplied
U-Bolt and position the wireless unit as shown in the graphic below.
Once the wireless unit is in position, tighten the supplied nuts with
washers to the U-Bolt until the wireless unit is securely attached to the
pole.
Using this pair of holes allows
freely adjusting tilt up to +/- 17°
EasyLink Pro Series
8/7/2023
Copyright 2023 EtherWAN Systems, Inc.
All Rights Reserved.
Page 1
Using this pair of holes allows
adjusting tilt in increments of
8.5° (up to +/- 17°)
(Up to 328 ft.)
CAT6 Shielded
Outdoor Cable *
*Not Included
EasyLink
EasyLink
Ethernet Switch
Power Adapter
Adapter
Power
RJ45
Product specificaties
| Merk: | EtherWAN |
| Categorie: | Niet gecategoriseerd |
| Model: | EasyLink Pro |
Heb je hulp nodig?
Als je hulp nodig hebt met EtherWAN EasyLink Pro stel dan hieronder een vraag en andere gebruikers zullen je antwoorden
Handleiding Niet gecategoriseerd EtherWAN

7 Januari 2026
6 Januari 2026
31 December 2026
31 December 2026
11 November 2025
9 November 2025
9 November 2025
7 November 2025
6 November 2025
6 November 2025
Handleiding Niet gecategoriseerd
Nieuwste handleidingen voor Niet gecategoriseerd
7 Juni 2026
7 Juni 2026
7 Juni 2026
7 Juni 2026
7 Juni 2026
6 Juni 2026
6 Juni 2026
6 Juni 2026
6 Juni 2026
6 Juni 2026