Denver DV-10201 Handleiding
Denver Niet gecategoriseerd DV-10201
Bekijk gratis de handleiding van Denver DV-10201 (2 pagina’s), behorend tot de categorie Niet gecategoriseerd. Deze gids werd als nuttig beoordeeld door 158 mensen en kreeg gemiddeld 4.3 sterren uit 3 reviews. Heb je een vraag over Denver DV-10201 of wil je andere gebruikers van dit product iets vragen? Stel een vraag
Pagina 1/2
ACT-1301 MK2 Quick Start Guide
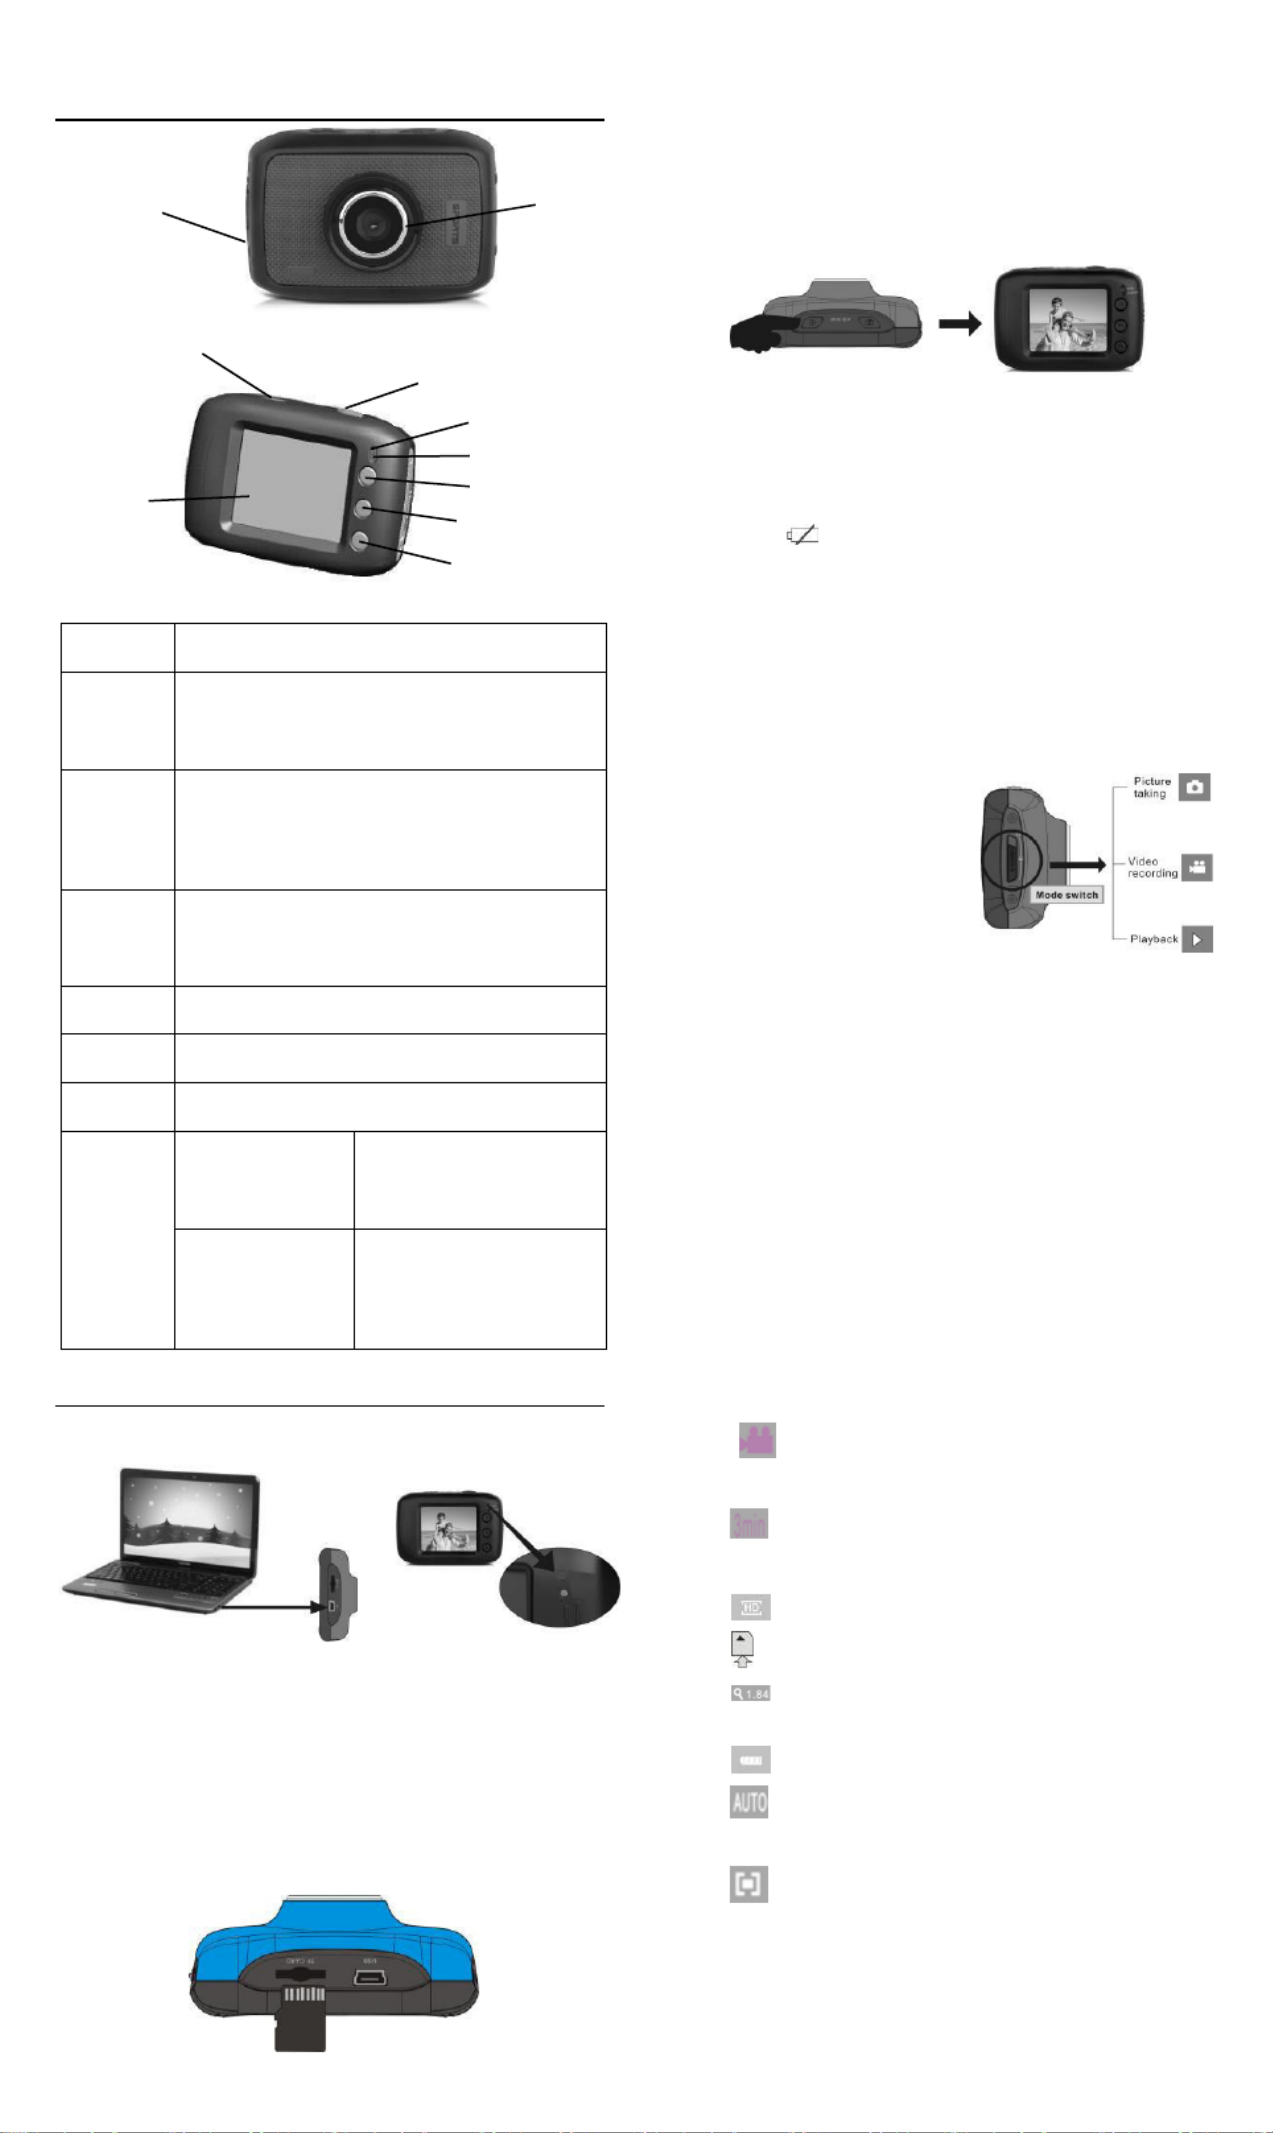
Appearance and key introduction
Key/Indi
cator
Function
Power
On/Off
Power the camera on or off. When opening the
menu, switch over between normal (effect
parameters and replay of image, video) and
setup menu.
Shutter
In recording video mode, it is used to start/stop
recording. In capture mode, it is used as a
shutter. In replay mode; it is used to play the
video. When operating the menu, it is used to
confirm the selection.
Up key
Digital zoom in (capture/video mode); menu
selection (after opening the menu); pause,
continue playing (when playing and recording
video in replay mode).
OK key
Open/exit from menu. Stop playing (when
replaying video).
Down key
Digital zoom out (capture/video mode); menu
selection (after opening the menu).
Mode
switch
Switch over among modes of capture, video and
replay.
Operation
indicator
The upper one is
a charging
indicator.
In power-off state, it keeps
constant lighting when the
charger is connected for
charging.
The lower one is
an operation
indicator.
It flashes once during
capturing, and it keeps
constant lighting when
connected with computer
portable disk.
Start Use
1. Charge built-in lithium battery
In power-off state, when the camera is connected with computer,
charging begins. At this time, the charger indicator lights and it turns off
when charged full. Generally, it costs 2-4 hours to charge full.
2. Use memory card
1. Follow the instructions carved by slot of the memory card, it is to insert
FT card into the card slot till entirely inserted.
2. To take the FT card out, after gently pressing the end of the memory
card inwards, the card will reject out.
Please notice: UHS (ultra highspeed) cards doesn’t work, as they
are not 100% backward compatible
Note: The camera is not equipped with a built-in memory, and thus
a memory card is required.
3. Power On/Off:
3.1 Power-on: If to press and hold POWER key for 3 seconds, the
screen starts up and the camera enters startup state.
3.2 Power-off: In idle state of the camera, if to click POWER key, the
camera turns off.
Automatic power-off: When idle time set for the camera reaches, it
automatically turns off to save power. The default time of the
system automatic power-off is 5 minutes;
3.3Power-off due to low battery: In case of extremely low battery, the
icon “ ”appears on the LCD screen. Please timely
charge the battery. When the icon turns red and flashes, the
camera will automatically power off.
4. Functional mode switchover
The camera is equipped with three modes: capture, video and replay
mode. After power-on, the modes can be switched over with MODE
switch.
5. Indicators
Operation indicator: When the camera works (e.g. recording video,
capturing or automatic screen turn-off), the
operation indicator lights.
Charger indicator: Constant lighting is to remind user that the
camera is being charged.
6 Video mode
( With maximum 29 minutes video recording per sequence)
When pushing Mode switch to video mode, click shutter in
preview state to start recording video; to stop video recording,
it is to click it again. It will also automatically stop recording in
case that no free room left in the memory card or the battery is
over low:
1 00:00:01: time-meter, indicating 1 second left for recording
(indicating 1 second recorded during recording).
2 : mode icon: indicates the current mode is video
recording.
3 : loop recording video time icon: indicates the current loop
video recording time is 3 minutes.
4 : movie size: indicates the current movie size is 720P.
5 : indicates currently a memory card is inserted.
6 : magnification of digital zoom: press Up and down key to
adjust zoom among 1x-4x.
7 : battery icon: indicates current battery level.
8 : white balance icon: indicates the current white balance
mode is automatic.
9 :metering icon: indicates it is currently the pan overall
perspective metering.
Video menu setup
In video mode, press OK key to open menu, and then press Up and
Down key to select menu. When selecting menu, background of the
selected item will be highlighted. Press Shutter to enter sub-menu. In
sub-menu, press Up and Down key for selection, press Shutter for
confirmation and back to main menu. In the main menu, press OK
USB Cable
Capture mode: Take pictures.
Video mode: Record video and
driving (5min, 3min and 1min).
Replay mode: Picture and video
file playback.
Mode switch:
-Photograph
-Video
-Replay
Lens
Power
On/Off
Shutter
Charging indicator
Operation indicator
Up key
OK key
Down key
LCD TFT
Product specificaties
| Merk: | Denver |
| Categorie: | Niet gecategoriseerd |
| Model: | DV-10201 |
Heb je hulp nodig?
Als je hulp nodig hebt met Denver DV-10201 stel dan hieronder een vraag en andere gebruikers zullen je antwoorden
Handleiding Niet gecategoriseerd Denver

9 Juli 2026
15 Mei 2026
14 Mei 2026
14 Mei 2026
13 Mei 2026
12 Mei 2026
11 Mei 2026
9 Maart 2026
6 Januari 2026
1 Juli 2023
Handleiding Niet gecategoriseerd
Nieuwste handleidingen voor Niet gecategoriseerd
31 Juli 2026
31 Juli 2026
31 Juli 2026
31 Juli 2026
31 Juli 2026
31 Juli 2026
31 Juli 2026
30 Juli 2026
30 Juli 2026
30 Juli 2026