Azden WL/T-PRO Handleiding
Bekijk gratis de handleiding van Azden WL/T-PRO (4 pagina’s), behorend tot de categorie Microfoon. Deze gids werd als nuttig beoordeeld door 63 mensen en kreeg gemiddeld 4.5 sterren uit 32 reviews. Heb je een vraag over Azden WL/T-PRO of wil je andere gebruikers van dit product iets vragen? Stel een vraag
Pagina 1/4

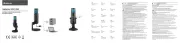
PRO VHF WIRELESS MICROPHONE SYSTEM
INSTRUCTION MANUAL
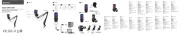
WR WM- -PRO -PRO WM/T PRO - - - EX-503 -EX-413
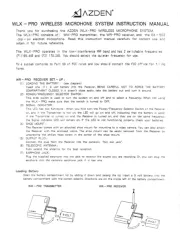
POWER/FREQUENCY
SELECTOR SWITCH
SHOE MOUNT
BATTERY
COMPARTMENT
EARPHONE JACK
SIGNAL INDICATOR
POWER INDICATOR
POWER/FREQUENCY
SELECTOR SWITCH
WR-PRO RECEIVER
WM-PRO TRANSMITTER
EX-503 LAVALIER MIC
MICROPHONE JACK
OUTPUT PLUG
NOTES
Do not store or use the unit in high heat or humidity.
Do not use near a broadcast staon, airport or plane . You must change the frequencies if you are
interfering with other transmiers.
The system will work connuously for 10 hours on one set of baeries. If sound quality is poor,
change baeries.
Remove baeries when the system is not in use.

2
Thank you for purchasing the AZDEN PRO VHF Wireless Microphone System. The following
will show you the contents of the system you ordered:
WHX PRO-
-1 x WR PRO VHF Receiver
-1 x WM/T PRO VHF Transmier/Handheld Microphone
WLX PRO-
-1 x WR PRO VHF Receiver
- -1 x WM PRO VHF Belt Pack Transmier
-1 x EX 503 Lavalier Microphone
WMS PRO-
-1 x WR PRO VHF Receiver
- -1 x WM PRO VHF Belt Pack Transmier
- 1 x EX 413 Wired Handheld Microphone
The PRO systems operate in the low interference VHF band and have 2 switchable frequen--
cies, 169.445 (F1) and 170.245 (F2). You should select the quieter frequency for use.
The systems conforms to Part 90 of the FCC rules. You should contact the FCC oce for l-
ing forms.
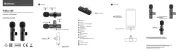
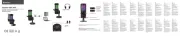
WR-PRO RECEIVER
1. Loading Baery
Open the baery compartment lid by sliding it down and raising the lid. Insert a 9-
volt baery into the baery compartment with the correct polarity. Direcons are
on the inside of the baery compartment. Do not force the baery compartment l
id to close. If it does not close easily, turn The baery around and try again.
2. Power/Frequency Selector Switch
This slide switch is used to turn the unit on and o as well as to select a frequency.
When not using the WR PRO, make sure that the switch is turned to OFF. -

3
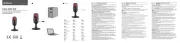
3. Signal Indicator
This LED has 2 funcons: When you rst turn the Power/Frequency Selector Switch
of the Receiver on, but if the Transmier is not on, the LED will go on and o indi-
cang that the baery is good. If both the Transmier and the Receiver are on and
they are on the same frequency, the Signal Indicator will remain on.
4. Shoe Mount
The Receiver comes with a shoe mount and loop and hook fastener to mount it to a - -
video camera. Select the one works best for your setup. To install the shoe mount,
align the three pegs to corresponding holes and slide the whole assembly upward
unl it clicks. To remove the shoe mount, slide the assembly downward.
5. Output Plug
Connect the plug from the Receiver into the camera’s “EXT. MIC’ jack.
6. Telescopic Antenna
Fully extend the antenna for the best recepon.
7. Earphone Jack
Plug the supplied earphone into the jack to monitor the sound you are recording.
WM/T PRO TRANSMITTER/MICROPHONE-
1. Loading baery
Turn the boom half of the microphone body counterclockwise unl it is completely
o. Insert 1 “AA” baery into the compartment. Make sure the polarity is correct or
the unit will not operate. Replace the boom half and turn it clockwise unl it is
snug. DO NOT OVERTIGHTEN.
2. Frequency Selecon
The unit is factory pre set to F1. Make sure that the Receiver is also set to F1. To -
change to F2, remove the boom half of the microphone body as you did when
loading baery. On the top of the baery compartment, there is a small 2 posion -
switch. Slide the switch to posion F2. Change the Receiver frequency to F2.
3. 3 Posion Power Switch-
The boom posion is “OFF”, the top is “ON”, and the middle is ”STANDBY”. In the
“STANDBY” posion, the unit is on but the microphone is muted. This allows the
microphone to be passed around noiselessly. Remember to set the mic to its “ON”
posion before speaking. When the switch in “ON” or “STANDBY”, the red LED will
stay lit if the Receiver is also operang on the same frequency.
Product specificaties
| Merk: | Azden |
| Categorie: | Microfoon |
| Model: | WL/T-PRO |
| Kleur van het product: | Zwart |
| Ingebouwd display: | Nee |
| Gewicht: | 98 g |
| Breedte: | 86 mm |
| Diepte: | 21.5 mm |
| Hoogte: | 60 mm |
| Vormfactor: | Bodypackzender |
| Accu/Batterij voltage: | 9 V |
| Levensduur accu/batterij: | 8 uur |
| Soort antenne: | Ingebouwd |
| Frequentie: | 169.445, 170.245 MHz |
| Type werkfrequentie: | Zeer hoge frequentie (VHF) |
| Aantal transmissiefrequenties: | 2 |
Heb je hulp nodig?
Als je hulp nodig hebt met Azden WL/T-PRO stel dan hieronder een vraag en andere gebruikers zullen je antwoorden
Handleiding Microfoon Azden
6 September 2025
27 April 2025

28 Mei 2023

26 Mei 2023

9 Mei 2023

2 Mei 2023

1 Mei 2023

24 April 2023

21 April 2023

18 April 2023
Handleiding Microfoon
- Sktome
- Auray
- Countryman
- AIRHUG
- Ibanez
- Creative
- BOYA
- Fun Generation
- Prodipe
- Mad Dog
- Musicmate
- Xtreme
- OneConcept
- DNA
- Alto
Nieuwste handleidingen voor Microfoon
15 September 2025
15 September 2025
15 September 2025
15 September 2025
15 September 2025
15 September 2025

15 September 2025
15 September 2025
15 September 2025
15 September 2025