Vimar R21512.1 Handleiding


Lees hieronder de 📖 handleiding in het Nederlandse voor Vimar R21512.1 (5 pagina's) in de categorie Niet gecategoriseerd. Deze handleiding was nuttig voor 26 personen en werd door 2 gebruikers gemiddeld met 4.5 sterren beoordeeld

Pagina 1/5
Viale Vicenza, 14
36063 Marostica VI - Italy
www.vimar.com
21512.1UEN 07 1806
Eikon Evo
21512.1
Touch screen colour Full Flat - 3 modules.
Device with a touch screen to be used in the By-me automation system for controlling
lights, roller shutters, air-conditioning, scenarios and speaker system. In addition, if
the system is also fitted with the load control, the device enables viewing the state of
the loads themselves. It does not handle the intrusion detection system.
CAUTION: For the flush-mounted controls only (art. 01480, 01481, 01482, 01485,
01486 and 01487), the function of pressing the button briefly or holding it down
dynamically change the behaviour of the timer actuator (from monostable timed to
bistable or vice versa) configured in the same group.
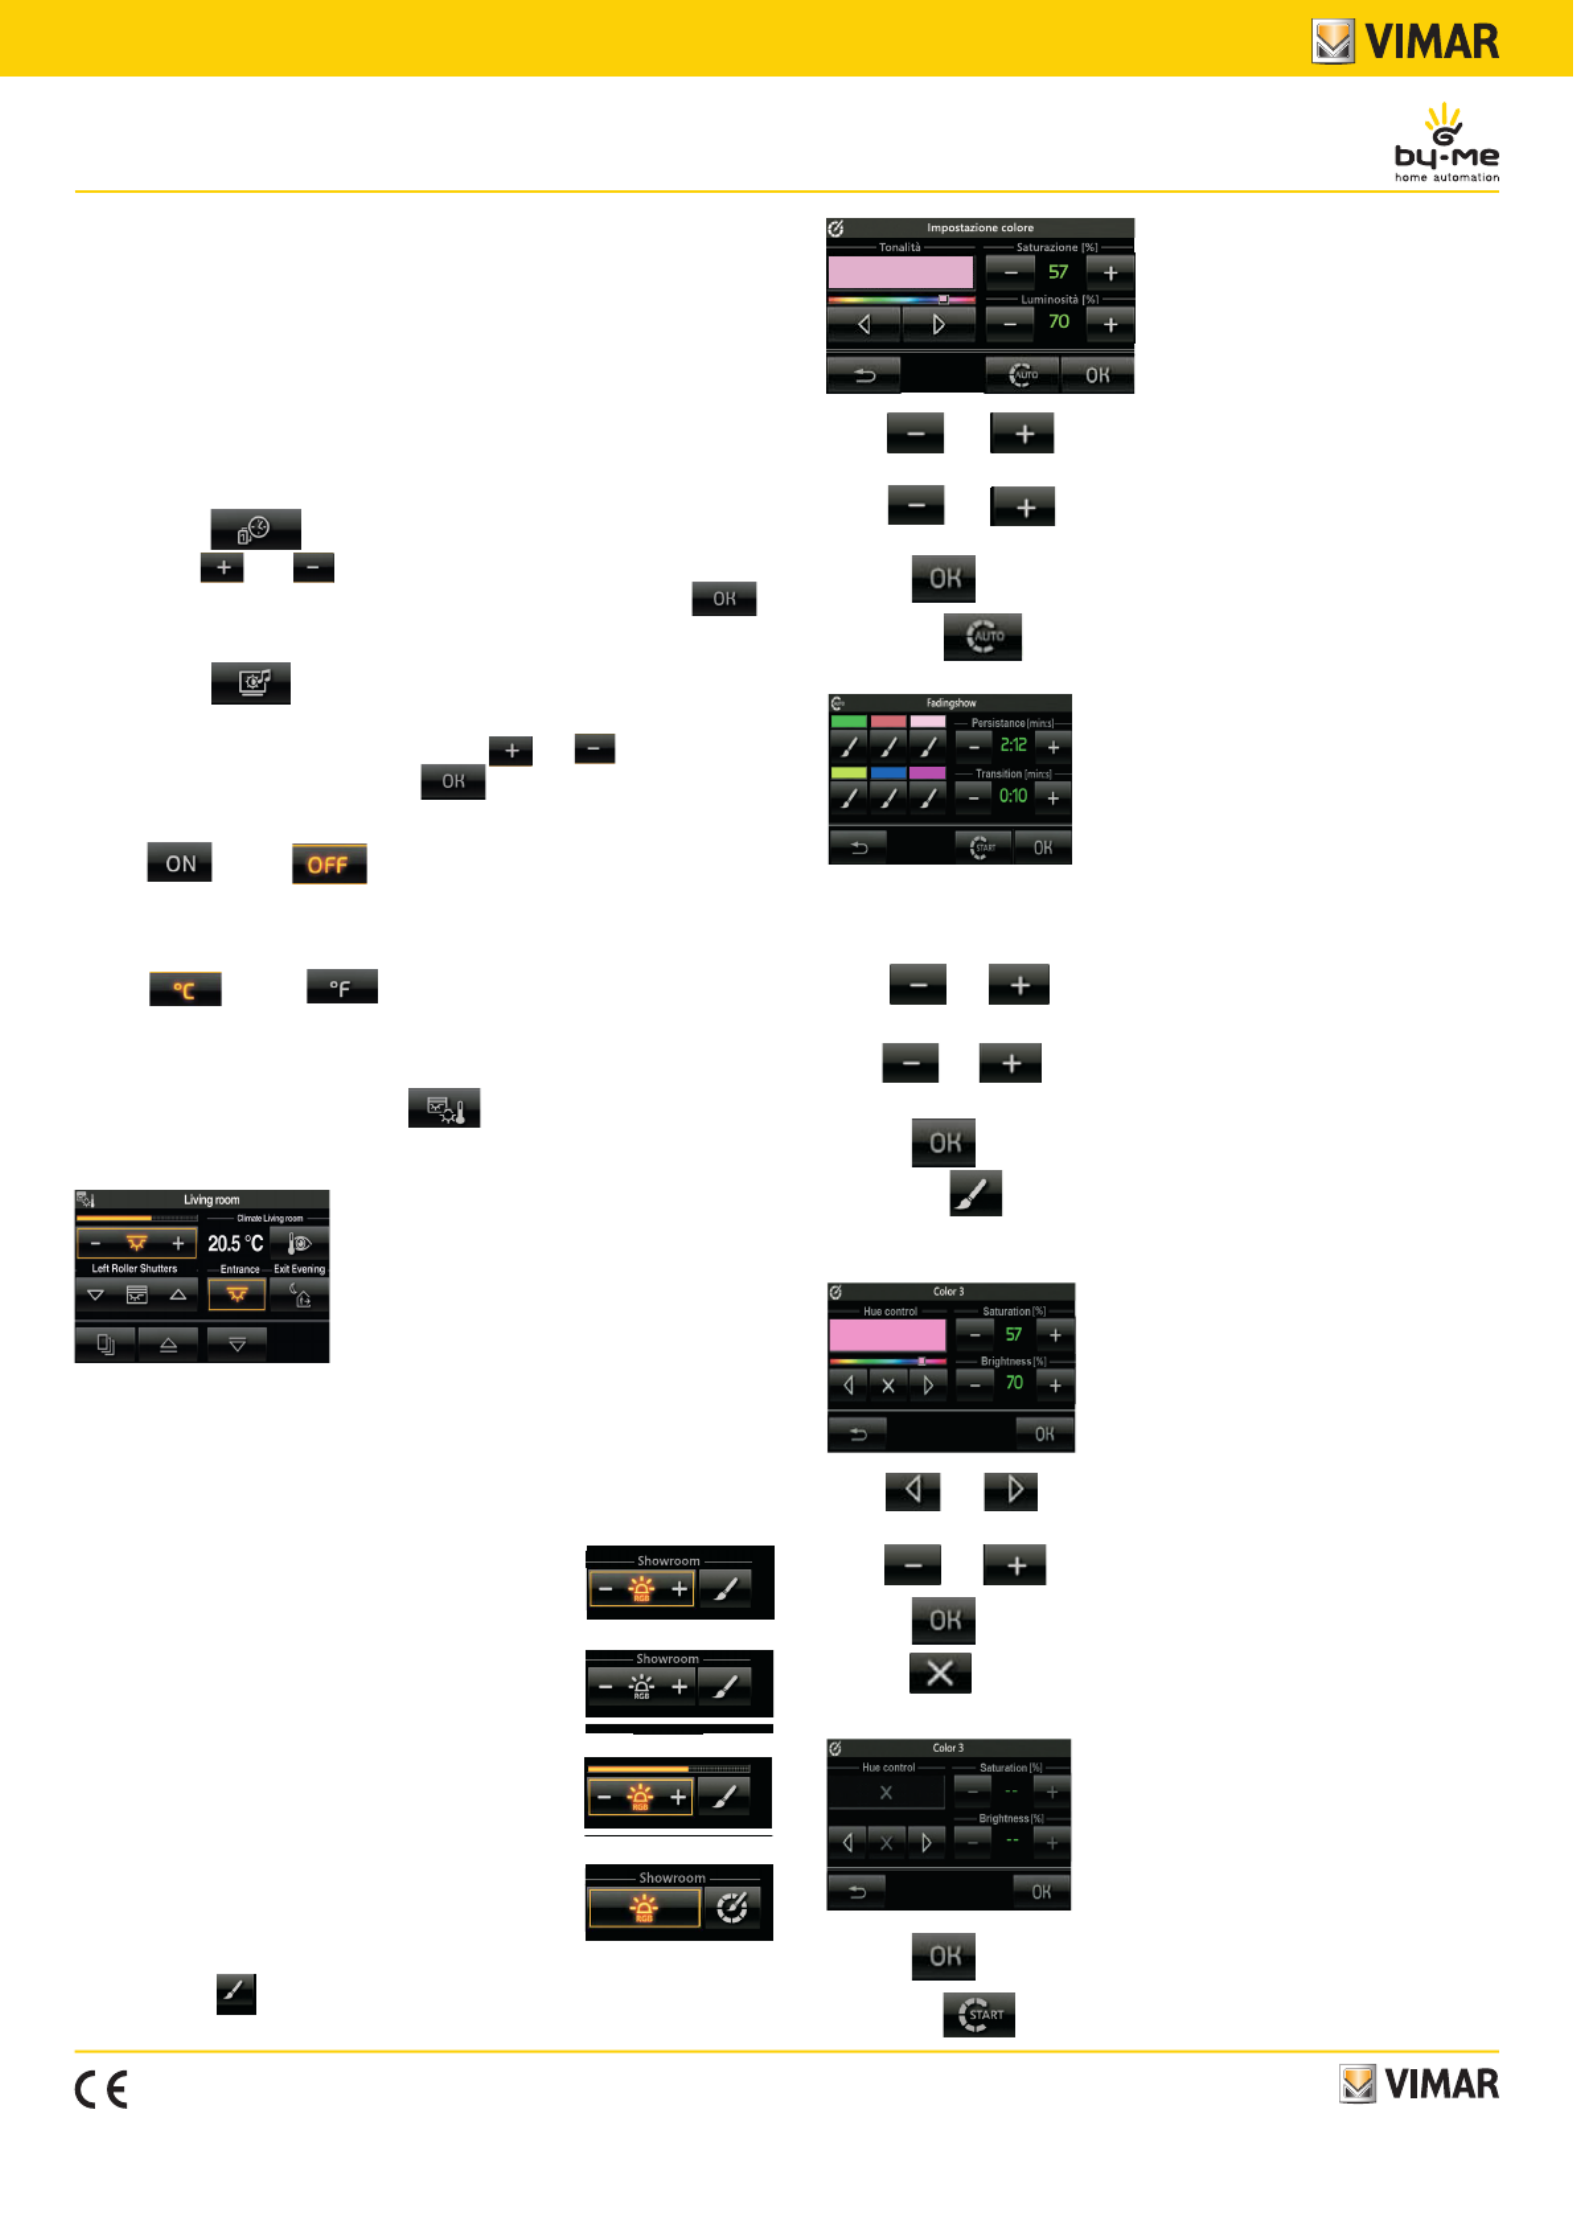
SETTING DATE AND TIME
B -y touching the icon it is possible to set the time and date to be displa
yed. Using the and icons set the blinking value to bring it to the desired
time and the day, month and year and finally confirm by touching the icon .
SETTING BACKLIGHTING AND CONTRAST OF THE DISPLAY
On touching the icon the display shows the screen that enables setting the
backlighting and the contrast of the display.
The setting is made by keeping your finger on the and icons to reach the
desired level and then it is confirmed with .
SETTING THE AUDIBLE WARNING
With the icon our icon it is possible to enable or disable the audible
warning (beep) that accompanies touching the icons displayed on the touch screen.
SETTING TEMPERATURE UNIT
With the icon our icon in correspondence of the wording of tem-
perature unit, you select the units in which temperature is displayed.
CONTROL MANAGEMENT
From the main menu, by touching the icon, you access the screen that
enables viewing and controlling the devices configured in the rooms controlled by the
touch screen. For example:
Managing RGB lamps
The video touch screen enables managing switching on/off, adjusting/changing the
hue, saturation, and brightnessof the RGB lamps and it will also be possible to activa-
te the Fading-Show application configured on the controller by your installer.
Depending on the operating mode, the adjustment icon will be displayed as follows:
Tapping the icon opens the screen where you make the colour settings.
With and on you set the percentage of “vividness” Saturation
of the colour.
With and on you set the percentage of “contrast” Brightness
of the colour.
• Tapping confirms the settings you have made.
Tapping the icon opens the screen where you make the Fading-Show
settings.
The function of Fading-Show allows to set a cyclical sequence of colors (up to a
maximum of 6) for color changes and the play of light in the environments where
the lamps are installed RGB.
With and on Persistance you set the time during which each of
the colors remains fixed.
With and on Transition you set the time that elapses between the
passage of a gradual color to the next.
• Tapping confirms the settings you have made.
Tapping the icon associated with each of the colors that make up the
sequence is going to change the color characteristics of that color; in fact will
see the following screen:
With and you set the tone of color that will match the position of
the cursor to the position desired color.
. With and you set Saturation and Brightness
• Tapping confirms the settings you have made.
Tapping you remove the color selected by the sequence of Fading-Show
and the screen will become as follows:
• Tapping confirms the settings you have made.
• Tapping the icon to activate the sequence Fading-Show just set.
WARNING - Operation of the icons of activation of
the scenarios:
Short press: Activate the scenario.
• Long press (5 seconds): storage scenario (are sto-
red and overwritten states of the groups involved
in the scenario being created).
- Lamp ON.
In this case the degree of illumination is constant (no
adjustment) and the colour is fixed.
- Lamp OFF.
As above but with the lamp off.
- Lamp under adjustment.
In this case the degree of illumination is adjustable (level
displayedby the scroll bar) and the colour is fixed.
- Lamp ON in Fading-Show mode.
In this case the lamp is on and it provides the lighting
sequence configured on the controller.
Viale Vicenza, 14
36063 Marostica VI - Italy
www.vimar.com
21512.1UEN 07 1806
When the sequence is active and you fall into the menu Fading-Show, the screen
becomes the following:
• Tapping the icon will stop the sequence of Faing-Show set.
Example for setting the Fading-Show with 4 colors.
- With the icon set the desired 4 colors; with remove the 2 colors
that you want to include in the sequence.
- With and set the Persistance and Transition (for example, 2 min
and 15 s respectively).
- Tapping confirms the settings you have made.
- Tapping to activate the sequence Fading-Show just set.
In the case considered the color remains fixed for 2 minutes then if will start to
change up to the next color within 15 seconds.
Dimmer feature when it is combined with the “Brightness Sensor”
If the system is fitted with a brightness sensor combined with art. 01467, you can
keep the brightness in a room automatically constant according to the value read
by the sensor and a brightness setpoint that is set automatically with each adjust-
ment on the dimmer.
The function of keeping the brightness constant can be switched on/off at any time
by tapping ; in this case the controls become the same as for any other
dimmered lighting point.
This function then allows obtaining energy savings as natural light is used, as long
as possible, instead of artificial light for lighting the room.
On the touchscreen, the dimmer combined with the brightness sensor can be
added to any room screen and the view is similar to the following:
THERMOSTAT AND TEMPERATURE PROBE
In the touchscreen, at the graphical user interface level, the thermostat and the
temperature probe behave in a similar way; it will then display:
• Current temperature.
• Temperature measured by the external sensor connected to the thermostat input
(if fitted).
• Relative humidity, measured by the electronic humidity sensor (if fitted).
• Speed of fan coil (if fitted).
• Current setpoint.
• Output status (on, off and, when present, with boost) .
Alarm symbol of an external probe used as a screed alarm in an underfloor
system .
With the touchscreen you can set:
• Seasonal mode SUMMER – NEUTRAL ZONE WINTER.
• Operating mode.
• Temperature setpoint.
Fan coil speed (1-2-3 AUTO or setting on a proportional value, in steps of 10%,
between 0 and 100% or AUTO) .
OTHER TYPES OF ADJUSTMENTS
The touchscreen lets you make other types of proportional adjustments that are not
necessarily related to the lighting; a viewing example can be as follows:
If the actuator is OFF, the display will show: .
If there is a fault on the output that you are adjusting, the associated control will
display a specific warning instead of the adjustment value:
If the system includes the device with 3 analogue inputs 01467 which is connected
to a dedicated sensor, the room control screens may display one or more instanta-
neous values of different variables measured by the sensor.
The variables that can be viewed, which can be brightness, wind speed, baromet-
ric pressure, relative humidity, air quality, air flow, voltage, electric current, power,
amount of rainfall and temperature, are shown as follows:
If the displayed variable is relative humidity and when envisaged by the system,
you can set a setpoint on exceeding which a special alarm will be displayed, and
activated when needed.
On the previous screen, notice that the ON/OFF output status indicator linked to it
may be absent if the humidity control is disabled on the setpoint adjustment screen.
Tapping displays the screen for setpoint adjustment (minimum value 20%
- maximum value 80%) and for switching the output control on/off:
CLIMATE CONTROLLER
If there is one or more climate controllers in the system and the installer has
configured their command/control in the touch screen, the device will display the
following operating options:
- Fixed mode (with the possible setpoint control).
- Modulating mode.
ON normal
On in the
adjustment phase
Adjustment OFF Viewing only
Viale Vicenza, 14
36063 Marostica VI - Italy
www.vimar.com
21512.1UEN 07 1806
If there is a malfunction of the system, or damage to the probes connected to the
climate controller, the touch screen will display the icon .
Note: The presence or absence of external and auxiliary probes depends on their
actual installation according to the needs and type of temperature control system.
WEATHER STATION
If the weather station is installed in the system, the touchscreen will display the
measured data in a specific screen. Two examples of screens showing the data
measured by the weather station are given below.
The arrows next to the temperature and wind speed take you to a page showing
the extreme values recorded. Resetting these values can be done manually (with
the specific button) or automatically at midnight every day. The choice between the
two reset modes is made during installation.
Reference screens displaying the extreme temperature values:
IMPORTANT: The weather symbols displayed by the touchscreen correspond
to the current state of the weather and are not a forecast.
LOAD CONTROL
Using the touch screen you can see at any time the instantaneous power consu-
med by the plant; in addition, if the same system is also monitoring a manufacturing
plant, you will see the instantaneous power produced in the system.
LOGIC UNIT
The icon is displayed in the main menu when the system contains one or
more logic units in which there are programs whose timing you can change.
Whenever the main screen is accessed, the touchscreen displays the following
information:
• number of programs;
• name of each program;
• number of timings for each program;
• type of each timing.
For each program you can:
• view the status ( or icons);
view and if necessary the timing (a program can have more than one weekly/
periodic/cyclic type of timing).
Tap the icon associated with the desired logic unit to access the screen displaying
the list of programs it contains. The symbol to the left of the name indicates whether
the program is paused (present) or playing (absent).
• SPEAKER SYSTEM
If a screen of the touchscreen includes an audio zone of the speaker system, the
screen displayed will be similar to the following one:
In this case it is possible to control switching the zone on/off and adjusting the
volume. Touching enables changing the channel for listening to the speaker
system (changing the source).
The icon indicates the type of source you are listening to and touching it
takes you to the control screen of the active source.
The FM radio control screen for the speaker system is the following:
The and icons enable setting the method of selecting the station
to listen to; by touching it is possible to search for the
next or previous station that the radio is able to receive.
By touching it is possible to use to select the previous or
next station saved on the radio (up to 8 different stations can be saved).
Keeping pressed a long time enables passing on to the screen for saving the
active broadcaster to one of the 8 stations that can be saved; on this screen, touch
one of the 8 buttons to save the active broadcaster to the corresponding memory
and then automatically return to the previous screen.
When combined with the speaker system, the touchscreen can also function as an
alarm clock. The alarm clock control/setting screen is the following:
Touching displays the screen for setting the alarm clock; via this screen
you can enable/disable the alarm clock (icon ), set the time (icon ) and
select whether the alarm clock will activate a scenario (icon ) or simply switch
on the audio zone (icon ).
Alarm clock operation.
When the time of day coincides with the time set on the alarm clock, the touchscre-
en switches on to display the relevant screen and the system activates the selected
audio zone or scenario.
The Snooze function is available whenever the alarm clock is activated and it can
only be used until the following intervention of the screensaver; in this case, touching
the touchscreen at any point temporarily deactivates the audio zone associated with
the alarm clock (even if the scenario output is selected) and will be reactivated after
8 minutes (this applies to each activation of the “Snoozefunction).
If the “Snooze” function is not used, the alarm clock will not reactivate the audio
zone (which can be switched off with the normal By-me controls, with the tou-
chscreen or with a scenario) but remains set to activate on the following day at
the same time.
CONTROL FOR iPOD, iPHONE AND AUXILIARY SOURCES
If the sound system includes a Docking Station, by using the touch screen you can
control:
- Apple devices (iPod/iPhone);
- auxiliary stereo sources.
Auxiliary stereo sources are connected to the Docking Station with the jack on
its base; this input takes priority over any Apple device connected to the Docking
Station and therefore the iPod/iPhone can only be controlled when there is no
auxiliary source.


Product specificaties

Merk: Vimar
Categorie: Niet gecategoriseerd
Model: R21512.1

Heb je hulp nodig?

Als je hulp nodig hebt met Vimar R21512.1 stel dan hieronder een vraag en andere gebruikers zullen je antwoorden


Handleiding Niet gecategoriseerd Vimar

Handleiding Niet gecategoriseerd

Nieuwste handleidingen voor Niet gecategoriseerd