Vimar ELVOX 46XVR Handleiding


Lees hieronder de 📖 handleiding in het Nederlandse voor Vimar ELVOX 46XVR (4 pagina's) in de categorie Niet gecategoriseerd. Deze handleiding was nuttig voor 17 personen en werd door 2 gebruikers gemiddeld met 4.5 sterren beoordeeld

Pagina 1/4
Viale Vicenza, 14
36063 Marostica VI - Italy
www.vimar.com
49401810A0 01 2209
46XVR.ES04 - 46XVR.ES08
1 - Introduction
1.1 - Summary
Series of multi-technology DVRs, allow to select the input technology for each
single channel, selectable between: AHD, CVBS, IP, TVI and CVI. They are able
to manage and record cameras up to 5Mpx in H.264 and H.265 compression,
available in 4 and 8 channel versions.
2 - Basic Operation Guide
2.1 - Startup & Shutdown
Please make sure all the connections are done properly before you power on the
unit. Proper startup and shutdown are crucial to expending the life of your device.
2.1.1 - Startup
1- Connect the output display device to the VGA/HDMI interface of the DVR.
2 - Connect with the mouse and power on. The device will boot and the power
LED would turn blue.
3 - A WIZARD window will pop up (you should select the display language the
rst time you use the DVR). Refer to 3.1 Startup Wizard for details.
2.1.2 - Shutdown
1 - Click Start Shutdown to pop up the Shutdown window. Select
“Shutdown” in the window. The unit will power o󰀨 after a while by clicking
“OK” button.
2 - Disconnect the power.
1 - Introduzione
1.1 - Riepilogo
Gamma di DVR multi-tecnologia, permettono di selezionare la tecnologia di
ingresso per ogni singolo canale, selezionabile tra: AHD, CVBS, IP, TVI e CVI.
Sono in grado di gestire e registrare telecamere no a 5Mpx in compressione
H.264 e H.265, disponibili nelle versioni 4 e 8 canali.
2 - Guida all’utilizzo di base
2.1 - Avvio e spegnimento
Prima di collegare l’unità all’alimentazione, vericare che tutti i collegamenti
siano stati eseguiti correttamente. Un corretto avvio e arresto è estremamente
importante per la durata del dispositivo.
2.1.1 - Avvio
1 - Collegare il dispositivo di visualizzazione all’interfaccia VGA/HDMI del DVR.
2 - Collegare il mouse e accendere. Il dispositivo si avvia e il LED di alimentazione
diventa blu.
3 - ComparirĂ  una procedura guidata (selezionare la lingua la prima volta che si
utilizza il DVR). Per ulteriori dettagli, fare riferimento a 3.1 Procedura guidata
per l’avvio.
2.1.2 - Spegnimento
1 - Fare clic su Start Shutdown (arresto) e comparirà la nestra di arresto.
Selezionare “Shutdown” (“Arresto”) all’interno della nestra. Dopo un
momento di attesa, l’unità si spegnerà facendo clic sul pulsante “OK”.
2 - Scollegare l’alimentazione.
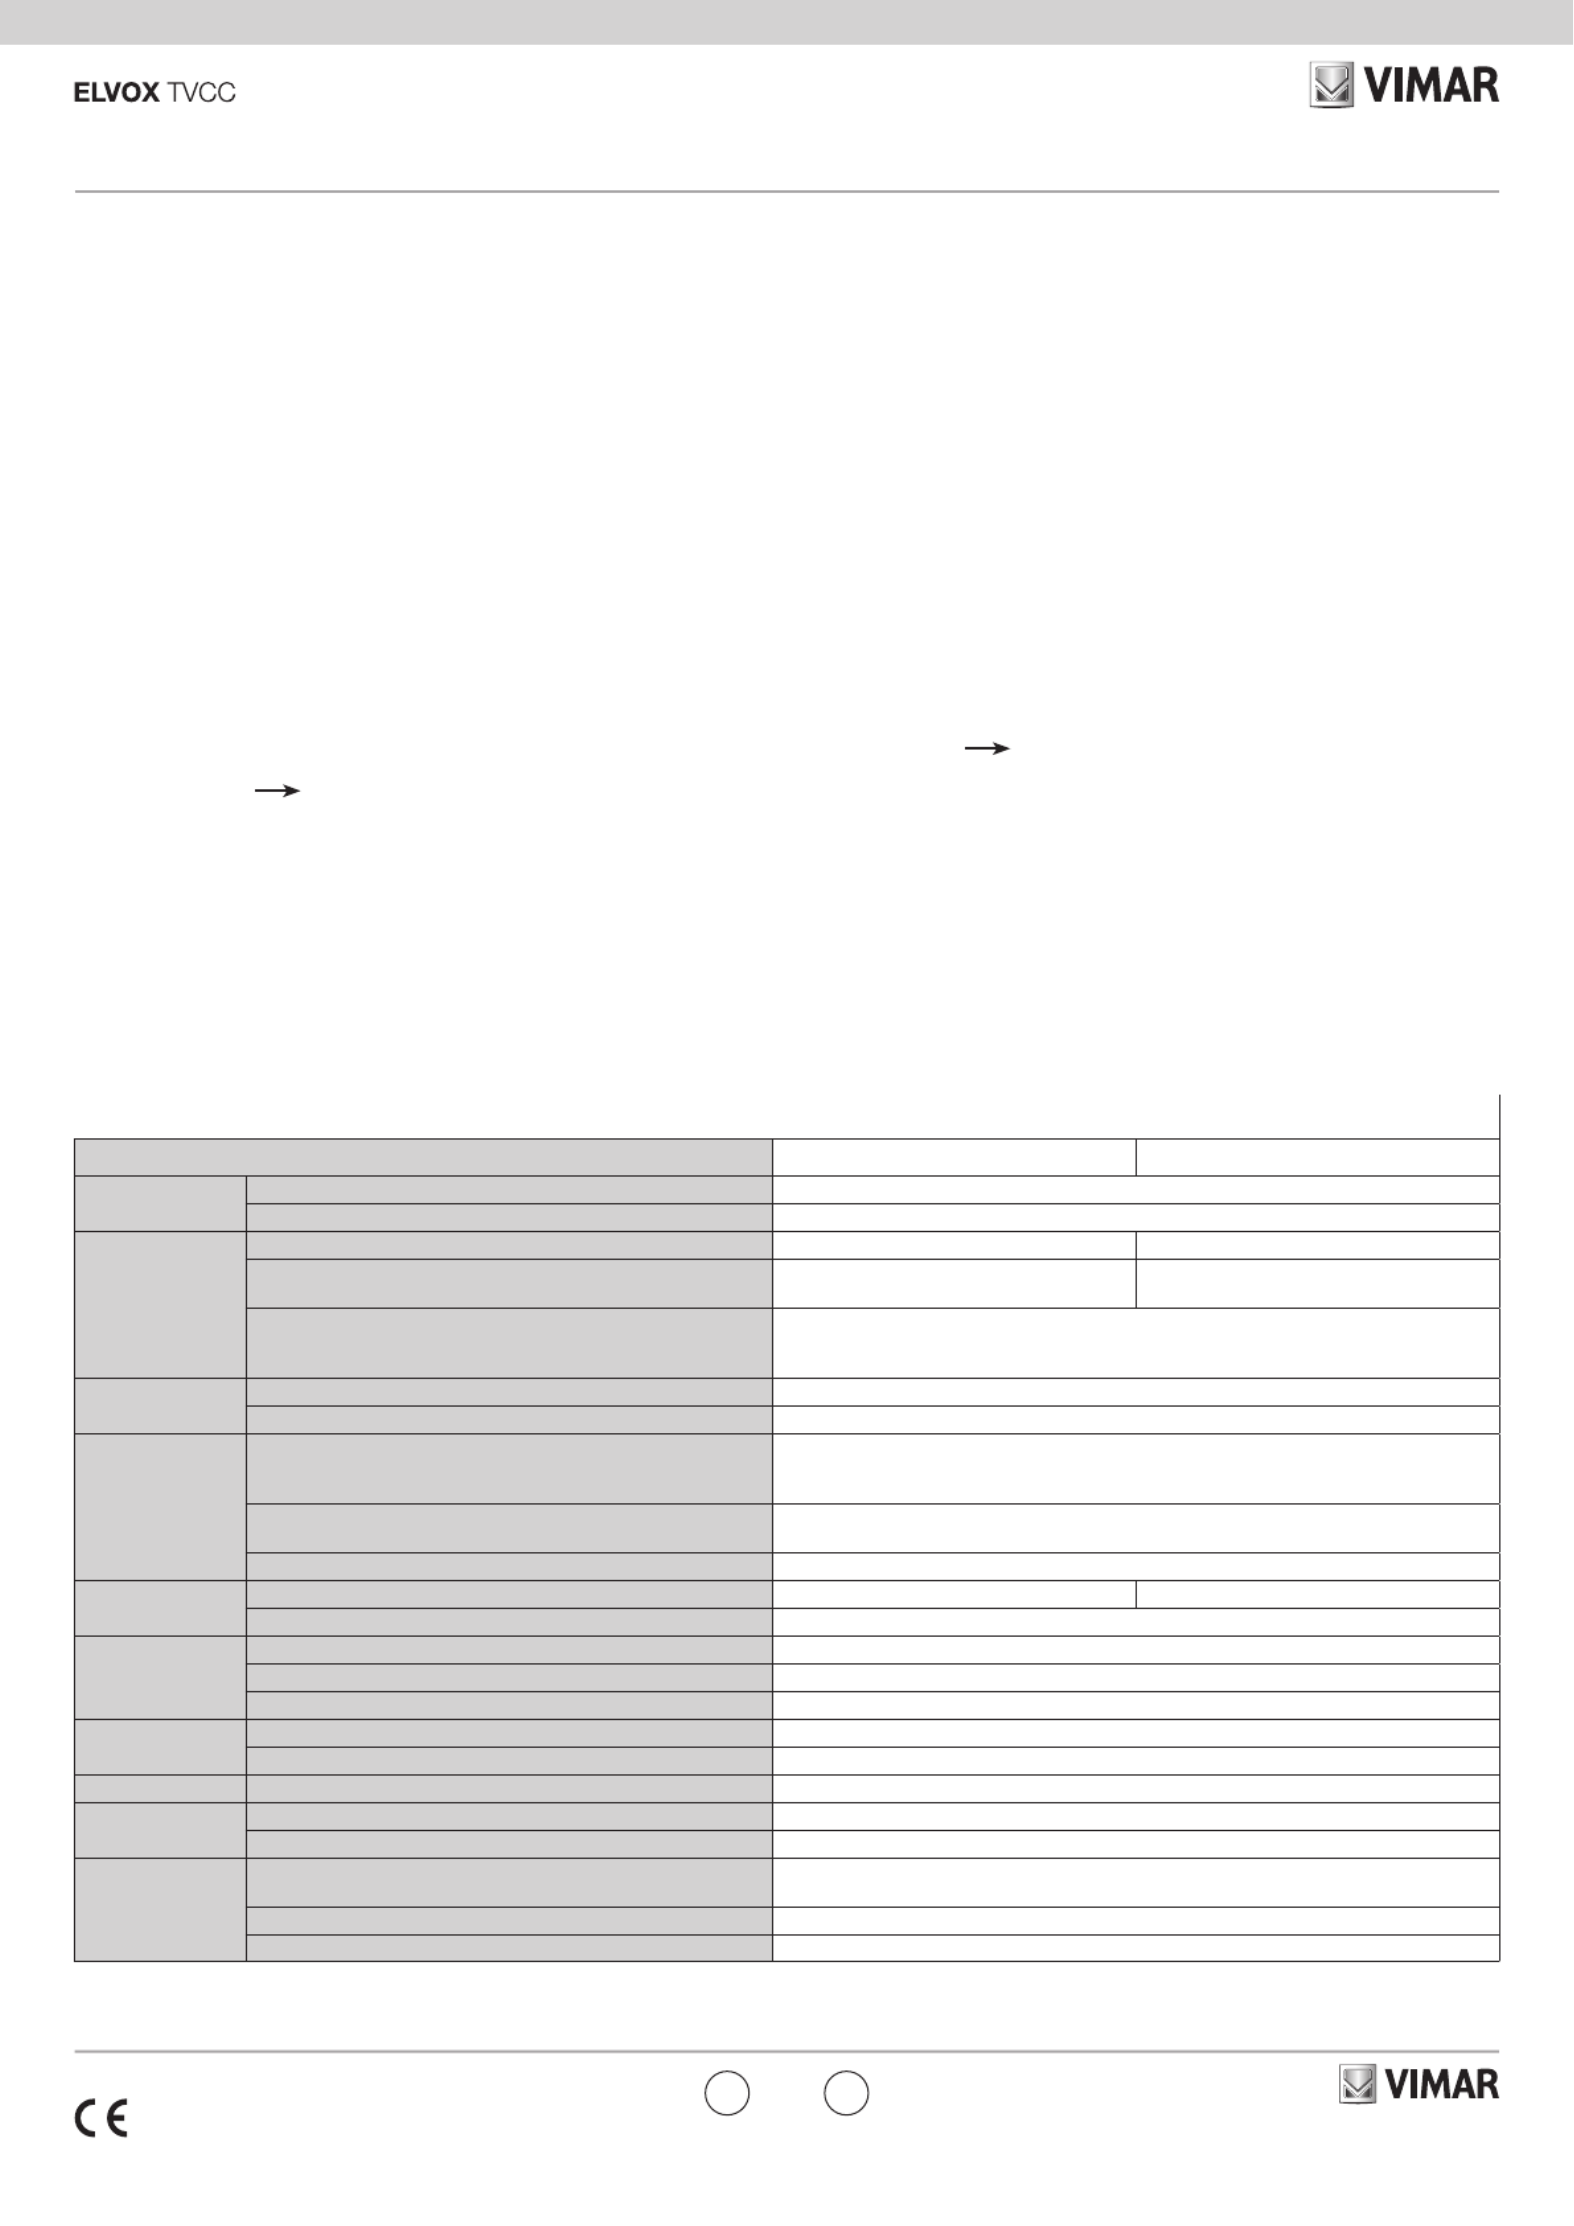
Speciche / Specications
Modello 46XVR.ES04 46XVR.ES08
Sistema
Sistem
Compressione / Compression Standard H.264 / H.265
CPU Cortex A9
Video
Ingressi / Input BNC x 4 BNC x 8
Telecamere IP / IP camera 2 in aggiunta alle 4 telecamere analogiche
2 in addition to the 4 analog cameras
4 in aggiunta alle 8 telecamere analogiche
4 in addition to the 8 analog cameras
Uscita Monitor / Monitor Output
HDMI x 1: 1920 x 1080 / 1280 x 1024 / 1024 x 768
VGA x 1:1920 x 1080 / 1280 x 1024 / 1024 x 768
BNC x 1 : MAIN o SPOT
Audio Ingressi / Input RCA x 1
Uscite / Output RCA x 1
Registrazione
Record
Risoluzione di registrazione / Record resolution
5MP Lite 10fps
4MP Lite/1080p 12fps
1080p Lite/720p/WD1 25fps
Risoluzione di registrazione telecamere IP /
Record resolution IP camera 5MP 25 fps
Bit rate 32 Kbps ~ 4 Mbps
Play Back Riproduzione / Playback 4 CH 8 CH
Ricerca / Search Ora/ricerca per calendario/evento (sensore, movimento)
Allarmi
Alarm
ModalitĂ  / Mode Sensore, movimento, perdita video / Sensor, Motion, Video Loss
Ingressi / Input No
Uscite / Output No
Rete
Network
Interfaccia / Interface RJ45 100M x 1
Protocollo / Protocol TCP/IP, UDP, DHCP, DNS, PPPOE, DDNS
Memoria/Storage HDD SATA x 1
Porte
Port
RS485 RS485 x 1
USB 2 USB 2.0
Altro
Others
Alim./ Consumo
Power Supply / Consumption 12Vdc < 15 W
Dimensioni / Dimensions 255 x 222 x 42 mm (WxDxH)
Ambiente di esercizio / Work Environment - 10 °C ~ 50 °C, 10 % ~ 90 % umidità / humidity
ENIT
Viale Vicenza, 14
36063 Marostica VI - Italy
www.vimar.com
49401810A0 01 2209
46XVR.ES04 - 46XVR.ES08
3 - Procedura guidata e interfaccia
principale
3.1 - Procedura guidata per l’avvio
Le icone del disco verranno visualizzate in alto
nell’interfaccia di avvio. È possibile visualizzare il numero
e lo stato di ciascun disco in maniera veloce e intuitiva
attraverso queste icone ( : disco assente; : disco non
disponibile; : disco RW disponibile).
È possibile congurare rapidamente l’DVR tramite la
procedura guidata d’impostazione per far funzionare
l’DVR normalmente. È necessario congurare la
procedura guidata quando l’DVR viene avviato per la
prima volta (oppure fare clic su “Skip” (Salta) per annullare
la procedura guidata la volta successiva).
Fare clic su “Wizard Setup” (Procedura Guidata
Impostazione) per iniziare la procedura guidata. Le fasi di
impostazione sono le seguenti.
1 - Accesso al sistema. Impostare la propria password
o utilizzare quella predenita quando viene utilizzata
la procedura guidata per la prima volta (il nome
utente predenito del sistema è admin; la password
predenita di admin è ); selezionare il 123456
nome utente di accesso e inserire la password
corrispondente la volta successiva.
Fare clic su “Edita Security Question” (Modica domanda
di sicurezza) per impostare le domande e le risposte di
sicurezza per la password dell’admin.
2 - Congurazione di data e ora.
La data e l’ora del sistema devono essere impostate se
la procedura guidata viene utilizzata per la prima volta.
Fare riferimento alla gura seguente. Impostare il
fuso orario, l’ora del sistema, il formato della data e
il formato dell’ora. Il DST (ora legale) sarà abilitato per
impostazione predenita se il fuso orario selezionato
comprende DST. Fare clic su “Next” (Avanti) per
continuare.
3 - Impostazioni di rete. Selezionare “Obtain an IP
address automatically” (Ottenere un indirizzo IP
automaticamente) e “Obtain DNS automatically”
(Ottenere DNS automaticamente) per ottenere
l’indirizzo IP e DNS automaticamente, o immettere
manualmente l’indirizzo IP, maschera di sottorete,
gateway, DNS preferito e DNS alternativi. Immettere
la porta HTTP, la porta RTSP e la porta Server. Fare
clic su “Next” (Avanti) per continuare.
4 - QRCode. È possibile scansionare il QRCode
attraverso l’applicativo client installato nel telefono
cellulare o nel PAD per accedere istantaneamente. Per
maggiori dettagli vedere il paragrafo 4.2 Sorveglianza
Client Mobile.
3 - Wizard & Main Interface
3.1 Startup Wizard
The disk icons will be shown on the top of the startup
interface. You can view the number and status of each
disk quickly and conveniently through these icons ( : no
disk; : unavailable disk; : available RW disk.
You can quickly congure the DVR by wizard setup to
make the DVR work normally. You must congure the
wizard if you start the DVR for the rst time (or click “Skip”
to cancel the wizard next time).
Click “Wizard Setup” to start wizard. The setting steps are
as follows.
1 - System Login. Set your own password or use the
default when you use the wizard for the rst time (the
default username of the system is and the admin
default password of admin is 123456); select the login
username and enter the corresponding password next
time.
Click “Edit Security Question” to set questions and
answers for password security of admin.
2 - Date and Time Conguration.
The date and time of the system need to be set up
if you use the wizard for the rst time. Refer to the
following gure. Set the time zone, system time, date
format and time format. The DST will be enabled by
default if the time zone selected includes DST. Click
“Next” to continue.
3 - Network Settings. Check “Obtain an IP address
automatically” and “Obtain DNS automatically” to get
the IP address and DNS automatically, or manually
input IP address, subnet mask, gateway, preferred
DNS and alternate DNS. Input the HTTP port, RTSP
port and Server port. Click “Next” to continue.
4 - QRCode. You can scan the QRCode through mobile
client which is installed in the mobile phone or PAD to
log in the mobile client instantly. Please refer to 4.2
Mobile Client Surveillance for details.
ENIT
Speciche degli alimentatori - Power Supplies Specications Alimentatore per 46XVR.ES04
Power supply for 46XVR.ES04
Alimentatori per 46XVR.ES08
Power supply for 46XVR.ES08
Costruttore - Manufacturer Dong Guan City GangQi Electronic Co.,Ltd
Indirizzo - Address Privately Operated Industrial District, ShiYong, 532600 Heng Li Town
Dong Guan, Guangdong, People's Republic of China
Modello - Model GQ24-120150-AG GQ24-120200-AG
Tensione di ingresso - Input voltage 100-240 V 100-240 V
Frequenza di ingresso - 50/60 Hz 50/60 HzInput AC frequency
Tensione di uscita - Output voltage 12,0 Vd.c. 12,0 Vd.c.
Corrente di uscita - Output current 1,5 A 2,0 A
Potenza di uscita - Output power 18,0 W 24,0 W
Rendimento medio in modo attivo - Average active efficiency 88,1% 88,1%
Rendimento a basso carico (10%) - Efficiency at low load (10%) 83,7% 83,7%
Potenza a vuoto - No-load power consumption 0,061 W 0,061 W
ConformitĂ  Normativa -
Conformity
Direttiva ErP - ErP Directive
Regolamento alimentatori esterni (UE) n. 2019/1782
Regulation for external power supplies (EU) n. 2019/1782
Viale Vicenza, 14
36063 Marostica VI - Italy
www.vimar.com
49401810A0 01 2209
46XVR.ES04 - 46XVR.ES08
6 - Impostazioni registrazione. Sono
disponibili due modalitĂ  di registrazione:
automatica e manuale.
Automatica: Selezionare una modalitĂ 
automatica nell’interfaccia come indicato di
seguito, quindi fare clic sul pulsante “OK”
per salvare le impostazioni.
Manuale: Impostare “Sensor Record”
(Registrazione Sensore), “Motion Record”
(Registrazione Movimento) e “Schedule
Record” (Registrazione Programmata) di
ciascuna telecamera. Fare clic sul pulsante
“OK” per salvare le impostazioni.
6 - Record Settings. Two record modes are
available: auto and manual.
Auto: Select one auto mode in the interface
as shown below and then click “OK” button
to save the settings.
Manual: Set the “Sensor Record”, “Motion
Record” and “Schedule Record” of each
camera. Click “OK” to save the settings.
4.1 - Visualizzazione dello stato di rete
Fare clic su Start Settings Network Network Status (Start/
Settings/Rete/Stato rete) per visualizzare lo stato di rete o fare clic sull’icona
sulla barra degli strumenti in fondo all’interfaccia di anteprima live per
visualizzare facilmente lo stato di rete.
4.1 - View Network Status
Click Start Settings Network Network Status to view
the network status or click on the tool bar at the bottom of the live preview
interface to view network status conveniently.
4.2 - Sorveglianza remota
Sorveglianza Client Mobile
1 - Attivare la funzione NAT nel DVR.
2 - Scaricare e installare l'app By-Camera in
un dispositivo mobile con sistema operativo
Android o iOS.
3 - Eseguire il client mobile, andare all'interfaccia
"Add Device" (Aggiungi dispositivo), quindi
fare clic su per scansionare il QRCode
dell'DVR (Andare al percorso Start
Settings System Information
Basic (Start/Impostazioni/Sistema/
Informazioni/Base) per visualizzare il
QRCode dell'DVR).
4 - Dopo aver scansionato il QRCode con
successo, immettere la password di login nel
client mobile.
4.2 - Remote Surveillance
Mobile Client Surveillance
1 - Enable NAT in the DVR.
2 - Download and install the app By-Camera
into the mobile device with the Android or iOS
system.
3 - Run the mobile client, go to the “Add
Device” interface and then click to scan
the QRCode of the DVR (Go to Start
Settings System Information
Basic to view the QRCode of the DVR).
4 - After scanning the QRCode successfully,
input the login password to log in mobile
client.
ENIT
4 - Congurazione NAT
Fare clic su Start Settings Network NAT (Start/
Impostazioni/Rete/NAT) per passare all’interfaccia per la congurazione NAT.
Selezionare il pulsante “Enable” (Abilita), quindi selezionare l’indirizzo server
NAT.
Tipo di accesso NAT1.0 NAT2.0: è possibile selezionare o .
Nota NAT2.0: per poter utilizzare l'aggiornamento FW da cloud, assicurarsi che
sia abilitato (impostazione predenita).
Fare clic sul pulsante “Apply” (Applica) per salvare le impostazioni.
4 - NAT Conguration
Click Start Settings Network NAT to go to the interface for NAT
conguration.
Check “Enable” and then select the server address. NAT
Access Type NAT1.0 NAT2.0: or can be selected.
Note NAT2.0: in order to use cloud FW update, please make sure is enabled
(default).
Click “Apply” to save the settings.
5 - Impostazioni disco. È possibile visualizzare il numero
disco, la capacità disco dell’DVR e il numero di serie,
lo stato R&W del disco. Fare clic su “Formatting”
(Formattazione) per formattare il disco. Fare clic su
“Next” (Avanti) per continuare.
5 - Disk Settings. You can view the disk number, disk
capacity of the DVR and serial number, R&W status
of the disk. Click “Formatting” to format the disk. Click
“Next” to continue.


Product specificaties

Merk: Vimar
Categorie: Niet gecategoriseerd
Model: ELVOX 46XVR

Heb je hulp nodig?

Als je hulp nodig hebt met Vimar ELVOX 46XVR stel dan hieronder een vraag en andere gebruikers zullen je antwoorden


Handleiding Niet gecategoriseerd Vimar

Handleiding Niet gecategoriseerd

Nieuwste handleidingen voor Niet gecategoriseerd