Toa HY-WM2 Handleiding
Toa Niet gecategoriseerd HY-WM2
Bekijk gratis de handleiding van Toa HY-WM2 (1 pagina’s), behorend tot de categorie Niet gecategoriseerd. Deze gids werd als nuttig beoordeeld door 50 mensen en kreeg gemiddeld 4.4 sterren uit 8 reviews. Heb je een vraag over Toa HY-WM2 of wil je andere gebruikers van dit product iets vragen? Stel een vraag
Pagina 1/1
HX-5 series
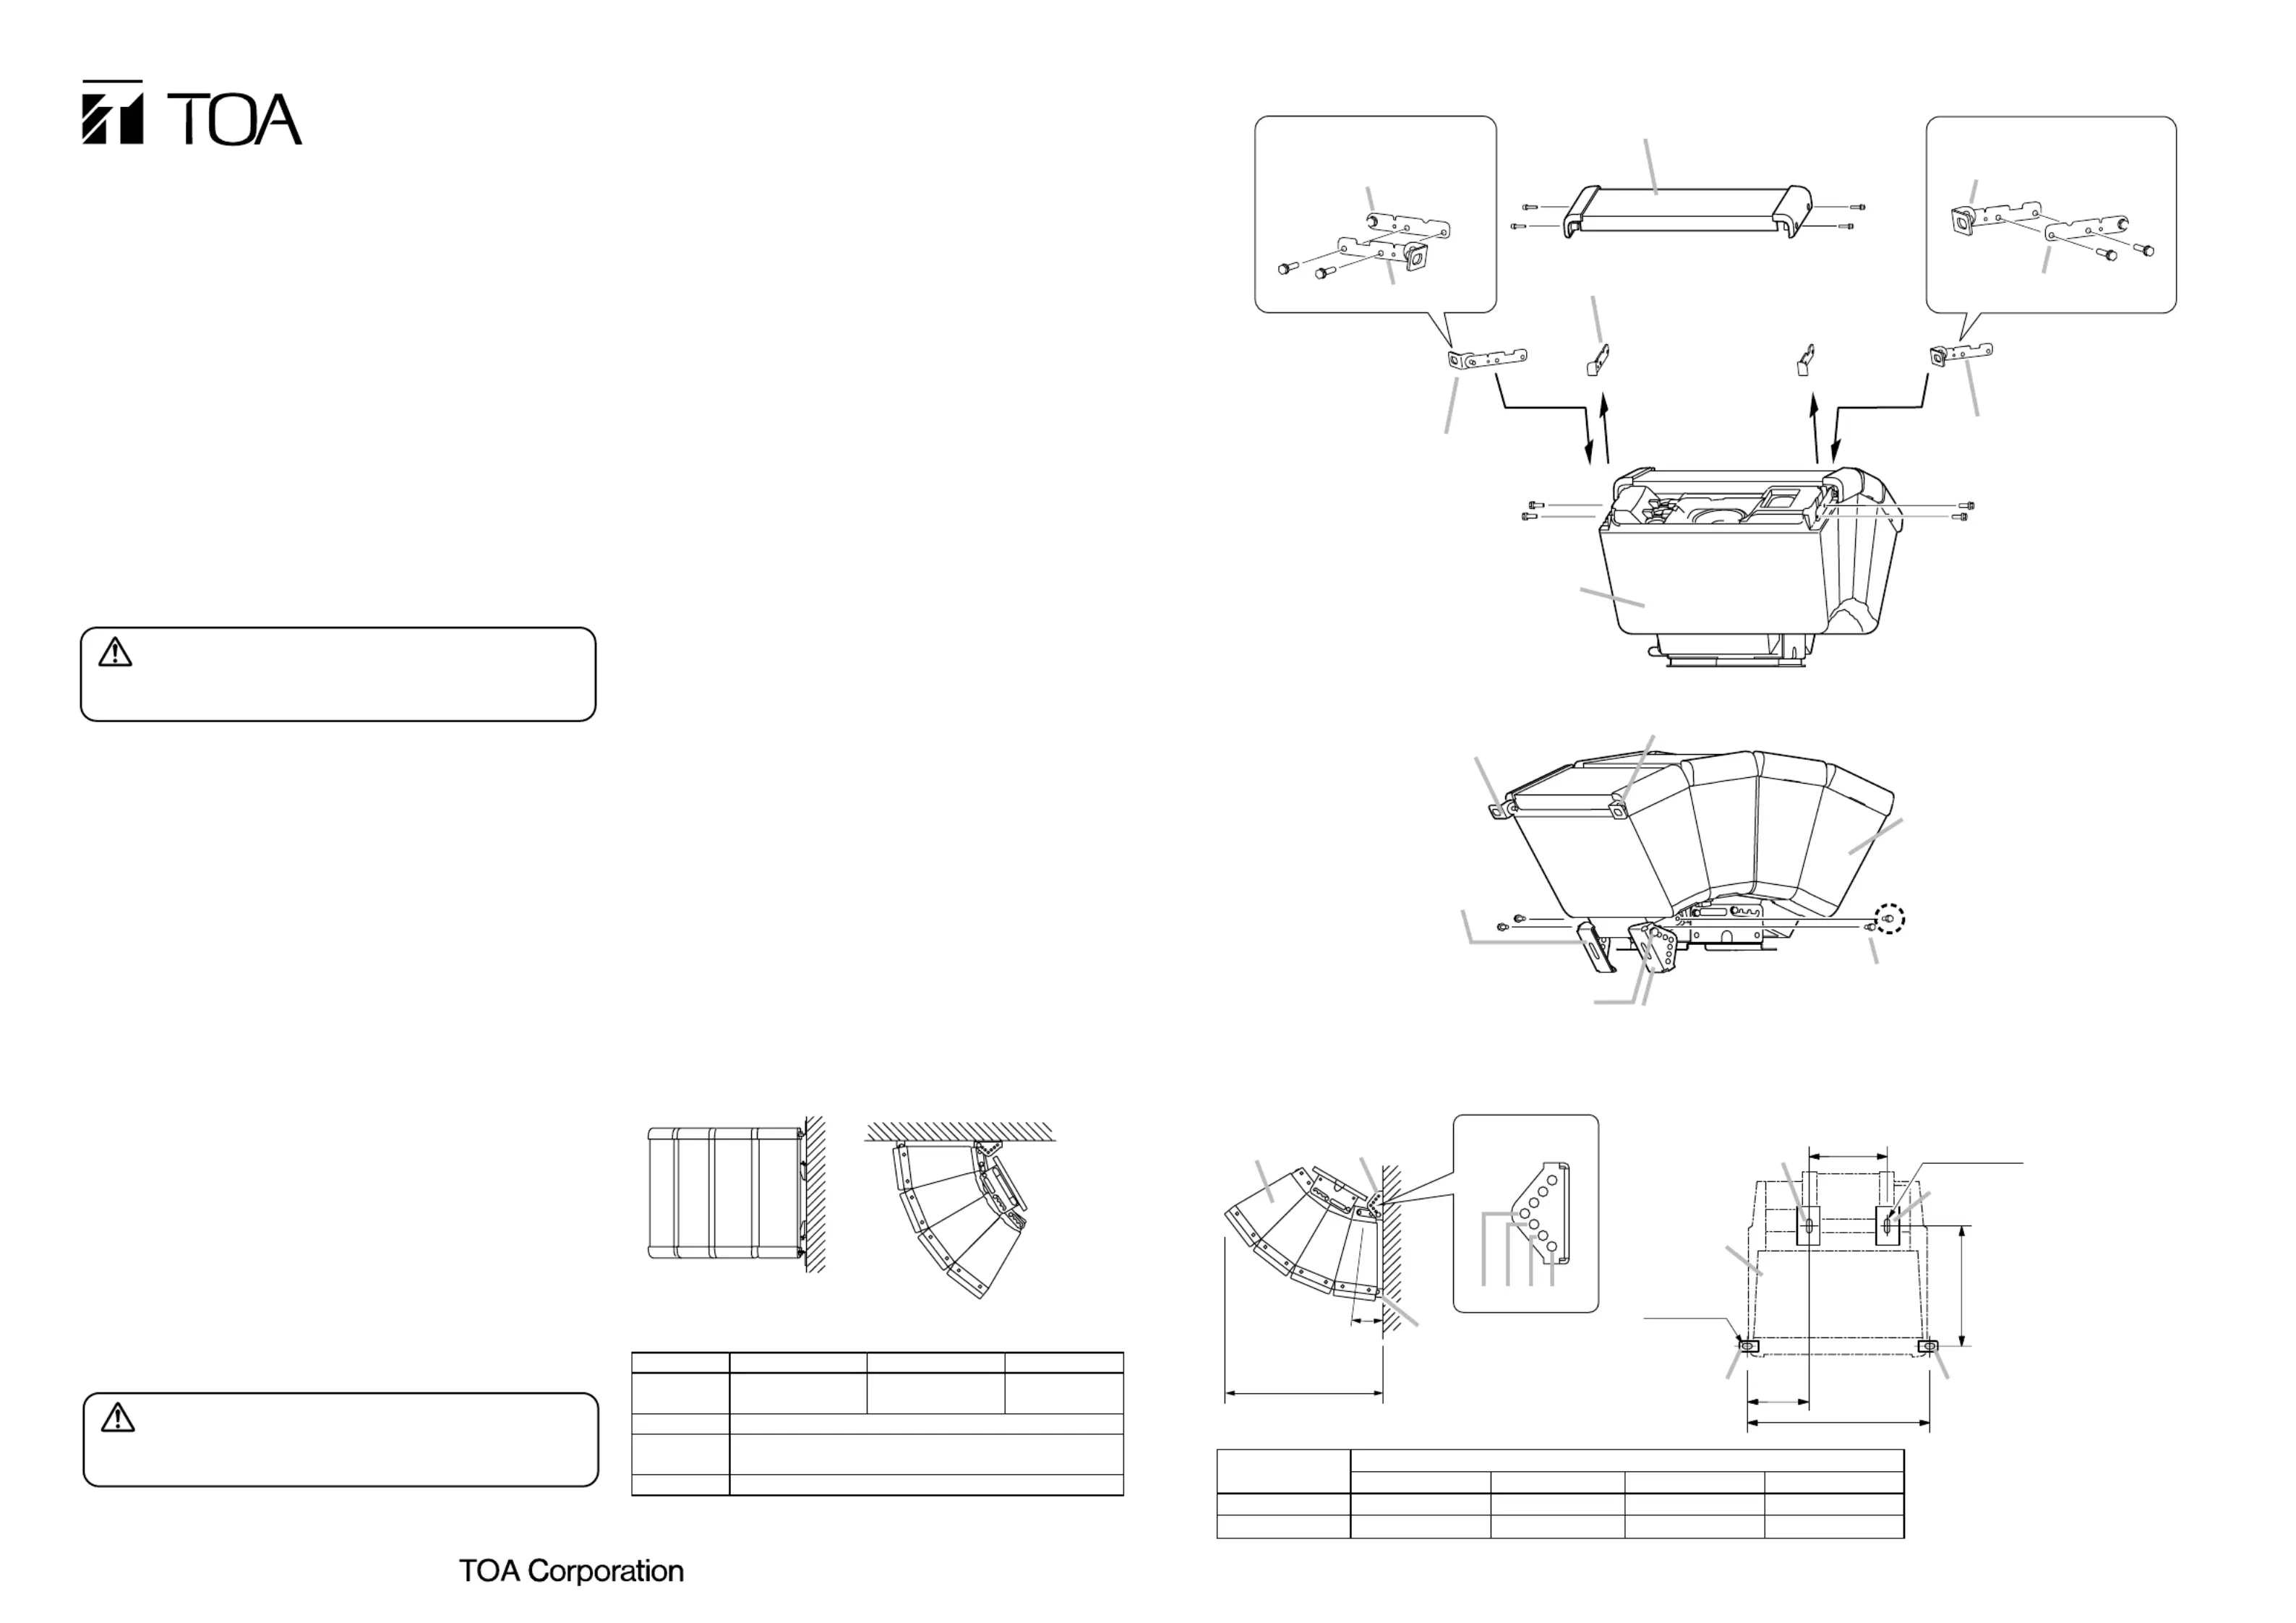
Front grill
Front bracket A
(component of HY-WM2 series)
Front bracket B
(component of HY-WM2 series)
Front bracket B
Front bracket B mounting position
Front end bar bracket
Bracket fixed into the speaker
Front bracket A
Front bracket A mounting position
Bracket fixed into the speaker
1
,
3
2
INSTALLATION MANUAL
SPEAKER MOUNTING BRACKETS
HY-WM2B, HY-WM2W, HY-WM2WP
TOA's HY-WM2 series are used exclusively to mount the HX-5
series speaker system closely to a wall or ceiling.
The brackets help to achieve clearer sound reproduction by
minimizing phase interference generated by sound waves
reflecting from walls or ceilings.
Both the HY-WM2B and HY-WM2W are designed for indoor use,
while the HY-WM2WP is designed for outdoor use.
1. SAFETYPRECAUTIONS
•Before installation or use, be sure to carefully read all the
instructions in this section for correct and safe operation.
•Be sure to follow all the precautionary instructions in this section,
which contain important warnings and/or cautions regarding
safety.
•After reading, keep this manual handy for future reference.
6. SPECIFICATIONS
Note:The design and specifications are subject to change without
notice for improvement.
•Install the unit only in a location that can structurally support the
weight of the unit and the speaker. Doing otherwise may result in
the speaker falling down and causing personal injury and/or
property damage.
•(HY-WM2B and HY-WM2W only)
Since the unit is designed for indoor use, do not install it
outdoors. If installed outdoors, the aging of parts causes the unit
to fall off, resulting in personal injury.
•Owing to the speaker's size and weight, be sure that at least two
persons are available to install the speaker. Failure to do so
could result in personal injury.
•Do not use other methods than specified to mount the unit.
Extreme force is applied to the unit and the speaker could fall off,
possibly resulting in personal injuries.
•Use nuts and bolts that are appropriate for the wall's or ceiling's
structure and composition. Failure to do so may cause the
speaker to fall, resulting in material damage and possible
personal injury.
•Tighten each nut and bolt securely. Ensure that the unit has no
loose joints after installation to prevent accidents that could
result in personal injury.
•Use the specified speaker in combination. Doing otherwise may
cause the speaker to fall off, resulting in personal injury.
•Do not mount the unit in locations exposed to constant vibration.
The unit can be damaged by excessive vibration, potentially
causing the speakerto fall, which could result in personal injury.
•Avoid installing the speaker in locations close to the seashore or
in indoor swimming facilities that are not well ventilated. In such
locations the unit may be vulnerable to corrosion, eventually
allowing the speaker to fall resulting in personal injury.
Indicates a potentially hazardous situation which, if mishandled,
could result in death or serious personal injury.
WARNING
Indicates a potentially hazardous situation which, if mishandled, could
result in moderate or minor personal injury, and/or property damage.
CAUTION
•Avoid touching the unit's sharp metal edge to prevent injury.
Only the HY-WM2WP can be installed outdoors.
•Only the HX-5B-WP and HX-5W-WP speakers can be
installed outdoors.
•Install the speaker so that all speaker modules face
downward from the horizontal axis.
Doing otherwise could adversely affect the speaker's weather
resistance and possibly lead to malfunction or failure.
2. PRECAUTIONS WHEN INSTALLING THE
HY-WM2WP
[Mounting the front brackets]
Step 1.Remove the front grill of the speaker module to be
mounted to a wall or ceiling.
Use the supplied hex head wrench to remove the
bolts.
Step 2.Remove the front end bar brackets, and attach the
front brackets instead.
Note: There are 2 different types of front brackets A
and B. Attach them correctly as illustrated.
Step 3.Reattach the removed front grill to the speaker
module, and retighten the bolts, making sure that the
edges of the grilles fit into their receptacle slots.
[Mounting the rear brackets]
Step 4.Fix the rear brackets A and B to the HX-5 series using
the bolts.
Before mounting the rear brackets, remove the
speaker's original bolt only at one place as indicated in
the diagram.
To fix the brackets, use all the 4 supplied mounting
bolts without using the removed bolt.
Step 5.Change the position of the angle adjustment bolts (at
the brackets A and B) to set the desired angle
between the wall or ceiling and the HX-5 series, then
fix the bolts in this position.
Step 6.Install the HX-5 series to a wall or ceiling
Note: Anchor bolts, nuts and washers required for
mounting are not supplied with the bracket.
3. INSTALLATION
6. MOUNTINGDIMENSIONS
[Mounting the rear brackets (speaker rear side)]
Hexagon head bolts M8 x 20
with washer (accessory)
HX-5 series
Front bracket A
(component of HY-WM2 series)
Front bracket B (component of HY-WM2 series)
Rear bracket B (component of HY-WM2 series)
Rear bracket A
(component of HY-WM2 series)
Angle adjustment bolt
5
6
4
Note
Mount the supplied bolt after
removing the speaker's original bolt.
Printed in Indonesia
533-06-124-60
[Mounting the front brackets (speaker front side)]
4. FINISHED ASSEMBLING DIAGRAM
Wall
Ceiling
[Horizontal mounting][Vertical mounting]
HX-5 series
Wall
Max. 498 (19
39
/) 64
Directivity angle X
(See the table below.)
Rear bracket
Y
(See the table below.)
Front bracket
Angle adjustment
bolt position
Note: The angle X and the distance Y vary depending on the bolt position.
Angle adjustment bolt position
abcd
245 mm (9
41
/)255 mm (10 64"
1
/)265 mm (10 32"
27
/)275 mm (10 64"
13
/)16"
1.8753.755.6257.5°°°°Directivity angle X
Distance Y
142
(5
19
/)32
418
(16
29
/)64
178
(7
1
/)64
Rear bracket B
12 x 32
(
15
/ x 1 32
17
/)64
12 x 22
(
15
/ x 32
55
/)64
Rear bracket A
Front bracket A
Front bracket B
HX-5 series
abcd
Unit: mm (inches)
Model No.HY-WM2WPHY-WM2BHY-WM2W
FinishSteel plate, brack, Stainless steel
(SUS304)semi-gloss, paint
Steel plate, white,
semi-gloss, paint
Weight
Product
Accessory
600 g
Front bracket A/B* ... 1 each, Rear bracket A/B* ... 1 each
Hexagon head bolt M6 x 20 with washer ...... 4
* Brackets A and B are symmetrical to each other. Composition
Product specificaties
| Merk: | Toa |
| Categorie: | Niet gecategoriseerd |
| Model: | HY-WM2 |
Heb je hulp nodig?
Als je hulp nodig hebt met Toa HY-WM2 stel dan hieronder een vraag en andere gebruikers zullen je antwoorden
Handleiding Niet gecategoriseerd Toa

12 April 2026
11 April 2026
11 April 2026
10 April 2026
6 April 2026
6 April 2026
27 December 2025
12 Oktober 2025
11 Oktober 2025
11 Oktober 2025
Handleiding Niet gecategoriseerd
Nieuwste handleidingen voor Niet gecategoriseerd
9 Juni 2026
9 Juni 2026
9 Juni 2026
9 Juni 2026
9 Juni 2026
9 Juni 2026
9 Juni 2026
9 Juni 2026
9 Juni 2026
9 Juni 2026