Thames & Kosmos Recycled Paper Press Handleiding

Thames & Kosmos Niet gecategoriseerd Recycled Paper Press

Bekijk gratis de handleiding van Thames & Kosmos Recycled Paper Press (2 pagina’s), behorend tot de categorie Niet gecategoriseerd. Deze gids werd als nuttig beoordeeld door 3 mensen en kreeg gemiddeld 4.4 sterren uit 2 reviews. Heb je een vraag over Thames & Kosmos Recycled Paper Press of wil je andere gebruikers van dit product iets vragen? Stel een vraag

Pagina 1/2
Let’s Get Started!
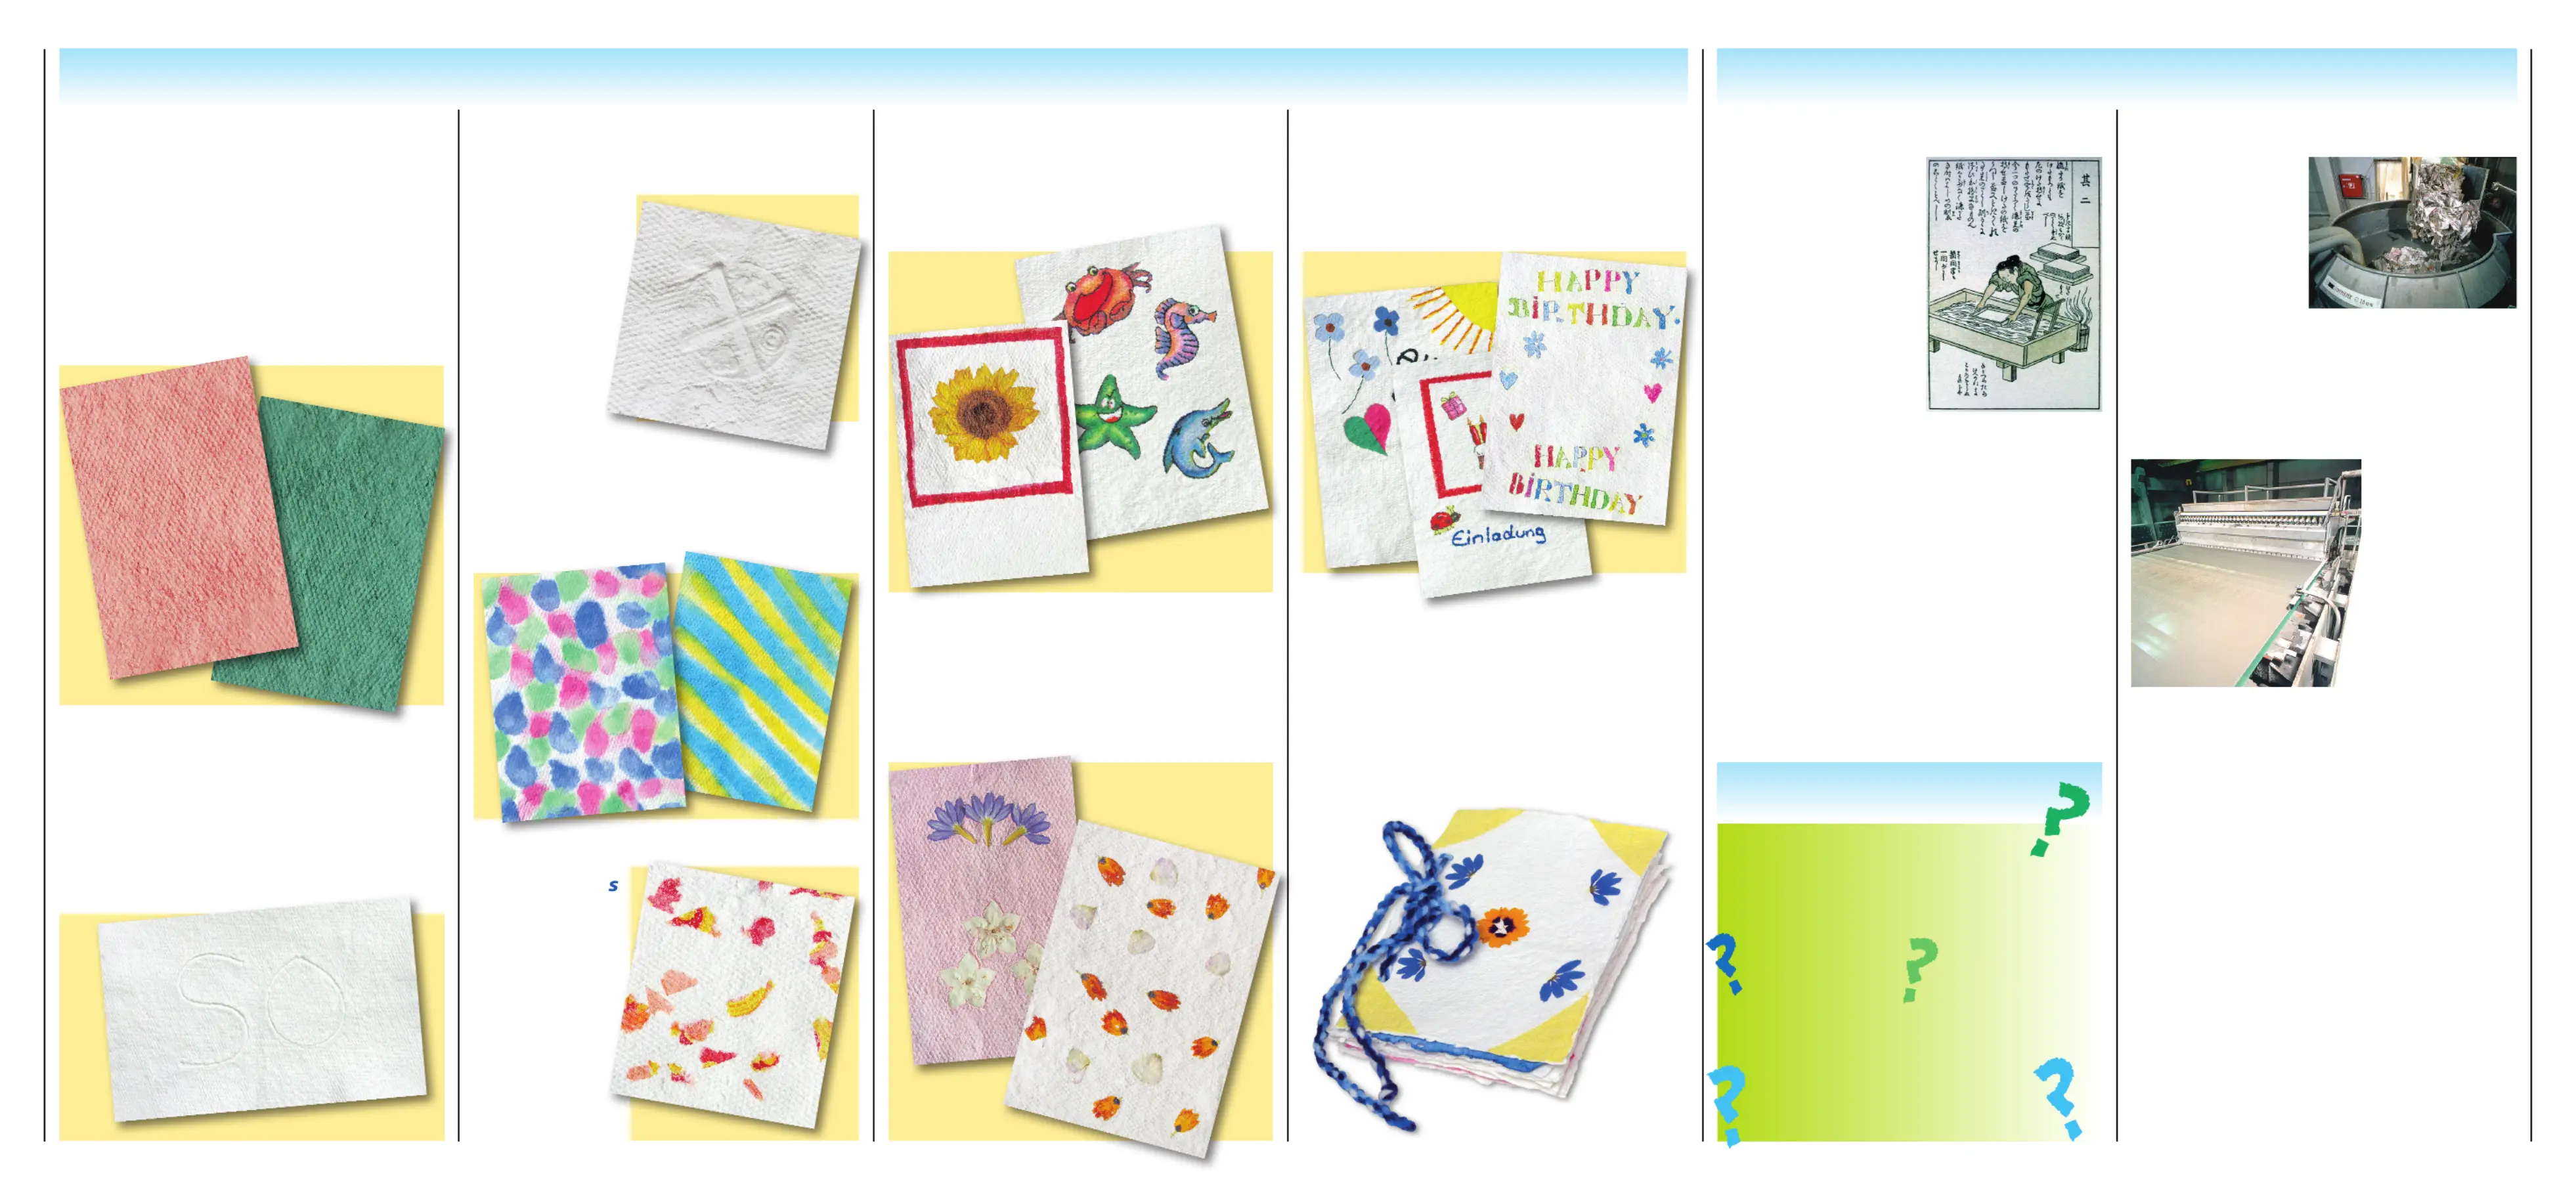
Your homemade paper will be 100% recycled. As
your raw material, you will just need newspaper,
toilet paper, paper towels, or paper napkins.
Also get your other required equipment ready: an
old bowl, as shallow as possible, or a plastic basin,
and an old cotton cloth (e.g., a dishcloth).
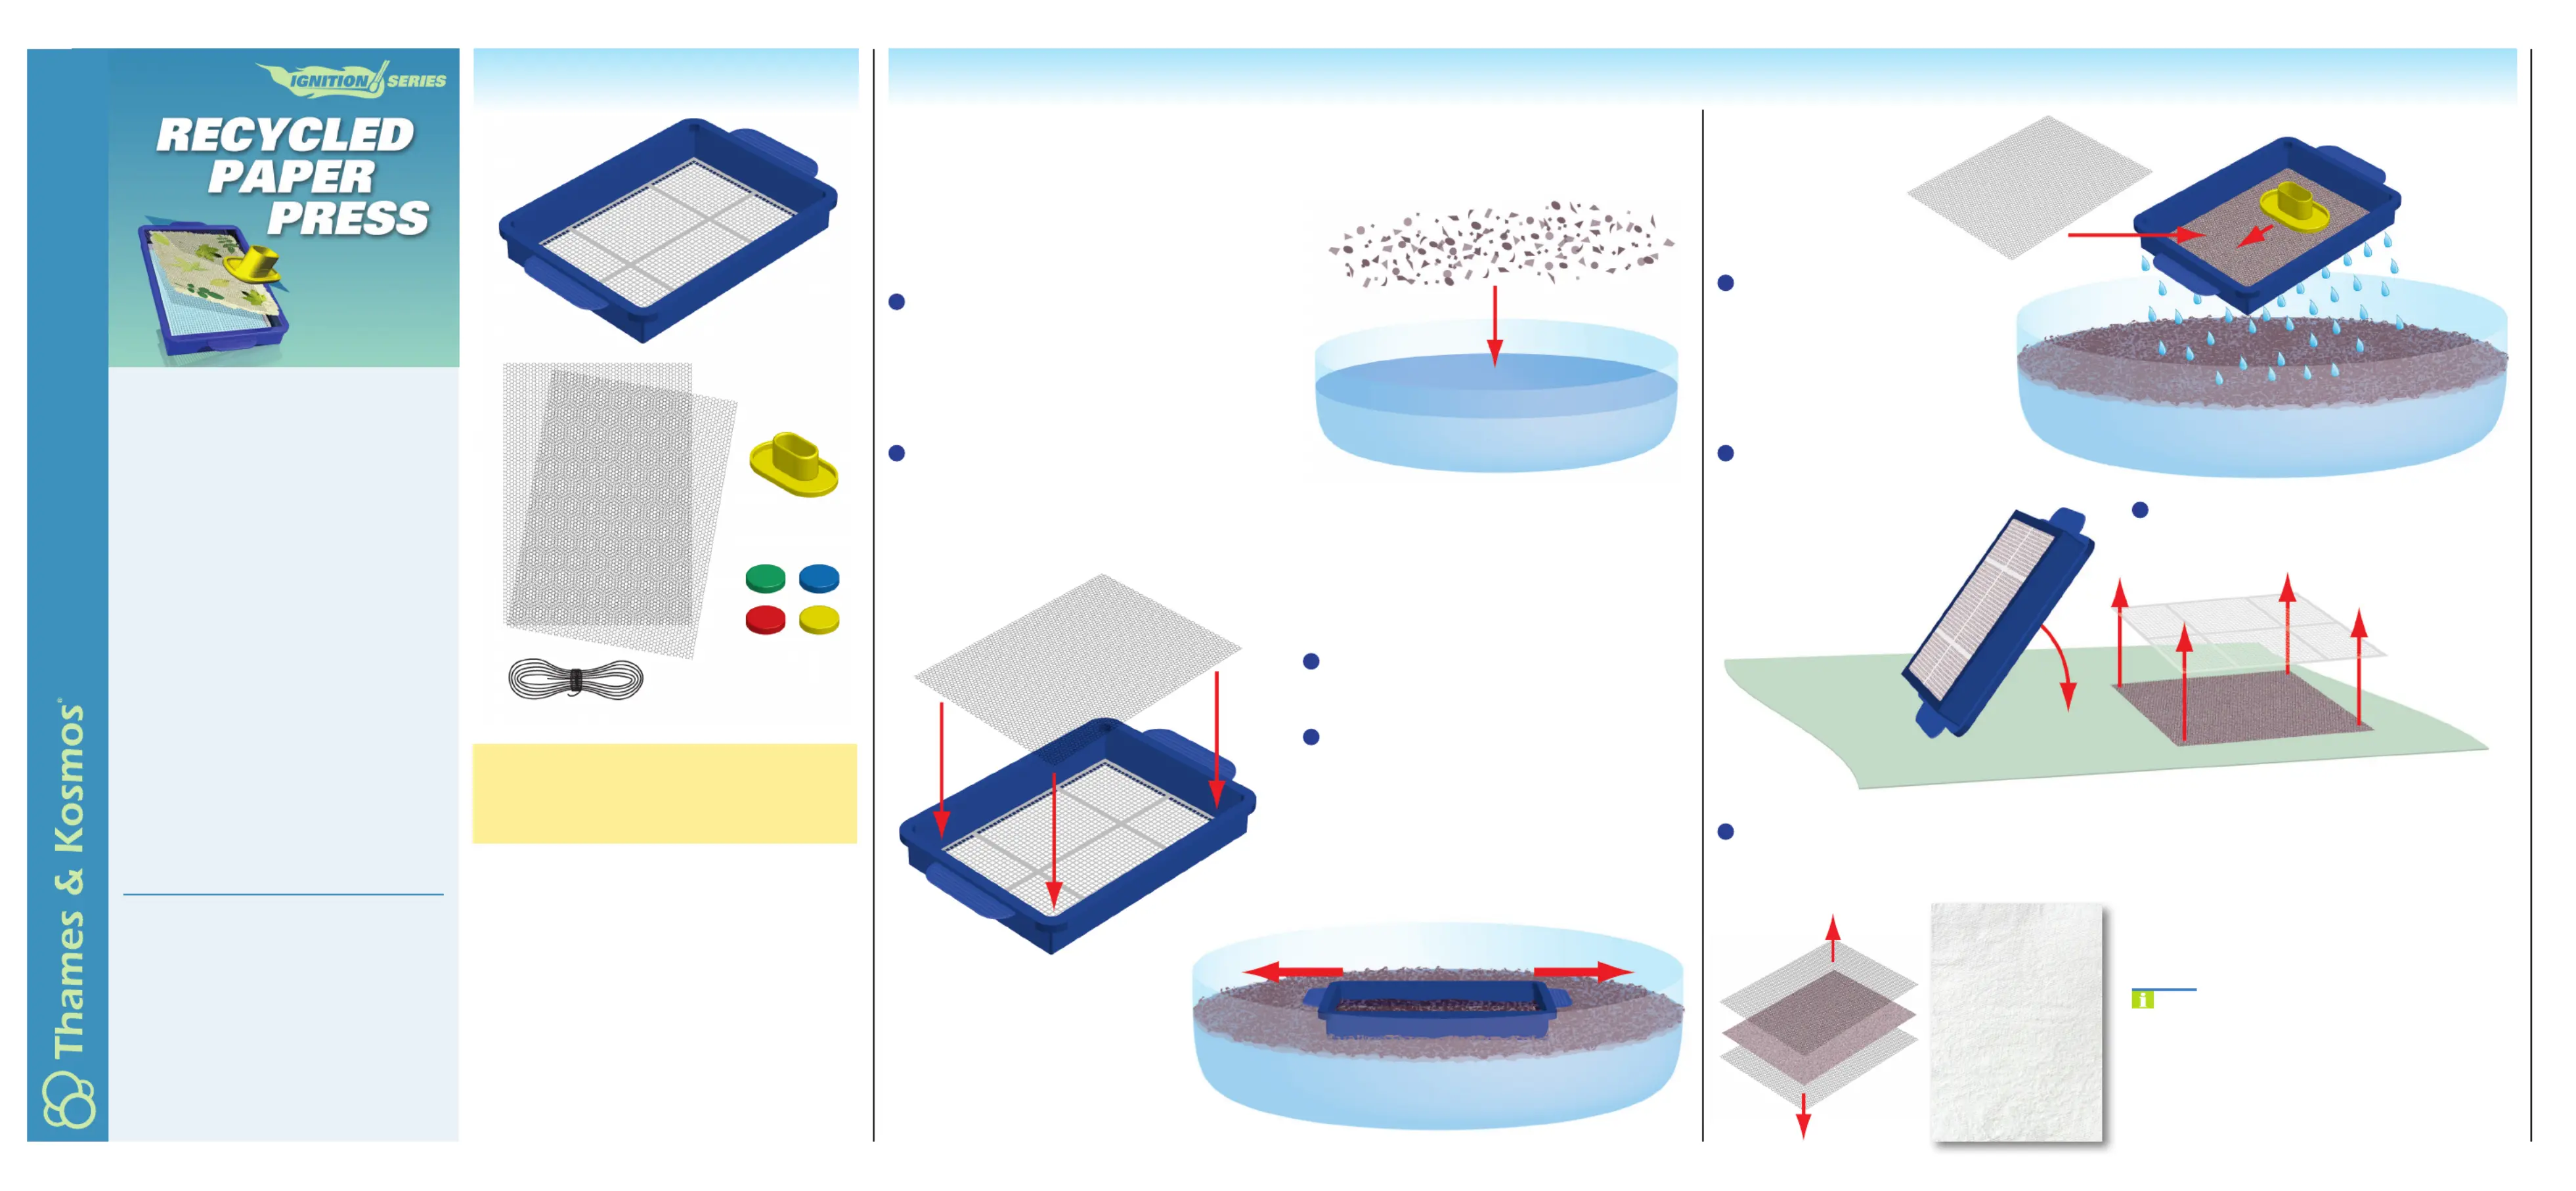
1
paper towels in the smallest pieces you can, and
put them in an old bowl or a basin. Add about one
liter of warm water. If you like, you can also add a
spoonful of powdered laundry detergent, which
will make the paper a little brighter.
3
Lay the screen insert into the paper molding tray,
and place one of the pieces of netting on top of it.
4
Thoroughly stir the fiber pulp one more time
and completely submerge the tray in the bowl or
basin. Now lift the tray, keeping it as horizontal as
possible, up to the surface of the thin pulp, and try
to distribute the paper fibers as evenly as possible in
the tray by carefully rocking it back and forth. Now
you can pull the tray completely out of the basin.
5
Now lay the second piece of
netting on top of the paper pulp
in the paper molding tray and
stroke the yellow pressing tool
over it. This pushes the water out
of the paper pulp and compresses
the paper fibers.
6
When you can’t push any more
water out, tip the tray over a dry
cloth and push the screen out of
the frame.
7
Release the screen insert. Now take the press-
ing tool again and press your paper between two
pieces of cloth.
8
Finally, you will have to carefully pull away the
two pieces of netting. It might take a little practice.
Now your homemade paper will just need a little
time to dry.
This is how you can gradually work through your
paper pulp until it is all used up and you have made
many sheets of paper.
If your first result doesn’t quite measure up to what
you’re expecting, try it again! You’ll soon get the
hang of it with a little practice.
Tip:
The ink in newspaper will turn the paper grey.
If you want to make brighter paper, just use the
unprinted edge of the paper. Paper towels or white
paper napkins will also produce bright paper.
Additional Items
Plastic bowl, cotton cloths (old dishrags or similar
rags), powdered laundry detergent, water, hand
mixer, newspaper, paper towels, toilet paper,
napkins, and other scrap paper
Instructions
Warning! — This set contains chemicals
that may be harmful if misused. Read cau-
tions on individual containers carefully. Not
to be used by children except under adult
supervision.
Only for use by children 8 years of age and
older. Use only under careful supervision
of adults who have familiarized themselves
with the kit’s written safety precautions.
A Note to Parents and Supervising Adults
Please stand by your child’s side in the
paper-making process, providing support
and company to him or her as needed.
Read through the instructions together
before beginning the experiments, and
follow them. Please be sure that no small
pieces get into the hands of young chil-
dren. Provide your child with any required
household items that are not contained in
the kit, and encourage your child to repeat
an experiment if the initial results don’t
meet expectations.
1st Edition © 2008 Franckh-Kosmos Verlags-GmbH & Co. KG, Stuttgart, Germany
This work, including all its parts, is copyright protected. Any use outside the
specific limits of the copyright law is prohibited and punishable by law without the
consent of the publisher. This applies specifically to reproductions, translations and
microfilming and the storage and processing in electronic systems and networks.
We do not guarantee that all material in this work is free from other copyright or
other protection.
Layout and design: komuniki – Michael Schlegel, Würzburg; Text: KOSMOS; Photos:
VDP – Verband Deutscher Papierfabriken e.V. [Association of German Paper
Manufacturers, Inc.]
First English Edition © 2010 Thames & Kosmos, LLC, Providence, RI
® Thames & Kosmos is a registered trademark of Thames & Kosmos, LLC.
Translation: David Gamon; Editing: Ted McGuire; Additional Graphics and Layout:
Dan Freitas
Distributed in North America by Thames & Kosmos, LLC. Providence, RI 02903
Phone: 800-587-2872; Email: support@thamesandkosmos.com
Printed in China / Imprimé en Chine
Caution! — Dye tablets: The dye tablets are non-
toxic, but as a precaution they should not be
ingested. Avoid contact with eyes and mouth.
Before You Start
Find a quiet work area and cover the work surface
so that any accidentally spilled water won’t cause
any damage. The ink from the newspaper and resi-
due from the dye tablets can cause stains too.
Keep small children and animals away from the
work area.
Basic Paper-Making InstructionsContents
Paper
molding tray
with removable
screen insert
(You will find the screen
beneath the package’s
red plastic insert)
2 Pieces of
Netting
Yellow Pressing
Tool
4 Dye Tablets
(These are non-toxic
watercolors)
String
2
Thoroughly stir this paper pulp together and let
it stand for a few hours, ideally overnight. If you
want finer paper, let an adult help you break up the
paper into smaller pieces with a hand mixer. If the
fiber pulp is too thick, add a little more water.
Experiment 5:
Designs with
Colored Piece
of Paper
To make this
design, scatter
finely-shredded
pieces of napkin
on the paper pulp
before applying
the second piece
of netting. They
will also soak
up water and
dry along with
the paper.
Once you have mastered the basic paper-making
process, you can try all these variations to create
your own unique, personalized paper designs.
Experiment 1: Colored Paper
Dissolve a dye tablet in a cup of water and add the
colored solution to the paper pulp. This will give
you paper with a delicate shade of color. As an
alternative, you can use colored napkins for your
paper pulp. That will give you a stronger color. Cau-
tion! The colored paper pulp can stain things! Only
use old cotton cloths to press it out.
Experiment 3: Textured Paper
Press a stamp onto the freshly made paper (use a
pre-made stamp or invent a design with a nail or a
screw). Use anything
that has a raised
shape. Try it with
a fluted or corru-
gated glass rolled
over the pressed
paper.
Experiment 6: Pattern Paper with
Napkin Pieces
Cut a design out of a paper napkin and lay the up-
per layer on the smoothed paper pulp. The napkin
piece will soak up water and dry along with the
paper.
Experiment 8: Greeting Cards
If you have made a selection of various kinds of
paper, you can naturally combine these with one
another. Try it with some homemade greeting cards
for your friends’ birthdays or design your own invi-
tation cards for a party. Use your imagination!
The History of Paper
The word “paper” goes
back to the writing
material called papyrus
(around 3,000 BC), which
was made out of the pith
of the papyrus plant.
The stalks of the papyrus
reed were beaten flat,
pressed, and laid cross-
wise. The first report of
usable paper comes from
a Chinese history book.
According to that book,
in 105 AD the Chinese
official Ts’ai Lun reported
to the emperor that he had succeeded in creating
paper from bark, hemp, old rags, and fishing nets.
In the 8th century, the Arabs learned from cap-
tured Chinese prisoners how to make paper. Paper
moved west 200 years later with the Arab military
campaigns, first to Egypt and Syria, and then North
Africa and Spain. The first paper mill is documented
in Italy in 1256. The first German paper mill was the
“Gleismühl” in Nuremberg, which started produc-
tion in 1390. The owner at that time made his work-
ers swear an oath to keep the art of paper-making
a secret. The first American paper mill was built
around 1690 in Germantown, Pennsylvania. Today,
about a third of all the paper in the world is made
and consumed by the United States.
In the Paper Factory
In today’s industrial
paper production,
raw materials (wood
fibers, recycled
paper, fillers, and
water) are mixed
into a homogenous
pulp in a pulper,
which is a kind of
giant stirring bowl. This thin pulp is taken from the
supply vat onto a movable screen. The movement
helps the fibers to intertwine as tightly as possible.
In the process, most of the water runs off. Then, the
web of soaked paper comes to the press. The paper
web is guided through rollers in an absorbent felt
cloth and the rest
of the water is
thereby removed.
This pressing
process makes the
paper structure
denser and firmer.
Then, the paper
web runs through
heated drying
cylinders. Finally,
it is smoothed and
rolled up.
Paper Recycling
Most of the paper manufactured today comes from
trees. By recycling paper, we can reduce the number
Paper recycling starts by collecting paper. There
are three sources of paper for recycling: mill broke,
pre-consumer waste, and post-consumer waste. Mill
broke is paper scrap from paper production that
hasn’t even left the paper mill yet. Pre-consumer
waste is discarded paper that has not been used by
people yet, for example, the scraps left over from
turning paper into books. Post-consumer waste is
paper that has been used by people and is no lon-
ger needed.
These three types of paper are collected by
various recycling programs and sold back to paper
mills that recycle it using a large-scale version of the
paper making process you used in this kit.
Only about 33% of new paper is made from re-
cycled paper. A lot of paper still goes into landfills.
It is important for you to sort your household trash
and make sure all paper goes in the recycling bin!
The explorer Marco Polo
reported on the wide-
spread use of paper money
in China in 1298, and that
there were already paper
handkerchiefs then.
A complete
paper web in a
paper factory can
be up to 35 miles
long?
Around 360 mil-
lion tons of paper
are used every year
worldwide, and the
per capita paper con-
sumption in the U.S. is
about 700 pounds?
Experiment 7: Pattern Paper with
Flowers
Lay flower petals or flat blades of grass onto the
paper pulp before applying the second piece of
netting. That will create beautiful and surprising
effects as well.
Experiment 4: Bleed
Pattern with Watercolors
If you paint a pattern onto fresh, still-wet paper, it
will produce a really cool effect. The colors create
beautiful designs as they run and bleed through
the wet paper.
Experiment 2: Paper with a Watermark
Make a design (for example, your initials) by laying
the string on the paper pulp when it is in the mold-
ing tray, before placing the second piece of netting
on top. When it is pressed, the paper will be a little
thinner and more translucent in that spot. Carefully
remove the string before drying. You can see the
watermark particularly well if you hold the paper
up to the light.
Experiment 9: Make Your Own Book
Here’s a great gift idea: As soon as you have made
several kinds of paper, you can easily combine them
into a book. Make holes in all the sheets of paper
and stack them on top of one another. Place a
specially designed cover sheet on top. Tie the sheets
together with a piece of ribbon or yarn. You could
use your book as a small photo album, for example.
Paper-Making Experiments About the History of Paper Making and Paper Recycling
Did You Know? Paper Facts
Paper accounts for
more than a third of
all recycled materials
in the U.S.


Product specificaties

Merk: Thames & Kosmos
Categorie: Niet gecategoriseerd
Model: Recycled Paper Press

Heb je hulp nodig?

Als je hulp nodig hebt met Thames & Kosmos Recycled Paper Press stel dan hieronder een vraag en andere gebruikers zullen je antwoorden


Handleiding Niet gecategoriseerd Thames & Kosmos

Handleiding Niet gecategoriseerd

Nieuwste handleidingen voor Niet gecategoriseerd