Sussex DPWBMS200 Handleiding
Bekijk gratis de handleiding van Sussex DPWBMS200 (3 pagina’s), behorend tot de categorie Kraan. Deze gids werd als nuttig beoordeeld door 82 mensen en kreeg gemiddeld 4.7 sterren uit 7 reviews. Heb je een vraag over Sussex DPWBMS200 of wil je andere gebruikers van dit product iets vragen? Stel een vraag
Pagina 1/3
AS/NZS 3718:2005
LIC. 20081
WATER
RATING
LicenceNo.LicenceNo.0124
WaterConsumption
Themore
starsthemore
waterefficient
www.waterrating.gov.au
litresperminute
WhentestedinaccordancewithStardardAS/NZS6400
Formoreinformationandtocompare
products,referto:
5
Ajointgovernmentandindustryprogram
WATER
RATING
WaterConsumption
Themore
starsthemore
waterefficient
www.waterrating.gov.au
litresperminute
WhentestedinaccordancewithStandardAS/NZS6400
Formoreinformationandtocompare
products,
referto:
8.5
Ajointgovernmentandindustryprogram
LicenceNo.LicenceNo.0124
WATER
RATING
WaterConsumption
Themore
starsthemore
waterefficient
www.waterrating.gov.au
litresperminute
WhentestedinaccordancewithStandardAS/NZS6400
Formoreinformationandtocompare
products,referto:
7.5
Ajoint government andindustryprogram
LicenceNo.0124
POL Basin Set
POL Basin Mixer
POL Basin Mixer Extended
POL Sink Mixer
( Twin Handle )
WATER
RATING
LicenceNo.LicenceNo.0124
WaterConsumption
Themore
starsthemore
waterefficient
www.waterrating.gov.au
litresperminute
WhentestedinaccordancewithStardardAS/NZS6400
Formoreinformationandtocompare
products,referto:
5.5
Ajointgovernmentandindustryprogram
POL Sink Mixer
( Single Lever )
POL Shower Head
POL Hand Held Shower
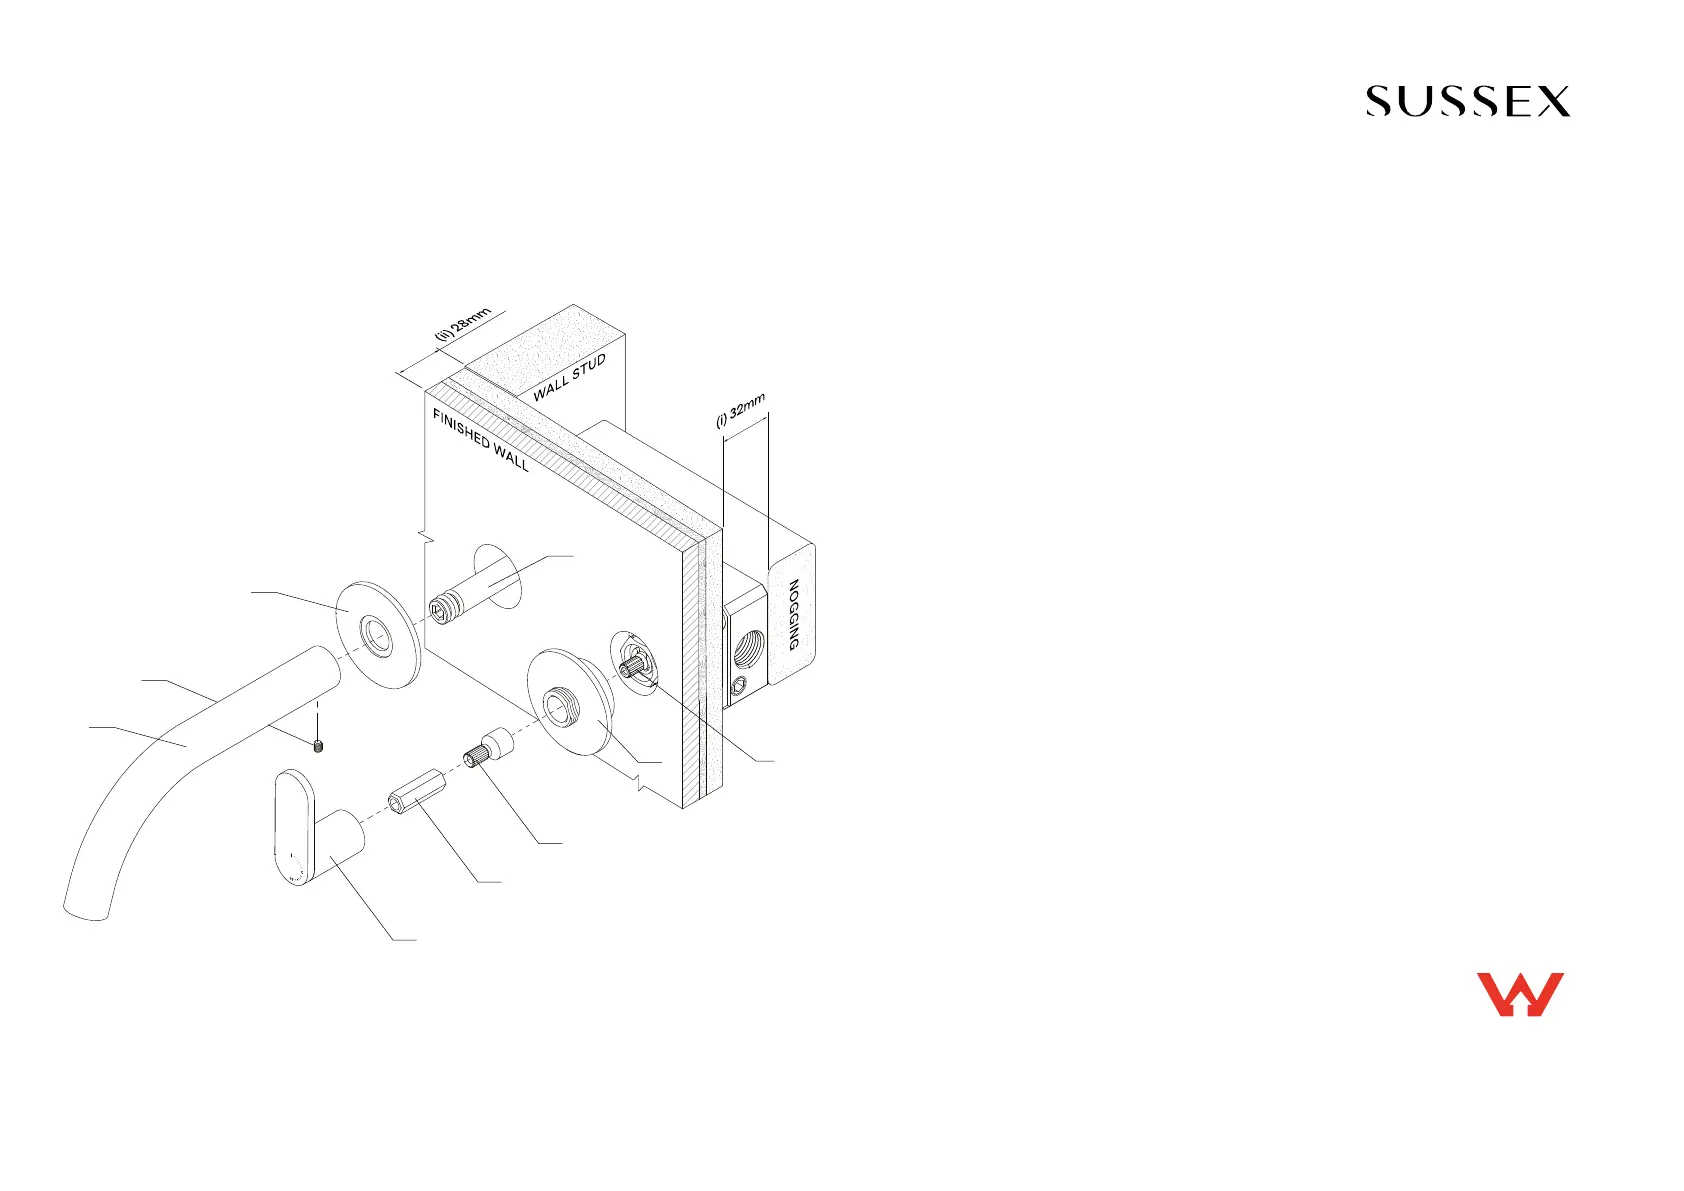
-The In-wall (Body Mixer) is supplied and is to be used in conjunction with this Tapware.
-Secure a nogging 32mm (i) back from the front of the stud. Attach the Wall Body Mixer to the nogging.
-Ensure the Body Mixer mounted is square and parallel between the Wall Studs.
-For the purpose of the illustration, the thickness of the finished Wall coverings is calculated to be 28mm (ii)
-See step 1 for rough in configuration
.
-Tapware is to be installed by a Licensed Plumber in accordance with AS/NZS 3500:2021
-Recommended working water pressure 300 - 500 Kpa. Maximum water temperature is 65°C
-After installation, ensure that tapware functions correctly without leaks.
-Please ensure a copy of the Installation Instructions are left with the end user for future reference.
DPBMS165
DPBMS200
DPWBMS165
DPWBMS200
Duet
Progressive Basin/Bath Mixer
System
Product code
Rough-in:
Plumber note
B
D
C
A
E
-(A) Handle
-(B) Spindle Adapter
-(C) Spindle Extention
-(D) Dress Ring
-(E) Spindle
-(F) Supply Post
-(G) Dress Ring (Outlet)
-(H) Set Screw
-(I) Outlet
Product parts
F
I
G
H
On-site high pressure line testing must be conducted with the Mixer in the closed position. (STATIC TEST ONLY)
Under no circumstances is the Mixer to be opened when exceeding the maximum stated water pressure.
At the completion of the testing, do not relieve any high pressure by opening the Mixer.
Exposing the internals of the Mixer Cartridge to higher than specified water pressures, will void the manufacturer's
warranty
Pressure testing
While we aim to ensure the specifications shown are correct at time of printing, Sussex Taps reserves the right to make modifications without prior notice.
Always use the physical product for accurate measurements. Dimensions are subject to change without notice. All measurements are shown in millimetres.
Copyright © Sussex Taps sussextaps.com.au
Product specificaties
| Merk: | Sussex |
| Categorie: | Kraan |
| Model: | DPWBMS200 |
Heb je hulp nodig?
Als je hulp nodig hebt met Sussex DPWBMS200 stel dan hieronder een vraag en andere gebruikers zullen je antwoorden
Handleiding Kraan Sussex

7 April 2025
7 April 2025
7 April 2025
7 April 2025
7 April 2025
7 April 2025
7 April 2025
7 April 2025
7 April 2025
7 April 2025
Handleiding Kraan
Nieuwste handleidingen voor Kraan
30 Mei 2026
29 Mei 2026
29 Mei 2026
27 Mei 2026
27 Mei 2026
27 Mei 2026
26 Mei 2026
26 Mei 2026
26 Mei 2026
26 Mei 2026