Star Micronics TSP100 TSP143ECO Handleiding
Star Micronics Labelprinter TSP100 TSP143ECO
Bekijk gratis de handleiding van Star Micronics TSP100 TSP143ECO (48 pagina’s), behorend tot de categorie Labelprinter. Deze gids werd als nuttig beoordeeld door 20 mensen en kreeg gemiddeld 4.2 sterren uit 9 reviews. Heb je een vraag over Star Micronics TSP100 TSP143ECO of wil je andere gebruikers van dit product iets vragen? Stel een vraag
Pagina 1/48
80876371 TSP100IIU EJCK
Setting
Up
Your
Printer
I
セットアップ
I
安装打印机
I
프린터 설치하기
Before you set up and operate your printer, look at the Manuals
included on the supplied CD-ROM for more information.
CAUTION: 注意 :
在安装及启动打印机之前,请参
阅在驱动光盘里的说明书。
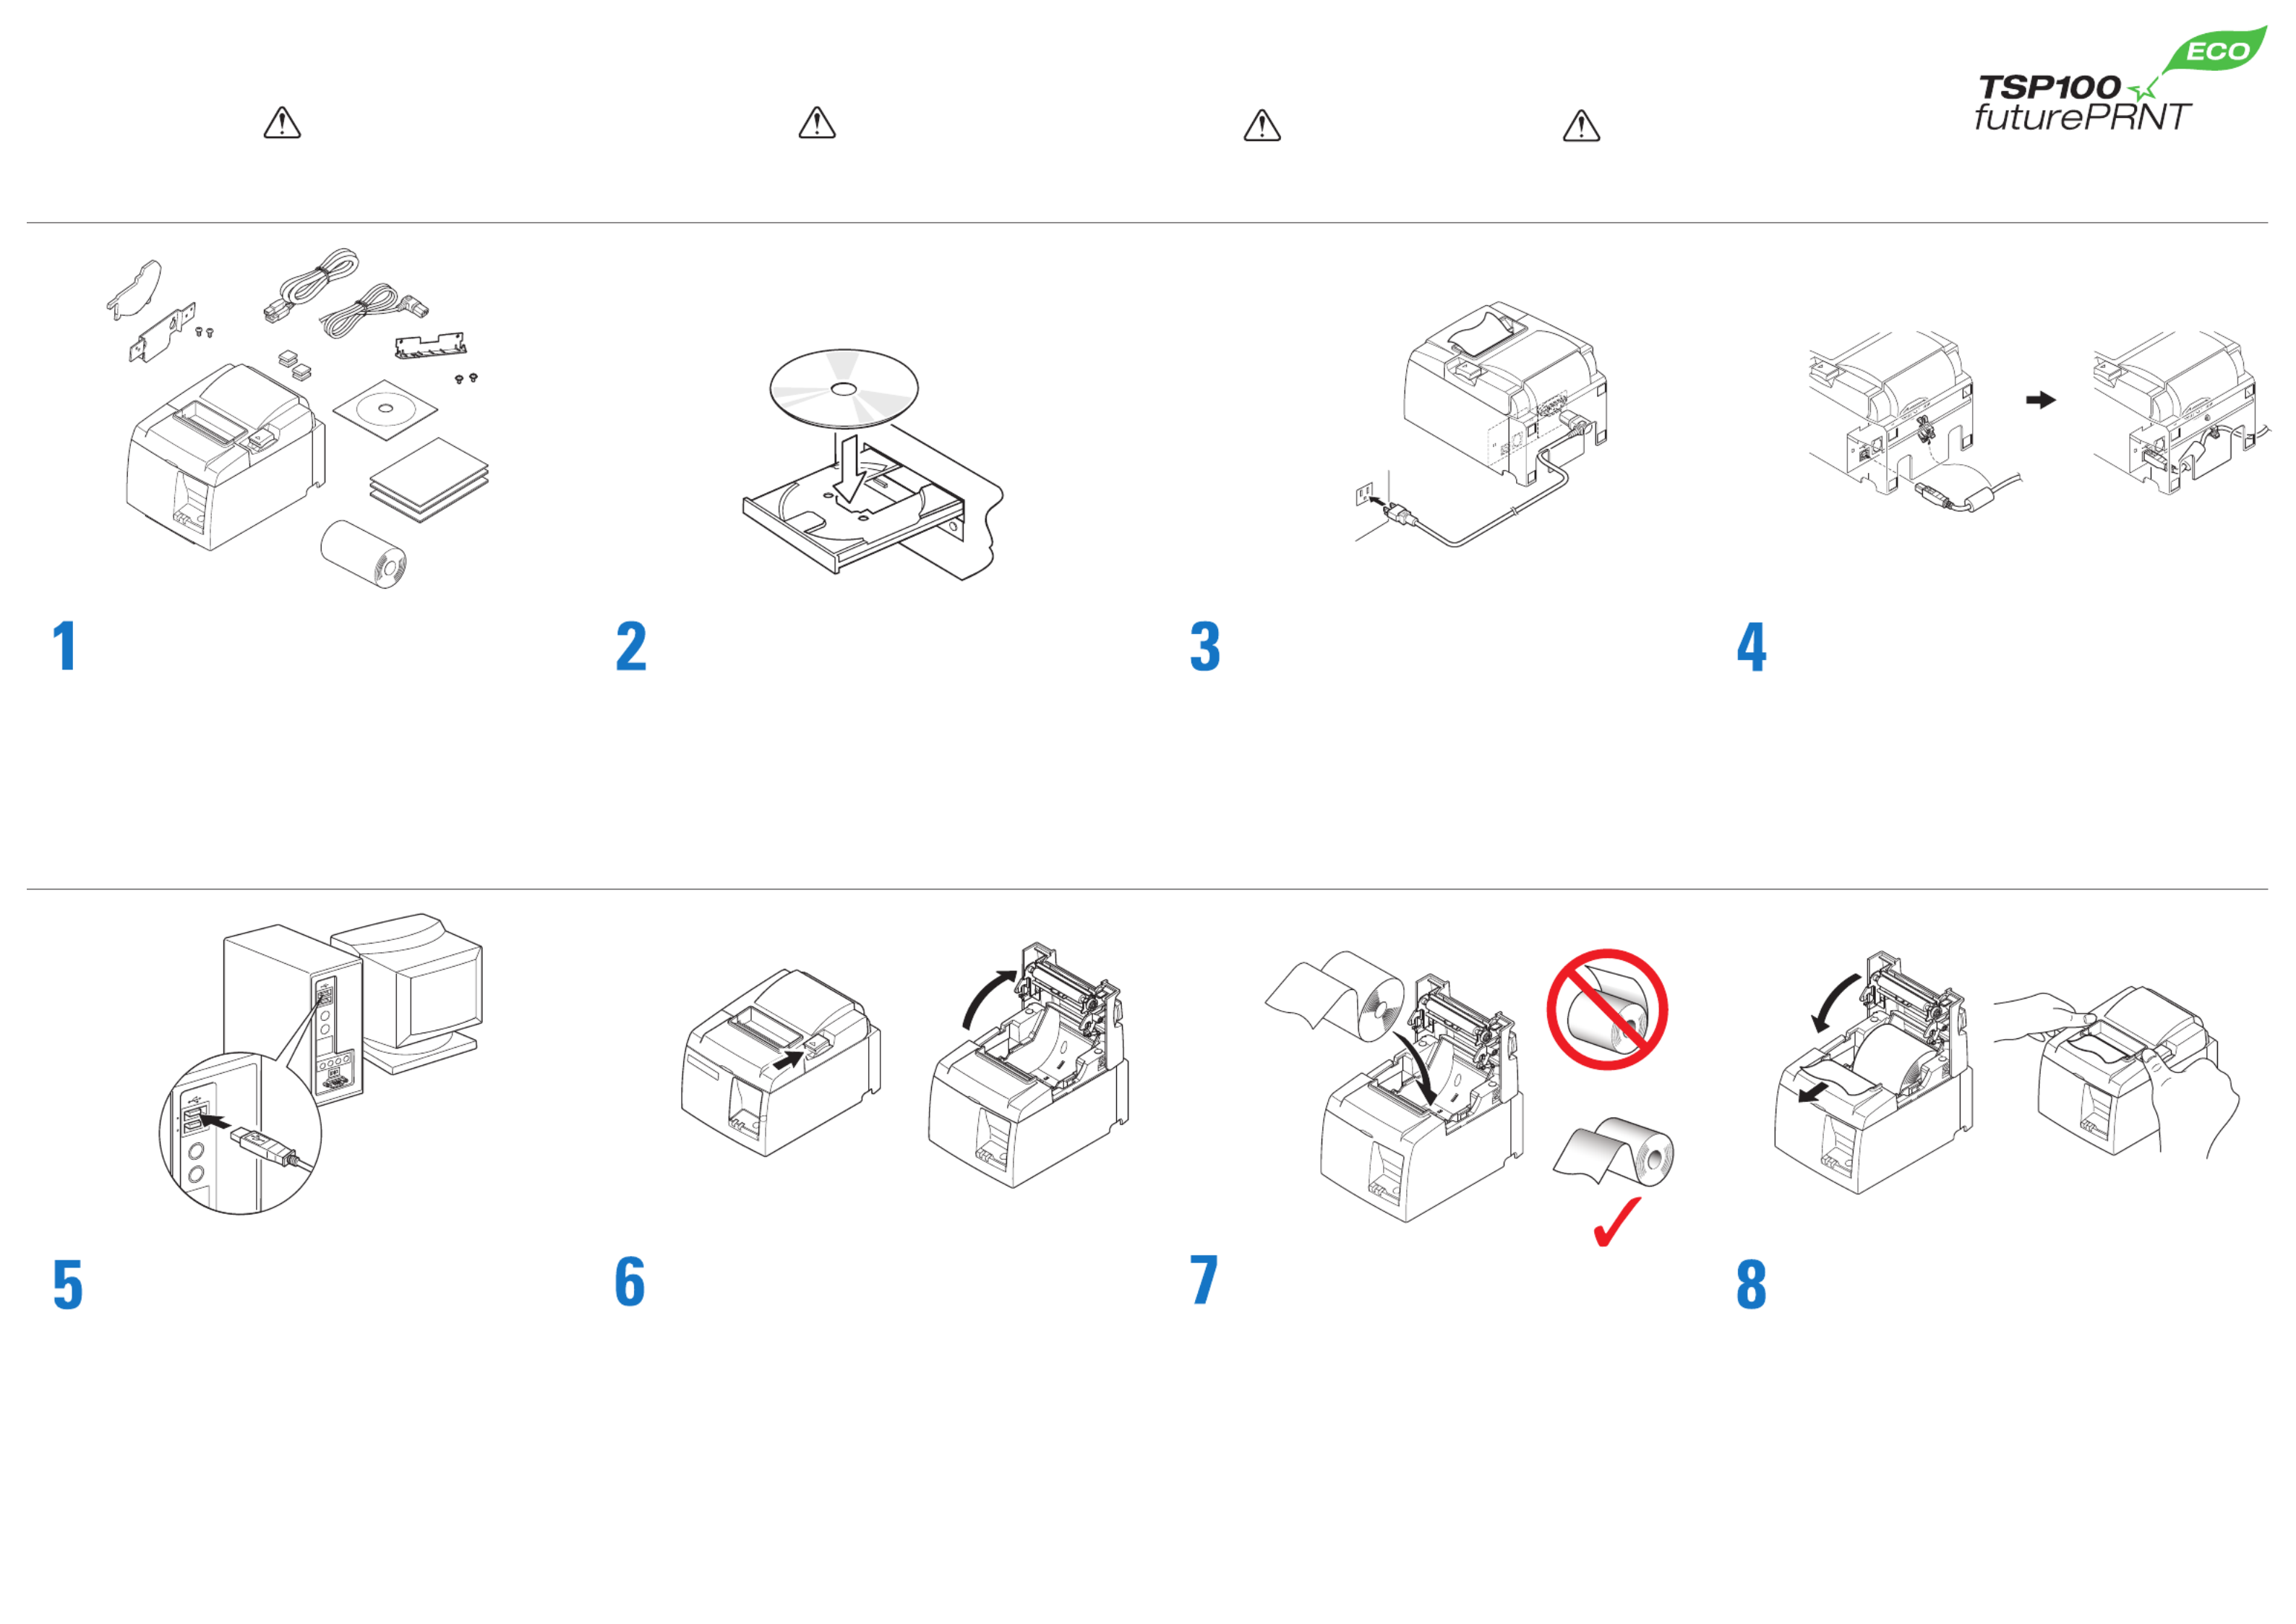
Unpack the printer.
开箱检查。
開梱してください。
注意 :
プリンタをセットアップしたり操作する前に、
付属 CD-ROM内のマニュアルをお読みください。
프린터 포장을 풉니다.
Insert the paper roll.
按照示意图所示方向装入卷纸。
用紙を図のような向きで挿入してください。
용지를 넣습니다.
電源コードをプリンタに接続してから電源プラグをコン
セントに差し込んでください。
Connect the power cord to the printer and plug the
cord into the wall.
先把电源线插入打印机后,再把电源插头插入电源
插座。
프린터에 전원 케이블을 연결합니다.
플러그를 콘센트에 꼽은 후 프린터 전원을 켭니다.
付属の CD-ROM をコンピュータにセットし、画面上の
インストールを選択してください。
Insert the CD-ROM into the computer, and then
select installation on the screen.
插入随机的驱动光盘,按屏幕指示进行安装。
CD-ROM을 컴퓨터에 넣은 후 스크린에서 설치를
선택해 주십시오.
USBケー ブ ル を コ ン ピ ュ ー タ に 接 続 し た 時 に、 初 め て
プリンタに電源が入ります。
When the USB cable is connected to the computer, the
printer power will be turned on for the first time.
请将 USB电缆插入计算机 USB 接口,这样,连接在另一
端的打印机将得到供电。
USB 케이블을 컴퓨터에 연결했을 때 처음으로
프린터의 전원이 켜집니다.
Pull out a small amount of paper and then close
the cover.
拉出一小部份的纸,然后关下机盖。
紙端を手前に引き出して、プリンタカバ-を閉めてく
ださい。
용지 끝부분을 약간 당긴 후 커버를 닫습니다.
주의 :
프린터의 설치 및 운용 전, 프린터에 관한 자세한 사항은
제공된 CD-ROM에 포함되어 있는 매뉴얼을 참조하십시오.
レリ-スレバ-を押して、プリンタカバ-を開けてく
ださい。
Open the cover by lifting the lever.
推开右边开关可打开机盖。
레버를 올려서 커버를 엽니다.
Confirm that the CD installation is complete,
and then connect the USB cable to the printer.
待驱动安装完毕后,请把 USB电缆连接到打印机上。
CD のインストールが完了したことを確認してからUSB
ケーブルをプリンタに接続してください。
CD 의 설치가 완료된 것을 확인한 후 USB
케이블을 프린터에 연결해 주십시오.
Printer: Power OFF
PC: Power ON
Windows XP (SP2 or later) / Vista / 7
Printer: Power ON
Product specificaties
| Merk: | Star Micronics |
| Categorie: | Labelprinter |
| Model: | TSP100 TSP143ECO |
| Kleur van het product: | Grijs |
| Breedte: | 142 mm |
| Diepte: | 204 mm |
| Hoogte: | 132 mm |
| Kleur: | Ja |
| Stroom: | 1 A |
| USB-poort: | Ja |
| Ethernet LAN: | Nee |
| Aantal USB 2.0-poorten: | 1 |
| Certificering: | UL, C-UL, TüV, FCC, VCCI, EN55022, CE |
| Duurzaamheidscertificaten: | ENERGY STAR |
| Temperatuur bij opslag: | -20 - 60 °C |
| Compatibele besturingssystemen: | Windows XP 32 Bit, Vista 32/64 Bit, Windows 7 32/64 Bit, Server 2008 32/64 Bit, XP Embedded, CE, POSReady 2009, OPOS, JavaPOS, USB Vendor Class, Linux, Mac OS X, StarIO SDK with support for iOS, Android and Blackberry |
| Luchtvochtigheid bij opslag: | 10 - 90 procent |
| AC-adapter, uitgangsspanning: | 24 V |
| Maximale resolutie: | 203 x 203 DPI |
| Mediadikte: | 0.065 - 0.085 mm |
| Maximum roll diameter: | 83 mm |
| Printtechnologie: | Direct thermisch |
| Standaard interfaces: | USB |
| Maximale print breedte: | 80 mm |
| Printsnelheid (metrisch): | - mm/sec |
| Maximale print hoogte: | 8 mm |
| AC-ingangsspanning: | - V |
| Bedrijfstemperatuur (T-T): | 5 - 45 °C |
| Relatieve vochtigheid in bedrijf (V-V): | 10 - 90 procent |
| Ondersteunde papierwijdte: | 80, 72, 58, 50.8 mm |
| Emulatie: | Star Mode, ESC/POS |
| Autocutter: | Ja |
| Autocutter duurzaamheid: | 1 miljoen delen |
Heb je hulp nodig?
Als je hulp nodig hebt met Star Micronics TSP100 TSP143ECO stel dan hieronder een vraag en andere gebruikers zullen je antwoorden
Handleiding Labelprinter Star Micronics

27 Februari 2024
4 Juli 2023
21 Juni 2023
21 Juni 2023
20 Juni 2023
15 Juni 2023
9 Juni 2023
6 Juni 2023
5 Juni 2023
31 Mei 2023
Handleiding Labelprinter
Nieuwste handleidingen voor Labelprinter
22 April 2026
21 April 2026
21 April 2026
31 Maart 2026
27 Maart 2026
25 Maart 2026
9 Maart 2026
27 Februari 2026
17 Februari 2026
16 Februari 2026