Sonnet GE1000LAB-E Handleiding


Lees hieronder de 📖 handleiding in het Nederlandse voor Sonnet GE1000LAB-E (4 pagina's) in de categorie Netwerkkaart/adapter. Deze handleiding was nuttig voor 15 personen en werd door 2 gebruikers gemiddeld met 4.5 sterren beoordeeld

Pagina 1/4
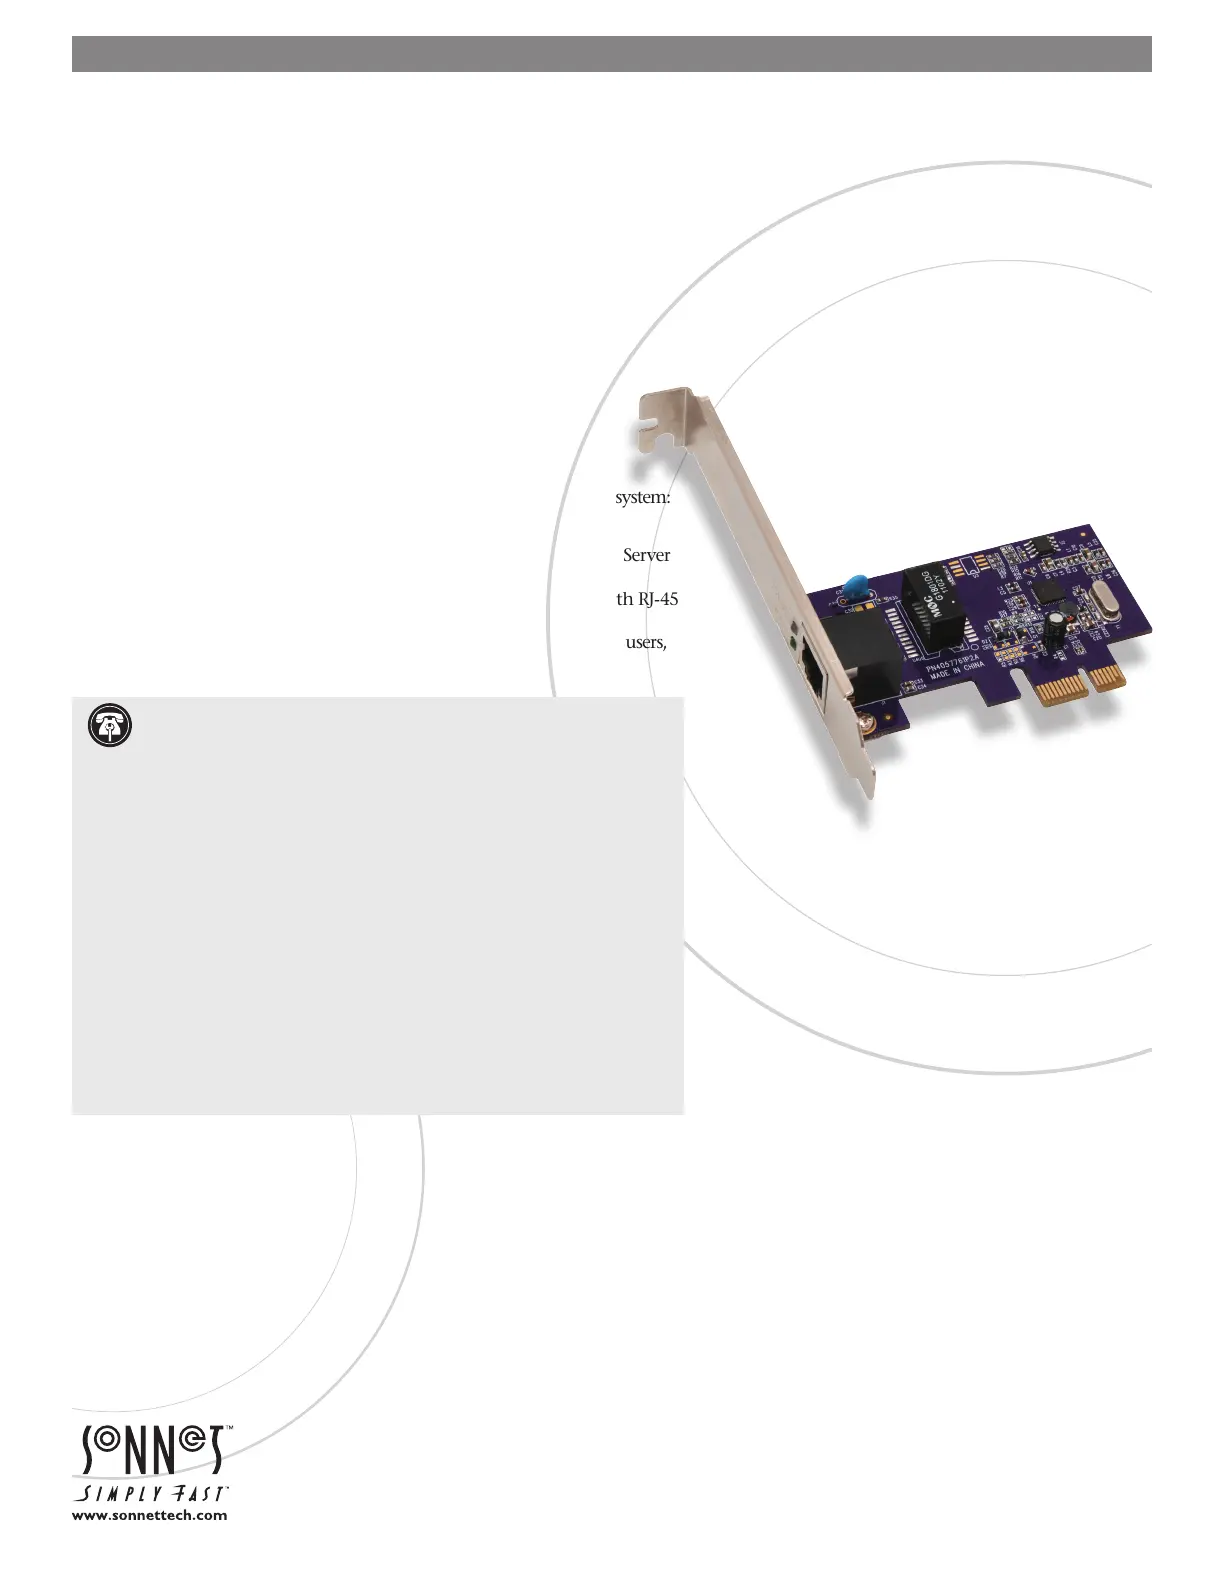
Quick Start Guide for Presto Gigabit Pro PCIe
You Should Have
The following items should be included in your product package:
One Presto Gigabit Pro PCIe adapter card
The following items may be required for installation:
Medium Phillips screwdriver
System Requirements
Presto Gigabit Pro PCIe requires the following in order to operate in your system:
One available PCI Express (PCIe) slot
OS X® Version 10.7.5 or later; or Windows® 8, 7, Vista®, Server 2012, or Server
2008
One standard Unshielded Twisted Pair (UTP) Category 5 or 6 cable with RJ-45
connectors
Internet access (for driver download, Windows 7, Vista, and Server 2008 users,
only)
Support Notes: We recommend you make a backup of important
information on your system’s current hard drive(s) prior to installing new
hardware or software.
When handling computer products, you must take care to prevent components
from being damaged by static electricity. Before opening your computer or
removing parts from their packages, always ground yourself first by touching
a metal part of the computer, such as a port access cover, and work in an area
free of static electricity; avoid carpeted areas. Handle all electronic components
by their edges, and avoid touching connector traces and component pins.
About This Document
Check the Sonnet website for the latest documentation.
1. Go to www.sonnettech.com/support/kb/kb.php
2. Click the Computer Cards link
3. Click the PCIe Cards link
4. Click the Presto Gigabit Pro PCIe link, and then click the Documentation link.
5. Click the Presto Gigabit Pro PCIe Quick Start Guide [English] link, and then
check the Document Version information. If the version listed is later than
this document, click the Download Now button for the latest version.
PRESTO GIGABIT PRO PCIe
GIGABIT ETHERNET ADAPTER CARD FOR PCI EXPRESS SLOT
Remember to register your product online at http://registration.sonnettech.com to be informed of future upgrades and product releases.
Software updates and links are available from the Sonnet Website at www.sonnettech.com. Online support form available at http://supportform.sonnettech.com.
Sonnet Technologies Customer Service hours are Mon.-Fri., 7 a.m.–4 p.m. Pacific Time Customer Service Phone: 1-949-472-2772 • E-mail: support@sonnettech.com
Sonnet Technologies, Inc., California USA Tel: 1-949-587-3500
2
Presto Gigabit Pro PCIe Quick Start Guide
STEPS FOR MAC USERS
The following section covers the installation and configuration
of the Presto Gigabit Ethernet Pro PCIe card in a Mac Pro or
Thunderbolt-to-PCIe card expansion chassis. If you are install-
ing the Presto card into a Windows PC, skip to STEPS FOR
WINDOWS USERS.
Installation Preparation
Sonnet strongly recommends that you read the section in your
computers user manual that addresses PCI card installation, prior
to installing the Presto Gigabit Pro PCIe into your system.
Card Installation Steps
This section covers the installation of the Presto Gigabit Pro PCIe
card into your Mac Pro® or Thunderbolt-to-PCIe expansion
chassis.
1. Shut down your computer or Thunderbolt-to-PCIe expansion
chassis, and then open it to access the expansion card area
(PCIe slots); refer to the users manual for specic information.
2. Locate an available PCIe slot and remove its access cover.
3. Remove the Sonnet card from its packaging, and then install
it into the PCI Express slot; make sure the card is firmly
seated and secured.
4. Close the computer or Thunderbolt-to-PCIe expansion chassis.
5. Plug in a network-connected twisted-pair Ethernet cable into
the Presto Gigabit Ethernet Pro PCIe card.
Driver Information—OS X
The drivers that enable the Presto Gigabit Pro PCIe card to work
in your computer are installed as part of OS X; the Presto card is
ready to configure when you power on your computer.
System Configuration Steps—Mac Users
Listed below are the basic steps necessary to add the Presto
Gigabit Pro PCIe for use as one of your computers Ethernet
network ports.
1. Power on your computer. After your computer hasnished
booting, launch the System Preferences application, and
then click Network.
2. If it is not already selected, click on the Presto Gigabit Pro
PCIe (identied as a ) in the left panel, and PCI Ethernet slot
then configure the settings, if necessary. If your computer
was connected to a network using built-in Ethernet, you
should not have to enter new settings.
3. After you accepted the existing settings, edited them, or
created new ones, click the Apply button.
4. Close System Preferences; if you used existing settings,
your installation is complete. For additional information on
configuring settings, refer to Mac Help (Help > Mac Help
from the Finder) and www.info.apple.com; type network,
Ethernet” andcombining Ethernet ports to display various
articles.
STEPS FOR WINDOWS USERS
The following section covers conguration and use of the Presto
Gigabit Pro PCIe card in a Windows PC.
Installation Preparation
Sonnet strongly recommends that you read the section in your
computers user manual that addresses PCI card installation, prior
to installing the Presto Gigabit Pro PCIe into your system.
Card Installation Steps
This section covers the installation of the Presto Gigabit Pro PCIe
card into your Windows PC.
1. Shut down your computer, and then open it to access the
expansion card area (PCIe slots); refer to the user’s manual for
specic information.
2. Locate an available PCIe slot and remove its access cover.
3. Remove the Sonnet card from its packaging, and then
install it into the PCI Express slot; make sure the card is
firmly seated and secured.
4. Close the computer.
5. Plug in a network-connected twisted-pair Ethernet cable into
the Presto Gigabit Ethernet Pro PCIe card.
Driver Information—Windows 8, Server 2012
The drivers that enable the Presto Gigabit Pro PCIe card to work
in your computer are installed as part of Windows 8 and Server
2012; the Presto card is ready to configure when you power on
your computer. Skip to System Configuration StepsWindows
Users on page 4 for basic configuration information.
Windows 7, Server 2012Software Download/
Installation Steps
1. Start up your computer.
2. Log onto the Internet and go to www.sonnettech.com/
support, and then click the Online Support Knowledgebase
link.
3. Click the Computer Cards link, and then click the PCIe Cards
link.
4. Locate and click the Presto Gigabit Pro PCIe link. Note: Do not
click the Presto Gigabit Pro PCIe (Discontinued) link.
(continued)
Windows 7, Server 2012—Software Download/
Installation Steps (continued)
5. Click the Presto Gigabit Pro PCIe Driver (Windows) link, and
then click Download Now; a new window or tab will appear.
6. Locate and click thele download link for the software
appropriate for the OS software running your computer (32
for 32-bit operating systems, x64 for 64-bit versions).
7. When the Broadcom License Agreement window appears, scroll
to the bottom of the page and then click Accept.
8. When asked whether you want to open or save the file, click
Save. When the message stating the download completed
appears, click Open; a new window will appear.
9. Select the win_b57_32 (or win_b57_x64) le folder, and
then click the Extract allles button toward the top of the
window.
10. When the Extract Compressed (Zipped) Folders window appears,
accept the default extraction location or choose a new one,
and then click Extract; the le will be extracted.
11. From the Start menu, right-click Computer and then select
Manage; the Computer Management window will appear.
12. In the window’s left panel, locate and click Device Manager.
In the middle panel, locate and double-click the Ethernet
Controller item listed in the Other devices category; an
Ethernet Controller Properties window will appear.
13. Click the Update Driver button; an Update Driver Software
window will appear.
14. ClickBrowse my computer for driver, and then click
Browse. Locate and select the win_b57_32 (or win_b57_x64)
folder you downloaded, and then click OK.
15. Back in the Update Driver Software window, click Next; the
driver is installed. When a message appears stating the
software installation is complete, click Close; the card is
ready for use. Skip to System Configuration Steps—Windows
Users on page 4 for basic conguration information.
Windows Vista, Server 20 Software Download/08
Installation Steps
1. Start up your computer.
2. During startup, a Found New Hardware window will
appear; clickDont show this message again for this device.
If you havent disabled User Account Control (UAC), a UAC
window will appear; click Continue.
3. Log onto the Internet and go to www.sonnettech.com/
support, and then click the Online Support Knowledgebase
link.
Presto Gigabit Pro PCIe Quick Start Guide
4. Click the Computer Cards link, and then click the PCIe Cards
link.
5. Locate and click the Presto Gigabit Pro PCIe link. Note: Do not
click the Presto Gigabit Pro PCIe (Discontinued) link.
6. Click the Presto Gigabit Pro PCIe Driver (Windows) link, and
then click Download Now; a new window or tab will open.
7. Locate and click thele download link for the software
appropriate for the OS software running your computer (32
for 32-bit operating systems, x64 for 64-bit versions).
8. When the Broadcom License Agreement window appears, scroll
to the bottom of the page and then click Accept.
9. When asked whether you want to open or save the file, click
Save. When the message stating the download completed
appears, click Open; a new window will appear.
10. Select the win_b57_32 (or win_b57_x64) file folder, and
then click the Extract allles button toward the top of the
window.
11. When the Extract Compressed (Zipped) Folders window appears,
accept the default extraction location or choose a new one,
and then click Extract; the le will be extracted.
12. From the Start menu, right-click Computer and then select
Manage; the Computer Management window will appear.
13. In the window’s left panel, locate and click Device Manager.
In the middle panel, locate and double-click the Ethernet
Controller item listed in the Other devices category; an
Ethernet Controller Properties window will appear.
14. Click the Reinstall Driver button; an Update Driver Software
window will appear.
15. ClickBrowse my computer for driver, and then click
Browse. Locate and select the win_b57_32 (or win_b57_x64)
folder you downloaded, and then click OK.
16. Back in the Update Driver Software window, click Next; the
driver is installed. When a message appears stating the
software installation is complete, click Close; the card is
ready for use. Skip to System Configuration Steps—Windows
Users on the next page for basic conguration information.
3


Product specificaties

Merk: Sonnet
Categorie: Netwerkkaart/adapter
Model: GE1000LAB-E
Connectiviteitstechnologie: Bedraad
Ethernet LAN: Ja
Aantal Ethernet LAN (RJ-45)-poorten: 1
Interface: Ethernet
Ethernet LAN, data-overdrachtsnelheden: 10,100,1000 Mbit/s
Bekabelingstechnologie: 10/100/1000BaseT(X)
Netwerkstandaard: IEEE 802.3
Ondersteunt Windows: Ja
Intern: Ja
Ondersteunt Mac-besturingssysteem: Ja
Hostinterface: PCI Express
Maximale overdrachtssnelheid van gegevens: 1000 Mbit/s
Auto MDIX IEEE: Ja

Heb je hulp nodig?

Als je hulp nodig hebt met Sonnet GE1000LAB-E stel dan hieronder een vraag en andere gebruikers zullen je antwoorden


Handleiding Netwerkkaart/adapter Sonnet

Handleiding Netwerkkaart/adapter

Nieuwste handleidingen voor Netwerkkaart/adapter