Proficient W670 Handleiding
Proficient Speaker W670
Bekijk gratis de handleiding van Proficient W670 (4 pagina’s), behorend tot de categorie Speaker. Deze gids werd als nuttig beoordeeld door 48 mensen en kreeg gemiddeld 4.9 sterren uit 5 reviews. Heb je een vraag over Proficient W670 of wil je andere gebruikers van dit product iets vragen? Stel een vraag
Pagina 1/4
Before installing your speakers, you should consider their place-
ment carefully, taking into account the location of electrical,
plumbing and other fixtures. Contact your Dealer for assistance
if you are unsure of the best location for your particular listening
environment.
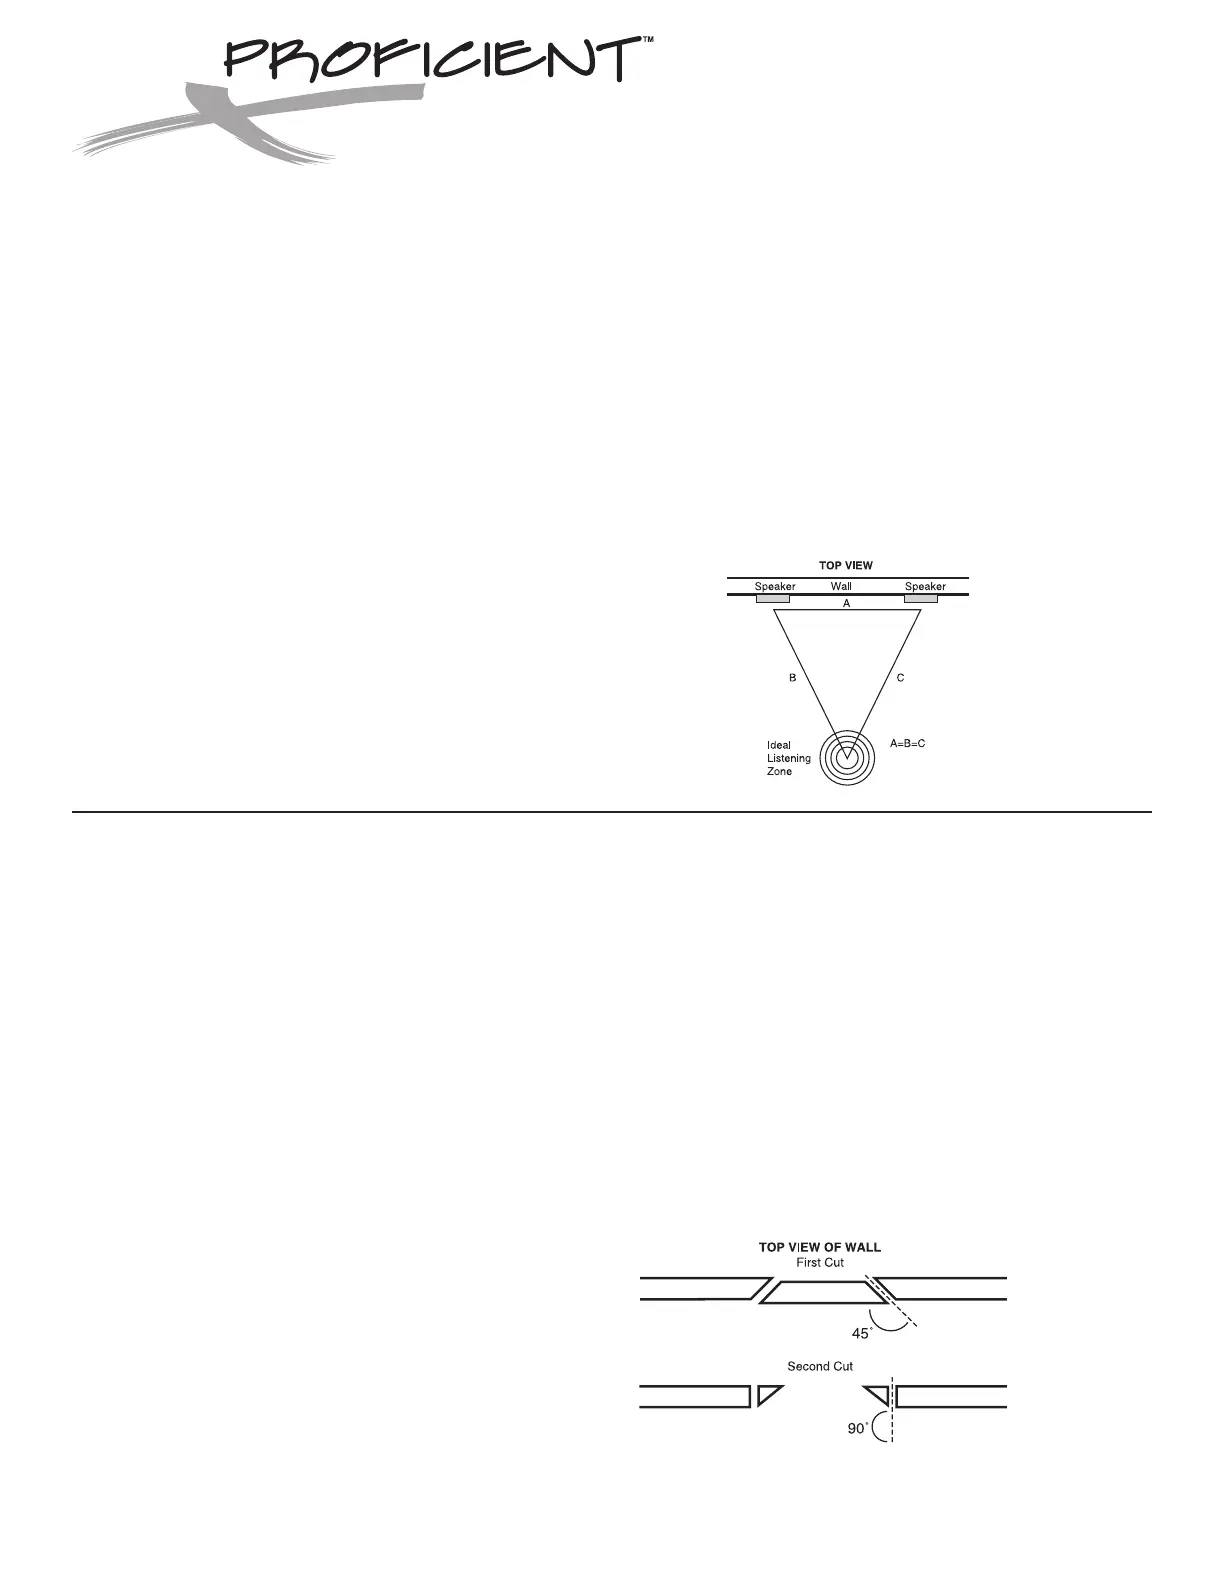
Placement In Wall:When installing your speakers into the wall,
ideal sound will be achieved when the tweeters are placed at ear
level or slightly higher and the primary listening area is no closer
to the wall than the distance between the speakers themselves.
(See Diagram 1)
If the speakers are positioned far away from the primary listening
area, adjust the pivoting tweeters so they are pointed towards it.
Note: To avoid possible damage to the pivoting tweeters, read the
section entitled “SPEAKER ADJUSTMENTS” in this manual prior to
performing the tweeter adjustment.
New Construction - Unfinished Walls
A Pre-Construction Bracket, available from your Dealer, may be
installed prior to drywall application across studs (up to 24" on-
center) where a speaker will be located. After the hole is cut and
the drywall is installed, the speakers are then easily installed fol-
lowing the instructions for mounting in “Finished Walls” below.
Note:If the speakers are to be mounted more than 24" on-center, a
special “Extra Long Wing” is available from your Dealer.
Finished Walls
Prior to the actual installation of the speakers, it will be necessary
to run cables to the speaker locations. See your Dealer for more
information about cable installation. After the cable has been
properly installed, you are ready to mount the speakers. Following
the simple steps listed below will result in a professional looking
installation:
1. Determine the best area to mount your speakers. This area of
the wall should be free of obstructions such as electrical con-
duit, HVAC ducts, or water lines. This can best be determined
by noting the placement of fixtures and gaining access to an
attic or crawl space for further analysis of the location of such
obstacles.
2. Find the studs nearest the desired speaker mounting location.
We highly recommend using a good stud-finder tool for this
procedure. If you are lining up the speakers to some other
object or molding in the room, make sure you consider the size
of the baffle flange which extends beyond the mounting hole
on all four sides.
3. Mark the hole. A template for setting the hole is provided in the
box (along with two paint mask inserts for use when painting).
Position the template in the desired position and pencil an
outline on the wall.
4. Cutting the hole. CAUTION: This is the most important part
of the entire installation.If you are not certain whether any
obstructions exist behind the desired mounting area, you
should start by cutting a small hole in the center of your pen-
ciled mounting hole with a drywall saw. Cut at a 45˚ angle
towards the inside of the hole (See Diagram 2). Cutting the small
hole at this angle will make drywall repair much easier as the
piece cut out can be installed neatly back into the hole. Once
you have determined there aren’t any obstructions in your
desired mounting location, start cutting the finished hole at a
90˚ angle to the wall surface.
5. Add insulation. If the area in the wall is not already insulated,
add an adequate amount of insulation material to fill the cavity.
If the insulation material used is faced with foil or paper, posi-
tion the foil or paper away from the speaker.
SPEAKER PLACEMENT
MOUNTING SURFACE PREPARATION
Diagram 2:
Wall Cut Out
Diagram 1:
Ideal Placement
Audio Systems
OWNER’S MANUAL
INWALL SPEAKERS
W665 • W670 • W680 • W690
W800 • W850
Product specificaties
| Merk: | Proficient |
| Categorie: | Speaker |
| Model: | W670 |
Heb je hulp nodig?
Als je hulp nodig hebt met Proficient W670 stel dan hieronder een vraag en andere gebruikers zullen je antwoorden
Handleiding Speaker Proficient

21 Februari 2024
21 Februari 2024
21 Februari 2024
21 Februari 2024
21 Februari 2024
21 Februari 2024
21 Februari 2024
21 Februari 2024
21 Februari 2024
21 Februari 2024
Handleiding Speaker
Nieuwste handleidingen voor Speaker
24 Juni 2026
23 Juni 2026
22 Juni 2026
22 Juni 2026
21 Juni 2026
17 Juni 2026
17 Juni 2026
17 Juni 2026
17 Juni 2026
16 Juni 2026