PAC AP4-TY11 Handleiding
Bekijk gratis de handleiding van PAC AP4-TY11 (13 pagina’s), behorend tot de categorie Keverőgép. Deze gids werd als nuttig beoordeeld door 19 mensen en kreeg gemiddeld 5.0 sterren uit 7 reviews. Heb je een vraag over PAC AP4-TY11 of wil je andere gebruikers van dit product iets vragen? Stel een vraag
Pagina 1/13
© 2018 AAMP Global. All rights reserved. PAC is a Power Brand of AAMP Global.
PAC-audio.com
Pacific Accessory Corporation
Page 1
Rev: V2
Date:032718
Advanced Amplier Interface
for Toyota / Lexus
AP4-TY11
The AP4-TY11 provides a 6-channel pre-amp output for use with aftermarket audio equipment. Using the full range,
xed level head unit output, in conjunction with data bus messages, the AP4-TY11 delivers a variable 5v RMS pre-
amp output with fading, balance, equalization, and level control capabilities. The module also retains audio from
other vehicle features such as factory navigation prompts, Bluetooth and Voice Activation. An accessory controlled
remote amplier turn on wire is also provided by the AP4-TY11. When used in conjunction with the APA-TOS1 (sold
separately), the module can provide a variable 2-channel ber optic digital audio output (TOSLINK).
Introduction and Features
Important Notes
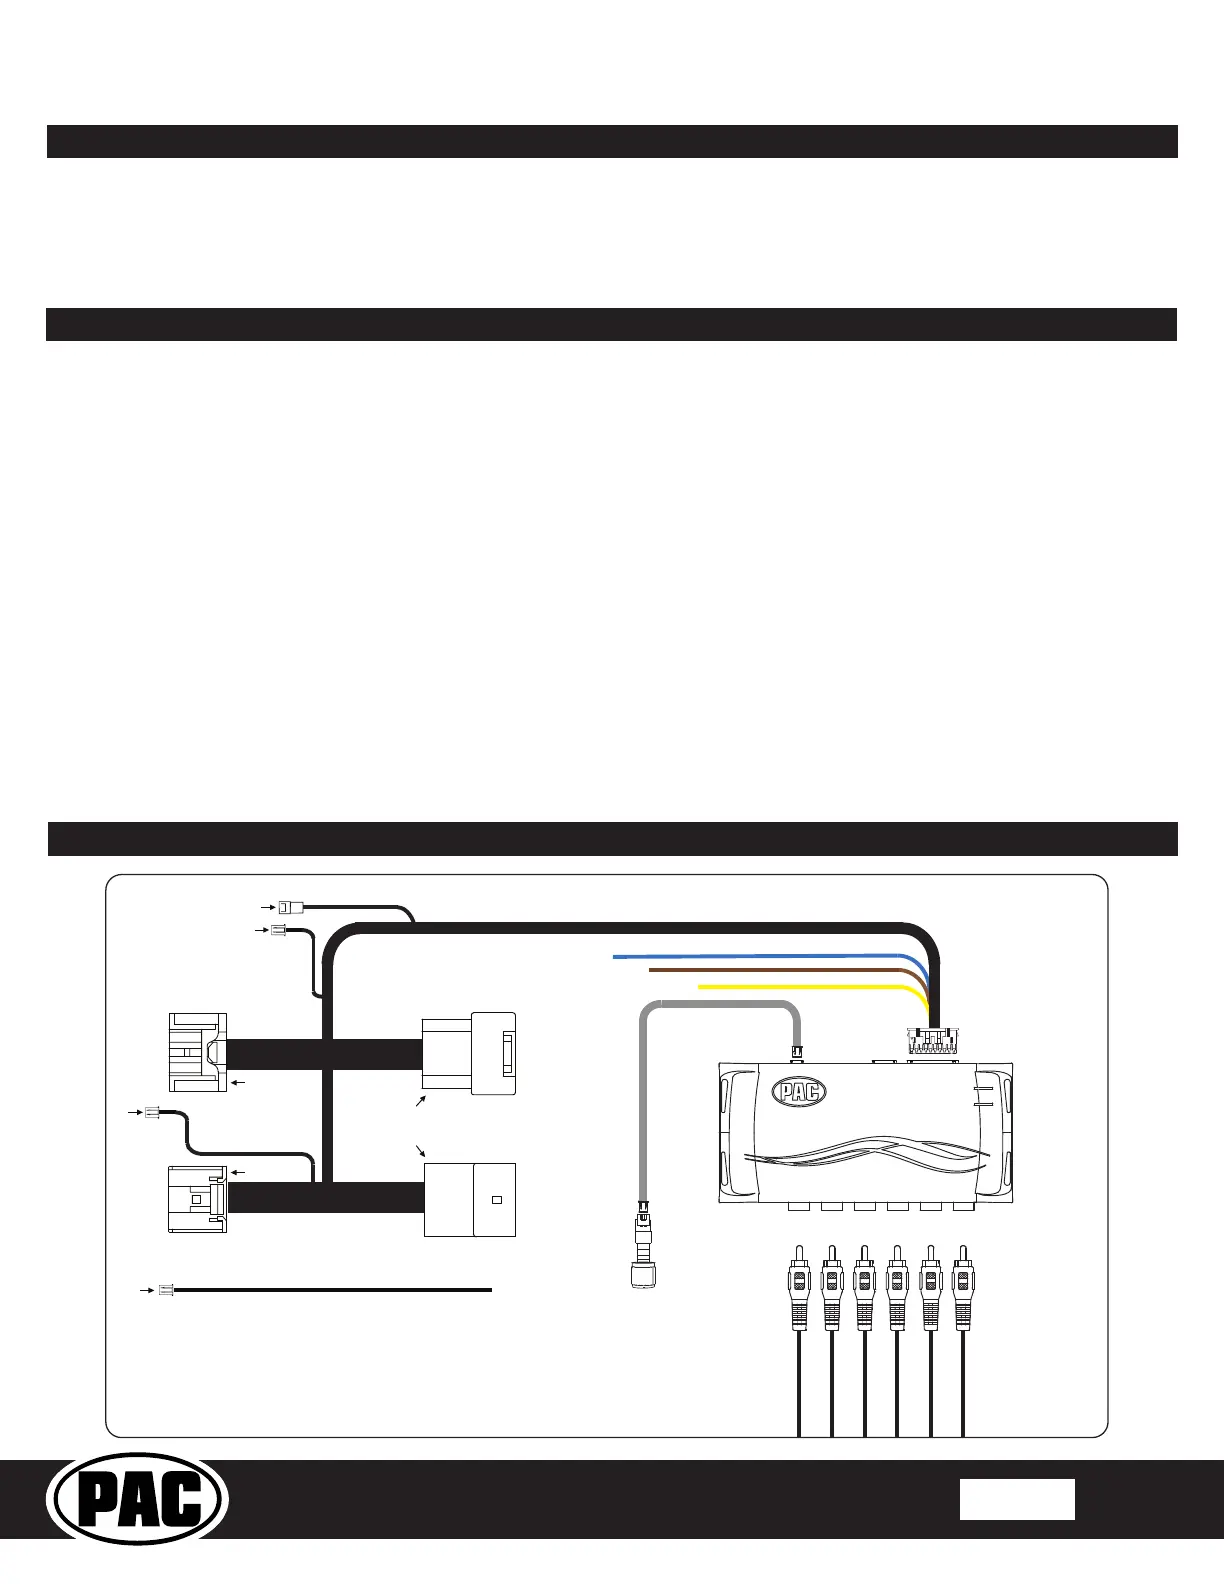
Wiring Connection Chart
To Aftermarket
Amplifier
Non-FadingRearFront
1(L)2(R)4(R)5(L)6(R)3(L)
Remote Turn On Output (2A Max)
Mute Input From Navigation
Mute Input From Telematics
To Amp PRO*
B*
A*
C*
*Connections “To Amp PRO”, “A”, “B” and “C”
are discussed in detail starting on page 5 under
“Voice / Nav Audio Connections”.
To Vehicle
Harness
To Radio
Non-Fading
Level Control
Knob
AP4-TY11-HAR
To Radio
1. Only compatible in vehicles equipped with a data bus controlled premium sound system. To verify compatibility in Toyota,
look for a JBL logo on the radio. In Lexus applications, most compatible radios will have a factory subwoofer or center
channel. RX Series Lexus are always amplied regardless if they do or do not have a center channel or subwoofer. Always
check PAC-audio.com for radio specic compatibility notes based on the year, make and model of the vehicle.
2. Voice activation / navigation prompt audio requires the AP4-TY11 harness to be connected for the proper conguration for
the vehicle. See the Vehicle Connections Chart starting on page 2 for details.
3. The factory radio's speed controlled volume, DSP, and surround sound mode are not supported by the AP4 outputs.
4. The factory amplier must remain connected, and in the vehicle after the AmpPRO has been installed.
5. Prior to testing, cycle the ignition off and back on again to properly initilize the AP4-TY11.
6. The AP4-TY11 beep volume and minimum volume levels are set to 0 dB by default. If you are happy with this level in your
particular application, additional adjustment is not required. Please refer to the Setup and Conguration section on page 9
for more details.
7. The remote output is rated at 2A of current. If more current is needed, an external relay must be used.
8. Channels 5 and 6 are non-fading outputs. The output level of channels 5 and 6 can be controlled using the supplied level
control knob.
9. The level control knob must be connected in order to manually adjust the beep volume and minimum volume settings.
10. Due to variations in output levels between various OEM radios and even between radio modes, the AP4-TY11 output
voltage may vary from the selected 5 volt (or 4 volt when DIP switch 2 is down) output.
11. Toyota Safety Connect and Lexus Enform (SOS) can easily be retained. See the Tech Brief "AP4-TY SOS Retention" at
PAC-audio.com for detailed instructions.
Product specificaties
| Merk: | PAC |
| Categorie: | Keverőgép |
| Model: | AP4-TY11 |
Heb je hulp nodig?
Als je hulp nodig hebt met PAC AP4-TY11 stel dan hieronder een vraag en andere gebruikers zullen je antwoorden
Handleiding Keverőgép PAC

29 Juli 2025
29 Juli 2025
11 Februari 2025
11 Februari 2025
11 Februari 2025
4 Juni 2023
Handleiding Keverőgép
Nieuwste handleidingen voor Keverőgép
20 Juli 2026
15 Juli 2026
15 Juli 2026
15 Juli 2026
15 Juli 2026
14 Juli 2026
14 Juli 2026
13 Juli 2026
13 Juli 2026
13 Juli 2026