Klein Tools 60900 Handleiding
Bekijk gratis de handleiding van Klein Tools 60900 (4 pagina’s), behorend tot de categorie Niet gecategoriseerd. Deze gids werd als nuttig beoordeeld door 89 mensen en kreeg gemiddeld 4.7 sterren uit 4 reviews. Heb je een vraag over Klein Tools 60900 of wil je andere gebruikers van dit product iets vragen? Stel een vraag
Pagina 1/4
60107 / 60107R60100
6090160900
60406
60400
60407
60401
6011360105
Instructions for Klein Hard Hats -
Models 60100, 60105, 60107,
60107R, 60113, 60400, 60401, 60406, 60407, 60900, 60901
Instrucciones para cascos de seguridad de Klein
-
Modelos 60100, 60105, 60107, 60107R, 60113, 60400, 60401, 60406,
60407, 60900, 60901
Instructions pour les casques de chantier Klein -
Modèles 60100, 60105, 60107, 60107R, 60113, 60400, 60401, 60406, 60407,
60900, 60901
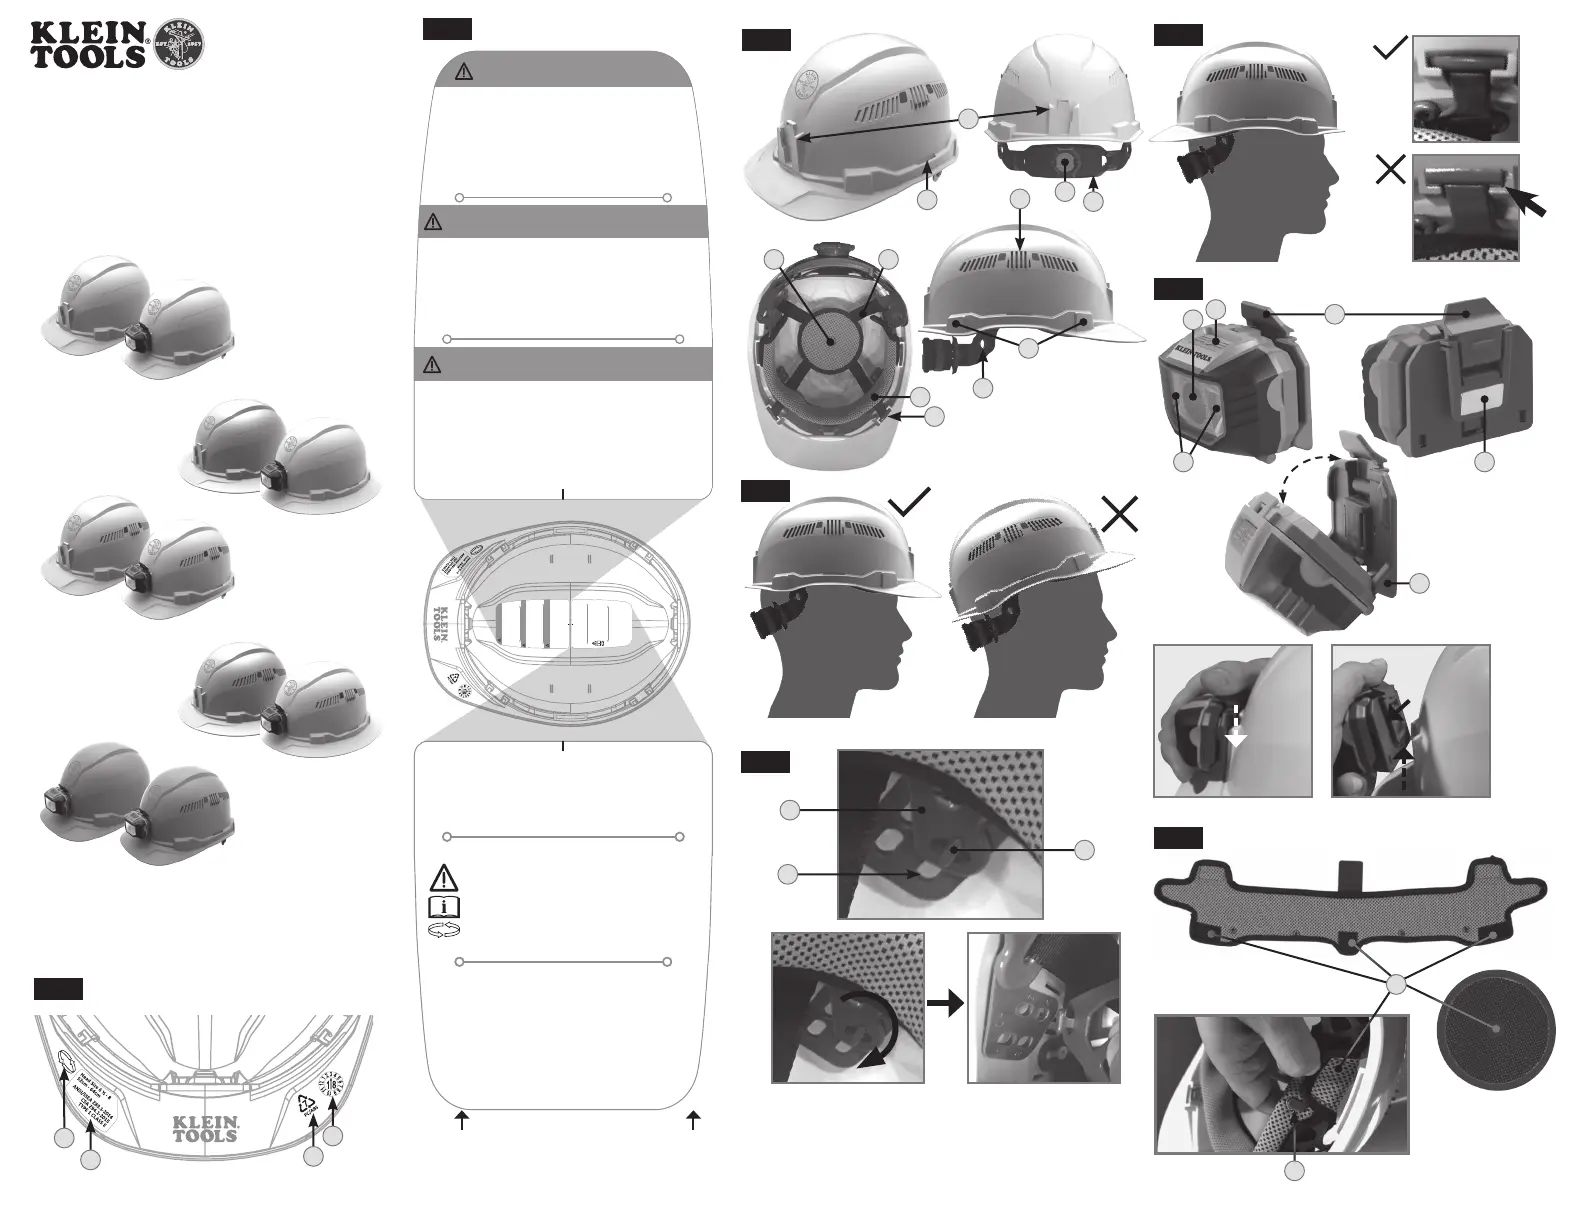
FIG. A
1
4
3
2
NOTE: This label is representative; contents will vary based on model #.
NOTA: esta etiqueta es representativa;
los contenidos variarán según el n.º del modelo #.
REMARQUE: Cette étiquette est fournie à titre indicatif;
son contenu varie en fonction du modèle #.
www.kleintools.com
ANSI/ISEA Z89.1-2014, Type 1, Class #
CSA Z94.1-2015, Type 1, Class #
Model #
60
###
HEAD SIZE 6½ - 8 (52cm - 64cm)
1370496 Rev. 01/19 E
This helmet provides LIMITED head protection from small falling objects
striking the top of the helmet. A Type II helmet MUST be used for
protection against front, side or rear blows. NEVER use as a vehicular or
sports helmet. Before using, replace any part showing wear or damage.
Replace helmet after any impact. Never alter or apply paints or solvents.
Do NOT use for electrical shock protection.
Do NOT expose suspension and padding to open flame.
Este casco proporciona protección LIMITADA para la cabeza
contra pequeños objetos que caen golpeando la parte
superior del casco. Un casco tipo II DEBE ser utilizado como
protección contra golpes frontales, laterales o traseros.
NUNCA lo use como un casco vehicular o deportivo.
Antes de usar, reemplace cualquier pieza que muestre
desgaste o daño. Reemplace el casco después de cualquier
impacto. Nunca altere ni aplique pinturas o solventes.
NO lo use para protección contra descargas eléctricas.
NO se debe exponer la suspención ni el acolchado a llamas
abiertas.
Ce casque offre une protection de tête limitée contre les petits objets
tombant sur le casque. Un casque de type II DOIT être utilisé pour la
protection contre les coups avant, latéraux ou arrière. N'utilisez
JAMAIS comme casque de sport ou de véhicule. Avant toute
utilisation, remplacez toute pièce présentant une usure ou des
dommages. Remplacer le casque après tout impact. Ne jamais
modifier ou appliquer des peintures ou des solvants.
NE PAS utiliser pour la protection contre les chocs électriques.
Ne PAS exposer la coiffe et le rembourrage à une flamme nue.
• This protective headwear is designed to absorb some of the
energy of a blow through partial destruction of its component parts
and, even though damage may not be readily apparent, any
protective headwear subjected to severe impact should be replaced.
• This protective headwear must not be painted or cleaned with
solvents. Any decals applied to the protective headwear must be
compatible with the surface material and known not to affect
adversely the characteristics of the materials used in the protective
headwear. • Any addition or structural modification may reduce the
protective properties afforded by this protective headwear.
WARNING! BEFORE USE: READ ALL
INSTRUCTIONS OR RISK SERIOUS INJURY OR
DEATH. DO NOT REMOVE LABEL.
• Esta gorra de protección está diseñada para absorber parte de la energía
de un golpe a través de la destrucción parcial de sus componentes y,
aunque el daño no sea aparente, debe reemplazarse cualquier gorro de
protección que tenga un impacto severo. • Esta gorra de protección no
debe pintarse ni limpiarse con disolventes. Las calcomanías aplicadas a los
sombreros protectores deben ser compatibles con el material de la
superficie y se sabe que no afectan adversamente las características de los
materiales utilizados en los sombreros protectores.
• Cualquier adición o modificación estructural puede reducir las propiedades
protectoras proporcionadas por esta protección para la cabeza.
ADVERTENCIA! ANTES DE USAR: LEA TODAS LAS
INSTRUCCIONES O PELIGRO DE LESIONES GRAVES O LA
MUERTE. NO QUITE LA ETIQUETA.
• Ce casque de sécurité est conçu pour absorber une partie du choc
produit par un coup par la destruction partielle de ses composants. Même
si l'endommagement n'est pas visible, tout casque de sécurité qui a subi
un choc sévère devrait être remplacé. • Ce casque de sécurité ne doit
pas être peint ni nettoyé à l'aide de solvants. Toute décalcomanie
appliquée à ce casque doit être compatible avec le matériau de la calotte
et être reconnue inoffensive pour les matériaux entrant dans la
fabrication du casque. • Tout ajout au casque ou toute modification
structurale du casque peut en réduire les propriétés de protection.
ATTENTION. AVANT UTILISATION: LIRE TOUTES LES
INSTRUCTIONS OU RISQUE DE BLESSURES GRAVES OU DE
MORT. NE PAS ENLEVER L'ÉTIQUETTE.
1370537 Rev. 01/19 E
FIG. B
FIG. C
FIG. D
FIG. E
6
5
10
9
1413
11
16
18
12
15
8
7
17
FIG. F
FIG. G
FIG. H
23
20
19
21
22
24
45°
25
26
Product specificaties
| Merk: | Klein Tools |
| Categorie: | Niet gecategoriseerd |
| Model: | 60900 |
Heb je hulp nodig?
Als je hulp nodig hebt met Klein Tools 60900 stel dan hieronder een vraag en andere gebruikers zullen je antwoorden
Handleiding Niet gecategoriseerd Klein Tools

7 Mei 2026
5 Mei 2026
4 Mei 2026
4 Mei 2026
3 Maart 2026
5 December 2025
28 November 2025
7 Oktober 2025
7 Oktober 2025
11 Augustus 2025
Handleiding Niet gecategoriseerd
Nieuwste handleidingen voor Niet gecategoriseerd
8 Juni 2026
8 Juni 2026
8 Juni 2026
8 Juni 2026
8 Juni 2026
8 Juni 2026
8 Juni 2026
8 Juni 2026
7 Juni 2026
7 Juni 2026