IMIT Blue 578090 Handleiding
IMIT
Thermostaat
Blue 578090
Bekijk gratis de handleiding van IMIT Blue 578090 (2 pagina’s), behorend tot de categorie Thermostaat. Deze gids werd als nuttig beoordeeld door 54 mensen en kreeg gemiddeld 4.6 sterren uit 27.5 reviews. Heb je een vraag over IMIT Blue 578090 of wil je andere gebruikers van dit product iets vragen? Stel een vraag
Pagina 1/2

INTRODUZIONE
Grazie per aver scelto un nostro prodotto! Questo cronotermostato elettronico permette di programmare il funzionamento del vostro
sistema di riscaldamento e/o condizionamento durante tutto l’arco della settimana, per avere la temperatura desiderata al momento
desiderato. Quelle che seguono sono le istruzioni che vi permetteranno di utilizzarlo in modo semplice e immediato. Leggetele con cura
e buon comfort!
CONFORMITA’ ALLE NORME
EN 60730-1 ed aggiornamenti successivi
EN 60730-2-7
EN 60730-2-9
CARATTERISTICHE TECNICHE
ALIMENTAZIONE n° 2 batterie alcaline 1,5V tipo LR6
CAMPO DI REGOLAZIONE TEMPERATURA 6 ÷ 35°C
AGGIORNAMENTO TEMPERATURA 1 volta al minuto
DIFFERENZIALE 0,2K ÷ 0,4 K (@dT/dt = 1°C/15’)
SONDA NTC 3%
GRADO DI PROTEZIONE IP20
CLASSE DI ISOLAMENTO II
GRADIENTE TERMICO 1k/15min.
USCITA relé in scambio
PORTATA SU CONTATTI 8(2,5)A/250V~
TIPO DI AZIONE 1BU
SITUAZIONE DI INSTALLAZIONE ambiente normale
TEMPERATURA MASSIMA DI ESERCIZIO 50°C
TEMPERATURA DI STOCCAGGIO 0° ÷ 60°C
ANTIGELO 6°C (fisso)
PROGRAMMAZIONE giornaliero/week-end/settimanale
PROGRAMMA PREIMPOSTATO modalità AUTO
Lu-Gio comfort dalle 05:30 alle 22:00
Ven comfort dalle 05:30 alle 23:00
Sab comfort dalle 06:30 alle 23:30
Dom comfort dalle 07:00 alle 22:00
SOFTWARE CLASSE A
DISPLAI LCD
INTERVALLO MINIMO DI PROGRAMMAZIONE 30 minuti
MONTAGGIO a parete
PRESCRIZIONI DI SICUREZZA
Prima di collegare il cronotermostato accertarsi che il CARICO UTILIZZATORE da comandare (caldaia, pompa ecc.) NON SIA
COLLEGATO e che LA TENSIONE DI ALIMENTAZIONE CORRISPONDA A QUELLA RIPORTATA all’interno della base dell’appa-
recchio (250V~ max.) (Fig.3)
COLLEGAMENTI ELETTRICI
Collegare i cavi del CARICO UTLIZZATORE ai morsetti n° 1 e n° 2 del cronotermostato come da schema elettrico (Fig. 8).
U= Carico utilizzatore
1= morsetto comune
2= morsetto n.a.
3= morsetto n.c.
Il cronotermostato può essere comandato a distanza grazie al collegamento ad un combinatore telefonico GSM. I morsetti 6 e 7
sono destinati al collegamento del combinatore telefonico GSM. Fare riferimento alla documentazione all’interno dell’accessorio
Combinatore telefonico GSM, per le istruzioni di montaggio e uso.
LEGENDA VISUALIZZAZIONI DISPLAY (Fig. 1)
A = Visualizzazione programma impostato
B = Giorno della settimana
C = Posizione cursore per impostazione programma1,
D = Fase programmazione attiva
E = Orologio
F = Temperatura rilevata
G = Batterie scariche
H = Programma vacanza attivo
I = Funzione Party attiva
L = Funzione Pausa Comfort attiva
M = Temperatura comfort
N = Temperatura ridotta
O = Antigelo attivo
P = Automatico
Q = Modalità manuale
R = Impianto in funzione (Fiamma accesa in caldaia o condizionatore attivo)
S = Funzionamento estivo (condizionamento)/Funzionamento invernale (riscaldamento)
LEGENDA COMANDI DEL CRONOTERMOSTATO (Fig. 2)
1 = Impostazione programma (prog)
2 = Scelta modalità di funzionamento ( )
3 = Scelta modalità “speciali” (F)
4 = Impostazione temperatura comfort ( )
5 = Impostazione temperatura ridotta ( )
6 = Uscita (ESC)
7 = Impostazione ESTATE ( ) / INVERNO ( )
8 = Tasto reset (RESET)
9 = Manopola impostazioni e conferma
POSIZIONAMENTO E INSTALLAZIONE
Installare il cronotermostato lontano da fonti di calore (caloriferi, raggi solari, cucine) e da porte/finestre, a circa 1,5 m. dal pavimento
(Fig.4)
CORREZIONE TEMPERATURA RILEVATA
Nel caso in cui il cronotermostato fosse installato in un punto dell’appartamento in cui la temperatura ambiente risultasse falsata per uno
dei motivi appena citati, è possibile introdurre un fattore correttivo di misurazione:
• Impostare la stagione INVERNO.
• Attivare la funzione ANTIGELO.
• Premere e tenere premuto il tasto ESC: dopo 20 secondi il display si spegnerà totalmente lasciando accesa solo l’indicazione della tem-
peratura; Ruotare la manopola fino a far comparire la temperatura corretta e poi confermare premendo la manopola.
• Rilasciare il tasto ESC.
• Per il fissaggio al muro vedi illustrazioni (Fig. 6,7)
ATTENZIONE:
Si raccomanda di eseguire l’installazione del cronotermostato rispettando scrupolosamente le norme di sicurezza e le disposizioni di
legge vigenti.
IMPOSTAZIONE TIPO DI PROGRAMMAZIONE (giornaliero/week-end/settimanale)
Il cronotermostato può essere impostato per funzionare in tre modalità differenti:
- funzionamento settimanale: questa modalità permette di creare un programma specifico per ogni giorno della settimana.
- funzionamento giornaliero: questa modalità permette di programmare una giornata “tipo” verrà ripetuta nell’arco dell’intera settimana.
- funzionamento week-end: questa modalità permette di programmare una prima giornata “tipo” per i giorni dal Lunedi al Venerdi e una
seconda giornata “tipo” per il week-end (Sabato-Domenica)
Per la selezione, bisogna agire sul ponticello apposito. Sganciare il dentino con l’aiuto di un cacciavite (fig. 6). Spostare il ponticello
nella posizione desiderata (fig.5):
- posizione 1 funzionamento settimanale
- posizione 2 funzionamento week-end
- posizione 3 funzionamento giornaliero
Terminata l’operazione richiudere l’apparecchio riagganciando dapprima la parte sinistra (fig. 9a). Quindi spingere il coperchio verso la
base facendo attenzione che il dentino nella parte destra risulti all’interno del coperchio (Fig. 9 b).
Premere il tasto reset (RESET) per rendere operativa la modifica.
INSTALLAZIONE DELLE BATTERIE
Per l’installazione delle batterie, sganciare il dentino con l’aiuto di un cacciavite (fig. 6). Inserire le batterie seguendo il verso indicato sul
prodotto. Richiudere l’apparecchio riagganciando dapprima la parte sinistra (fig. 9 a). Quindi spingere il coperchio verso la base facendo
attenzione che il dentino nella parte destra risulti all’interno del coperchio (Fig. 9 b). Impostare l’orario come descritto nel capitolo “IMPO-
STAZIONE ORA E GIORNO”. La durata delle batterie è di circa 1 anno.
SOSTITUZIONE DELLE BATTERIE
La comparsa del simbolo lampeggiante ( ) sul display indica che le batterie si stanno esaurendo. Dal momento dell’accensione
del simbolo, il cronotermostato funzionerà correttamente per 1 mese circa, dopodiché si bloccherà e verrà visualizzato solo il simbo-
lo ( ) fisso. Per la modalità di sostituzione delle batterie, vedere il capitolo INSTALLAZIONE DELLE BATTERIE.
IMPOSTAZIONE ORA E GIORNO
Il display visualizza i giorni della settimana e l’orario con le prime due cifre lampeggianti (ore) (Fig. 10).
• Ruotare la manopola per impostare l’ora.
Premere la manopola per confermare.
Il display visualizza le ultime cifre dell’orologio lampeggianti. Ruotare la manopola per impostare i minuti.
Premere la manopola per confermare.
• Il cursore del giorno inizia a lampeggiare.
• Ruotare la manopola per impostare il giorno.
• Premere la manopola per confermare.
N.B.: In qualsiasi momento premendo il tasto ESC si abbandona la programmazione.
MODIFICA ORA E GIORNO
Premere il tasto “reset” e seguire le istruzioni riportate in “IMPOSTAZIONE ORA E GIORNO” (Fig. 10).
IMPOSTAZIONE STAGIONE
La selezione della stagione è attiva solo se si è in modalità AUTO.
Utilizzando il tasto ESTATE/INVERNO è possibile scegliere la modalità di funzionamento del cronotermostato.
INVERNO = funzionamento in abbinamento a caldaia
ESTATE = funzionamento in abbinamento a condizionatore
La scelta della stagione determina la scelta dei livelli di temperatura attivabili.
INVERNO = 3 livelli di temperatura (Tantigelo ridotta comfort< T < T )
ESTATE = 2 livelli di temperatura (Tcomfort risparmio< T )
Ciascun valore è attivo e fa riferimento solo alla stagione in cui è stato programmato.
Per semplicità nel seguito delle istruzioni, si farà riferimento esplicito alla stagione INVERNO.
IMPOSTAZIONE TEMPERATURE
Il cronotermostato nella stagione INVERNO gestisce tre livelli di temperatura:
• Tcomfort = La temperatura ideale durante i periodi in cui si soggiorna nell’abitazione
• Tridotta = La temperatura per la notte o per i periodi in cui la casa è vuota (ad esempio quando si è al lavoro per parecchie ore…).
• Tantigelo = Temperatura minima in abitazione per proteggere l’impianto.
(Vedi paragrafo specifico)
Per impostare le temperature da assegnare al programma settimanale:
• Aprire lo sportello (Fig. 2).
• Premere il tasto temperatura comfort ( ) per modificare la temperatura comfort. L’indicazione della temperatura precedentemente
impostata lampeggia. Ruotare la manopola per impostare la temperatura desiderata.
Premere la manopola per confermare o “esc” per annullare l’operazione.
Premere il tasto temperatura ridotta ( ) per modificare la temperatura ridotta. L’indicazione della temperatura precedentemente impo-
stata lampeggia. Ruotare la manopola per impostare la temperatura desiderata.
Premere la manopola per confermare o “esc” per annullare l’operazione.
N.B.: In caso di mancata impostazione del valore della temperatura entro 10”, il cronotermostato abbandona la funzione e ritorna
nella modalità precedente.
VARIAZIONE TEMPORANEA DELLA TEMPERATURA.
(attivabile da AUTO, MAN, e FUNZIONI SPECIALI)
Oltre ai due livelli di temperatura standard è possibile gestire un valore temporaneo della temperatura desiderata. La modifica del valo-
re desiderato avrà effetto solo per il periodo attivo e viene cancellata alla fine del periodo stesso (cioè al primo passaggio da
Tcomfort=>Tridotta o viceversa). Per attivare la funzione è sufficiente ruotare la manopola: al primo scatto verrà indicata la temperatura
impostata e con i successivi si può regolare al nuovo valore l’impostazione. Durante tutto il periodo con T modificata, lo stato prov-
visorio della scelta, verrà segnalato dal simbolo °C lampeggiante. Se si vuole cancellare questa impostazione temporanea premere
ESC.
IMPOSTAZIONE PROGRAMMA
Programmare il cronotermostato significa suddividere la giornata nei periodi Tcomfort o Tridotta. In base alla scelta fatta in fase di impo-
stazione, con il posizionamento del ponticello, a questo punto si potranno avere tre situazioni diverse.
• Aprire lo sportello e premere il tasto “prog”.
Il display visualizza la scritta PROG, il giorno o i gruppi di giorni e il programma relativo (Fig. 11).
Se si è scelto:
1. Modalità settimanale:
Ruotando la manopola è possibile scegliere il singolo giorno da programmare.
2. Modalità week-end:
Ruotando la manopola è possibile scegliere il gruppo di giorni da programmare.
Primo gruppo dal Lun al Ven e secondo gruppo il Sab e la Dom.
3. Modalità giornaliero:
verranno proposti tutti giorni della settimana in un'unica soluzione
In tutti e tre i casi per accedere alla programmazione va premuta la manopola.
Il display propone il giorno o il gruppo di giorni su cui la programmazione avrà effetto; contemporaneamente viene visualizzato anche il
cursore impostazione ( ) e nella parte alta del display viene visualizzato il programma precedentemente esistente (segmenti acce-
si = Tcomfort, segmenti spenti = Tridotta).
CREAZIONE/MODIFICA dei periodi a Tcomfort e dei periodi a Tridotta
Una volta selezionato il giorno o gruppo di giorni apparirà, lampeggiante, il cursore posizionamento (Fig. 12) e sull’orologio apparirà l’ora
00:00.
Per impostare tutta la giornata:
Utilizzando i tasti (temperatura comfort) o il tasto (temperatura ridotta) è ora possibile impostare la temperatura desiderata in tutte
le 24 ore del giorno a intervalli di mezz’ora.
Ad ogni pressione di uno dei due tasti, l’orologio avanza di 30’ attivando nel programma (vedere la barra orizzontale in alto nello scher-
mo) la modalità contrassegnata nel tasto premuto. Tenendo premuto il tasto si avrà un avanzamento veloce.
Per impostare solo una parte della giornata:
Partendo dalle 00:00, ruotare la manopola sino a far apparire sull’orologio l’ora di inizio del periodo che si vuole programmare/modifi-
care.
Utilizzare poi i tasti e con le stesse modalità indicate nella programmazione di tutta la giornata.
Esempio: Creazione periodo comfort dalle 18:00 alle 22:00:
•Ruotare la manopola sino a raggiungere le 18:00.
•Premere, o tenere premuto, il tasto temperatura comfort “ “ fino a raggiungere le 22:00.
•Premere la manopola per confermare o posizionarsi con la manopola su un nuovo orario per l’impostazione di un nuovo periodo.
Una volta impostati/modificati i periodi comfort e ridotta, premere la manopola per confermare la nuova programmazione o il tasto
“esc” per annullare le modifiche.
Ripetere l’operazione per i giorni o gruppo giorni desiderati.
Se si vuole programmare più giorni con lo stesso programma è possibile copiare il giorno tipo su altre giornate. Con la manopola ci si
posiziona sul giorno da copiare, premere PROG e mantenerlo premuto.
La scritta PROG lampeggia.
Tenendo premuto PROG si ruota la manopola fino a scegliere il giorno (spostando il riquadro) su cui si vuole copiare il programma e si
conferma premendo la manopola.
A questo punto si può rilasciare il tasto PROG oppure scegliere un altro giorno e continuare nella copiatura.
La funzione copiatura è attiva solo nelle modalità Week-end o settimanale.
Una volta terminata la programmazione, premere “esc” per uscire.
FUNZIONAMENTO AUTOMATICO (Fig.13)
Selezionando il funzionamento AUTOMATICO il cronotermostato gestirà la temperatura ambiente rispettando il programma impostato.
Premere il tasto ( ) fino alla comparsa del simbolo AUTO.
Se si desidera variare momentaneamente la temperatura impostata, ruotare la manopola, il cronotermostato manterrà la nuova tempera-
tura scelta fino al prossimo cambio di periodo (da periodo Tcomfort ridottaa periodo T o viceversa).
FUNZIONAMENTO MANUALE (Fig.14)
Selezionando il funzionamento MANUALE il cronotermostato gestirà la temperatura ambiente mantenendola in ogni ora del giorno al valo-
re impostato.
Premere il tasto fino alla comparsa del simbolo MAN.
La temperatura preimpostata sul cronotermostato è di 20°C (nel funzionamento estate è 25°C). Ruotare la manopola se si desidera varia-
re la temperatura.
N.B. Ogni volta che si abbandona il funzionamento manuale, la temperatura impostata viene persa. Alla successiva riattivazione del fun-
zionamento manuale la temperatura impostata assume il valore 20°C.
FUNZIONAMENTO ANTIGELO (Fig.15)
Selezionando il funzionamento ANTIGELO il cronotermostato gestirà la temperatura ambiente in modo che non scenda al di sotto dei 6°C,
proteggendo cosi le tubature contro il congelamento nei lunghi periodi di assenza dall’abitazione. Il valore di 6°C non è modificabile.
Premere il tasto fino alla comparsa del simbolo .
PROGRAMMA VACANZE
Il programma “vacanza” è pensato per lunghi periodi di assenza dall’abitazione: non permette alla temperatura ambiente di scendere sotto
i 6°C e a differenza del funzionamento ANTIGELO consente di programmare il riavvio dello stato di comfort con sufficiente anticipo rispet-
to al giorno di rientro in modo da trovare l’abitazione alla Tcomfort al momento dell’arrivo.
Premere il tasto “F” fino alla comparsa del simbolo . Ruotare la manopola per impostare il periodo della vacanza; questo per per-
mettere al cronotermostato di riprendere il funzionamento in modalità AUTOMATICO alle ore 00:01 del giorno di rientro impostato.
La durata massima della vacanza è di 99 giorni; ad ogni trascorrere della mezzanotte il contatore diminuisce di 1 unità i giorni rima-
nenti. A contatore pari a zero il programma in uso viene attivato.
Premere la manopola per confermare o “esc” per annullare.
La temperatura ridotta del programma vacanze è impostabile, ruotando la manopola, all’interno dell’intervallo 6-15°C. Il nuovo valore
rimarrà attivo fino alla scadenza del periodo di vacanza. Vedi anche paragrafo “Variazione temporanea della temperatura”.
Per interrompere in anticipo la modalità “vacanza”, premere il tasto “esc.”
PROGRAMMAZIONE PAUSA COMFORT
Il programma “pausa comfort” è pensato per spegnere il riscaldamento per brevi periodi durante il giorno, fino ad un massimo di 24 ore;
ad esempio per brevi assenze dall’abitazione o nei momenti in cui si fa il ricambio d’aria dell’ambiente durante le pulizie domestiche.
In questa fase il cronotermostato utilizzerà il valore della temperatura ridotta impostata nel programma .
Premere il tasto “F” fino alla comparsa del simbolo . Ruotare la manopola per selezionare l’ora di fine periodo. Il periodo sele-
zionato viene identificato dal lampeggio dei segmenti. Premere la manopola per confermare o “esc” per annullare. Nel caso in cui il
periodo modificato si trovi a cavallo della mezzanotte, il display visualizzerà lampeggianti anche i segmenti dopo le ore 00:00 relati-
ve al giorno successivo. Con il trascorrere di ciascuna ora il relativo segmento tornerà in visualizzazione fissa
E’ possibile comunque variare il valore impostato all’interno dell’intervallo di temperatura 6÷35°C ruotando la manopola. Il nuovo valore
rimarrà attivo fino alla scadenza del periodo impostato. Vedi anche paragrafo “Variazione temporanea della temperatura”.
Per interrompere in anticipo la modalità “periodo pausa comfort”, premere il tasto “esc.”
PROGRAMMAZIONE PERIODO “PARTY”
Il programma “party” è pensato per prolungare, rispetto alla normale programmazione, il periodo a Tcomfort.
Viene utilizzata altresì se si vuole riscaldare momentaneamente la casa, durante un periodo a Tridotta.
Premere il tasto “F” fino alla comparsa del simbolo . Ruotare la manopola per selezionare l’ora di fine periodo. Il periodo seleziona-
to viene identificato dal lampeggio dei segmenti. Premere la manopola per confermare o “esc” per annullare.
Nel caso in cui il periodo modificato si trovi a cavallo della mezzanotte, il display visualizzerà lampeggianti anche i segmenti dopo le ore
00:00 relative al giorno successivo. Con il trascorrere di ciascuna ora il relativo segmento tornerà in visualizzazione fissa
In questa fase il cronotermostato utilizzerà la temperatura comfort impostata nel programma ( ).
E’ possibile comunque variare il valore impostato all’interno dell’intervallo di temperatura 6÷35°C ruotando la manopola. Il nuovo valore
rimarrà attivo fino alla scadenza del periodo impostato. Vedi anche paragrafo “Variazione temporanea della temperatura”.
Per interrompere in anticipo la modalità “periodo party”, premere il tasto “esc.”
TASTO RESET
Il tasto RESET serve per riprogrammare l’orologio e il giorno della settimana.
Deve essere premuto dopo aver spostato il ponticello di selezione del tipo di programma.
Inoltre va premuto in caso di anomalie di funzionamento del cronotermostato.
Con la pressione del tasto RESET (con la punta di una matita) lo strumento effettua una fase di “autotest” presentando per alcuni secon-
di tutti i segmenti del display illuminati.
Quindi, la pressione del tasto RESET:
• Non modifica le impostazioni del programma inserito.
• Non modifica le temperature impostate (comfort e ridotta).
• Azzera l’orologio e il giorno della settimana.
• Azzera tutte le altre funzioni in uso (programmazione periodo temporizzato, programma vacanze)
SOLUZIONE DEI PROBLEMI
NOTA: In caso di anomalie persistenti non manomettere per nessun motivo alcuna parte del prodotto, ma contattare l’Assistenza Tecnica.
PROBLEMA CAUSE POSSIBILI SOLUZIONI
L’apparecchio non si accende 1.Batterie scariche
2.Batterie inserite non corretta-
mente
3.Falso contatto
1.Sostituire le batterie
2.Verificare la corretta polarità
3.Premere tasto reset
L’impianto non si accende/non si
accende agli orari stabiliti
4.Collegamenti errati
5.Impostazione programma errato
6.Modalità ANTIGELO o
Programma vacanza attivato
7. Impostazione dell’orario
attuale errata
8.Stagione errata
4.Verificare i collegamenti dei fili
del carico on i morsetti del cro-
notermostato
5.Verificare l’esatta corrisponden-
za dell’orario impostato nel
programma
6.Disattivare la funzione in que-
stione
7.Verificare l’esattezza dell’orario
e del giorno e nel caso ripro-
grammarli
8.Assicurarsi che sul display
compaia il simbolo “igloo”
(nel caso di collegamento a
caldaia) o il simbolo “ombrel-
lone” (nel caso di collega-
mento a condizionatore)
La temperatura ambiente
visualizzata non corrisponde a
quella reale
9.Errato posizionamento del cro-
notermostato nell’ambiente
10.Corrente d’aria proveniente dal
condotto del tubo che porta i
fili dell’impianto al cronoter-
mostato
9.Seguire le istruzioni paragrafo
“POSIZIONAMENTO
10.Sigillare il condotto del tubo
per evitare correnti d’aria
calda o fredda
Sul display compare 11.Batterie scariche 11.Sostituire le batterie
L’apparecchio si comporta in
modo “irregolare”
12.Batterie non alcaline 12.Utilizzare batterie alcaline tipo
LR6
INTRODUCTION
Thank you for selecting our product! This electronic programmable thermostat allows you to program the operation of your heating and/or
air conditioning system during the entire week in order to have the temperature you desire at the time you desire. The instructions below
will help you use it in a direct and simple manner. Read them carefully and enjoy the comfort!
CONFORMITY WITH STANDARDS
EN 60730-1 and subsequent updates
EN 60730-2-7
EN 60730-2-9
TECHNICAL FEATURES
POWER SUPPLY = n. 2 alkaline batteries, 1.5V, type LR6
TEMPERATURE ADJUSTMENT RANGE = 6 - 35°C
ROOM TEMPERATURE DISPLAY = 0 - 40°C (resolution 0.1°C)
TEMPERATURE UPDATE = 1 time per minute
DIFFERENTIAL = 0.2K - 0.4K (@dT/dt= 1°C/15’)
PROBE = NTC 3%
DEGREE OF PROTECTION = IP20
INSULATION CLASS = II
THERMAL GRADIENT = 1k/15min.
OUTPUT = exchange relay
LOAD ON THE CONTACTS = 8(2.5)A/250V~
TYPE OF ACTION = 1BU
INSTALLATION SITUATION = normal room
MAXIMUM OPERATING TEMPERATURE = 50°C
STORAGE TEMPERATURE = 0 - 60°C
ANTIFREEZE = 6°C (fixed)
PROGRAMMING = daily/week-end/weekly
PRESET PROGRAM = AUTO mode
Mon-Thur comfort from 05:30 to 22:00
Fri comfort from 05:30 to 23:00
Sat comfort from 06:30 to 23:30
Sun comfort from 07:00 to 22:00
CLASS A SOFTWARE
LCD DISPLAY
MINIMUM PROGRAMMING INTERVAL = 30 minutes
ASSEMBLY = wall-mounted
SAFETY REQUIREMENT
Before connecting the programmable thermostat, make sure that the EQUIPMENT LOAD to be controlled (boiler, pump, etc.) IS
NOT CONNECTED and that SUPPLY VOLTAGE CORRESPONDS TO THE VALUE SHOWN inside the base of the device (250V~
max.) (Fig. 3)
ELECTRICAL CONNECTIONS
Connect the cables of the EQUIPMENT LOAD to terminals n.1 and n.2 of the programmable thermostat as shown in the electrical
wiring diagram (Fig. 8).
U= Equipment load
1= common terminal
2= n.o. terminal
3= n.c. terminal
The programmable thermostat can also be remotely controlled by connecting it to a GSM telephone dial.
Terminals 6 and 7 are intended for the GSM telephone dial connection. Refer to the documentation inside the GSM telephone dial
accessory for instructions regarding its installation and use.
DISPLAY LEGEND (Fig. 1)
A = Display of set program
B = Day of the week
C = Cursor position for program setting
D = Programming phase active
E = Clock
F = Temperature detected
G = Low batteries
H = Holiday program active
I = Party function active
L = Comfort Pause function active
M = Comfort temperature
N = Reduced temperature
O = Antifreeze active
P = Automatic
Q = Manual mode
R = System in operation (Boiler flame lit or air conditioning system active)
S = Summer operation (air conditioning)/Winter operation (heating)
PROGRAMMABLE THERMOSTAT CONTROLS LEGEND (Fig. 2)
1 = Program setting (prog)
2 = Operation mode selection ( )
3 = “Special” mode selection (F)
4 = Comfort temperature setting ( )
5 = Reduced temperature setting ( )
6 = Exit (ESC)
7 = SUMMER ( ) / WINTER ( )setting
8 = Reset key (RESET)
9 = Setting and confirmation knob
POSITIONING AND INSTALLATION
Install the programmable thermostat far from sources of heat (heaters, direct sunlight, kitchens) and from doors/windows, at a height of
about 1.5 m above the floor (Fig. 4).
DETECTED TEMPERATURE CORRECTION
If the programmable thermostat is installed in a location point which has a temperature non-representative of the true room temperature
for one of the reasons cited above, a corrective measurement factor can be introduced as follows:
•Set the season WINTER.
•Activate the function ANTIFREEZE.
•Press and hold down the ESC key: after 20 seconds the display will turn off completely, leaving only the temperature indication lit. Turn
the knob until the correct temperature appears and then confirm by pressing the knob.
•Release the ESC key.
•For the wall mounting procedure, see illustrations (Fig. 6,7)
CAUTION:
It is recommended to carry out the installation of the programmable thermostat in strict compliance with safety standards and current
regulations.
SETTING THE TYPE OF PROGRAMMING (daily/week-end/weekly)
The programmable thermostat can be set to operate in three different operating modes:
- weekly operation: this mode allows to create a specific program for each day of the week.
- daily operation: this mode allows to program a “typical" day which will be repeated throughout the entire week.
- week-end operation: this mode allows to program a “typical" day for the days from Monday to Friday and a second “typical" day for the
week-end (Saturday-Sunday).
To select the type of programming, it is necessary to operate on the appropriate jumper. Release the small tooth with the aid of a screw-
driver (Fig. 6). Move the jumper to the desired position (Fig. 5):
- position 1 weekly operation
- position 2 week-end operation
- position 3 daily operation
When this operation is finished, close the device by rehooking the left part first (Fig. 9a). Then push the cover towards the base being
careful that the tooth on the right side is inside the cover (Fig. 9b).
Press the reset key (RESET) to make the modification operative.
INSTALLING THE BATTERIES
To install the batteries, release the small tooth with the aid of a screwdriver (Fig. 5). Replace the batteries according to the direction
indicated on the product. Close the device by rehooking the left part first (Fig. 9a). Then push the cover towards the base being careful
that the tooth on the right side is inside the cover (Fig. 9b).
Set the time as described in the chapter “SETTING THE TIME AND DAY”. The batteries have a lifetime of about 1 year.
REPLACING THE BATTERIES
When the flashing symbol ( ) appears on the display, this indicates that the batteries are low. From the time this symbol appears,
the programmable thermostat will continue to work correctly for about 1 month, after which it will block and only the fixed symbol ( )
will be displayed.
To replace the batteries, see the INSTALLING THE BATTERIES section.
SETTING THE TIME AND DAY
The display shows the days of the week and the time with the first two digits flashing (hours) (Fig. 10).
Turn the setting knob to set the hour.
• Press the knob to confirm.
The display shows the last digits of the clock flashing. Turn the setting knob to set the minutes.
Press the knob to confirm.
• The cursor of the day begins to flash.
• Turn the knob to set the day.
• Press the knob to confirm.
N.B.: Press the ESC key at any time to quit the programming.
MODIFYING THE TIME/DAY
Press the “reset” key and follow the instructions provided in “SETTING THE TIME AND DAY” (Fig. 10).
SETTING THE SEASON
The season selection is active only if the thermostat is in AUTO mode.
The SUMMER/WINTER key can be used to select the operation mode of the programmable thermostat.
WINTER = operation in combination with a boiler
SUMMER = operation in combination with an air conditioning system
The season selection determines the temperature levels that can be activated.
WINTER = 3 temperature levels (Tantifreeze reduced comfort < T < T )
SUMMER = 2 temperature levels (Tcomfort saving< T )
Each value is active and refers only to the season in which it has been programmed.
For simplicity, the instructions provided below refer explicitly to the WINTER season.
SETTING THE TEMPERATURES
In the WINTER season, the programmable thermostat manages three temperature levels:
• Tcomfort = The ideal temperature during periods in which people are present in the residence
• Treduced = The temperature for nights or for periods in which the house is empty (for example, when the user is at work for several
hours…).
• Tantifreeze = Minimum temperature in the residence to protect the system.
(See specific section)
To set the temperatures to be assigned to the weekly program:
• Open the door (Fig. 2).
• Press the comfort temperature key ( ) to change the comfort temperature. The indication of the previously set temperature flashes.
Turn the knob to set the desired temperature.
Press the knob to confirm or “ESC” to cancel the operation.
• Press the reduced temperature key ( ) to change the reduced temperature. The indication of the previously set temperature flashes.
Turn the knob to set the desired temperature.
Press the knob to confirm or “ESC” to cancel the operation.
N.B.: If the temperature value is not set within 10”, the programmable thermostat quits the function and returns to the previous mode.
TEMPORARY VARIATION OF THE TEMPERATURE.
(in AUTO, MAN, and SPECIAL FUNCTIONS)
In addition to the two standard temperature levels, a temporary value can also be set for the desired temperature. The modification of the
desired value will be effective only during the current active period and is cancelled at the end of this period (i.e., at the first passage from
Tcomfort=>Treduced or vice versa).
To activate the function, just turn the knob: at the first click the set temperature will be indicated, and with the following clicks it is possible
to adjust the value of the new setting.
During the entire period with T modified, the temporary state of the selection will be signalled by the flashing °C symbol.
If desired, this temporary setting can be cancelled by pressing ESC.
SETTING THE PROGRAM
Programming the programmable thermostat means dividing the day into periods of Tcomfort reducedor T . Depending on the choice made
during the setup, with the positioning of the bridge, at this point the user will have one of three different situations.
• Open the door and press the “prog” key.
The display shows the writing PROG, the day or group of days and the relative program (Fig. 11).
If the user has chosen:
1. Weekly mode:
Turning the knob allows to select the individual day to be programmed.
2. Week-end mode:
Turning the knob allows to select the group of days to be programmed.
First the group from Mon to Fri, and then the second group of Sat and Sun.
3. Daily mode:
All the days of the week will be set in a single solution.
In all three cases, the knob should be pressed to access the programming.
The display proposes the day or group of days for which the programming will be effective; at the same time the setting cursor ( )
is shown and the previously set program i s displayed in the top part of the display (lit segments = Tcomfort reduced, off segments = T ).
CREATION/MODIFICATION of the Tcomfort and Treduced periods
Once the day or group of days has been selected, the positioning cursor will appear flashing (Fig. 12) and the clock will show the time
00:00.
To set the entire day:
Using the keys (comfort temperature) or (reduced temperature), it is now possible to set the desired temperature for all 24 hours
of the day at half-hour intervals.
Each time one of the two keys is pressed, the clock advances by 30’ activating in the program (see the horizontal bar on the top part of
the screen) the mode marked on the key that has been pressed. Keeping the key pressed will produce a rapid advancement.
To set only a part of the day:
Starting at 00:00, turn the knob until the clock shows the start time of the period to be programmed/modified.
Then use the keys and as described above.
Example: Creation of a comfort period from 18:00 to 22:00 :
• Turn the knob until reaching 18:00.
• Press, or hold pressed, the comfort temperature key “ “ until reaching 22:00.
• Press the knob to confirm or use the knob to position on a new time for the setting of a new period.
Once the comfort and reduced periods have been set/modified, press the knob to confirm the new programming or the “ESC” key to cancel
the modifications.
Repeat the operation for the desired days or group of days.
If you wish to program several days with the same program, it is possible to copy the typical day’s program onto other days. Use the knob
to position on the day to be copied, press PROG and hold it pressed. PROG starts blinking.
While keeping PROG pressed, turn the knob to select the day (moving the selection box) on which to copy the program, and confirm the
selection by pressing knob.
At this point you can release the PROG key or select another day and continue to copy.
The copy function is active only in the Week-end or weekly modes.
When the programming is finished, press “ESC” to exit.
AUTOMATIC OPERATION (Fig. 13)
When AUTOMATIC operation is selected, the programmable thermostat will manage the room temperature according to the set program.
Press the key ( ) until the symbol AUTO appears.
If you wish to change the temperature temporarily, turn the knob and the programmable thermostat will keep the newly set temperature
until the next period change (from T period or vice versa). comfort period to Treduced
MANUAL OPERATION (Fig. 14)
When MANUAL operation is selected, the programmable thermostat will manage the room temperature during every hour of the day by
maintaining the set value.
Press the key until the symbol MAN appears.
The preset temperature on the programmable thermostat is 20°C (25°C in summer operation). Turn the knob if you wish to change the
temperature.
N.B.: Each time that the manual operation is quit, the set temperature is lost. At the next reactivation of manual operation, the set
temperature takes on the value of 20°C again.
ANTIFREEZE OPERATION (Fig. 15)
When ANTIFREEZE operation is selected, the programmable thermostat will manage the room temperature so that it does not drop below
6°C, thus preventing the pipes from freezing during long periods of absence from the residence. The value of 6°C cannot be changed.
Press the key until the symbol appears.
HOLIDAY PROGRAM
The “Holiday” program is designed for long periods of absence from the residence: it does not allow the room temperature to drop below
6°C and, unlike the ANTIFREEZE program, it allows to program the comfort state restart enough in advance of the return date so as to find
the residence already at Tcomfort at the time of arrival.
Press the “F” key until the symbol appears. Turn the knob to set the date of return from the holidays; this will allow the programmable
thermostat to resume operation in AUTOMATIC mode at 00:01 on the set return date.
The maximum duration of the holiday is 99 days; at midnight of each day that passes, the counter decreases the number of days remaining
by 1. When the counter reaches zero, the program in use is activated.
Press the knob to confirm or “ESC” to cancel the operation.
The reduced temperature of the holiday program can be set within the range of 6-15°C by turning the knob. The new value will remain
active until the holiday period expires. See the “Temporary variation of the temperature” section also.
To stop the “holiday” mode in advance, press the “ESC” key.
PROGRAMMING THE COMFORT PAUSE
The “Comfort pause” program is designed to turn off the heating for brief periods during the day, up to a maximum of 24 hours, such as
for brief absences from the residence or when the residence is being aired during normal household cleaning.
During this phase the programmable thermostat will use the reduced temperature value set in the program .
Press the key “F” until the symbol appears. Turn the knob to select the end-of-period time. The selected period is identified by the
flashing segments. Press the knob to confirm or “ESC” to cancel the operation.
If the modified period straddles midnight, the segments after the time 00:00 regarding the next day will also be flashing on the display.
As each hour passes, the relative segment will stop flashing.
It is possible, however, to change the set value within the temperature range of 6÷35°C by turning the knob. The new value will remain
active until the set period expires. See the “Temporary variation of the temperature” section also.
To stop the “comfort pause period” mode in advance, press the “ESC” key.
PROGRAMMING THE “PARTY” PERIOD
The “Party” program is designed to extend, with respect to the normal programming, the Tcomfort period.
It is also used to momentarily heat the house, during a Treduced period.
Press the key “F” until the symbol appears. Turn the knob to select the end-of-period time. The selected period is identified by the
flashing segments. Press the knob to confirm or “ESC” to cancel the operation.
If the modified period straddles midnight, the segments after the time 00:00 regarding the next day will also be flashing on the display.
As each hour passes, the relative segment will stop flashing.
During this phase the programmable thermostat will use the comfort temperature set in the program .
It is possible, however, to change the set value within the temperature range of 6÷35°C by turning the knob. The new value will remain
active until the set period expires. See the “Temporary variation of the temperature” section also.
To stop the “party period” mode in advance, press the “ESC” key.
RESET
The RESET key is used to reprogram the clock and the day of the week.
It must be pressed after having moved the program type selection bridge.
It should also be pressed if the programmable thermostat shows any operating anomalies.
When the RESET key is pressed (with the tip of a pencil), the instrument carries out an “autotest” phase lighting up all the display
segments for a few seconds.
Thus, pressing the RESET key:
•Does not change the settings of the current program.
•Does not change the set temperatures (comfort and reduced).
•Resets the clock and the day of the week.
•Resets all the other functions in use (timed period programming, holiday program).
SOLUTION OF PROBLEMS
NOTE: If problems continue, do not tamper with any part of the product for any reason whatsoever, but contact Technical Service.
PROBLEM SOLUTIONPOSSIBLE CAUSE
The device does not turn on. 1.Low batteries
2.Batteries inserted incorrectly
3.False contact
1.Replace the batteries
2.Check for the correct polarity
3.Press the reset key
The system does not turn on/off
at the set times
4.Incorrect connections
5.Incorrect program setting
6.ANTIFREEZE mode or Holiday
program activated
7.Incorrect setting of the current
time
8.Incorrect season
4.Check the connections of the
load wires on the terminals of
the programmable thermostat
5.Check the exact
correspondence with the time
set in the program
6.Deactivate the function in
question
7.Check that the time and day are
correct and reprogram if
necessary
8.Make certain the “igloo”
symbol (if connected to
the boiler) or the “umbrella”
symbol (if connected to an
air conditioner) appears on the
display
The room temperature displayed
does not correspond to the real
temperature
9.Incorrect positioning of the
programmable thermostat in
the room
10. Air currents coming from the
cable duct that conveys the
system wires to the
programmable thermostat
9.Follow the instructions
provided in the “POSITIONING”
section
10. Seal the duct in order to avoid
warm or cool air currents
The symbol “ ” appears on
the display
11.Low batteries 11.Replace the batteries
The device behaves in an
"irregular” manner
12.Non-alkaline batteries 12.Use LR6 alkaline batteries
INSTALLAZIONE E COLLEGAMENTI INSTALLATION AND CONNECTIONS
I
GB

INTRODUCTION
Nous vous remercions d’avoir fait l’achat de l’un de nos produits! Ce chronothermostat électronique permet de programmer le
fonctionnement de votre système de chauffage et/ou climatisation pour toute la semaine afin d’avoir la température désirée au moment
désiré. Vous trouverez ci-dessous des instructions pour l’utiliser avec simplicité et rapidité. Nous vous remercions de les lire avec
attention et vous souhaitons un excellent confort thermique!
CONFORMITÉ AUX NORMES
EN 60730-1 et mises à jour successives
EN 60730-2-7
EN 60730-2-9
CARACTÉRISTIQUES TECHNIQUES
ALIMENTATION = 2 piles alcalines 1,5V type LR6
PLAGE DE RÉGLAGE TEMPÉRATURE = 6÷35°C
AFFICHAGE TEMPÉRATURE AMBIANTE = 0÷40°C (résolution 0,1°C)
MISE À JOUR TEMPÉRATURE = toutes les minutes
DIFFÉRENTIEL = 0,2K ÷ 0,4 K(@dT/dt= 1°C/15’)
SONDE = NTC 3%
INDICE DE PROTECTION = IP20
CLASSE D’ISOLEMENT = II
GRADIENT THERMIQUE = 1K/15min.
SORTIE = relais inverseur
PORTÉE SUR CONTACTS = 8(2,5)A/250V~
TYPE D’ACTION = 1BU
SITUATION D’INSTALLATION = environnement normal
TEMPÉRATURE MAX. DE SERVICE = 50°C
TEMPÉRATURE DE STOCKAGE = 0÷60°C
HORS GEL = 6°C (fixe)
PROGRAMMATION = journalière/week-end/hebdomadaire
PROGRAMME PRÉDÉFINI = mode AUTO
Lu-Jeu confort de 05h30 à 22h
Ven confort de 05h30 à 23h
Sam confort de 06h30 à 23h30
Dim confort de 07h à 22h
LOGICIEL CLASSE A
ÉCRAN LCD
INTERVALLE MIN. DE PROGRAMMATION = 30’
MONTAGE = mural
PRESCRIPTIONS CONCERNANT LA SÉCURITÉ
Avant de connecter le chronothermostat, s’assurer que l’appareil à commander (chaudière, pompe, etc.) N’EST PAS CONNECTÉ
et que la TENSION D’ALIMENTATION CORRESPOND à CELLE INDIQUÉE à l’intérieur de la base de l’appareil (250V~ max.) (Fig.3)
CONNEXIONS ÉLECTRIQUES
Connecter les câbles de l’appareil aux bornes 1 et 2 du chronothermostat comme indiqué sur le schéma électrique (Fig. 7).
U= appareil à commander
1= borne commune
2= borne NO
3= borne NF
Le chronothermostat peut être commandé à distance grâce à un relais téléphone
Les bornes 6 et 7 sont prévues pour la connexion du relais téléphone.
Se reporter à la notice du relais téléphone pour les instructions de montage et d’utilisation.
LÉGENDE AFFICHAGE ÉCRAN (Fig. 1)
A = Affichage programme configuré
B = Jour de la semaine
C = Position curseur pour configuration programme
D = Phase programmation activée
E = Horloge
F = Température ambiante
G = Piles usées
H = Programme vacances activé
I = Fonction «Réception» activée
L = Fonction pause Confort activée
M = Température confort
N = Température réduite
O = hors gel activé
P = Automatique
Q = Mode manuel
R = Installation en fonctionnement (chaudière allumée ou climatisation activée)
S = Fonctionnement été (climatisation)/T= Fonctionnement hiver (chauffage)
LÉGENDE COMMANDES DU CHRONOTHERMOSTAT (Fig. 2)
1 = Configuration programme (prog)
2 = Sélection mode de fonctionnement ( )
3 = Sélection modes “spéciaux” (F)
4= Réglage température confort ( )
5 = Réglage température réduite ( )
6 = Sortie (ESC)
7 = Réglage ÉTÉ ( ) / HIVER ( )
8 = Touche Reset (RESET) remise à réro
9 = Bouton réglages et confirmation
POSITIONNEMENT
• Installer le chronothermostat à distance des sources de chaleur (radiateurs, rayons solaires, cuisines) et des portes et fenêtres et à
environ 1,5m du sol (Fig.4)
CORRECTION TEMPÉRATURE AMBIANTE
En cas d’installation du chronothermostat à un endroit de l’appartement dont la température est faussée pour l’une des raisons
susmentionnées, il est possible de prévoir un facteur de correction de la mesure :
• Configurer la saison HIVER.
• Activer la fonction hors gel.
• Maintenir enfoncée la touche ESC : après 20 secondes, l’écran s’éteint et seule l’indication de la température reste allumée ; tourner le
bouton jusqu’à afficher la température correcte et confirmer en enfonçant ce dernier.
• Relâcher la touche ESC.
• Pour la fixation au mur voir illustrations (Fig. 6,7)
ATTENTION:
Il est conseillé de procéder à l’installation du chronothermostat en se conformant rigoureusement aux normes de sécurité et aux
dispositions de loi en vigueur.
RÉGLAGE DU TYPE DE PROGRAMMATION (journalier/week-end/hebdomadaire)
Le chronothermostat peut être configuré pour fonctionner selon trois modes différents :
- fonctionnement hebdomadaire: ce mode permet de créer un programme spécifique pour chaque jour de la semaine.
- fonctionnement journalier: ce mode permet de programmer une journée “type” qui sera répétée durant toute la semaine.
- fonctionnement week-end: ce mode permet de programmer une première journée “type” du lundi au vendredi et une seconde journée
“type” pour le week-end (samedi-dimanche)
Pour sélectionner, utiliser la borne prévue. Appuyer sur l’encoche au moyen d’un tournevis (fig. 6). Déplacer le cavalier dans la position
désirée (fig. 5):
- position 1 fonctionnement hebdomadaire
- position 2 fonctionnement week-end
- position 3 fonctionnement journalier
Une fois l’opération terminée, refermer ensuite le couvercle en insérant tout d’abord la partie gauche (fig. 9a). Pousser ensuite le couvercle
vers la base en contrôlant que l’encoche à droite se trouve à l’intérieur du couvercle (Fig. 9b).
Enfoncer la touche Reset (RESET)pour prendre en compte la modification.
INSTALLATION DES PILES
Pour l’installation des piles, appuyer sur l’encoche au moyen d’un tournevis (fig. 6). Installer les piles en se conformant a la direction
indiquée sur le produit. refermer ensuite le couvercle en insérant tout d’abord la partie gauche (fig. 9a). Pousser ensuite le couvercle vers
la base en contrôlant que l’encoche à droite se trouve à l’intérieur du couvercle (Fig. 9b). Procéder au réglage comme décrit au chapitre
“RÉGLAGE DE L’HEURE ET DU JOUR”. La durée de vie des piles est d’environ 1 an.
REMPLACEMENT DES PILES
L’affichage du symbole clignotant ( ) sur l’écran indique que les piles sont usées. Après affichage du symbole clignotant ( ),
le chronothermostat fonctionne encore correctement durant environ 1 mois avant de se bloquer et d’afficher le symbole ( ) fixe.
Pour remplacer les piles, débloquer le couvercle avec un tournevis (fig. 5). Remplacer les piles selon la direction indiquée sur le produit
(durée de vie des piles 1 an) (Fig. 8)
Une fois le remplacement effectué, refermer le couvercle en insérant tout d’abord la partie gauche (fig. 9). Pousser ensuite le couvercle
vers la base en contrôlant que l’encoche à droite se trouve à l’intérieur du couvercle (Fig. 10).
RÉGLAGE DE L’HEURE ET DU JOUR
L’écran affiche les jours de la semaine et l’horaire avec les deux premiers chiffres clignotants (heures) (Fig. 10).
Tourner le bouton de réglage de l’heure.
Enfoncer le bouton Confirmation pour confirmer.
• L’écran affiche les derniers chiffres de l’horloge clignotants.
Tourner le bouton de réglage des minutes.
Enfoncer la touche Confirmation pour confirmer.
• Le curseur du jour commence à clignoter.
• Tourner le bouton de réglage/confirmation pour régler le jour
• Enfoncer le bouton Réglage/Confirmation pour confirmer.
N.B. : la pression de la touche ESC permet de quitter à tout moment la programmation.
MODIFICATION HEURE/DATE
Enfoncer la touche “Reset” et se conformer aux instructions de “RÉGLAGE HEURE ET JOUR” (Fig. 11).
CONFIGURATION SAISON
La sélection de la saison n’est activée qu’en mode AUTO.
La touche ÉTÉ/HIVER permet de sélectionner le mode de fonctionnement du chronothermostat.
HIVER = fonctionnement associé à une chaudière
ETE = fonctionnement associé à un climatiseur
La sélection de la saison détermine le choix des niveaux de température pouvant être activés.
HIVER = 3 niveaux de température (Thors gel < Tréduite < Tconfort )
ÉTÉ = 2 niveaux de température (Tconfort < Téconomie)
Chaque valeur est activée et se rapporte uniquement à la saison à laquelle elle a été programmée.
Par souci de simplicité, le reste des instructions se rapportera à la saison HIVER.
CHOIX DES TEMPERATURES
Le chronothermostat saison HIVER gère trois niveaux de température:
• Tconfort = La température idéale durant les périodes de séjour dans l’habitation
• Tréduite = La température pour la nuit ou les périodes durant lesquelles la maison est vide (par ex. durant les heures de travail, etc.).
• Thors gel = Température minimale de l’habitation en vue de protéger l’installation.
(Voir paragraphe spécifique)
RÉGLAGE TEMPERATURE
Pour régler la température à attribuer au programme hebdomadaire :
• Ouvrir le couvercle (Fig. 12).
• Enfoncer la touche température confort ( ) pour modifier la température confort.
L’indication de la température précédemment configurée clignote.
Tourner le bouton pour régler la température désirée.
Enfoncer le bouton pour confirmer ou “esc” pour annuler l’opération.
• Enfoncer la touche température réduite ( ) pour modifier la température réduite.
L’indication de la température précédemment configurée clignote
Tourner le bouton pour régler la température désirée.
Enfoncer le bouton pour confirmer ou “esc” pour annuler l’opération.
N.B. : en cas de non-réglage de la valeur de température avant la fin d’un délai de 10”, le chronothermostat quitte la fonction et revient au
mode précédent.
VARIATION TEM PORAIRE DE LA TEMPÉRATURE.
(activable en AUTO, MAN, et FONCTIONS SPÉCIALES)
En-dehors des deux niveaux de température standard, il est possible de gérer une valeur temporaire de la température désirée.
La modification de la valeur désirée n’aura effet que durant la période activée et sera annulée à la fin de cette dernière (c’est-à-dire lors
du premier passage de Tconfort=>Tréduite ou vice-versa).
Pour activer cette fonction, tourner le bouton: au premier déclic, la température configurée sera indiquée et les déclics suivants permettent
de procéder à la nouvelle configuration.
Durant toute la période de T modifiée, l’état provisoire de la sélection sera indiqué par le clignotement du symbole °C.
Pour annuler cette configuration temporaire, enfoncer ESC.
RÉGLAGE PROGRAMME
Programmer le chronothermostat signifie subdiviser la journée en périodes Tconfort ou Tréduite. En fonction du choix effectué lors de la
configuration et du positionnement du cavalier, trois cas de figure sont possibles.
• Ouvrir le couvercle et enfoncer la touche “prog”.
L’écran affiche PROG, le jour (ou groupe de jours) et le programme du jour (Fig. 11).
En cas de sélection:
1. Mode hebdomadaire:
Tourner le bouton pour sélectionner le jour à programmer.
2. Mode week-end:
Tourner le bouton pour sélectionner le groupe de jours à programmer.
Premier groupe du Lun au Ven et second groupe Sam et Dim.
3. Mode journalier:
tous les jours de la semaine sont proposés en une seule solution
Dans les trois cas, enfoncer le bouton pour accéder à la programmation.
L’écran propose le jour ou le groupe de jours sur lequel la programmation sera appliquée; le curseur configuration ( ) est
simultanément affiché et le programme précédent est affiché en haut de l’écran (segments allumés = Tconfort, segments éteints = Tréduite).
CRÉATION/MODIFICATION des périodes Tconfort et des périodes Tréduite
Après avoir sélectionné le jour ou le groupe de jours, le curseur de positionnement s’affiche et clignote (Fig. 12) et l’horloge affiche l’heure
00:00.
Pour configurer toute la journée :
Utiliser les touches (température confort) ou la touche (température réduite) pour configurer la température désirée pour les 24
heures de la journée à intervalle d’une demi-heure.
À chaque pression de la touche (température confort) ou de la touche (température réduite), l’horloge avance de 30 minutes (voir
la barre horizontale en haut de l’écran) et active dans le programme le mode indiqué sur la touche enfoncée. Maintenir la touche enfoncée
pour avancer rapidement.
Pour configurer uniquement une partie de la journée :
En partant de 00:00, tourner le bouton jusqu’à affichage sur l’horloge de l’heure de début de la période que l’on désire
programmer/modifier.
Utiliser ensuite les touches et selon la procédure indiquée dans la programmation de toute la journée.
Exemple: Création période confort de 18h à 22h:
• Tourner le bouton Réglage/Confirmation pour le positionner sur 18h.
• Enfoncer, ou maintenir enfoncé, la touche température confort “ “ jusqu’à atteindre 22h (8 fois).
• Enfoncer le bouton Configuration/Confirmation pour confirmer ou se positionner au moyen du bouton sur un nouvel horaire pour
configurer une nouvelle période.
Après avoir réglé/modifié les périodes confort et réduite, enfoncer la touche pour confirmer la nouvelle programmation ou la touche “esc”
pour annuler les modifications.
Répéter l’opération pour les jours ou le groupe de jours désirés.
Pour programmer plusieurs jours avec le même programme, il est possible de copier la journée type sur d’autres journées. Au moyen
du bouton, se positionner sur le jour à copier et maintenir enfoncé PROG.
PROG commence à clignoter.
En maintenant PROG enfoncé, tourner le bouton pour sélectionner le jour (en déplaçant le cadre) sur lequel copier le programme et
confirmer en pressant le bouton.
Relâcher ensuite la touche PROG ou sélectionner un autre jour et poursuivre l’opération.
La fonction de copie est uniquement activée avec les modes Week-end ou hebdomadaire.
Une fois terminé la programmation, appuyer sur la touche «esc» pour sortir.
FONCTIONNEMENT AUTOMATIQUE (Fig.13)
Sélectionner le fonctionnement AUTOMATIQUE pour la gestion par le thermostat de la température ambiante conformément au
programme défini.
Enfoncer la touche ( ) jusqu’à affichage du symbole AUTO.
Pour modifier temporairement la température configurée, tourner le bouton. Le thermostat maintiendra cette nouvelle température
sélectionnée jusqu’au prochain changement de période (de période Tconfort à période Tréduite ou vice-versa).
FONCTIONNEMENT MANUEL (Fig.14)
Sélectionner le fonctionnement MANUEL pour le maintien par le thermostat de la température ambiante à toutes les heures du jour selon
la valeur configurée.
Enfoncer la touche jusqu’à affichage du symbole MAN.
La température configurée sur le chronothermostat est de 20°C (de 25°C en fonctionnement été). Tourner le bouton pour modifier la
température désirée.
N.B. : La température réglée est effacée à chaque désactivation du fonctionnement manuel. La température réglée est de 20°C lors de la
réactivation du mode manuel.
FONCTIONNEMENT HORS GEL (Fig.15)
Sélectionner le fonctionnement HORS GEL pour la gestion par le thermostat de la température ambiante pour que cette dernière ne
descende pas en-dessous de 6°C afin de protéger les conduites du gel durant des périodes d’absence prolongée. La valeur de 6°C ne
peut être modifiée.
Enfoncer la touche jusqu’à affichage du symbole .
PROGRAMME VACANCES
Le programme “vacances” est prévu pour les périodes d’absence prolongée et évite à la température de descendre en-dessous de 6°C.
À la différence du fonctionnement HORS GEL, ce programme permet de programmer le démarrage du mode confort avec une anticipation
suffisante par rapport au jour de votre retour afin de trouver l’habitation en Tconfort lors de votre arrivée.
Enfoncer la touche “F” jusqu’à affichage du symbole .Tourner le bouton pour régler la date de retour de vacances (durée max. 90
jours) ; le chronothermostat reprendra ainsi son fonctionnement en mode AUTOMATIQUE à 00h01 de la date réglée plus haut.
La durée maximale des vacances est de 99 jours; à chaque échéance de minuit, le compteur diminue d’une unité les jours restants.
Une fois le compteur arrivé à zéro, le programme utilisé est activé.
Enfoncer le bouton pour confirmer ou “esc” pour annuler l’opération.
La température réduite du programme vacances peut être réglée entre 6÷15°C en tournant le bouton. La nouvelle valeur restera activée
jusqu’à la fin de la période de vacances. Se reporter également au paragraphe “Variation temporaire de la température”.
Pour interrompre le mode “vacances”, enfoncer la touche “esc”
PROGRAMMATION PAUSE CONFORT
Le programme “pause confort” est conçu pour éteindre le chauffage durant de brèves périodes de la journée jusqu’à une durée maximale
de 24 heures; par exemple, en cas de brève absence de l’habitation ou lors de l’aération des pièces durant leur nettoyage.
Durant cette phase, le chronothermostat utilise la valeur de la température réduite configurée dans le programme .
Enfoncer la touche “F” jusqu’à affichage du symbole .Tourner le bouton pour sélectionner l’heure de fin de période. La période
sélectionnée est indiquée par le clignotement des segments. Enfoncer le bouton pour confirmer ou “esc” pour annuler l’opération.
Si la période modifiée comprend minuit, les segments après 00h00 du jour suivant clignoteront sur l’écran. Après chaque heure, le
segment correspondant se replacera en affichage fixe.
Il est néanmoins possible de modifier la valeur configurée à l’intérieur de l’intervalle de température de la plage 6÷35°C en tournant le
bouton. La nouvelle valeur sera activée jusqu’à la fin de la période configurée.
Se reporter également au paragraphe “Variation temporaire de la température”.
Pour interrompre de façon anticipée le mode “période réduite temporisée”, enfoncer la touche “esc”
PROGRAMMATION PÉRIODE COMFORT TEMPORISÉE “RECEPTION”
Le programme “réception” est prévu pour prolonger la période Tconfort par rapport à la programmation.
Il est également utilisé pour chauffer momentanément la maison durant une période en Tréduite.
Enfoncer la touche “F” jusqu’à affichage du symbole . Tourner le bouton pour sélectionner l’heure de fin de période. La période
sélectionnée est indiquée par le clignotement des segments. Enfoncer le bouton Confirmation pour confirmer ou “esc” pour annuler
l’opération.
Si la période modifiée comprend minuit, les segments après 00h00 du jour suivant clignoteront sur l’écran. Après chaque heure, le
segment correspondant se replacera en affichage fixe.
Durant cette phase, le chronothermostat utilisera la valeur de la température confort configurée dans le programme .
Il est néanmoins possible de modifier la valeur configurée à l’intérieur de la plage 6÷35°C en tournant le bouton. La nouvelle valeur sera
activée jusqu’à la fin de la période configurée.
Se reporter également au paragraphe “Variation temporaire de la température”.
Pour interrompre le mode “période confort temporisée (réception)”, enfoncer la touche “esc”.
TOUCHE RESET
La touche RESET permet de reprogrammer l’horloge et le jour de la semaine.
L’enfoncer après avoir déplacé le cavalier de sélection du type de programme.
L’enfoncer également en cas de dysfonctionnement du chronothermostat. La pression de la touche RESET (avec la pointe d’un crayon)
entraîne l’activation d’une phase d’essai automatique qui illumine durant quelques secondes tous les segments de l’écran.
Donc, la pression de la touche reset (res):
• Ne modifie pas les configurations du programme activé.
• Ne modifie pas les températures configurées (confort et réduite).
• Réinitialise l’horloge et le jour de la semaine.
• Remet à zéro toutes les autres fonctions utilisées (programmation période temporisée, programme vacances).
SOLUTION DES PROBLÈMES
REMARQUE: En cas d’anomalies persistantes, ne manipuler sous aucun prétexte les composants du produit mais contacter le service
d’assistance technique.
PROBLÈME SOLUTIONCAUSE POSSIBLE
L’appareil ne s’allume pas 1. Piles usées
2. Piles installées de façon incorrecte
3. Faux contact
1. Remplacer les piles
2. Vérifier la polarité
3. Enfoncer la touche reset (res)
L’installation ne fonctionne pas/ne
fonctionne pas aux horaires
configurés
4. Connexions incorrectes
5. Configuration programme incorrecte
6. Mode HORS GEL ou Programme
vacances activé
7. Réglage de l’horaire actuel incorrect
8. Réinitialise l’horloge et le jour de la
semaine.
4. Vérifier la connexion des fils de la
charge avec les bornes du
chronothermostat
5. Vérifier la correspondance de l’horaire
configuré dans le programme
6. Désactiver la fonction intéressée
7. Vérifier l’exactitude de l’horaire et du
jour et les reprogrammer si
nécessaire
8. Vérifier que l’écran affiche le symbole
“igloo” (en cas de connexion
chaudière) ou le symbole “parasol”
(en cas de connexion climatiseur)
La température ambiante affichée ne
correspond pas à la température réelle 9. Positionnement incorrect du
chronothermostat dans la pièce
10. Courant d’air provenant de la gaine
du tube acheminant les fils de
l’installation au chronothermostat
9. Se conformer aux instructions du
paragraphe “POSITIONNEMENT”
10. Obstruer la gaine du tube pour
éviter les courants d’air chaud ou
froid
L’écran affiche “ ” 10. Piles usées 10. Remplacer les piles
L’appareil se comporte de façon
anormale
11. Piles non alcalines 11. Utiliser des piles alcalines type LR6
EINFÜHRUNG
Danke, dass Sie sich für eines unserer Produkte entschieden haben! Dieses elektronische Chronothermostat ermöglicht das
Programmieren der Funktionsweise Ihres Heiz- und / oder Klimasystems während der gesamten Woche, um die gewünschte Temperatur
zum gewünschten Zeitpunkt zu erzielen. Es folgen einige Hinweise, die es Ihnen erlauben, es einfach und sofort zu benutzen. Lesen Sie
sie sorgfältig. Wir wünschen einen angenehmen Komfort!
ÜBEREINSTIMMUNG MIT DEN STANDARDS
EN 60730-1 und weitere Überarbeitungen
EN 60730-2-7
EN 60730-2-9
TECHNISCHE DATEN
STROMVERSORGUNG = 2 Alkalibatterien 1,5V Typ LR6
TEMPERATURREGELBEREICH = 6÷35°C
ANZEIGE DER RAUMTEMPERATUR = 0÷40°C (Auflösung 0,1°C)
AKTUALISIERUNG DER TEMPERATUR = 1 mal pro Minute
DIFFERENTIAL = 0,2K 0,4 K(@dT/dt= 1°C/15’)
FÜHLER = NTC 3%
SCHUTZGRAD = IP20
ISOLIERKLASSE = II
TEMPERATURGRADIENT = 1 K/15 min
AUSGANG = Wechselrelais
KONTAKTLEISTUNG = 8(2,5)A/250V~
WIRKUNGSART = 1BU
INSTALLATIONSBEDINGUNG = normale Umgebung
MAXIMALE BETRIEBSTEMPERATUR = 50°C
LAGERTEMPERATUR = 0÷60°C
FROSTSCHUTZ = 6°C (unveränderlich)
PROGRAMMIERUNG = täglich/Wochenende/wöchentlich
VOREINGESTELLTES PROGRAMM = Betriebsart AUTO
Mo-Do Komfort von 05:30 bis 22:00
Fr Komfort von 05:30 bis 23:00
Sa Komfort von 06:30 bis 23:30
So Komfort von 07:00 bis 22:00
SOFTWARE KLASSE A
LCD-DISPLAY
MINIMALER PROGRAMMIERZEITRAUM = 30’
MONTAGE = an der Wand
SICHERHEITSVORSCHRIFTEN
Prüfen Sie vor dem Anschließen des Chronothermostats, ob die zu steuernde ABNEHMERLAST (Heizkessel, Pumpe, usw.) NICHT
ANGESCHLOSSEN IST und die VERSORGUNGSSPANNUNG DER IM UNTERTEIL DES GERÄTES ANGEGEBENEN ENTSPRICHT
(max. 250V~). (Abb. 3)
ELEKTRISCHE ANSCHLÜSSE
Schließen Sie die Kabel der ABNEHMERLAST an die Klemmen Nr. 1 und Nr. 2 des Chronothermostats gemäß dem Schaltplan (Abb.
8) an.
U = Abnehmerlast
1 = Netzklemme
2 = Schließerklemme
3 = Öffnerklemme
Das Chronothermostat kann durch den Anschluss an eine telefonische GSM-Wählvorrichtung ferngesteuert werden.
Die Klemmen 6 und 7 dienen zum Anschluss der telefonischen GSM-Wählvorrichtung.
Siehe in der Dokumentation im Inneren des Zubehörteils telefonische GSM-Wählvorrichtung für die Montage-und
Gebrauchshinweise.
LEGENDE ZU DEN DISPLAY-ANZEIGEN (Abb. 1)
A = Anzeige des eingerichteten Programms
P = Wochentag
M = Cursorposition zum Einrichten des Programms
R = Programmierphase aktiv
O = Uhr
Q = Ermittelte Temperatur
N = Batterien leer
F = Ferienprogramm aktiv
E = Funktion Party aktiv
D = Funktion Pause Komfort aktiv
I = Komfort-Temperatu
H = Reduzierte Temperatur
C = Frostschutz aktiv
L = Automatisch
G = Manuelle Betriebsart
B = Anlage in Betrieb (Flamme in Kessel gezündet oder Klimaanlage aktiv)
S = Sommerbetrieb (Klimatisierung)/Winterbetrieb (Heizen)
LEGENDE DER BEDIENVORRICHTUNGEN DES CHRONOTHERMOSTATS (Abb. 2)
1 = Einrichten des Programms (prog)
2 = Wahl der Betriebsart ( )
3 = Wahl der “Sonder”-Betriebsarten (F)
4 = Einrichten der Komfort-Temperatur ( )
5 = Einrichten der reduzierten Temperatur ( )
6 = Ausgang (ESC)
7 = Einrichten SOMMER ( ) / WINTER ( )
8 = Reset-Taste (RESET)
9 = Drehgriff für Einstellungen und Bestätigung
POSITIONIERUNG UND INSTALLATION
• Installieren Sie das Chronothermostat fern von Wärmequellen (Heizkörper, Sonnenstrahlen, Küche), entfernt von Türen/Fenstern sowie
in einer Höhe von etwa 1,5 m vom Fußboden (Abb. 4).
KORREKTUR DER ERMITTELTEN TEMPERATUR
Sollte das Chronothermostat an einer Stelle der Wohnung installiert werden, an der die Umgebungstemperatur aus einem der soeben
genannten Gründe verfälscht wird, ist es möglich einen Korrekturfaktor bei der Messung anzuwenden:
• Richten Sie die Jahreszeit WINTER ein.
• Aktivieren Sie die Funktion FROSTSCHUTZ.
• Betätigen und halten Sie die Taste ESC gedrückt: nach 20 s schaltet sich das Display vollständig aus, während nur die
Temperaturanzeige eingeschaltet bleibt. Drehen Sie den Drehgriff, bis die richtige Temperatur angezeigt wird und bestätigen Sie den
Vorgang dann durch Drücken auf den Drehgriff.
• Lassen Sie die Taste ESC los.
Zur Befestigung an der Wand siehe die Abbildungen (Abb. 6, 7)
ACHTUNG:
Es wird empfohlen, die Installation des Chronothermostats unter genauer Einhaltung der Sicherheitsbestimmungen und der gültigen
gesetzlichen Vorgaben vorzunehmen.
EINRICHTEN DER PROGRAMMIERART (täglich/Wochenende/wöchentlich)
Das Chronothermostat kann für den Betrieb in drei verschiedenen Betriebsarten eingerichtet werden:
- Wochenbetrieb: diese Betriebsart ermöglicht es, für jeden Wochentag ein spezifisches Programm zu erstellen.
- Tagesbetrieb: diese Betriebsart ermöglicht es, einen “typischen” Tag zu programmieren, der während der gesamten Woche wiederholt
wird.
- Wochenendbetrieb: diese Betriebsart ermöglicht es, einen ersten “typischen” Tag für Montag bis Freitag sowie einen zweiten
“typischen” Tag für das Wochenende (Sonnabend-Sonntag) zu programmieren
Zur Auswahl muss die entsprechende Brücke betätigt werden. Hängen Sie die Klinke mit Hilfe eines Schraubendrehers aus (Abb. 6).
Verschieben Sie die Brücke in die gewünschte Position (Abb. 5):
- Position 1 Wochenbetrieb
- Position 2 Wochenendbetrieb
- Position 3 Tagesbetrieb
Verschließen Sie nach erfolgter Programmierung das Gerät wieder und hängen Sie dabei zuerst den linken Teil ein (Abb. 9a). Drücken Sie
den Deckel dann auf das Unterteil, wobei darauf zu achten ist, dass sich die Klinke am rechten Teil innerhalb des Deckels befindet (Abb.
9b). Drücken Sie die Reset-Taste (RESET), um die Änderung wirksam zu machen.
EINBAU DER BATTERIEN
Hängen Sie zum Einbau der Batterien die Klinke mit Hilfe eines Schraubendrehers aus (Abb. 6). Tauschen Sie die Batterien gemäß der auf
dem Produkt angegeben Richtung aus. Verschließen Sie das Gerät wieder und hängen Sie dabei zuerst den linken Teil ein (Abb. 9a).
Drücken Sie den Deckel dann auf das Unterteil, wobei darauf zu achten ist, dass sich die Klinke am rechten Teil innerhalb des Deckels
befindet (Abb. 9b). Richten Sie die Uhrzeit ein, wie im Kapitel “EINRICHTEN VON UHRZEIT UND TAG” beschrieben ist. Die Batterie hat
eine Dauer von etwa 1 Jahr.
AUSTAUSCH DER BATTERIEN
Beim Erscheinen des blinkenden Symbols ( ) zeigt an, dass die Batterien zur Neige gehen. Ab dem Aufleuchten des Symbols
funktioniert das Chronothermostat für etwa 1 Monat richtig, dann nimmt es eine Störabschaltung vor und wird nur das nicht blinkende
Symbol ( ) angezeigt. Zur Vorgehensweise beim Austausch der Batterien siehe im Kapitel EINBAU DER BATTERIEN.
EINRICHTEN VON UHRZEIT UND TAG
Das Display zeigt die Wochentage und die Uhrzeit an, wobei die ersten beiden Ziffern (Stunden) blinken (Abb. 10).
Drehen Sie am Drehgriff zur Bestätigung.
Das Display zeigt die letzten Ziffern der Uhrzeit blinkend an. Drehen Sie am Drehgriff, um die Minuten einzurichten.
Betätigen Sie den Drehgriff zur Bestätigung.
Der Cursor des Tages beginnt zu blinken.
Drehen Sie am Drehgriff, um den Tag einzurichten.
Drehen Sie am Drehgriff, um den Vorgang zu bestätigen.
Anm.: Bei Betätigen der Taste ESC zu einem beliebigen Zeitpunkt wird die Programmierung beendet.
ÄNDERN VON UHRZEIT UND TAG
Betätigen Sie die Taste “Reset” und führen Sie die Anweisungen unter “EINRICHTEN VON UHRZEIT UND TAG” ein (Abb. 10).
EINRICHTEN DER JAHRESZEIT
Die Auswahl der Jahreszeit ist nur in der Betriebsart AUTO aktiv.
Bei Benutzung der Taste SOMMER/WINTER kann die Betriebsart des Chronothermostats gewählt werden.
WINTER = Funktionsweise als Heizkessel
SOMMER = Funktionsweise als Klimaanlage
Die Wahl der Jahreszeit bedingt die Wahl der aktivierbaren Temperaturstufen.
WINTER = 3 Temperaturstufen (TFrostschutz Reduziert Komfort< T < T )
SOMMER = 2 Temperaturstufen (TKomfort < TSparbetrieb)
Alle Werte sind aktiv und beziehen sich nur auf die Jahreszeit, für die sie programmiert wurden.
Aus Gründen der Einfachheit wird bei den weiteren Anweisungen ausdrücklich auf die Jahreszeit WINTER Bezug genommen.
EINRICHTEN DER TEMPERATUREN
Das Chronothermostat steuert in der Jahreszeit WINTER drei Temperaturstufen:
• TKomfort = Die ideale Temperatur während Zeiträumen, in denen man sich in der Wohnung aufhält
• TReduziert = Die Temperatur für die Nacht oder Zeiträume, in denen die Wohnung unbelegt ist (z.B., wenn man viele Stunden arbeitet
…).
• TFrostschutz = Mindesttemperatur in der Wohnung zum Schutz der Anlage.
(siehe im entsprechenden Abschnitt)
Zum Einrichten der dem Wochenprogramm zuzuweisenden Temperaturen:
• Öffnen Sie die Klappe (Abb. 2).
• Betätigen Sie die Taste Komfort-Temperatur ( ), um die Komfort-Temperatur zu ändern. Die Anzeige der zuvor eingerichteten
Temperatur blinkt. Drehen Sie am Drehgriff, um die gewünschte Temperatur einzurichten.
Betätigen Sie den Drehgriff zur Bestätigung, um zu bestätigen, bzw. „Esc“, um den Vorgang zu annullieren.
• Betätigen Sie die Taste reduzierte Temperatur ( ), um die reduzierte Temperatur zu ändern. Die Anzeige der zuvor eingerichteten
Temperatur blinkt. Drehen Sie am Drehgriff, um die gewünschte Temperatur einzurichten.
Betätigen Sie den Drehgriff, um zu bestätigen, bzw. “Esc“, um den Vorgang zu annullieren.
Anm.: Ohne eine Einrichtung des Temperaturwertes innerhalb von 10“, verlässt das Chronothermostat die Funktion und kehrt zur
vorherigen Betriebsart zurück.
VORÜBERGEHENDE ÄNDERUNG DER TEMPERATUR.
(aktivierbar von AUTO, MAN, und SPEZIALFUNKTIONEN)
Außer den beiden Standard-Temperaturstufen ist es möglich, einen gewünschten, vorübergehenden Temperaturwert zu steuern.
Die Änderung des gewünschten Wertes ist nur für den aktiven Zeitraum wirksam und wird an dessen Ende gelöscht (d.h. beim ersten
Umschalten von TKomfort=>TReduziert oder umgekehrt).
Zum Aktivieren der Funktion genügt es, den Drehgriff zu betätigen: in der ersten Schaltstufe wird die eingerichtete Temperatur angezeigt
und mit den weiteren kann der neue Einstellwert geregelt werden.
Während des gesamten Zeitraums mit geänderter T, d.h. vorläufigem Auswahlstatus wird das blinkende Symbol °C angezeigt.
Betätigen Sie ESC, um diese vorübergehende Einstellung zu löschen.
EINRICHTEN DES PROGRAMMS
Das Chronothermostat zu programmieren heißt, den Tag in die Zeiträume TKomfort oder TReduziert zu unterteilen. Je nach der bei der
Einstellung durch die Positionierung der Brücke getroffenen Auswahl können drei verschiedene Situationen eintreten.
• Öffnen Sie die Klappe und betätigen Sie die Taste “Prog”.
Das Display zeit die Meldung PROG, den Tag und das Programm des Tages an (Abb. 11).
Bei Auswahl von:
1. Wochen-Modus:
Durch Betätigen des Drehgriffs ist es möglich, den jeweils zu programmierenden Tag zu wählen.
2. Wochenend-Modus:
Durch Betätigen des Drehgriffs ist es möglich, die zu programmierende Gruppe von Wochentagen zu wählen.
Erste Gruppe von Mo bis Fr und zweite Gruppe Sa und So.
3. Tages-Modus:
Es werden alle Wochentage als eine Lösung angeboten.
In allen drei Fällen muss zum Aufrufen der Programmierung der Drehgriff gedrückt werden.
Das Display zeigt den Tag oder die Tagesgruppe an, auf die die Programmierung Auswirkung hat. Gleichzeitig auf der Cursor zur
Einrichtung ( ) und im oberen Teil des Display wird das zuvor vorhandene Programm angezeigt (leuchtende Segmente = TKomfort,
nicht leuchtende Segmente = TReduziert).
ERSTELLEN/ÄNDERN der Zeiträume mit TKomfort und TReduziert
Nach Auswahl des Tages / der Tagesgruppe blinkt der Cursor zur Positionierung (Abb. 12) und auf der Uhr erscheint die Uhrzeit 00:00.
Einrichten des gesamten Tages:
Bei Verwendung der Tasten (Komfort-Temperatur) oder (Reduzierte Temperatur) ist es jetzt möglich, die gewünschte Temperatur
für alle 24 Stunden des Tages in Abständen von 30 min einzurichten.
Bei Betätigung einer der beiden der Tasten wird die Uhr um 30’ weitergeschaltet, wobei im Programm (siehe waagerechte Leiste oben auf
dem Bildschirm) die durch die gedrückte Taste bezeichnete Betriebsart aktiviert wird. Beim Gedrückthalten der Taste erfolgt ein schnelles
Umschalten.
Einrichten nur eines Teils des Tages:
Drehen Sie bei 00:00 beginnend, den Drehgriff, bis auf der Uhr die Uhrzeit für den Beginn des Zeitraums erscheint, der programmiert /
geändert werden soll.
Verwenden Sie dann die Tasten und mit der gleichen Vorgehensweise, wie bei der Programmierung für den ganzen Tag
angegeben ist.
Beispiel: Erstellen eines Komfort-Zeitraums von 18:00 bis 22:00:
• Drehen Sie den Drehgriff bis zum Erreichen von 18:00.
• Betätigen und halten Sie die Taste Komfort-Temperatur “ “ bis zum Erreichen von 22:00 gedrückt.
• Betätigen Sie den Drehgriff zur Bestätigung oder regeln Sie mit dem Drehgriff eine neue Uhrzeit zum Einrichten eines weiteren
Zeitraums.
Betätigen Sie nach dem Einrichten/Ändern der Komfort - und reduzierten Zeiträume den Drehgriff zur Bestätigung der neuen
Programmierung bzw. die Taste “Esc”, um die Änderungen zu annullieren.
Wiederholen Sie den Vorgang für die gewünschten Tage oder Tagesgruppen
Wenn mehrere Tage mit dem gleichen Programm programmiert werden sollen, kann der typische Tagesablauf auf andere kopiert werden.
Positionieren Sie dabei den Drehgriff auf dem zu kopierenden Tag, betätigen Sie PROG und halten Sie die Taste gedrückt. Um den
gewählten Tag beginnt der Auswahlrahmen zu blinken.
Drehen Sie, während Sie PROG gedrückt halten, den Drehgriff bis zur Auswahl des Tages (Verschieben des Rahmens), auf den das
Programm kopiert werden soll und bestätigen Sie durch Drücken auf den Drehgriff.
Jetzt kann die Taste PROG losgelassen oder ein weiterer Tag gewählt werden, um den Kopiervorgang fortzusetzen.
Die Kopierfunktion ist nur im Wochenend- oder Wochenmodus aktiv.
Betätigen Sie nach Beendigung der Programmierung "Esc”, um den Vorgang zu verlassen.
AUTOMATISCHER BETRIEB (Abb.13)
Bei Auswahl des AUTOMATISCHEN Betriebs steuert das Chronothermostat die Raumtemperatur entsprechend dem eingerichteten
Programm.
Betätigen Sie die Taste ( ) bis zum Erscheinen des Symbols AUTO.
Drehen Sie, wenn die eingerichtete Temperatur vorübergehend verändert werden soll, am Drehgriff. Das Chronothermostat behält die
gewählte neue Temperatur bis zum nächsten Wechsel des Zeitraums bei (vom Zeitraum TKomfort zum Zeitraum TReduziert oder umgekehrt).
MANUELLER BETRIEB (Abb.14)
Bei Auswahl des MANUELLEN Betriebs steuert das Chronothermostat die Raumtemperatur, indem es zu jeder Tageszeit den eingerichteten
Wert einhält.
Betätigen Sie die Taste bis zum Erscheinen des Symbols MAN.
Die vorab auf dem Chronothermostat eingerichtete Temperatur beträgt 20°C (im Sommerbetrieb 25°C). Drehen Sie den Drehgriff, wenn
die Temperatur verändert werden soll.
Anm.: Bei jedem Verlassen der manuellen Betriebsart wird die eingestellte Temperatur gelöscht. Bei nachfolgender Wiederaufnahme des
manuellen Betriebs nimmt die eingerichtete Temperatur einen Wert von 20°C an.
FROSTSCHUTZ-BETRIEB (Abb. 15)
Bei Auswahl des FROSTSCHUTZ-Betriebs steuert das Chronothermostat die Raumtemperatur so, dass sie nicht unter 6°C sind. Dadurch
werden die Leitungen vor einem Einfrieren während langer Abwesenheit von der Wohnung geschützt. Der Wert von 6°C kann nicht
geändert werden.
Betätigen Sie die Taste bis zum Erscheinen des Symbols .
FERIENPROGRAMM
Das Programm “Ferien” dient für eine lange Abwesenheit von der Wohnung: es verhindert, dass die Raumtemperatur unter 6°C sinken
kann, wobei es im Unterschied zum FROSTSCHUTZ-Betrieb möglich ist, den Neustart des Komfort-Status ausreichend vorzeitig zum Tag
der Rückkehr zu programmieren, so dass man die Wohnung bei der Ankunft bereits bei TKomfort vorfindet.
Betätigen Sie die Taste „F“ bis zum Erscheinen des Symbols . Drehen Sie den Drehgriff, um den Ferienzeitraum einzurichten. Dadurch
kann das Chronothermostat den Betrieb in der AUTOMATISCHEN Betriebsart um 00:01 Uhr des oben eingerichteten Tages wieder
aufnehmen.
Die maximale Dauer der Ferienzeit beträgt 99 Tage. Immer um Mitternacht verringert der Zähler die verbleibenden Tage um 1 Einheit.
Hat der Zähler Null erreicht, wird das verwendete Programm aktiviert.
Betätigen Sie den Drehgriff zur Bestätigung bzw. “Esc”, um den Vorgang zu annullieren.
Die reduzierte Temperatur des Ferien-Programms kann durch Betätigen des Drehgriffs innerhalb des Bereichs von 6-15°C eingerichtet
werden. Der neue Wert bleibt bis zum Ablauf des Ferien-Zeitraums aktiv. Siehe auch im Abschnitt “Vorübergehende Veränderung der
Temperatur”.
Betätigen Sie die Taste “Esc”, um die Betriebsart “Ferien” vorzeitig zu unterbrechen.
PROGRAMMIERUNG DES KOMFORT-PAUSE
Das Programm “Komfort-Pause” dient dazu, die Heizung für kurze Zeiträume während des Tages bis zu maximal 24 Stunden
auszuschalten, wie zum Beispiel bei einer kurzen Abwesenheit von der Wohnung oder während des Lüftens bei der häuslichen Reinigung.
In dieser Phase verwendet das Chronothermostat den im Programm eingerichteten Wert für die reduzierte Temperatur.
Betätigen Sie die Taste “F“ bis zum Erscheinen des Symbols . Drehen Sie am Drehgriff, um die Uhrzeit für das Ende des Zeitraums
zu wählen. Der gewählte Zeitraum wird durch das Blinken der Segmente angezeigt. Betätigen Sie den Drehgriff, um zu bestätigen, bzw.
“Esc“, um den Vorgang zu annullieren.
Sollte der geänderte Zeitraum Mitternacht einschließen, blinde auf dem Display auch die Segmente nach 00:00 bezüglich des darauf
folgenden Tages. Nach Ablauf der entsprechenden Stunde kehrt das entsprechende Segment wieder zur normalen Anzeige zurück.
Jedoch ist es auch möglich, den eingerichteten Wert innerhalb des Temperaturbereichs von 6÷35°C durch Drehen des Drehgriffs zu
verändern. Der neue Wert bleibt bis zum Ende des eingerichteten Zeitraums aktiv. Siehe auch im Abschnitt “Vorübergehende Änderung
der Temperatur”.
Betätigen Sie die Taste “Esc”, um die Betriebsart “Zeitraum Komfort-Pause” vorzeitig zu unterbrechen.
PROGRAMMIERUNG DES ZEITRAUMS “PARTY”
Das Programm “Party” dient dazu, den Zeitraum mit TKomfort über die normale Dauer hinaus zu verlängern.
Es wird außerdem genutzt, wenn die Wohnung während eines Zeitraums mt T vorübergehend beheizt werden soll. Reduziert
Betätigen Sie die Taste “F“ bis zum Erscheinen des Symbols . Drehen Sie am Drehgriff, um die Uhrzeit für das Ende des Zeitraums
zu wählen. Der gewählte Zeitraum wird durch das Blinken der Segmente angezeigt. Betätigen Sie den Drehgriff zur, um zu bestätigen, bzw.
“Esc“, um den Vorgang zu annullieren.
Sollte der geänderte Zeitraum Mitternacht einschließen, blinde auf dem Display auch die Segmente nach 00:00 bezüglich des darauf
folgenden Tages. Nach Ablauf der entsprechenden Stunde kehrt das entsprechende Segment wieder zur normalen Anzeige zurück.
In dieser Phase verwendet das Chronothermostat den Wert der Komfort-Temperatur, der im Programm ( ) eingerichtet ist.
Jedoch ist es auch möglich, den eingerichteten Wert innerhalb des Temperaturbereichs von 6÷35°C durch Drehen des Drehgriffs zu
verändern. Der neue Wert bleibt bis zum Ende des eingerichteten Zeitraums aktiv.
Siehe auch im Abschnitt “Vorübergehende Änderung der Temperatur”.
Betätigen Sie die Taste “Esc”, um die Betriebsart “Party-Zeitraum” vorzeitig zu unterbrechen.
RESET-TASTE
Die RESET-Taste dient zur Programmierung der Uhrzeit und des Wochentages.
Sie muss nach Versetzung der Brücke zur Programmauswahl gedrückt werden.
Außerdem muss sie bei Funktionsstörungen am Chronothermostat betätigt werden.
Beim Drücken der Taste RESET (mit einer Bleistiftspitze) führt das Instrument eine “Autotest”- Phase durch, während der für einige
Sekunden alle Segmente des Displays leuchten.
Die Betätigung der Taste RESET:
•Ändert nicht die Einstellungen des aktivierten Programms.
•Ändert nicht die eingerichteten Temperaturen (Komfort und reduziert).
•Setzt die Uhr und den Wochentag zurück.
•Setzt alle anderen genutzten Funktionen (Programmierung des getakteten Zeitraums, Ferienprogramm) zurück.
LÖSUNG VON PROBLEMEN
HINWEIS: Verändern Sie bei Störungen keinesfalls einen Teil des Produktes, sondern verständigen Sie den technischen Kundendienst.
PROBLEM MÖGLICHE URSACHE LÖSUNG
Das Gerät schaltet sich nicht ein 1. Batterien leer
2. Batterien falsch eingesetzt
3. Falscher Kontakt
1. Tauschen Sie die Batterien aus
2. Prüfen Sie die richtige Polarität
3. Drücken Sie die Reset-Taste
Die Anlage schaltet sich nicht/nicht
zur festgelegten Uhrzeit ein 4. Falsche Anschlüsse
5. Einrichtung des Programms falsch
6. Betriebsart FROSTSCHUTZ oder
Ferien-Programm aktiv
7. Einrichtung der aktuellen Uhrzeit
falsch
8. Jahreszeit falsch
4. Prüfen Sie die Anschlüsse der
Lastdrähte zu den Klemmen des
Chronothermostats
5. Prüfen Sie die genaue
Übereinstimmung der im Programm
eingerichteten Uhrzeit
6. Deaktivieren Sie die betreffende
Funktion
7. Prüfen Sie die Genauigkeit der
Uhrzeit und des Tages und
programmieren Sie sie
gegebenenfalls neu
8. Prüfen Sie, ob auf dem Display das
“Igloo”-Symbol erscheint (beim
Anschluss an einen Heizkessel) oder
das “Schirm”-Symbol (beim
Anschluss an eine Klimaanlage)
Die angezeigte Raumtemperatur
entspricht nicht der eigentlichen 9. Falsche Positionierung des
Chronothermostats im Raum
10. Luftstrom von der Rohrleitung, die
die Drähte der Anlage zum
Chronothermostat führt
9. Beachten Sie die Hinweise im
Abschnitt “POSITIONIERUNG”
10. Versiegeln Sie die Rohrleitung, um
warme oder kalte Luftströme zu
vermeiden
Auf dem Display erscheint “ ” 10. Batterien leer 10. Tauschen Sie die Batterien aus
Das Gerät verhält sich
“ungewöhnlich” 11. Keine Alkalibatterien 11. Verwenden Sie Alkalibatterien vom
Typ LR6
INSTALLATION UND ANSCHLÜSSE
F
D
INSTALLATION ET BRANCHEMENTS
Product specificaties
| Merk: | IMIT |
| Categorie: | Thermostaat |
| Model: | Blue 578090 |
Heb je hulp nodig?
Als je hulp nodig hebt met IMIT Blue 578090 stel dan hieronder een vraag en andere gebruikers zullen je antwoorden
Handleiding Thermostaat IMIT
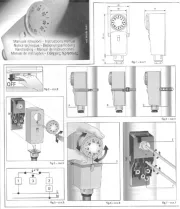
19 November 2024

23 Oktober 2023

23 Oktober 2023

23 Oktober 2023

23 Oktober 2023

23 Oktober 2023

23 Oktober 2023

23 Oktober 2023

23 Oktober 2023

23 Oktober 2023
Handleiding Thermostaat
- Vemer
- Vasco
- Elgato
- Braeburn
- PECO
- Bryant
- Dimplex
- AEG
- Baxi
- Gewiss
- EMOS
- Nefit
- Mikoterm
- Wachendorff
- Carel
Nieuwste handleidingen voor Thermostaat

2 September 2025

1 September 2025
30 Augustus 2025
30 Augustus 2025
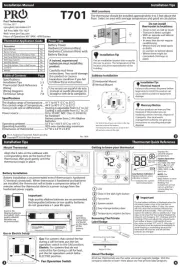
26 Augustus 2025
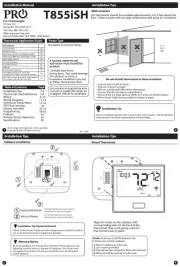
26 Augustus 2025
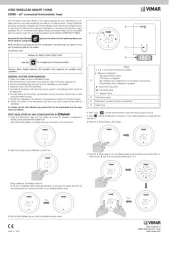
26 Augustus 2025
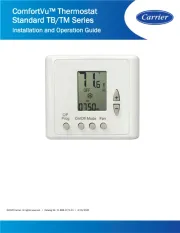
26 Augustus 2025

26 Augustus 2025
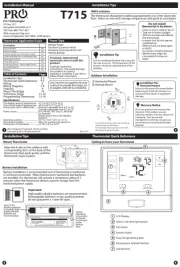
26 Augustus 2025