Extron VTT001 Handleiding
Extron AV extender VTT001
Bekijk gratis de handleiding van Extron VTT001 (1 pagina’s), behorend tot de categorie AV extender. Deze gids werd als nuttig beoordeeld door 35 mensen en kreeg gemiddeld 4.6 sterren uit 4 reviews. Heb je een vraag over Extron VTT001 of wil je andere gebruikers van dit product iets vragen? Stel een vraag
Pagina 1/1
© 2012 Extron Electronics — All rights reserved. All trademarks mentioned are the property of their respective owners. www.extron.com
Extron USA HeadquartersExtron USA - st: We +1.714.491.1500 +1.714.491.1517 X FA
+1.800.633.9876 (Inside USA/Canada Only) +1.919.863.1794 +1.919.863.1797 XExtron USA - East:FA
68-760-50 Rev. B
03 12
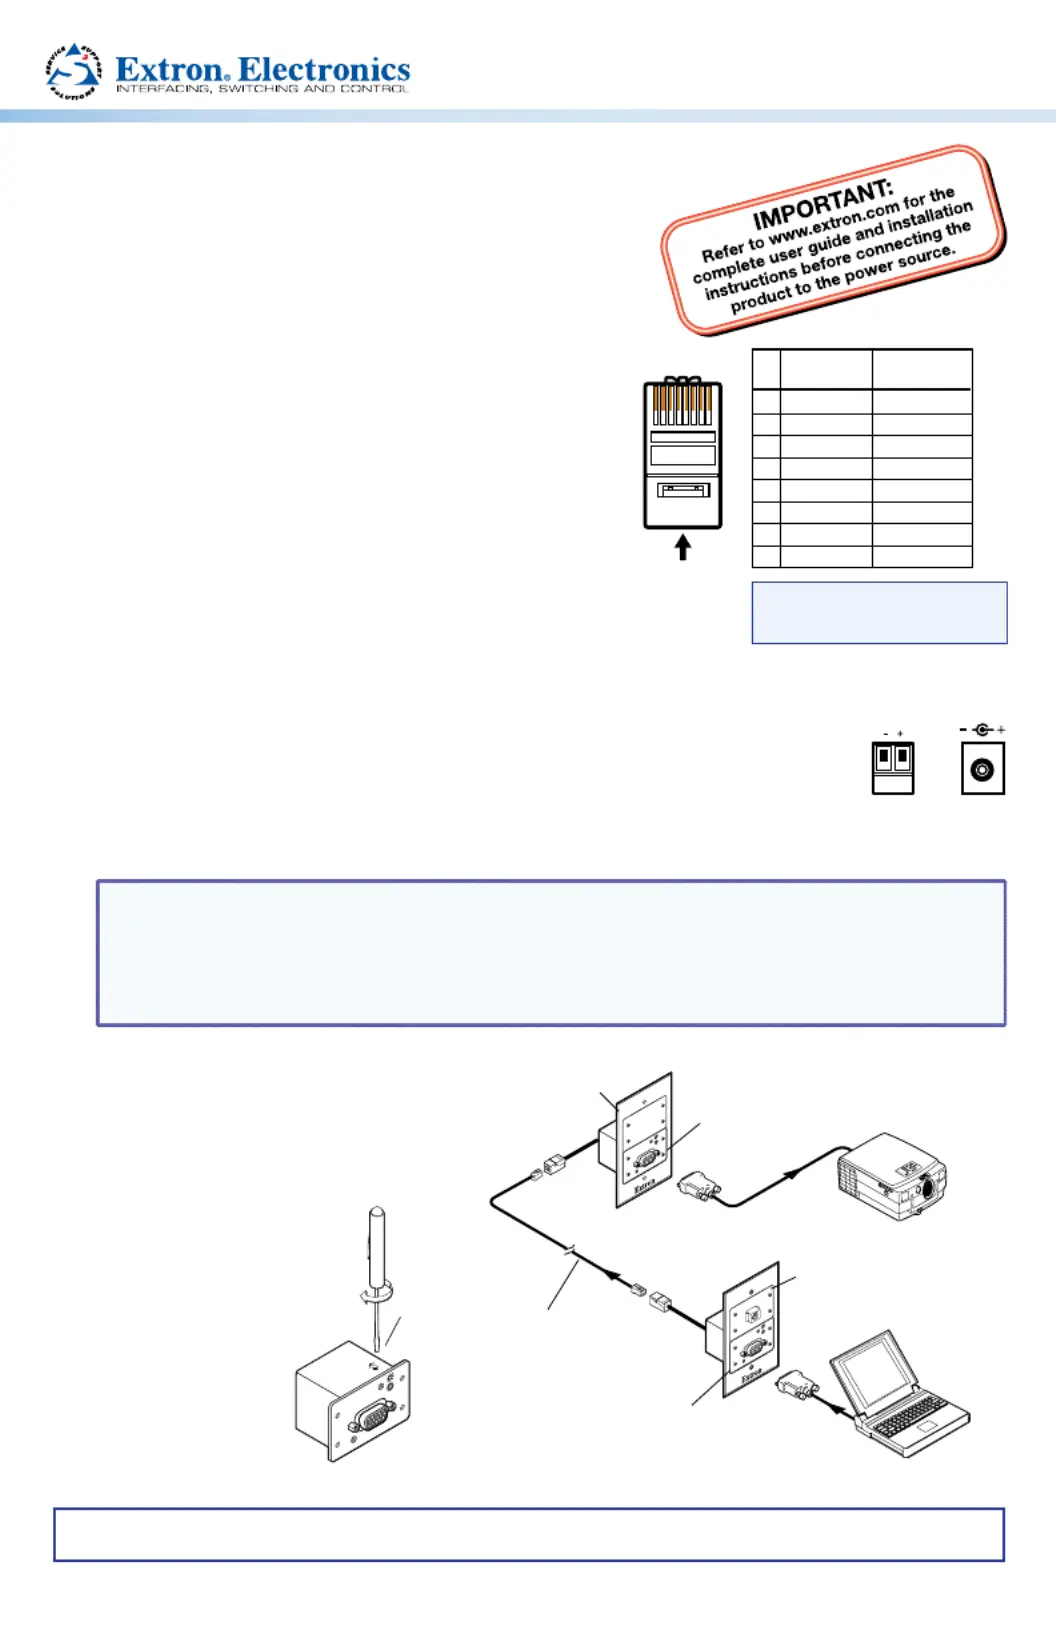
VTT001 and VTR001 • Setup Guide
This guide provides basic instructions for an
experienced installer to set up and operate the
VTT001 and VTR001.
Step 1 — Powering down
Power off and disconnect all devices from
the power source.
Step 2 — Connecting the TP cable
Connect the RJ-45 connectors of the transmitter and
receiver to either end of the TP cable. Terminate the
cables using the same standard as shown to the right.
Step 3 — Connecting input/output devices
Using the 15-pin front panel HD connectors, attach
RGBHV or RGBS input to the transmitter and a display output to
the receiver (see the example application diagram below).
Step 4 — Connecting the power supply
Connect the external power supply to the power input of the transmitter,
or the receiver, or to both, then plug the power supply into the AC power
source and power on the transmitter/receiver modules and the input/output devices.
NOTES:
•Both transmitter and receiver have remote power capability.
•For transmission distances up to 300 feet, the power is required at either the
transmitter or the receiver. Greater distances require power to be applied locally to
both the transmitter and the receiver.
Step 5 — Adjusting sharpness
For the VTR001 Series, set the sharpness
control located on top of the receiver.
See the illustration below.
Turning the control
clockwise increases
sharpness and turning it
counterclockwise
decreases sharpness.
LCD Projector
Extron
Skew-Free
™
A/V UTP
Cable
(up to 500')
Laptop
Extron
VTT001 MAAP
TwTristed ir Paansmitter
Extron
VTR001 MAAP
Twisted irPa
Receiver
Extron
CPM101
Mounting ameFr
Extron
CPM101
Mounting ameFr
OUTPUT
VTR001 MAAP
VIDEO INPUT
VTT001 MAAP
OUTPUT
VTR001 MAAP
SHARP
Sharpness
5
Pin
1
2
3
6
7
8
4
Wire color
White-green
Green
White-orange
White-blue
Orange
White-brown
Brown
Wire color
T568AT568B
White-orange
Orange
White-green
White-blue
Green
White-brown
Brown
BlueBlue
NOTE:
If you are using Enhanced
Skew-Free™ A/V cable, use
theTIA/EIA T568A standard only.
12345678
Insert Twisted
Pair Wires
Pins:
Product specificaties
| Merk: | Extron |
| Categorie: | AV extender |
| Model: | VTT001 |
| Kleur van het product: | Zwart |
| Gewicht: | 500 g |
| Soort: | AV-zender |
| LED-indicatoren: | Ja |
| Maximum resolutie: | 1600 x 1200 Pixels |
| VGA (D-Sub) invoer ports: | 1 |
| Impedantie: | 75 Ohm |
| Temperatuur bij opslag: | -40 - 70 °C |
| Luchtvochtigheid bij opslag: | 10 - 90 procent |
| Afmetingen (B x D x H): | 35 x 35 x 35 mm |
| AC-ingangsspanning: | 100-240 V |
| AC-ingangsfrequentie: | 50 - 60 Hz |
| Bedrijfstemperatuur (T-T): | 0 - 50 °C |
| Relatieve vochtigheid in bedrijf (V-V): | 10 - 90 procent |
| Ondersteundende kabel types: | Cat5, Cat5e, Cat6 |
Heb je hulp nodig?
Als je hulp nodig hebt met Extron VTT001 stel dan hieronder een vraag en andere gebruikers zullen je antwoorden
Handleiding AV extender Extron

8 December 2025
7 Oktober 2025
7 Oktober 2025
11 Augustus 2025
11 Augustus 2025
11 Augustus 2025
11 Augustus 2025
21 Juli 2025
2 April 2025
27 Oktober 2024
Handleiding AV extender
Nieuwste handleidingen voor AV extender
9 Maart 2026
7 Maart 2026
6 Januari 2026
5 Januari 2026
5 Januari 2026
1 Januari 2026
29 December 2026
21 December 2025
9 December 2025
5 December 2025