CTA Digital PAD-AFS Handleiding
CTA Digital Niet gecategoriseerd PAD-AFS
Bekijk gratis de handleiding van CTA Digital PAD-AFS (20 pagina’s), behorend tot de categorie Niet gecategoriseerd. Deze gids werd als nuttig beoordeeld door 57 mensen en kreeg gemiddeld 4.4 sterren uit 6 reviews. Heb je een vraag over CTA Digital PAD-AFS of wil je andere gebruikers van dit product iets vragen? Stel een vraag
Pagina 1/20
Select the appropriate foam pad according to the thickness of
your tablet (or tablet in its case), then press adhesive side into
center of the tablet holder.
Use this table to determine the appropriate foam pad to
use with your tablet.
Note: sizes refer to total tablet size with or without a case.
Foam Pad
Thickness
1mm
5mm
10mm
Tablet Thickness
0.51-0.91in / 13-23mm
0.31-0.71in / 8-18mm
0.67-1.06in / 17-27mm
1mm Foam Pad
5mm
Foam
Pad
10mm
Foam
Pad
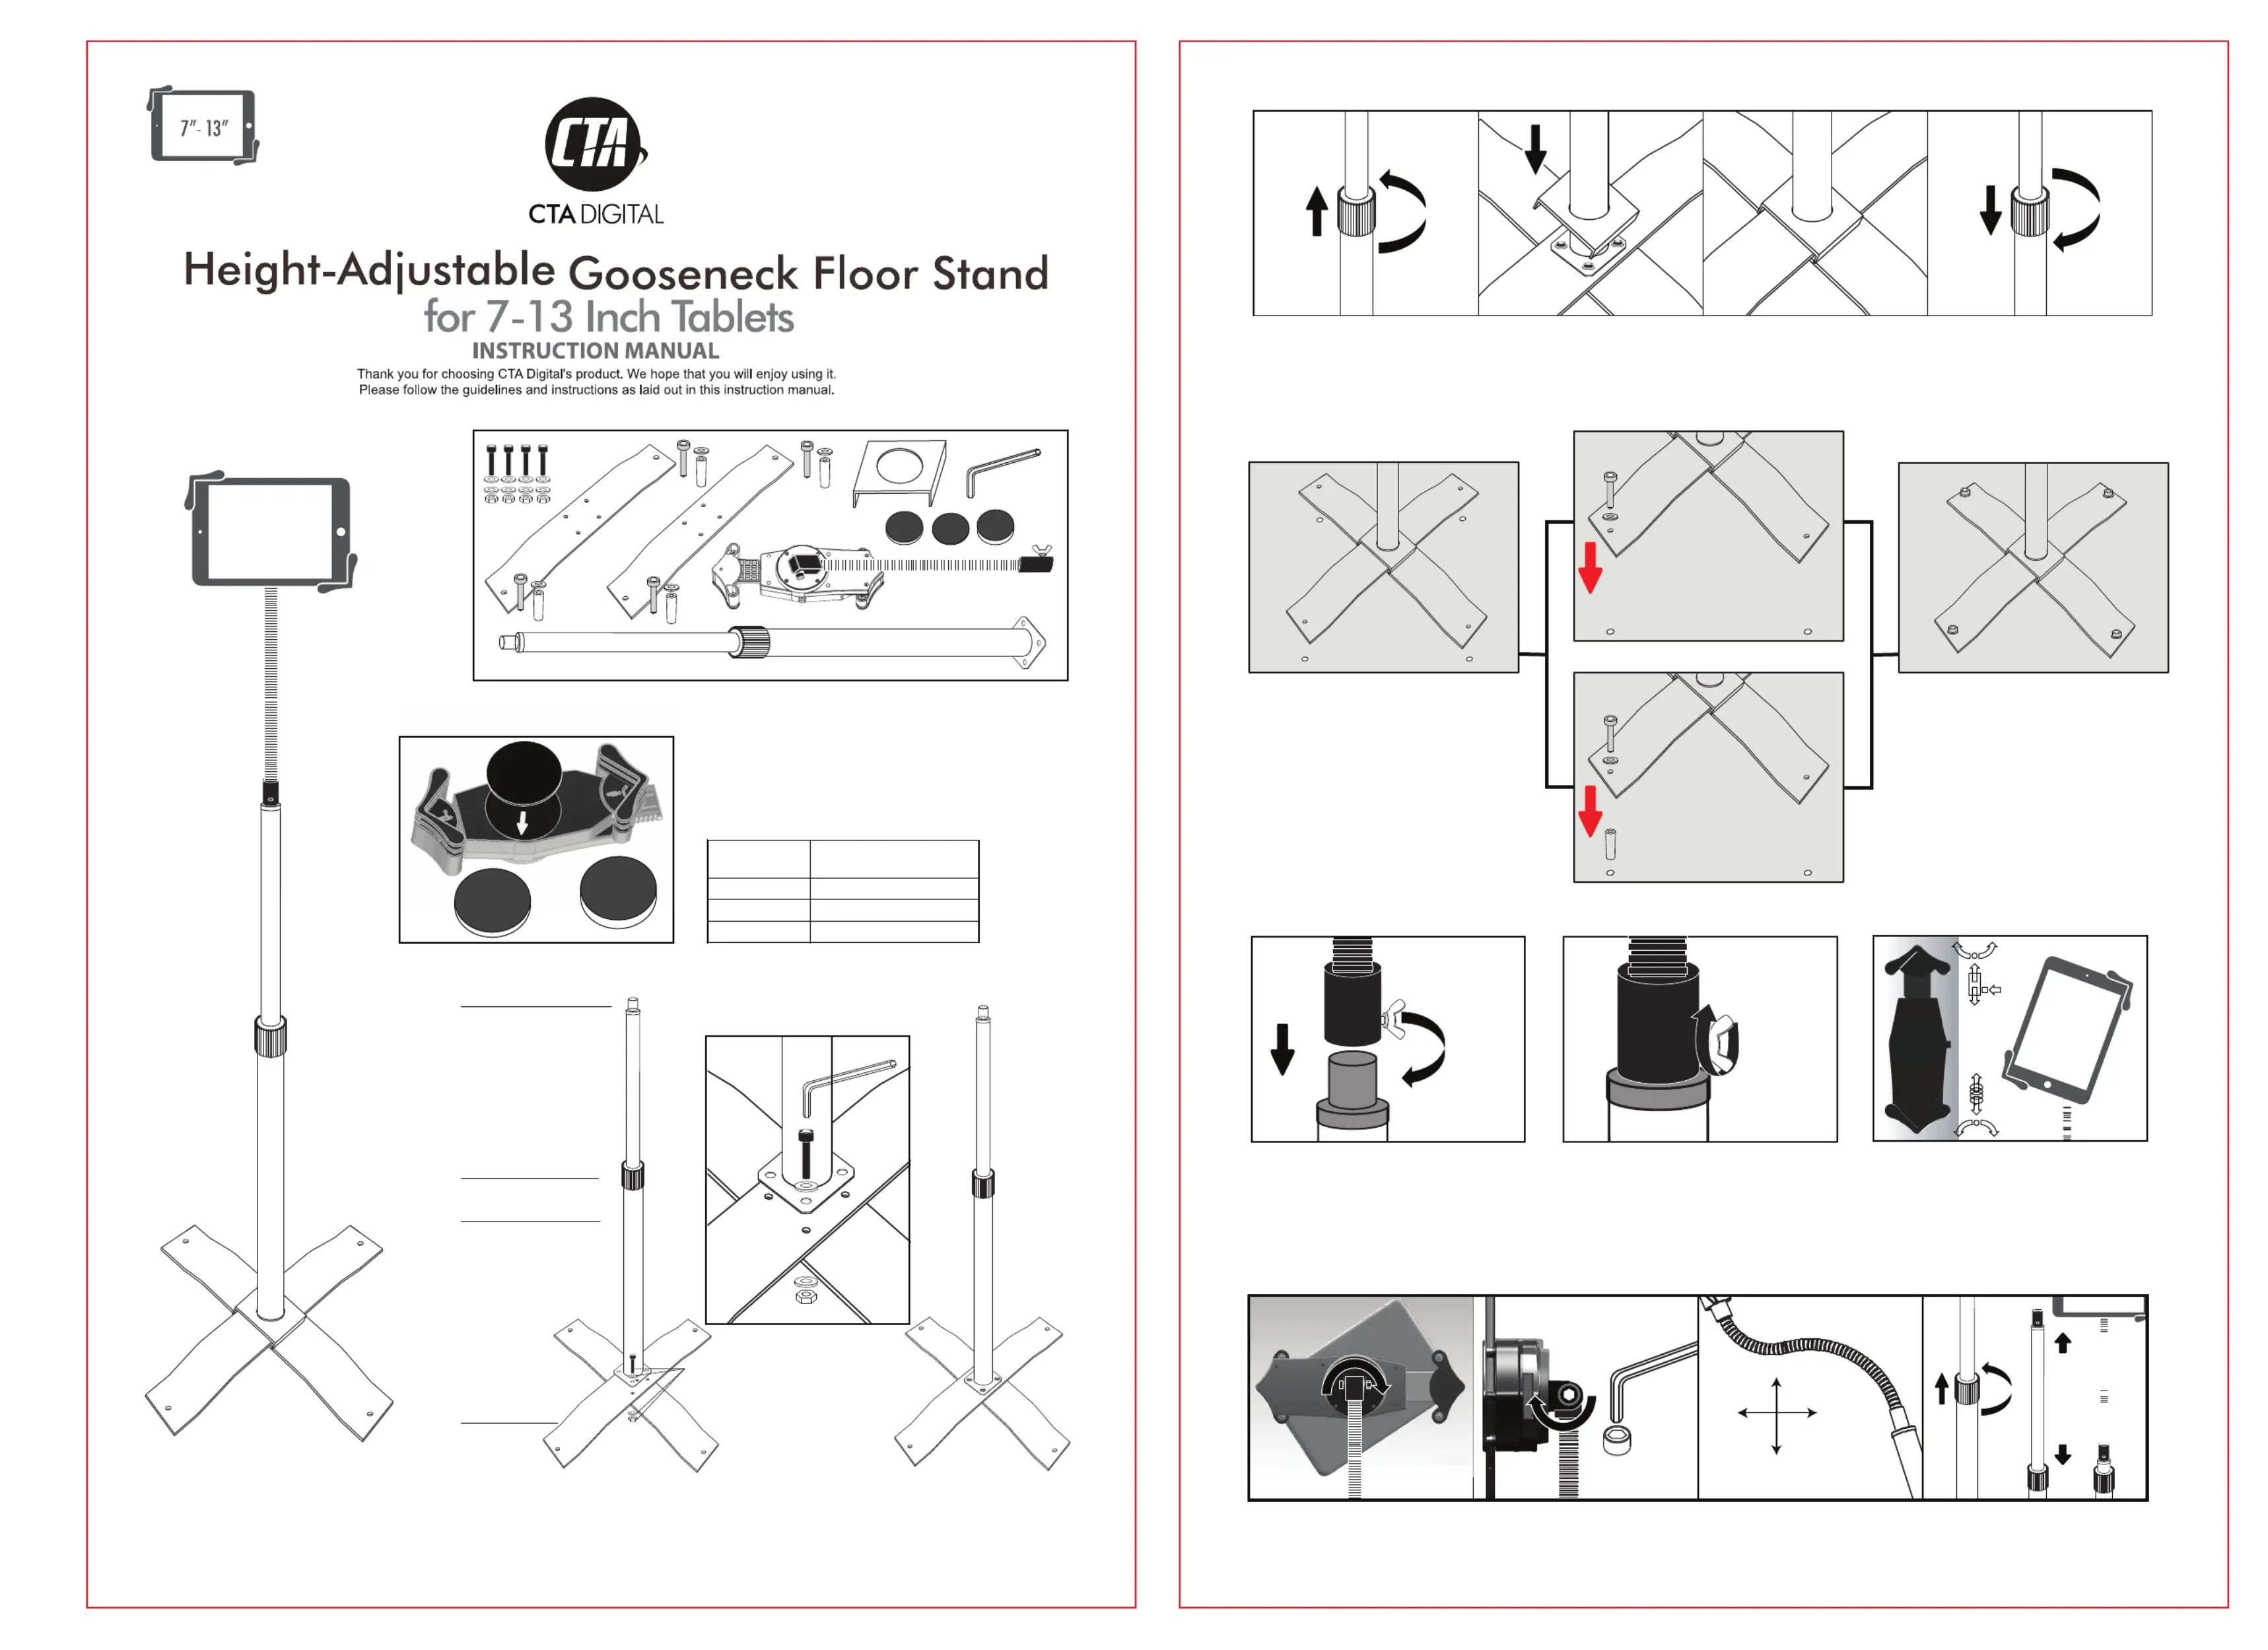
1).Attaching Foam Pad to Tablet Holder
PAD-AFS
SUPPORT@CTADIGITAL.COM
Gooseneck flexes by hand.To adjust the height of the pole,
turn plastic cover counter-clockwise and raise or lower the pole
to desired height. Turn clockwise again to lock it in place.
Allen Key
360 rotation
o
270 rotation
o
Multi
direction
flexing
Use the Allen key to tighten and loosen the
gooseneck connection screw, adjusting ease of
rotation in the tablet holder.
5.Adjustment:
4. Connecting the Tablet Holder to the Pole and Installing Your Device
Press button on side of tablet holder to
slide open. Insert your tablet against
spring arm,then slide other end back
down.
Screw the gooseneck onto the metal
connection of the pole by turning
clockwise.
Turn the Y screw clockwise to tighten
the connection.
Note: if Y screw is already in,
unscrew before attaching gooseneck.
Gooseneck
Metal Connection
Y Screw
Y Screw
Instructions:
2. Base Assembly and Connecting the Metal Cover:
METAL CONNECTION
HEIGHT
ADJUSTMENT
KNOB
POLE
METAL
CROSS BASE X 2
CONNECTION SCREW BOLT,
WASHERS AND NUT
Pole Assembly and Pole Nut
Cross Base Sections (2)
Allen Key
4.Rotate the grip counter clockwise to
loosen completely and remove from top
of pole.
5.Place the square metal cover over
the top of the pole and slide down to
stand base.
6.Place grip back over stand pole
and tighten.
3. Connecting the Stand to the Floor (Optional)
1. Use a pencil to mark holes on the
floor aligned with holes in the stand,
then drill. If using plastic inserts,hole
diameter should be around 8mm.
If not using plastic inserts,hole
diameter should be around 5.5mm.
Without plastic insert
Use the plastic insert
2. Put a floor screw through a
washer and align with hole,
then use the Allen key to screw
into the floor.
2. Put a plastic insert
into the floor hole. Put a screw
through a washer and align
with hole, then use Allen key
to screw into the floor.
3. Repeat step 2 for remaining holes.
1). Place the metal base pieces with the higher piece on top of the cross base. Align the holes at the bottom of the pole with
the holes on the cross base.
2). Insert a screw bolt with a washer into each of 4 holes. Place another washer on the underside of each screw bolts.
3). Grip the nut on the underside with one hand,and use the other to tighten each screw with Allen key. Repeat to tighten all
four screw bolts.
Package Contents:
Floor Screw
Plastic Inserts
Washer
Product specificaties
| Merk: | CTA Digital |
| Categorie: | Niet gecategoriseerd |
| Model: | PAD-AFS |
| Kleur van het product: | Zwart, zilver |
| Gewicht verpakking: | 2041 g |
| Breedte verpakking: | 198.755 mm |
| Diepte verpakking: | 106.172 mm |
| Hoogte verpakking: | 622.3 mm |
| Montagewijze: | Vloer |
| Type stroombron: | Niet ondersteund |
| Ingebouwde luidsprekers: | Nee |
| Correct gebruik: | Binnen |
| Materiaal: | ABS synthetics, Steel |
| Verstelbaar: | Ja |
| Compatibiliteit: | iPad 2nd – 4th Gen |
| Draaihoek: | 360 ° |
| Type mobiele apparatuur: | Tablet/UMPC |
| Hoogte verstelbaarheidsbereik: | 1066.8 - 1402.08 mm |
Heb je hulp nodig?
Als je hulp nodig hebt met CTA Digital PAD-AFS stel dan hieronder een vraag en andere gebruikers zullen je antwoorden
Handleiding Niet gecategoriseerd CTA Digital

22 Juni 2026
22 Juni 2026
22 April 2026
22 April 2026
19 April 2026
26 Maart 2026
26 Maart 2026
26 Maart 2026
25 Maart 2026
25 Maart 2026
Handleiding Niet gecategoriseerd
Nieuwste handleidingen voor Niet gecategoriseerd
22 Juni 2026
22 Juni 2026
22 Juni 2026
22 Juni 2026
22 Juni 2026
22 Juni 2026
22 Juni 2026
22 Juni 2026
22 Juni 2026
22 Juni 2026