Bosch HGD745221N Handleiding
Bekijk gratis de handleiding van Bosch HGD745221N (24 pagina’s), behorend tot de categorie Fornuis. Deze gids werd als nuttig beoordeeld door 88 mensen en kreeg gemiddeld 4.8 sterren uit 44.5 reviews. Heb je een vraag over Bosch HGD745221N of wil je andere gebruikers van dit product iets vragen? Stel een vraag
Pagina 1/24

03
261293
Ú Instructions for connecting gas and gas conversion (for
After-Sales Service only) ......................................................2
é Aanwijzing voor de gasaansluiting en -omschakeling
(Alleen voor de klantenservice) .........................................12

2
Ú Table of contents
Ú Instructions for connecting gas and gas conversion (for After-Sales Service only)
Measures to note ....................................................................... 2
Selecting a connection side .............................................................2
Gas connection.......................................................................... 3
Approved connections.......................................................................3
Types of connection ...........................................................................3
Natural gas connection (NG)............................................................3
Liquid gas connection (LPG) ............................................................4
Conversion to a different gas type........................................... 4
Converting to a different gas type ...................................................4
Functional parts for the gas conversion.........................................4
Replacing the burner nozzles...........................................................5
Adjusting or replacing the burner bypass screws and setting
the small flame ....................................................................................5
Converting the appliance from natural gas to liquefied gas ......5
Conversion from liquid gas to natural gas.....................................5
Removing the control panel..............................................................6
Replacing bypass screws .................................................................6
Installing the control panel ................................................................7
Replacing the oven burners (optional) ...........................................7
Leak test and function test ....................................................... 8
Check the gas connection ................................................................8
Checking the burner nozzles............................................................8
Checking the bypass valves.............................................................8
Checking the oven burner nozzle (option).....................................8
Check the grill burner nozzle (option) ............................................8
Correct flame formation ............................................................ 9
Burner ...................................................................................................9
Oven ......................................................................................................9
Technical properties - gas ........................................................ 9
Measures to note
The appliance may only be converted to a different gas type
by an approved specialist, in accordance with the
instructions in this manual.
Incorrect connection and incorrect settings may cause
serious damage to the appliance. The appliance
manufacturer accepts no liability for damage and
malfunctions of this kind.
Pay close attention to the symbols indicated on the rating plate.
If there is no symbol for your country, follow the technical
guidelines that apply in your country when making settings.
Before setting up the appliance, determine the gas type and
pressure in the local supply network. Before using the
appliance for the first time, make sure that all settings have
been made correctly.
Pay attention to local and international rules and regulations.
All connection data can be found on the rating plate on the rear
of the appliance.
Enter the data in the following table:
Product number (E no.),
Manufacturing number (FD),
Enter the factory settings for gas type/gas pressure, as well as
the settings for gas type/pressure that apply after the gas
conversion, in the following table.
The changes made to the appliance and the type of connection
play an important role in ensuring that the appliance operates
correctly and safely.
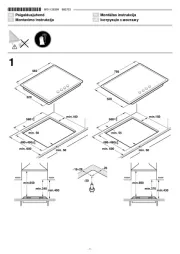
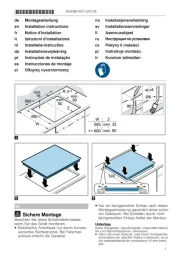
Selecting a connection side
The gas can be connected on either the right or the left. If
necessary, you can change the connection side.
Shut off the main gas supply.
If the gas is to be connected on the opposite side, the screw
fastening (size 22 key) on the gas connection that is not in use
must be fitted with a blind cap (size 24 key) and a new sealing
ring.
Once the connection side has been changed, a leak test must
be performed. See the section entitled " ".Leak test
Note: A torque spanner must be used when the gas is
connected.
E no. FD no.
After-sales serviceO
Type of gas / gas pressure
Data on the rating plate
Type of gas / gas pressure
Data after gas conversion
6:
1P
6:

3
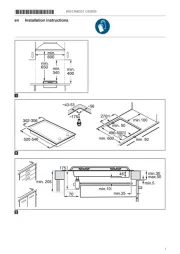
Gas connection
Approved connections
These instructions apply only when the appliance is set up in
countries that are indicated on the rating plate.
If the appliance is set up, connected and used in a country that
is not indicated on the rating plate, installation and assembly
instructions must be used that contain data and information on
the valid connection conditions in the relevant country.
Types of connection
Natural gas connection (NG)
When natural gas (NG) is used, gas is connected via a gas
pipe or a safety hose using a connecting piece with a screw
thread at each end.
Connection in accordance with EN ISO 228 G^ (TS EN ISO
228 G^ )
1. Place the new seal on the connecting piece. Make sure that
the seal is correctly seated.
2. Attach the connecting piece (with a size 24 key) to the end of
the gas connection (with a size 22 key).
3. Attach the threaded connection on the gas pipe or the safety
hose (with a size 24 key) to the connecting piece using a
new seal and tighten this.
4. To perform a leak test, see the section entitled . "Leak test"
Open the gas supply.
Notes
■*G : EN ISO 228 G (TS EN ISO 228 G )^ ^ ^
■A torque spanner must be used when the gas is connected.
Connection in accordance with EN 10226 R^ (TS 61-210 EN
10226 R^ )
1. Place the new seal on the connecting piece. Make sure that
the seal is correctly seated.
2. Attach the connecting piece (with a size 24 key) to the end of
the gas connection (with a size 22 key).
3. Attach the threaded connection on the gas pipe or the safety
hose (with a size 24 key) to the connecting piece and tighten
this.
4. To perform a leak test, see the section entitled . "Leak test"
Open the gas supply.
Notes
■*R : EN 10226 R (TS 61-210 EN 10226 R )^ ^ ^
■A torque spanner must be used when the gas is connected.
Country EN 10226
R^
(TS 61-210
EN 10226
R^)
EN ISO 228
G^
(TS EN ISO
228 G^)
AT Austria X
BE Belgium X
CH Switzerland X
DE Germany X
ES Spain X X
FR France X
GR Greece X
IT Italy X X
NL Netherlands/Holland X
PT Portugal X X
HR Croatia
SL Slovenia
YU Serbia
TR Turkey X X
PL Poland X
RO Romania X X
AE United Arab Emirates X
ZA South Africa X
HU Hungary X
5A
76(1 76(1,62*A
(15A(1,62*A
6:
6:
6:
*ê
1P
1***
6:
6:
6:
1P
1***
5ê
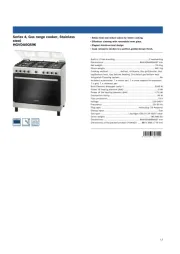
Product specificaties
| Merk: | Bosch |
| Categorie: | Fornuis |
| Model: | HGD745221N |
| Soort bediening: | Draaiknop |
| Kleur van het product: | Wit |
| Ingebouwd display: | Ja |
| Breedte: | 600 mm |
| Diepte: | 600 mm |
| Hoogte: | 850 mm |
| Grill: | Ja |
| Kinderslot: | Ja |
| Energie-efficiëntieklasse: | A |
| Verlichting binnenin: | Ja |
| Geïntegreerde klok: | Ja |
| Soort klok: | Elektronisch |
| Convectie koken: | Ja |
| Vermogen brander/kookzone 2: | 1700 W |
| Vermogen brander/kookzone 3: | 3000 W |
| Vermogen brander/kookzone 1: | 1000 W |
| Aantal branders/kookzones: | 4 zone(s) |
| Type kookplaat: | Gaskookplaat |
| Electronische ontsteking: | Ja |
| Type brander/kookzone 1: | Klein |
| Type brander/kookzone 2: | Medium |
| Type brander/kookzone 3: | Groot |
| Totale binnen capaciteit (ovens): | 66 l |
| Voedingsbron oven: | Electrisch |
| Aantal ovens: | 1 |
| Aantal gaspitten: | 4 zone(s) |
| Aantal elektronische kook zones: | 0 zone(s) |
| Energieverbruik (conventioneel): | 0.98 kWu |
| Energieverbruik (geforceerde convectie): | 0.84 kWu |
| Koken: | Ja |
| Grootte oven: | Middelmaat |
| Netto capaciteit oven: | 66 l |
| Boven- en onderverwarming: | Ja |
| Type timer: | Digitaal |
| Hittesensor bescherming: | Ja |
| Verstelbare voeten: | Ja |
| Brutocapaciteit oven: | 66 l |
| Snelle hitte: | Ja |
| Type product: | Vrijstaand fornuis |
Heb je hulp nodig?
Als je hulp nodig hebt met Bosch HGD745221N stel dan hieronder een vraag en andere gebruikers zullen je antwoorden
Handleiding Fornuis Bosch
4 Juli 2025

4 Juli 2025
4 Juli 2025
16 Juni 2025
16 Juni 2025
16 Juni 2025
16 Juni 2025
16 Juni 2025

15 Juni 2025
15 Juni 2025
Handleiding Fornuis
- Sharp
- Smile
- Kucht
- Samsung
- Vollrath
- BlueStar
- Arthur Martin-Electrolux
- Melissa
- Iberna
- Cata
- Hotpoint-Ariston
- Electroline
- Salton
- La Germania
- Elektra Bregenz
Nieuwste handleidingen voor Fornuis
1 Augustus 2025
1 Augustus 2025
30 Juli 2025
30 Juli 2025
29 Juli 2025
29 Juli 2025
29 Juli 2025
29 Juli 2025
29 Juli 2025
29 Juli 2025