AVerMedia F50 Handleiding


Lees hieronder de πŸ“– handleiding in het Nederlandse voor AVerMedia F50 (3 pagina's) in de categorie Scanner. Deze handleiding was nuttig voor 46 personen en werd door 2 gebruikers gemiddeld met 4.5 sterren beoordeeld

Pagina 1/3
ξ˜ƒξ˜ƒ
Β©
2016 AVer Information Inc. All rights reserved.
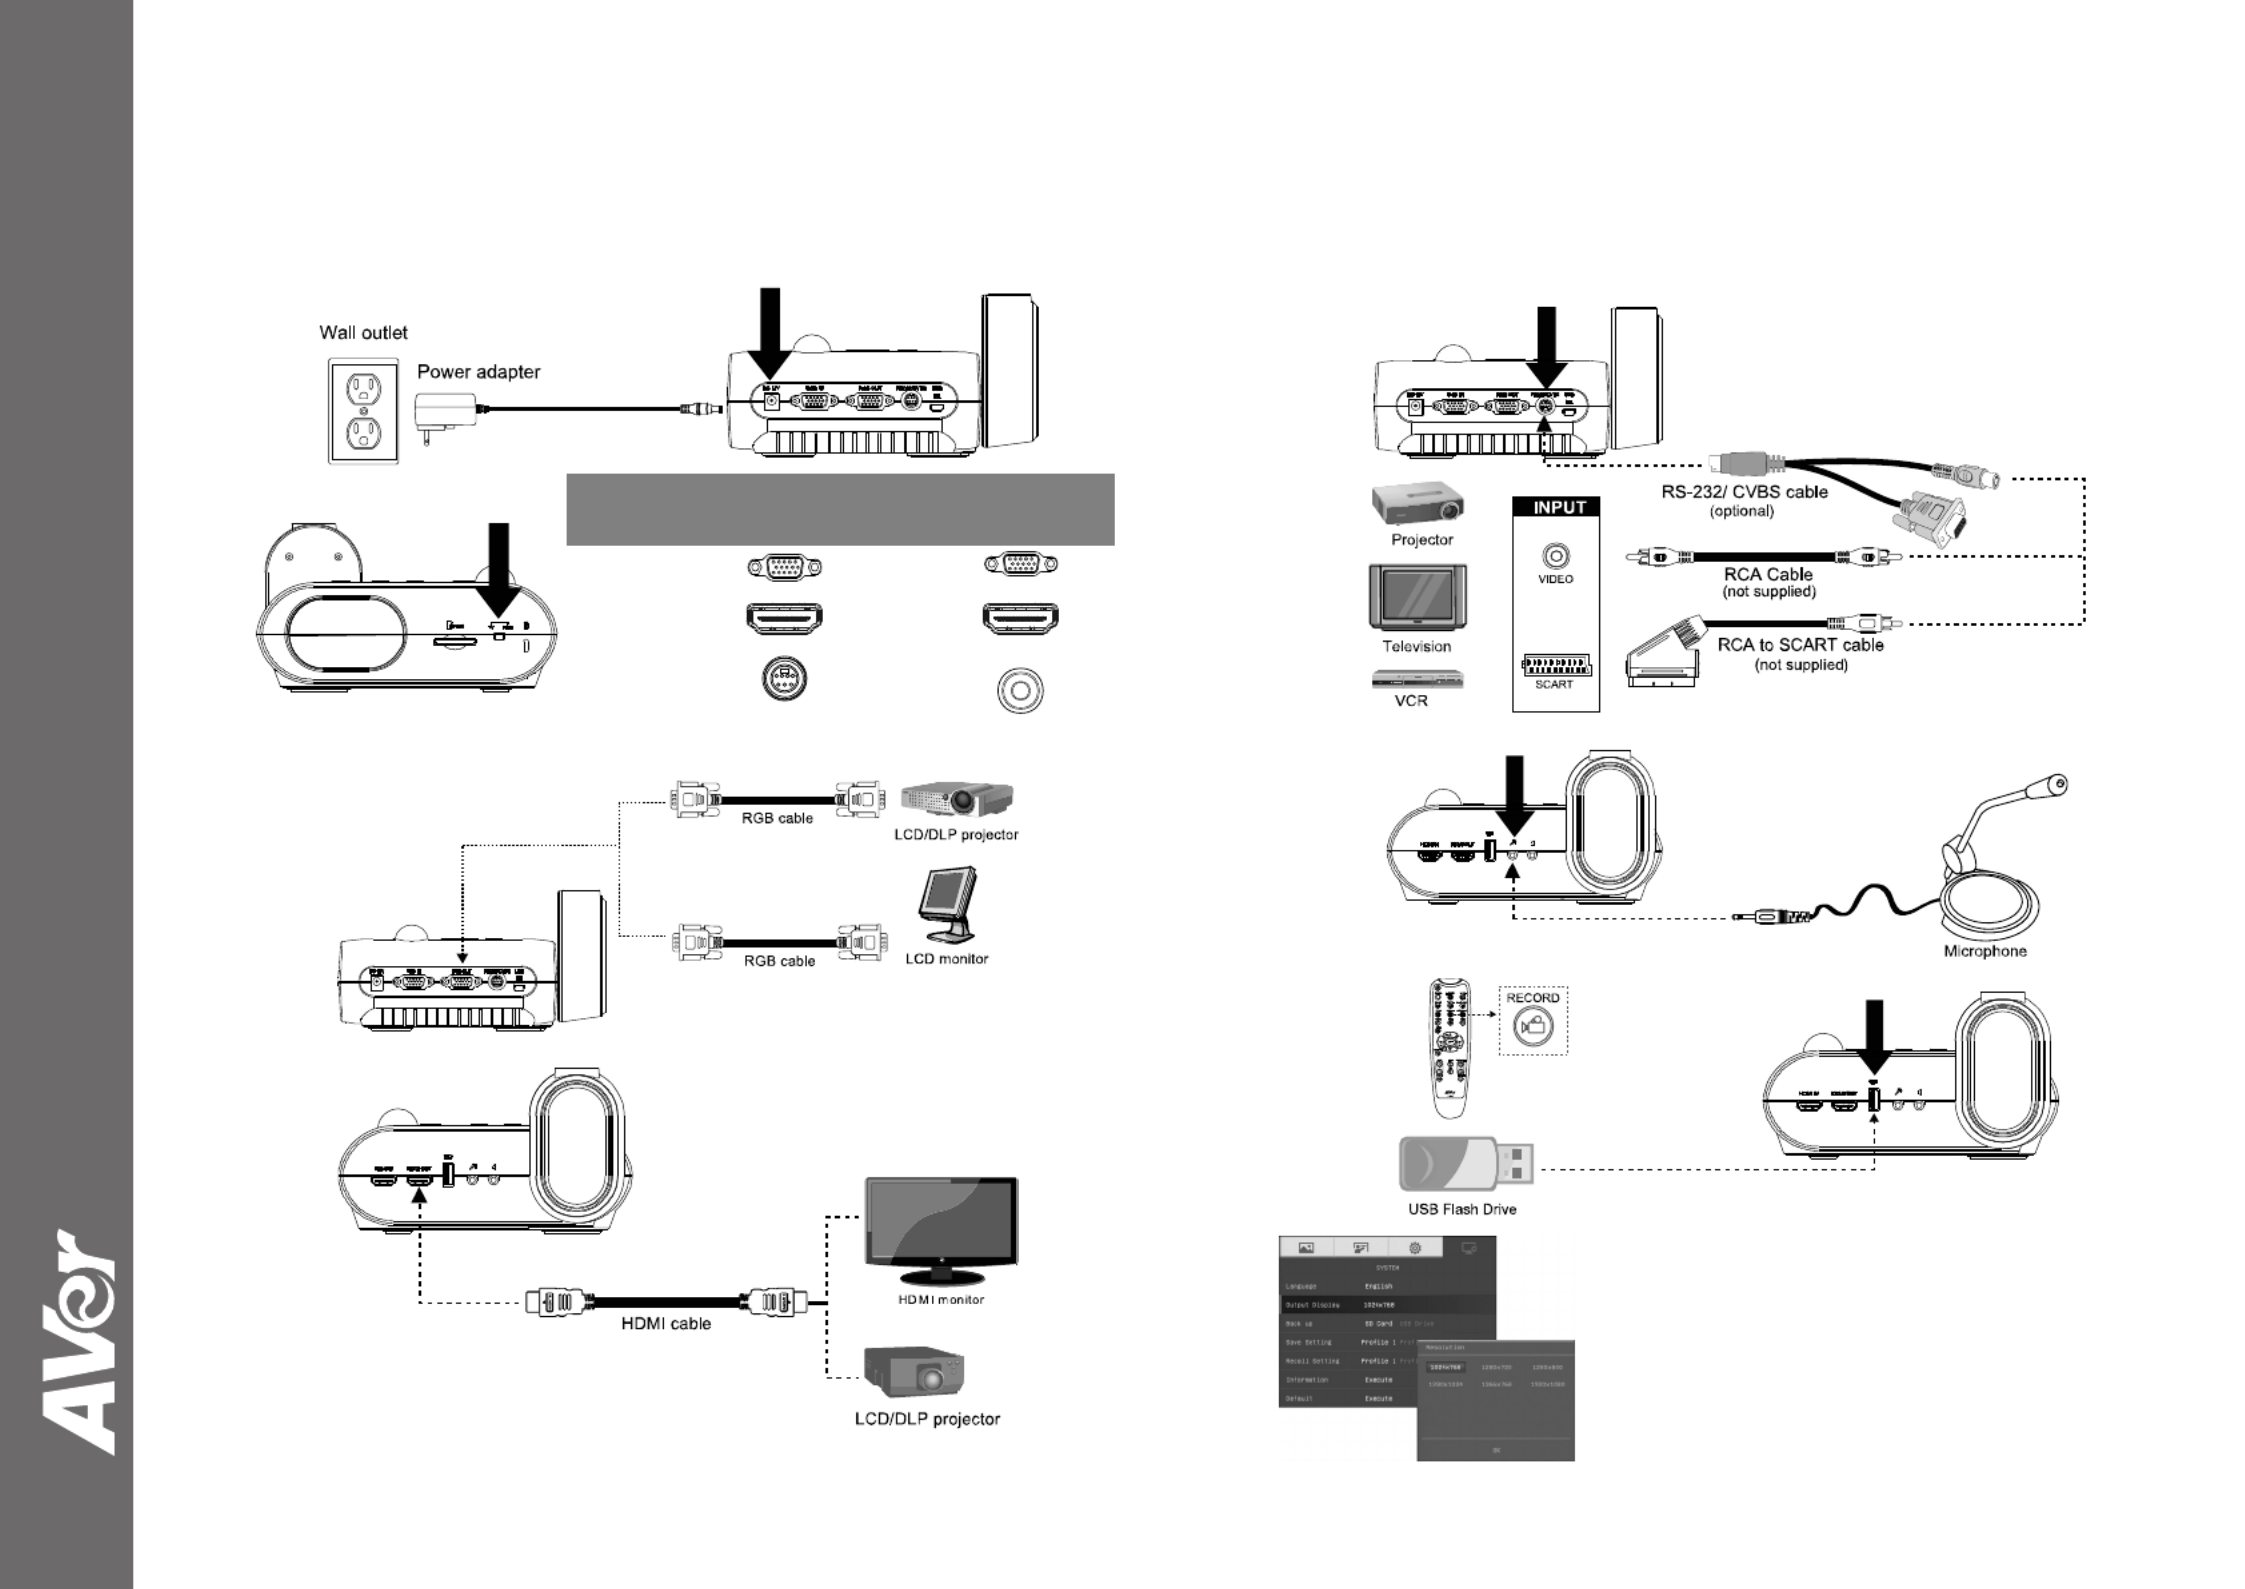
AVerVision F50-8M
Quick Guide
ξ˜ƒ
(1)
ξ˜ƒ
(3-B)
ξ˜ƒ
(2)
ξ˜ƒ
Switchξ˜ƒAVerVisionξ˜ƒξ˜ƒDisplay Deviceξ˜ƒ
A. RGBξ˜ƒξ˜ƒ
RGB OUTPUTξ˜ƒ>ξ˜ƒ
RGB INPUTξ˜ƒ
HDMI OUTPUTξ˜ƒ>ξ˜ƒ
HDMI INPUTξ˜ƒ
B. TVξ˜ƒξ˜ƒ
RS232/CVBS
(use RS-232/CVBS cable) ξ˜ƒ
>ξ˜ƒξ˜ƒ
VIDEO INξ˜ƒ
(3-A)
ξ˜ƒ
ξ˜ƒ
ξ˜ƒ
(4)
ξ˜ƒ
(5)
ξ˜ƒ
(6)
ξ˜ƒ
Output Display
Set the resolution to display the image on screen.
This selection will be disabled in TV output mode.ξ˜ƒ
ξ˜ƒ
ξ˜ƒ
Remote Control
The remote control requires two (2) β€œAAA” size batteries (supplied), make sure batteries are installed
properly before use.
Name Name Function
(18)
(14)
(11)
(7)
(8)
(5)
(2)
(1)
(22)
(13)
(4)
(3)
(15)
(12)
(17)
(23)
(20)
(19)
(9)
(6)
(16)
(10) (21)
(1) POWER Turn the unit on/standby.ξ˜ƒ
(2) CAMERA Camera mode displays the video signal from
the built-in camera.
(3) RECORD Start/Stop audio & video recording. Video
recording can only be saved either in a SD
memory card or a USB flash drive.ξ˜ƒ
(4) CAPTURE Capture still image in Camera mode. In
continuous capture mode, press this button again
to stop.
(5) VISOR Cover part of the presentation screen and allow
presenter to reveal the material as desire.
(6) ROTATE Rotate the image by 0/180Β° in Camera mode and
Playback mode.
(7) MENU Open and exit the OSD menu.
Show a thumbnail size captured picture/video
from the memory at the corner of the screen in
Camera mode.
(8)
β–² β–Ό β—„ β–Ί, , , &
- Pan the image when image is above 10X zoom
in live mode or in playback captured image
mode.
- Move the selection in Playback mode and in
OSD menu.
- Use & to increase and decrease the video
playback volume.
- Use & to play the video backward and
forward.
- Move the Spotlight frame and Visor screen
cover.
(9) AUTO FOCUS Adjust the focus automatically.
(10) ZOOM +/- ‐ Increase/decrease the image magnification in
camera and picture playback mode.
‐ Use to easily page up and page down 16-
thumbnail picture preview.
(11 ) ZOOM 1X Reset zoom level to 100%.
(12) PLAYBACK View the captured picture/video from the memory
in 16-thumbnail images.
(13) PC 1/2 PC mode displays the video signal from the
RGB/HDMI INPUT port of F50-8M.
(14) FREEZE / STOP - Freeze live images.
- Stop video playback.
(15) SPOTLIGHT Call the Spotlight submenu. Spotlight overlays a
box frame on the presentation screen. You can
adjust the box size and move it around.
(16) SPLIT SCREEN Divide the screen into two. One side displays
the live image from the built-in camera and the
other side displays 8-thumbnail size
picture/video from the memory.ξ˜ƒ
ξ˜ƒ
ξ˜ƒ
ξ˜ƒ
Name Function
(17) MODE Select from 6 type of modes:
Sharp - adjust the contrast along the edges making text appear more visible.
Graphics - adjust the gradient of image.
Motion - increase frame rate. Sufficient lighting is required when using this
mode.
Microscope - automatically adjust optical zoom for microscopic viewing.
*Macro - set to view when object is only 5 – 10 cm away from the camera.
*Infinite - set to view when subject is at least 80cm away from the camera.ξ˜ƒ
(18) TIMER Start/Pause/Stop the timer countdown and set the timer duration.
(19) ‐ Make a selection in Playback mode and OSD menu.
‐ Play/Pause video playback
(20) LAMP Turn the overhead light on/off.
(21) BRIGHTNESS +/- Adjust the brightness.
(22) DEFAULT Reset at factory default setting.ξ˜ƒ
(23) DEL Delete the selected picture/video in Playback mode.
OUTPUT
RGB
TV
MENU FREEZE ROTATE LAMP
POWER RECORDING PLAYBACKCAMERA / PC
AUTO FOCUS
Wi - Fi
CAP / DEL
(1)
(24)
(3)
(25)
(8/10)
(19)
(14)
(7)
(6)
(2)
(12)
(9)
(26)
(4/23)
(20)
Name Function
(24) OUTPUT LED Indicate the TV-RGB switch selection to
which port the video signal is sent out.
(25) WiFi LED* ‐ Flashing Blue: Searching WiFi
router or connecting to WiFi router
‐ Solid Blue: Connected to WiFi router
‐ Slow Flashing Blue: Sending
stream to other device/APP
‐ OFF: WiFi function is not activating.
(26) WiFi* Switch between USB mode and WiFi
mode.
In WiFi mode, the LED will light up
(blue). Press WiFi button over 3 seconds
to activate auto search WiFi router.
*(25) & (26) are optional functions.
For User Manual, Software and WiFi functions, please visit the link below.ξ˜ƒ
http://averusa.com/classroom-technology/support/
For Warranty information, please visit the link below.ξ˜ƒ
http://www.averusa.com/classroom-technology/support/warranty.asp
P/N: 300AP0J7-D6V


Product specificaties

Merk: AVerMedia
Categorie: Scanner
Model: F50

Heb je hulp nodig?

Als je hulp nodig hebt met AVerMedia F50 stel dan hieronder een vraag en andere gebruikers zullen je antwoorden


Handleiding Scanner AVerMedia

Handleiding Scanner

Nieuwste handleidingen voor Scanner