Aruba Instant IAP-224 Handleiding
Aruba Access point Instant IAP-224
Bekijk gratis de handleiding van Aruba Instant IAP-224 (2 pagina’s), behorend tot de categorie Access point. Deze gids werd als nuttig beoordeeld door 63 mensen en kreeg gemiddeld 5.0 sterren uit 3 reviews. Heb je een vraag over Aruba Instant IAP-224 of wil je andere gebruikers van dit product iets vragen? Stel een vraag
Pagina 1/2
Aruba Instant
Quick Start Guide
This Quick Start Guide assists you to quickly connect and configure Aruba
Instant. To learn more about Aruba Instant and for detailed configuration
information, see Aruba Instant User Guide.
Getting Started
Unpack and Power on IAP
After unpacking the Instant Access Point (IAP), check the power
requirements and connect the IAP.
Connect
To connect the IAP to your network, plug in a LAN cable to Ethernet port
(on the back side of the device). The Ethernet port LED turns green.
Provision
IAPs can be provisioned automatically, through AirWave or Aruba Central,
or by manually connecting to an existing provisioning network. Based on
your IAP provisioning requirements, use the following methods.
Functional IAP in the Network
To automatically configure an IAP, check if your network has an IAP that is
configured and operational. If you have a configured IAP in your network,
connect the new IAP to the same VLAN or subnet.
Based on the IAP model, you can power on the IAP by using an
AC adapter or Power over Ethernet (PoE). Use the option that
suits your IAP deployment environment.
Aruba AirWave and Aruba Activate
If both Aruba Activate and Aruba AirWave are deployed to manage the
network, wait for the radio LEDs to turn green.
Aruba Central
If you have subscribed for Central:
1.Go to https://portal.central.arubanetworks.com and log in with your
user credentials.
2.Connect your AP to the wired network.
3.Complete the AP configuration through the Central portal.
Instant UI
Instant user interface is a standard web-based interface that allows you to
configure and monitor an IAP network.
To start using the Instant UI, perform the following steps:
1.Using a wireless client, scan the wireless networks and connect to the
instant SSID.
2.Using a web browser, go to http://instant.arubanetworks.com.
3.Log in to the Instant UI with admin and admin as username and
password respectively.
4.If the Country Code window is displayed after a successful login, select
a country from the list.
5.If the Instant UI is used for managing IAPs, proceed to Creating a
Wireless Network. If AirWave is deployed for managing the netwok,
perform the following steps.
a.Click Set Up Now at the bottom of the Instant UI to configure
AirWave. The window appears. System
b.Click the Admin
tab. In the AirWave
section, enter the Shared Key
and AirWave IP details. Contact your local network administrator
to obtain these details.
Creating a Wireless Network
To create a wireless network using the Instant UI, perform the following
steps:
1.From the Instant UI main window, click New under the Networks
section. The New WLAN window appears.
2.In the WLAN Settings tab, enter a name (SSID) for the network. This
name is used for identifying the Network.
3.Click Next. The VLAN tab details are displayed.
4.In the VLAN tab, select the required Client IP assignment
and Client
VLAN assignment options.
5.Click Next. The Security tab details are displayed.
6.In the Security tab, enter a unique passphrase andretype it to
confirm. You can use the default values or customize the security
settings.
7.Click Next. The Access tab details are displayed.
8.In the Access tab, ensure that the Unrestricted access control is
specified.
9.Click Finish. The new network is added and displayed in the Networks
window.
For more information on configuring different types of wireless network
such as Employee, Guest, or Voice, see Aruba Instant User Guide.
Verifying the Operating Status
After setting up an IAP and creating a wireless networks, use the Instant
UI or the LEDs to verify the operating status.
Verifying Status Using LEDs
You can use the LEDs to verify that both radios are active after the AP
initialization and configuration.
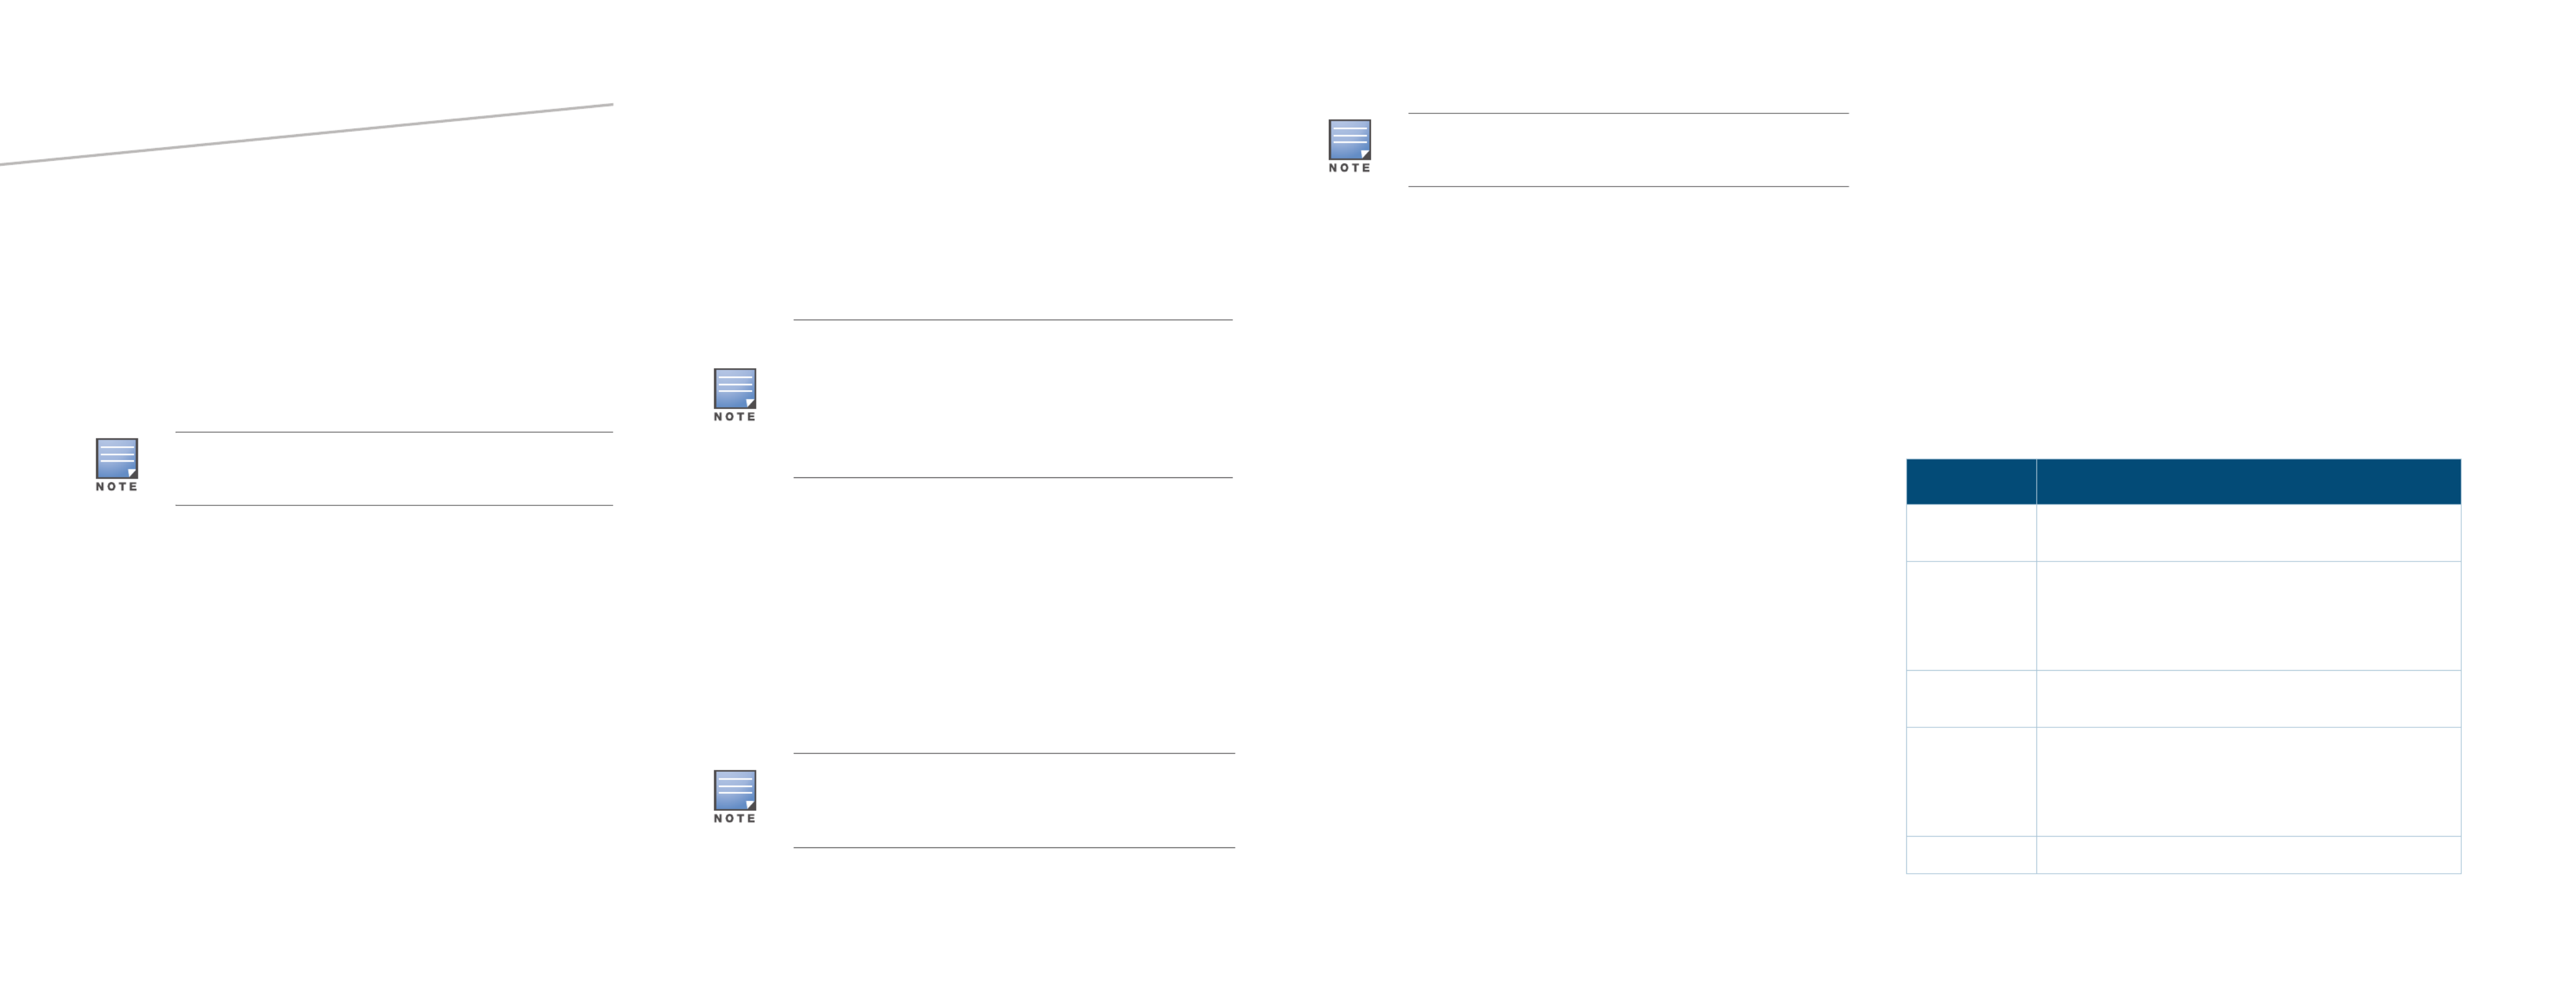
The following table lists the Ethernet ports available on an IAP and the
corresponding status indication:
The IAPs boot with factory default configuration and will try to
provision automatically. If the automatic provisioning is
successful, the instant SSID will not be available. If AirWave and
Activate, or Central are not reachable and the automatic
provisioning fails, the instant SSID becomes available and the
users can connect to a provisioning network by using the
instant SSID.
Aruba recommends that you change the administrator
credentials after the initial configuration. For more information,
see the Management Authentication Settings section in Aruba
Instant User Guide.
The Country Code window appears only when the IAP-ROW
(Rest of World) variants are installed. The country code setting
is not applicable to the IAPs designed for US, Japan, and Israel.
Table 1 Ethernet Ports
IAP ModelEthernet Ports
IAP-134/135ENET0: Indicates uplink connection.
ENET1: Indicates wired downlink connection.
RAP-3WN/3WNPE0: Indicates uplink connection
E1 and E2: Indicate wired downlink connection.
NOTE: The E2 port on RAP-3WNP supports Power Sourcing
Equipment (PSE) to supply power to any compliant 802.3af
powered (class 0-4) device.
RAP-108/109ENET0: Indicates uplink connection.
ENET1: Indicates wired downlink connection.
RAP-155/155PE0: Indicates uplink connection
E1, E2, E3, and E4: Indicate wired downlink connection.
NOTE: The RAP-155P supports PSE for 802.3at powered
device (class 0-4) on one port (E1 or E2), or 802.3af powered
DC IN (Power Socket) on two ports (E1 and E2).
IAP-204/205ENET: Indicates uplink connection.
Product specificaties
| Merk: | Aruba |
| Categorie: | Access point |
| Model: | Instant IAP-224 |
Heb je hulp nodig?
Als je hulp nodig hebt met Aruba Instant IAP-224 stel dan hieronder een vraag en andere gebruikers zullen je antwoorden
Handleiding Access point Aruba

20 Augustus 2024
19 December 2023
19 December 2023
30 Mei 2023
25 Mei 2023
25 Mei 2023
8 Mei 2023
7 Mei 2023
29 April 2023
23 April 2023
Handleiding Access point
Nieuwste handleidingen voor Access point
20 Mei 2026
19 Mei 2026
25 April 2026
6 April 2026
13 Maart 2026
13 Maart 2026
13 Maart 2026
13 Maart 2026
12 Maart 2026
6 Maart 2026