Alcatel Versatis D300 Handleiding
Bekijk gratis de handleiding van Alcatel Versatis D300 (2 pagina’s), behorend tot de categorie HŰTŐK. Deze gids werd als nuttig beoordeeld door 43 mensen en kreeg gemiddeld 4.1 sterren uit 3 reviews. Heb je een vraag over Alcatel Versatis D300 of wil je andere gebruikers van dit product iets vragen? Stel een vraag
Pagina 1/2
Speakerphone Operation
NOTE: If you are using the speakerphone, remain close to handset so the party
you are speaking to can hear you.
To switch the speakerphone on or off during a call, press the TALK/speaker button.
When the speakerphone is on, the speaker symbol appears on handset
display.
Press the TALK/speaker button again to switch from speakerphone to earpiece mode.
Press the END button to end conversation.
Making a Call
1. Press the TALK/speaker button. Dial the desired number.
- OR -
Dial the number first, press the TALK/speaker button.
- OR -
Press the Navigation ( or ) button to select the desired record, press the
TALK/speaker button.
2. When finished, press the END button to end conversation.
NOTE: You may enter up to 24 pre-dial digits.
NOTE: If you want to delete the pre-dial number you entered, press the C/int/conf
button until all of the digits are erased.
Answering a call
1. Pick up the handset and press the TALK/speaker button.
2. When finished, press the END button to end conversation.
NOTE: Adjust the handset volume by pressing the Navigation ( or ) button
during a call.
Call Timer
After you press the TALK/speaker button on the handset, the built-in call timer
shows on the display after 20 seconds and counts the length of time of the call in
minutes and seconds.
Auto Standby
If you place the handset in the cradle while the handset is off the hook (during
a call), the call is automatically disconnected.
Ringer Volume (Shortcut)
There are two ways to set the ringer volume. One is the traditional way as
described in the Programming Functions; Sound Setup; Ringer Volume menus.
The other one is this short cut to ringer menu.
1. Make sure the phone is OFF (not in TALK mode).
2. Press the #pause/ringer button to display RING VOLUME 5.
CAUTION
RISK OF ELECTRICAL SHOCK, DO NOT OPEN
Telephone Operation
Handset layout
Base layout
Precaution:
The quality of communication depends on the location and environment of the
base and the handset. Your Versatis D300 telephone must be kept away from
sources of excessive heat (radiators, direct sunlight, etc.) and protected
against vibrations and dust. Never allow your telephone to come into contact
with water or other liquids or with aerosols. To reduce the risk of interference
and optimize reception, take particular care to keep it away from the
immediate vicinity of windows, large metal objects, reinforced concrete,
televisions, music centre, halogen lamps or heating devices, fluorescent
lighting, burglar alarms, microwave ovens, computers, etc. To clean your
Versatis D300, use a lightly moistened antistatic cloth.
Information for DECT product:
Your Versatis D300 telephone is compliant with the DECTTM* standard. It is designed
to transmit and receive telephone calls and be connected to the certain public
telephone network.
Safety
In the event of danger, the mains adapter acts as 100-240V power isolating
device. It should therefore, as a precaution, be installed close to the appliance
and be easily accessible. If the mains adapter fails, it must be replaced by an
identical model. If not connected to the mains power or if there is a mains
power failure, installations with cordless handsets will no longer work. You
will then be unable to make or receive calls in the event of an emergency.
This is why we recommend that you also have a conventional telephone as
a backup. The appliance is designed for connection to an analogue
telephone line class TRT3 (telecommunications network voltage).
! Do not use your telephone to notify a gas leak when you are in the
vicinity of the leak.
It is recommended that you avoid using this device during electrical storms.
Thomson Telecom hereby declares that the Versatis D300 conforms to the essential
requirements and other applicable provisions of European directive 1999/5/CE.
It is recommended read the USER GUIDE before using the equipment for
the first time.
IMPORTANT: In order to use this unit, you must subscribe to either the
standard Name/Number Caller ID Service.
IMPORTANT: Because cordless phones operate on electricity, you should
have at least one phone in your home that isn’t cordless, in case the power
in your home goes out.
WARNING:
TO PREVENT FIRE OR ELECTRICAL SHOCK HAZARD, DO NOT EXPOSE THIS
PROCUCT TO RAIN OR MOISTURE.
THE LIGHTING
FLASH AND ARROW
HEAD WITHIN THE
TRIANGLE IS A
WARNING SIGN
ALERTING YOU
OF “DANGEROUS
VOLTAGE” INSINDE
THE PRODUCT.
CAUTION: TO REDUCE THE
RISK OF ELECTRICAL SHOCK,
DO NOT REMOVE COVER
(OR BACK). NO USER
SERVICEABLE PARTS INSIDE.
REFER SERVICING TO
QUALIFIED SERVICE
PERSONNEL.
THE EXCLAMATION
WITHIN THE
TRIANGLE IS
WARNING SIGN
ALERTING YOU OF
IMPORTANT
INSTRUCTIONS
ACCOMPANYING
THE PRODUCT.
SEE MARKING ON BOTTOM / BACK OF PRODUCT
Battery Safety Precautions
• Do not burn, disassemble, mutilate, or puncture. Like other batteries of this
type, toxic materials could be released which can cause injury.
• To reduce the risk of fire or personal injury, use only the battery listed in
User’s Guide.
• Keep batteries out of children.
• Remove batteries if storing over 30 days.
Danger of explosion if battery is incorrectly replaced. CAUTION:
Replace only with rechargeable SANIK Ni-MH AAA 1.2V/550mAh
battery or equivalent in the handset. Only use rechargeable batteries with
exactly the same specifications as those supplied with the product. Using
non-rechargeable or non-conforming batteries can damage the product.
The batteries could split or leak if incorrectly inserted, opened or exposed
to heat. Never dispose of batteries in a fire: the cell could explode.
Check with local code for possible special disposal instruction.
Installation and set-up
Fit the rechargeable batteries in the cordless handset.
1. Install the AAA batteries (Brand name: SANIK, Capacity: Ni-MH 1.2V/550mAh)
into handset in accordance with the polarity marked in the battery compartment.
2. Close the battery compartment cover, sliding it into place and pressing firmly to
make sure it is secure.
Note: Don’t use non-rechargeable batteries in the handset. They may burst,
causing damage.
Connecting AC (electrical) power
1. Plug the base power adaptor (Manufacturer: Thomson, Type:
IW506E, 100-240Vac/6Vdc/500mA) cord into the power jack on the bottom of
the base and the other end into a 100-240Vac 50-60Hz electrical outlet.
2. Connect telephone line cord into the phone jack on rear panel of the base and
the other end into a main socket, Plug the charger power adaptor
(Manufacturer: Thomson, Type: IW156E, 100-240Vac/6Vdc/150mA)
cord into the power jack on rear panel of charger and the other end into a
100-240Vac 50-60Hz electrical outlet.
Connecting charger power adaptor
1. Plug the charger power adaptor (put here the reference of power adaptor) into
the power jack of the charger and the other end into a 100-240 Vac 50-60Hz
electrical outlet
Before you use the cordless handset for the first time, it’s important to charge
the batteries fully.
The charge/in use indicator will remain lit when a handset is in the base charging.
otherwise the batteries will not be charged.
Leave the handset on the charging cradle for 12 hours.
The battery charge level symbol should increase by one bar every half hour
when you're charging an empty battery. If you think that the symbol isn't
showing the correct battery charge level, first check that the handset is
correctly positioned in the charging cradle. If you’re sure that it is, remove and
refit the batteries. Please note that it's normal for the mains adapter to become
warm this doesn't indicate a fault.
Use only the Thomson Telecom power supply that came CAUTION:
with this unit. Using other power supplies may damage the unit.
Base adaptor type is ; IW506E, 100-240Vac/6Vdc/500mA
Charge adaptor is IW156E, 100-240Vac/6Vdc/150mA.
Before you begin
Electrical safety
1. Don’t let the base unit or charger gets wet. Electrical equipment can cause
serious injury if used while you are wet or standing in water.
2. If the base unit or charger ever falls into water, don’t retrieve it until you
have unplugged the power lead from the mains and the telephone line plug
from the telephone socket (base unit only); then pull it out by the unplugged
cables.
3. Never use your cordless handset outdoors during a thunderstorm ― unplug
the base unit from the telephone line and the mains socket when there are
storms in your area. Damage caused by lightning is not covered by the
guarantee.
Interference
If the sound quality gets worse as you move around while on a call, this is
probably caused by interference between the handset and the base unit,
perhaps because you are too near to another phone or other electrical
equipment. Move to a different position to clear the interference. If you do not
move, your call may be cut off.
Note: Radio interference in the environment may occasionally cause a short break
in the link between the handset and the base unit while you are on a call.
The handset’s display will flash briefly, while the unit automatically restores the link.
Out of range warning
If you hear a warning tone during a call, and the sound in the earpiece
becomes faint or distorted, you may be going out of range of the base unit.
Move nearer to the base unit within 20 seconds, until the warning tone stops.
Otherwise, your call may be cut off.
Parts Checklist (for Versatis D300 model)
Make sure your package includes the items shown here.
For Model Versatis D300 Duo there will be ONE additional handset, charge cradle,
belt clip, cover and two battery cells than shown above.
For Model Versatis D300 Trio there will be TWO additional handsets, charge cradles,
belt clips, covers and four battery cells than shown above.
- SIGNAL STRENGTH icon (blinking when no or weak
signal strength)
- SPEAKERPHONE active
- Voice Mail icon
- Handset ringer off/DND active
- Alarm clock on
- CALLER LIST active
- BATTERY INDICATOR icon
3. Use the Navigation ( or ) button to scroll to your selection. RING VOLUME 5
is the default setting.
4. Press #pause/ringer button again to save and display the new selection for a
few seconds.
Flash
Press the R button to access line transfer offered by call waiting provided by
Telephone Company.
Mute the Microphone
To have a private, off-line conversation, use the MUTE feature. The party on the
telephone line cannot hear you, but you can hear them.
1. Press the mute/menu ok button when you are talking, The handset display
shows MUTE ON.
2. Press the mute/menu ok button to cancel and return to your phone conversation.
Last Number Redial
You may redial a number up to 16 digits long. To quickly redial the last number
you dialed:
1. Press the talk/speaker button.
2. Press the redial button.
-OR
Press the redial button first, then use the Navigation ( or ) button to select
the desired redial number.
- Press the Navigation () to review the oldest call and scroll toward the most
recent calls (higher numbers).
- Press the Navigation () to review the newest call and scroll to older calls
(lower numbers).
NOTE: You may choose from the last five numbers that were dialed.
- Press the talk/speaker button. The number dials automatically.
If you get a busy signal and want to keep dialing the number, press the redial
button to quickly redial the number.
Exit
Press the end button to exit a menu function and return to the standby mode.
Page
The page feature helps you locate a misplaced handset. To send and receive
pages, all handsets must be registered. If your handset is not registered, follow
the instructions in the Registration section of this manual.
Charge/In use Indicator on Base
The charge/in use indicator on the base will flash to alert you to an incoming
call, during paging, or if you have a message waiting from your service
provider. The indicator will remain lit when a handset is in the base charging
or when the line is inuse.
IMPORTANT: In order to use this unit’s Visual Message Waiting Indicator
(VMWI) feature, you must subscribe to this service from your phone company.
Keypad lock
To lock the cordless handset’s keypad:
1. Press and hold [*] button for 2 seconds until KEYPAD LOCKED shows on
the display.
If you press the keypad, PRESS AND HOLD * TO UNLOCK shows in the display.
To unlock the keypad:
1. Press and hold [*] button for 2 seconds until you hear a beep tone.
Paging from Base/group page
Use the base to page all registered handsets at the same time.
1. Press the page button on the base. All handsets beep for two minutes, and
FIND HANDSET shows on each handset’s display.
2. To cancel the page, press the page button on the base, or press the talk or the
end button on each handset.
Receiver Volume Control
When the handset is ON (in talk mode) you may adjust the receiver volume
by pressing the Navigation ( or ) button.
There are five volume levels to choose from. When the maximum or minimum
volume level is reached, the phone beeps twice. VL 1 is minimum and VL 5 is
maximum.
Do Not Disturb (D-N-D)
This feature allows you to turn off all the handset ringer(s) at once, by pressing
one button at the base unit, even though the ringer volume of handset(s) has
been preset.
1. In the standby mode, press the do not disturb button on the base.
2. The DND indicator will light and DO NOT DISTURB icon shows in each
handset display.
3. To cancel, press the do not disturb button again.
NOTE: You can press the do not disturb button and activate the function
immediately, even when there is incoming call ringing in, or during call screening
after the call is taken by the answerer.
Phone Book
You can store up to fifty records in phone book for quick dialing; each record can
contain a maximum of 20-digit numbers and 14-character names.
Review Records
1. Make sure the phone is OFF (not in talk mode).
2. Press the mute/menu ok button to go to main menu.
3. Use the Navigation ( or ) button to scroll to PHONE BOOK.
4. Press the mute/menu ok button to access the phone book sub-menu.
5. Use the Navigation ( or ) button to scroll to VIEW RECORDS.
6. Press the mute/menu ok button to confirm, all records are shown in
alphabetical order.
7. Press the Navigation ( or ) button or key in alphabet to view the records.
Add Records
From Phonebook sub-menu:
1. Use the Navigation ( or ) button to scroll to ADD RECORDS.
2. Press the mute/menu ok button to confirm, ENTER NAME shows on the display.
3. Use the touch-tone pad to enter a name (up to 14 characters). More than one
letter is stored in each of the number keys. For example, to enter Bill Smith, press
the key 2 twice for the letter B. Press the 4 key 3 times for the letter I. Press the
5 key 3 times for the letter L. Press the 5 key 3 times for the second letter L, and
press the 1 key to insert a space between the first and last name. Press the 7 key
4 times for the letter S; press the 6 key once for the letter M; press the 4 key 3
times for the letter I; press the 8 key for the letter T; press the 4 key twice for the
letter H.
NOTE: If you make a mistake press the C/int/conf button to backspace and erase
the wrong character(s) or number(s).
4. Press the mute/menu ok button again to save your selection. The display shows
ENTER NUMBER.
5. Use the touch-tone pad to enter the telephone number (up to 20 digits,
including pauses), and press the mute/menu ok button to confirm, the screen
displays DEFAULT, 1 OF 10.
6. Use the Navigation ( or ) button to scroll to the desired melody.
NOTE: DEFAULT means to select current ring for this phone record.
7. Press the mute/menu ok button to save your selection, you will hear a
confirmation tone.
NOTE: The records are stored alphabetically in the phone book.
Key assignment overview
Key Capital letter
1 Space1_-+=@
2 ABC2ÄÅÆÇ
3 DEF3ÉD
4 GHI4FGWP
5 JKL5YSqX'
6 MNÑO6Ö(Ø
7 PQRS7b
8 TUV8Ü"
9 WXYZ9)
0 0$&%/£¥€
* *.,;:?!¡¿§#<Λ
# toggle between upper and lower case
Inserting a Pause
Press the #pause/ringer button on the handset’s touch tone pad to insert a
delay in dialing sequence when a pause is needed to wait for a dial tone
(for example, after you dial 9 for an outside line, or to wait for a computer
access tone.) Each pause counts as one digit in the dialing sequence.
Handset display icons
Telephone Jack Requirements
To use this phone, you need an RJ11C type modular telephone jack, which might
look like the one pictured here, installed in your home. If you don’t have a modular
jack, call your local phone company to find out how to get one installed.
Modular
telephone line
jack
Wall plate
Menu structure (Handset)
1. Phone book
View Records
Add Records Enter Name Enter number
Edit Records
Delete Records Delete?
2. Room Monitor Extention?Room Monitor
3. ON Set Alarm TimeAlarm Clock
OFF
4. Initial Setup
Handset Name
Date and Time
Area Code Set Area Code
Language English French Russian
Greek Romanian
Polish Bulgarian
Auto Talk NO
YES
Registration
Deregistration
Change PIN
5. Sound Setup
Ringer Tone 1 of 10
Ringer Volume Ringer Volume 5
Key Tone ON
OFF
Equalizer Natural
Bass
Treble
6. Dialing Setup
Direct MEM Key 1 Key 2 Key 3
Flash Time Short Med Long
Prefix Memory Set prefix ------
Call Barring Enter PIN code
ON Call barring 1,2,3,4
OFF
Tone/Pulse
7. Reset Settings
Voicemail
All Settings
User’s Guide
Alcatel Logo and Alcatel name are trademarks of Alcatel and used under license
by Thomson Telecom.
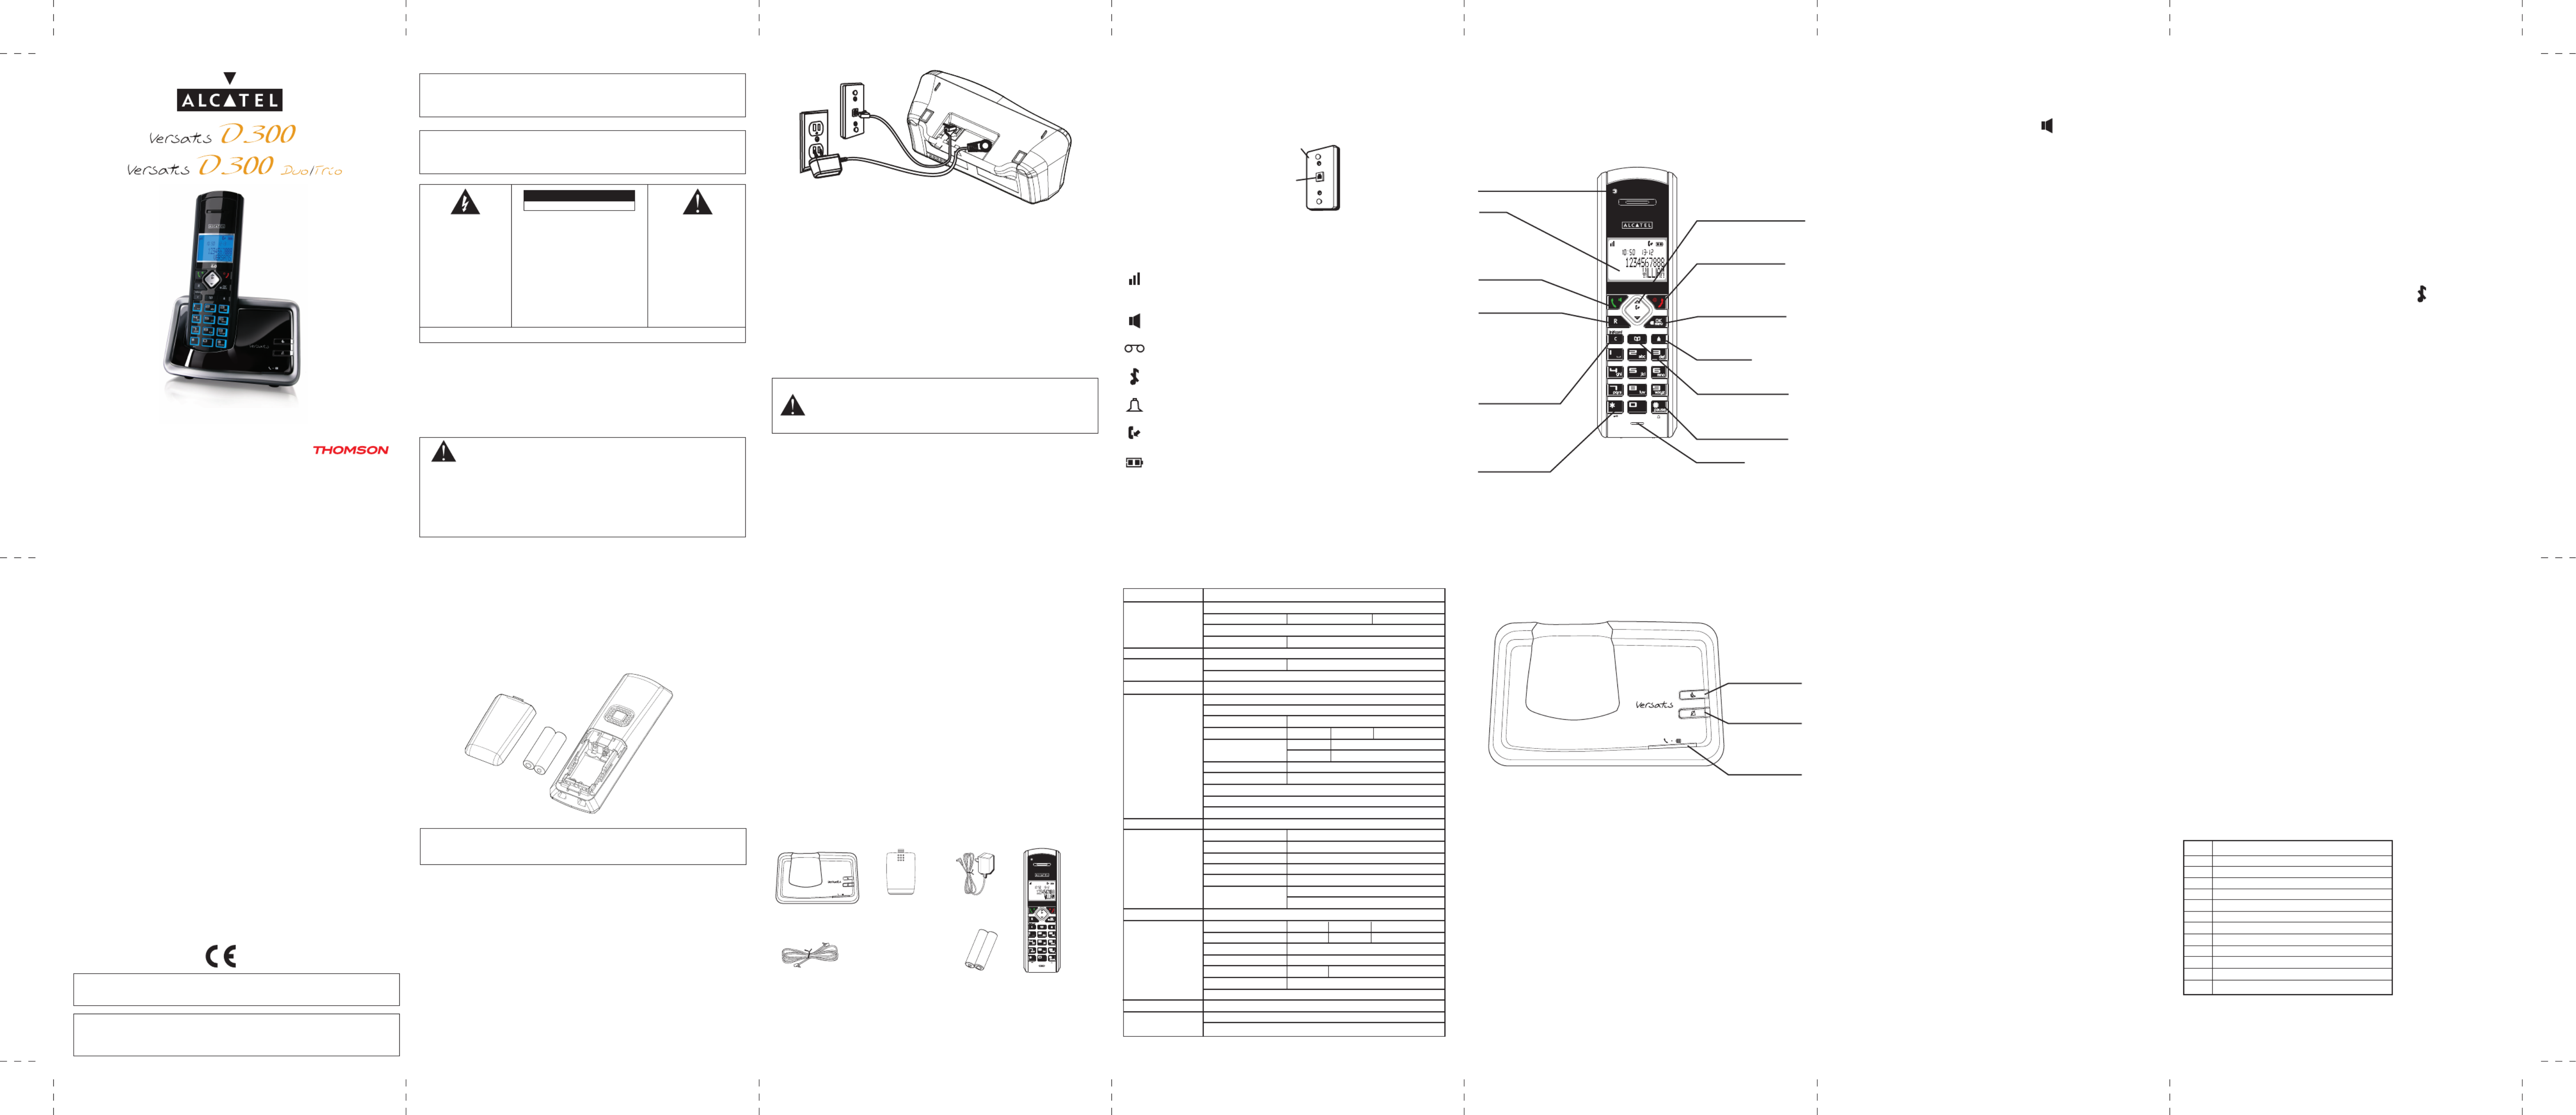
charge/in use
indicator
PAGE button
- Search handset
- Register handset
do not disturb
button
Base
Telephone line cord
Battery
compartment
cover
AC power
adaptor
Handset
Two AAA
battery cells
NAVIGATION button
- Up to increase volume
and view CID
- Down to decrease volume
END button
- End a call/reject a call
- Cancel a menu entry
menu ok/Mute button
- Access to main menu
- Select a menu entry
- Mute the microphone
Redial button
Phone book button
- Access to phone book
[#] button
- Long press to activate
ringer volume
Microphone
Display
TALK button
- Make a call
- Accept a call
- Switch to speakerphone
mode
R button
- Flash the phone line
C/int/conf button
- Backspace the digit (s)
or character (s)
- Press to activate
internal call
- Press to activate 3
way conference call
[*] button
- Long press to activate
or deactivate the key lock
- Temporary change to
tone mode
Voice mail waiting indicator
(VMWI) / visual ringer
Tomson Telecom
1 Rue Jeanne D’arc
92443 Issy Les Moulineaux
France
Product specificaties
| Merk: | Alcatel |
| Categorie: | HŰTŐK |
| Model: | Versatis D300 |
Heb je hulp nodig?
Als je hulp nodig hebt met Alcatel Versatis D300 stel dan hieronder een vraag en andere gebruikers zullen je antwoorden
Handleiding HŰTŐK Alcatel

6 September 2025
12 Mei 2025
12 Mei 2025
12 Mei 2025
11 Mei 2025
9 Mei 2025
9 Mei 2025
9 Mei 2025
20 Februari 2025
16 November 2024
Handleiding HŰTŐK
Nieuwste handleidingen voor HŰTŐK
7 Mei 2026
6 April 2026
2 April 2026
31 Maart 2026
31 Maart 2026
25 Maart 2026
23 Maart 2026
22 Maart 2026
14 Maart 2026
9 Maart 2026