Alcatel Temporis 55 Handleiding
Bekijk gratis de handleiding van Alcatel Temporis 55 (4 pagina’s), behorend tot de categorie HŰTŐK. Deze gids werd als nuttig beoordeeld door 5 mensen en kreeg gemiddeld 5.0 sterren uit 6 reviews. Heb je een vraag over Alcatel Temporis 55 of wil je andere gebruikers van dit product iets vragen? Stel een vraag
Pagina 1/4
TEMPORIS 55-EXTEMPORIS 55-EX
DESK
DESK
DESK
DESKDESK
WALL
WALL
WALL
WALLWALL
Make sure your package includes the items:
INTRODUCTION
Your Caller ID phone stores and displays specific information, provided by your
local telephone company, to subscribers of Caller ID or similar caller
identification services.
FSK/DTMF Caller ID auto detect
Incoming call log records up to 68 calls
Outgoing call log records up to 15 last dialed numbers
10 two-touch memories
On hook pre-dialing
Prefix Code
Redial
Pulse or Tone dialing mode
Mute function
Speakerphone
M FAIN EATURES
Your Caller ID phone enables you to:
Identify callers before you answer the phone.
View the time and date of each incoming call.
Record up to 68 Caller ID messages sequentially.
To get the most from your new phone, you are suggested to take a few
minutes right now to read through this user guide.
SHORT GLOSSARY OF TERMINOLOGY USED IN THIS MANUAL
Hook switch. The part of the phone that pops up to activate the phone line
when the handset is lifted from the base.
Off-hook.A term used to describe the phone in its active mode when the
handset is off of the base cradle or when the SPEAKERbutton is pressed.
On-hook. A term used to describe phone in an inactive mode.the
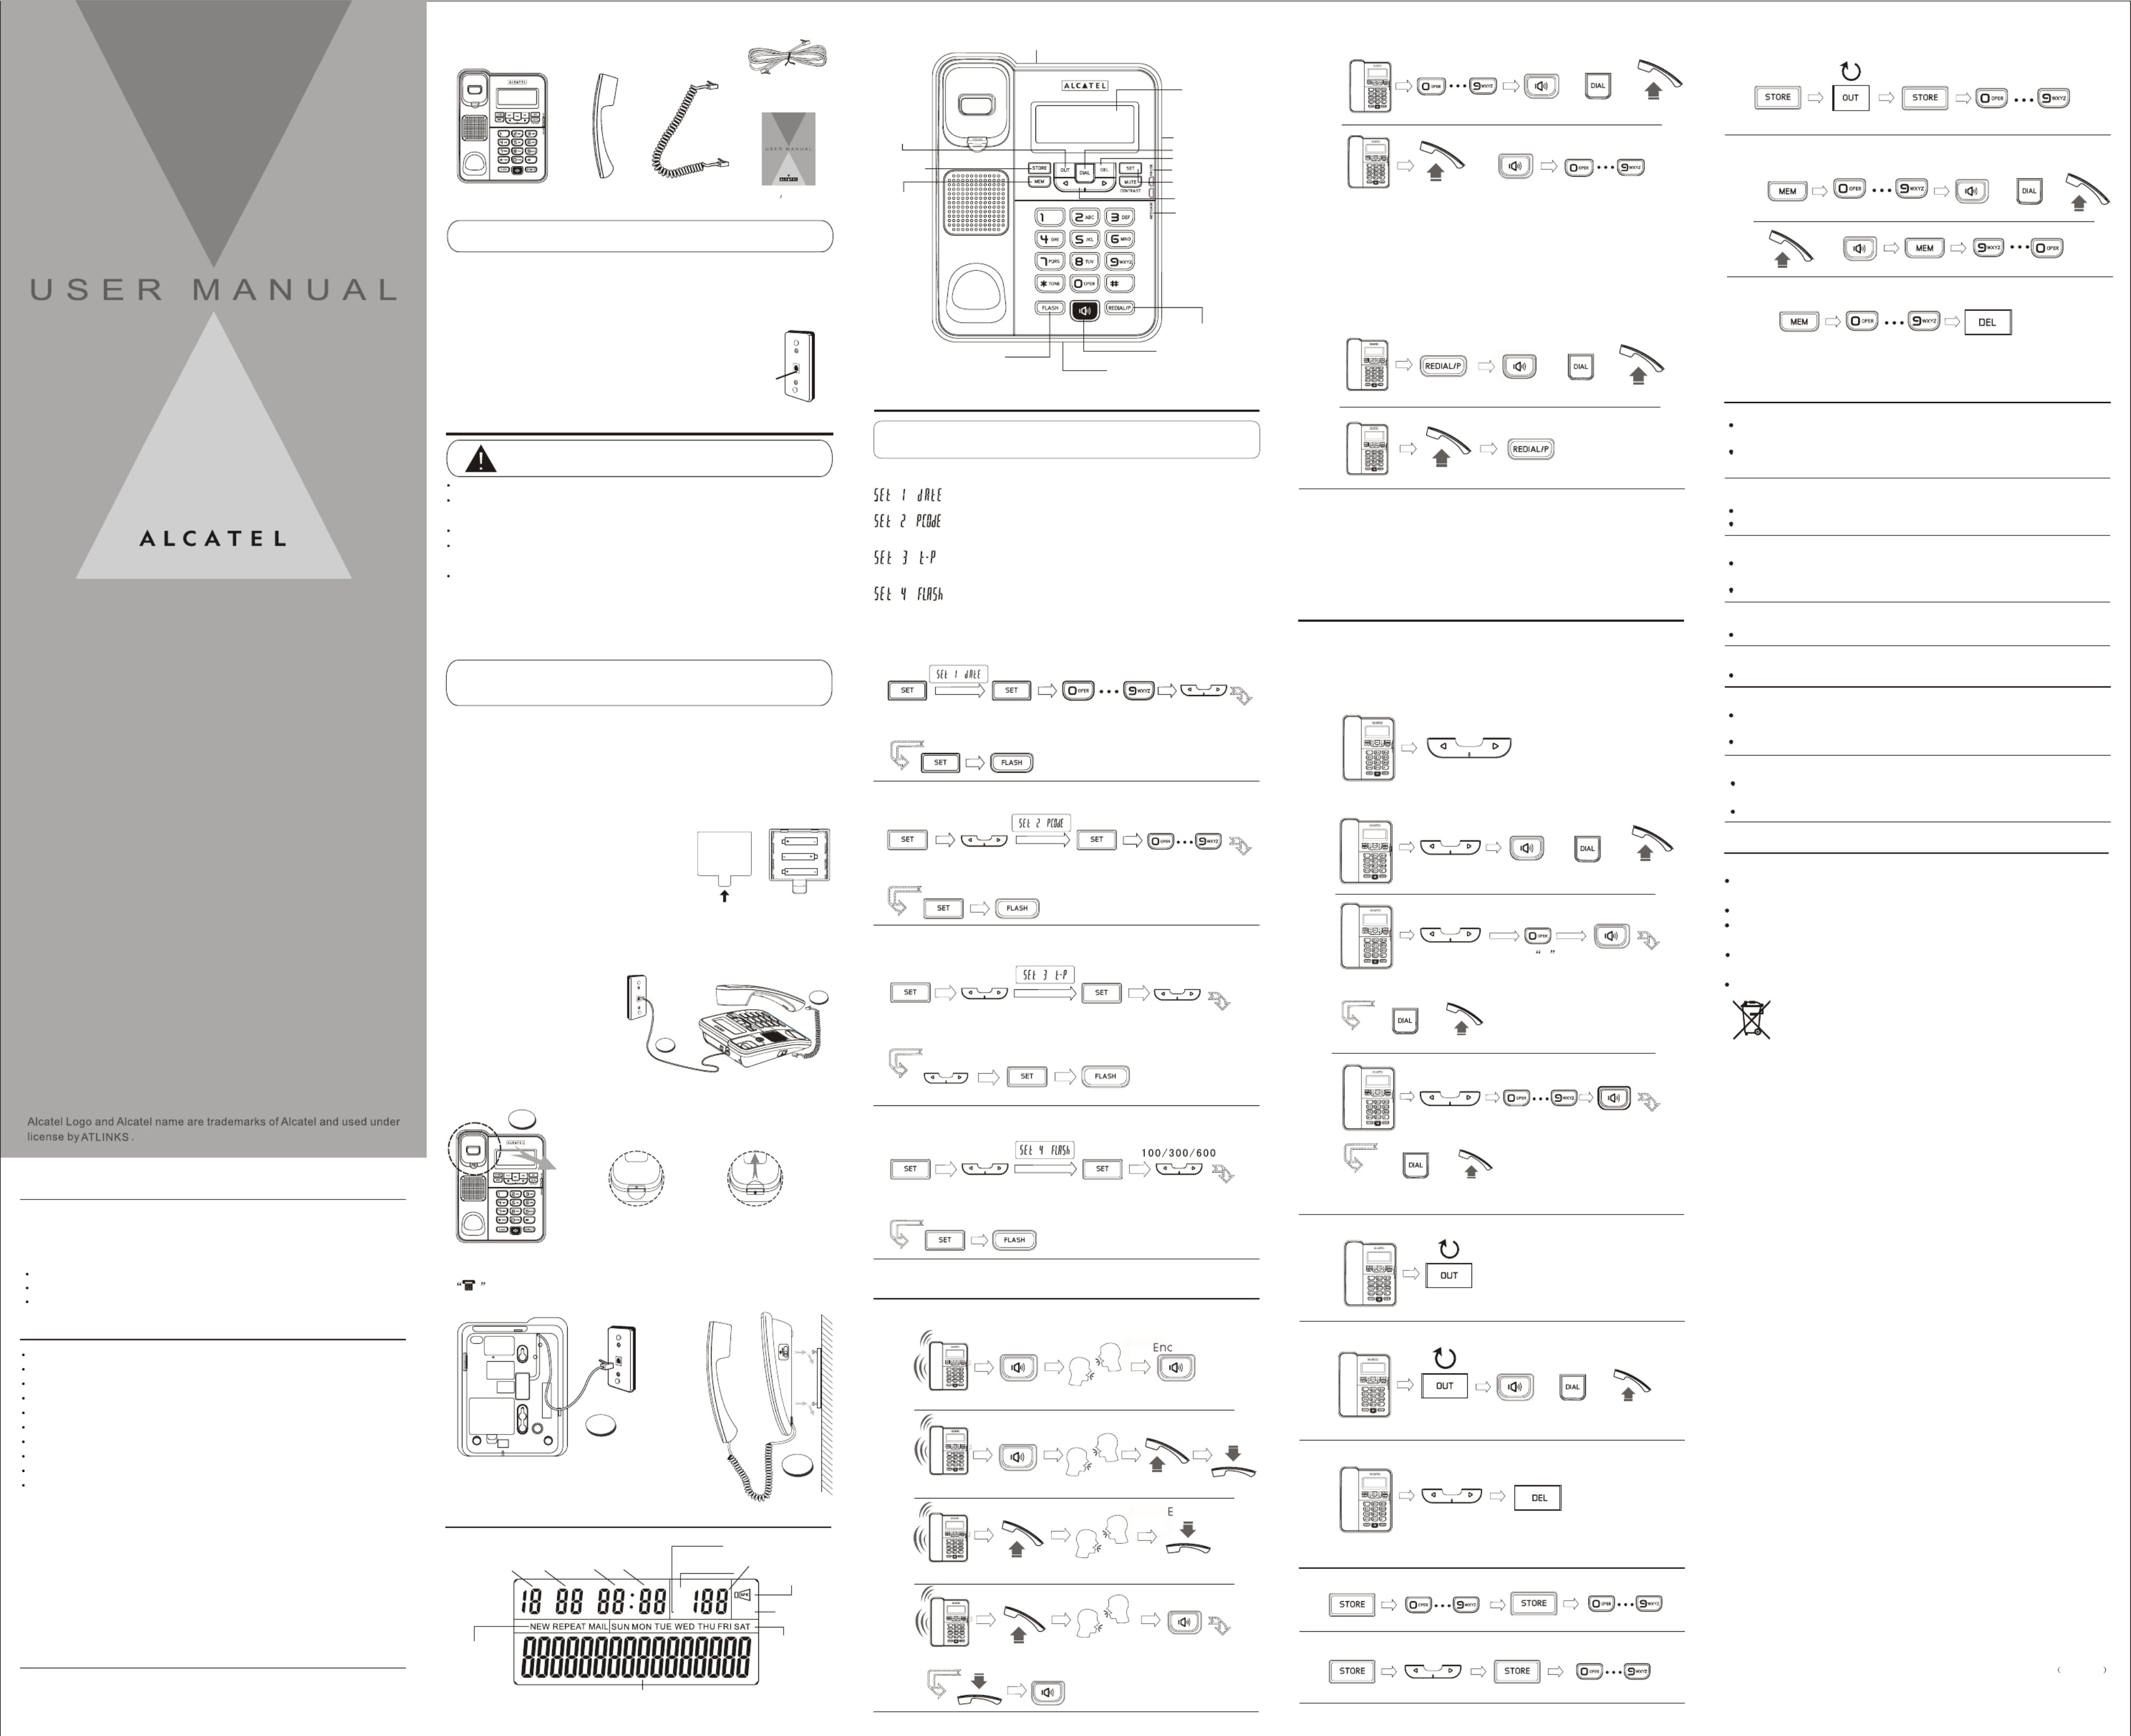
P CARTS HECKLIST
NOTE: If you find any of the parts missing, please contact your local
shop where you buy this product right away.
Base HandsetCoil cord
Modular
telephone
line jack
Wall plate
To use this phone, you need a RJ11C type modular
telephone jack, which might look like the one pictured
here, installed in your home. If you don't have a jack,
call your local phone company to find out how
to get one installed.
TELEPHONE JACK REQUIREMENTS
Line cord
Users Guide
TEMPORIS 55-EX
TEMPORIS 55-EX
O MPTIONS ENU
Outgoing call
3
2
INSTALLING THE PHONE
Your phone should be placed on a level surface, such as a desk or t
able top, or you can mount it on a wall.
BATTERY
1. If the telephone line cord is connected, disconnect it from the base unit.
2. Carefully turn over the phone, use a pen or paper clip to loosen the
battery cover. Open the battery compartment by pushing on the battery
cover and sliding it away from the unit.
3. Insert 3 AA-size alkaline batteries (not included) as shown
on the diagram in the battery compartment.
4. Snap the battery compartment door back
into place.
5. If the line cord was previously connected,
reattach it to the unit and check your
memory locations.
Wall mounting knob
location 0
Rotate 180
WALL MOUNTING: The knob is designed to keep this
unit in place when the telephone is vertical on the wall.
2. Install the base unit to the wall and then plug one end of line cord into the
junction box and the other end into modular telephone line jack marked
.
3. Fix the telephone in the wall as the following layout.
WALL MOUNTING
1.Rotate the wall mounting knob as shown in the following layout:
1. Connecting the handset.
2. Connecting the telephone line.
IMPORTANT: If you are not going to use the telephone for more
than 30 days, remove the batteries because they may leak and
damage the unit.
INSTALLATION
CAUTION:Disconnect the phone cord from the wall outlet
before installing or replacing the batteries.
Never install telephone wiring during lightning storm.
Never touch un-insulated telephone wires or terminals, unless the
telephone line has been disconnected at the network interface.
Use caution when installing or modifying telephone lines.
Never install telephone jack in wet location unless the jack is
specifically designed for wet locations.
Temporarily disconnect any equipment connected to the phone,
such as faxes, other phones or modems.
INSTALLING AND REPLACING THE BATTERIES
Your Caller ID phone uses 3 AA-Size alkaline batteries for receiving and
storing Caller ID records and for storing the numbers you use for frequently.
SIZE A A
SIZE A A
SIZE A A
New Caller,
Repeat Caller
Mail information
MUTEOUT
DM
IN
Speakerphone
Day Minutes Incoming Call
Phone number display
Week display
Mute Mic
HourMonth Call-log Number
Ringer Vol Switch
Speaker button
Set/Mute button
contrast
Up/Down buttons
Memory button
In use indicator
Redial/pause button
Flash button
Display
Store button
Out button
Dial button
Delete button
Speaker Vol Switch
Microphone
Message indicator
1
2
SETTING DATE/TIME
Enter Year, Month, Day and TimePress and Hold
2 Seconds
SETTING PCODE
SETTING TONE/PULSE
P OHONE PERATION
RECEIVING A PHONE CALL
Answer CallEndCall
Answer CallEnd Call
Ringing
Ringing
CASE 2
CASE 1
Answer CallEnd Call
CASE 3
Answer Call
CASE 4
Ringing
Press and Hold
2 Seconds
Press and Hold
2 Seconds
Tone Pulse
Select Tone or Pulse
SETTING FLASH
Press andHold
2 Seconds
Select Timing
S PETTING THEHONE
NOTE: Proceed immediately to change any of the following factory
preset as required.
There are 4 options to set:
Date and Time Setting.
Pcode is a prefix code that user may add to the front of
the number before dialing.
Select the dialing mode. This is dependent of the
telephone company you are connected to.
Timing setting. This timing is to allow user to momentary
access telephone services such as call waiting when
FLASHbutton is pressed.
End Call
Ringing
MAKING A PHONE CALL
The number shown will be dialedDial number
Dial number
OR OR
OR
CASE 1
CASE 2
The number shown
will be dialed
OR OR
Selectthe number
REVIEWING OUTGOING NUMBERS
DIAL BACK AN OUTGOING NUMBER
DELETING A CALLER ID NUMBER
M OEMORY PERATIONS
STORING A TELEPHONE NUMBER
STORING INCOMING CALL NUMBER
DialnumberMemor ylocation
Caller ID (CID) is a service available from your local telephone company.
For Caller ID to work on this system, you must subscribe to Caller ID
service. This unit can receive caller ID without any setting. Your Caller ID
information may include the phone number, date and time.
CALLER ID FEATURES
REVIEWING INCOMING CALLS
Add number
to the front
The number shown
will be dialed
Select the
caller number
OR OR
CASE 3
OR OR
CASE 1
OR OR
CASE 2
DIAL BACK A CALLER ID NUMBER
Select the
caller number
The number
shown will be dialed
Select the
caller number
Press0key 2
seconds PCODE
willbeaddedto the
front of number shown
Thenumbershownwillbe dialed
Reviewing Incoming Call Log
CASE 1
CASE 2
MUTE
In off-hook state, user can press the MUTE button to access mute function,
when MUTEis on, the
MUTEindicator will show on the screen.
Press the MUTEbutton to exit mute function and resume normal
conversation.
P=>T DIAL MODE
In PULSE dialing mode, press[*] button to access TONE service.
The number shown will be dialed
OR OR
Last number redial
REDIAL
CONTRAST LEVEL ADJUSTMENT
In on-hook state, press theMUTE button to adjust the display contrast
level.
Select the numberMemor ylocation
STORING OUTGOING NUMBERS INTO MEMORY
Memory Location
Select the number
T TROUBLESHOOTING IPS
No Dial Tone
Check all cabling to make sure that all connections are secure and
not damaged
Check hook switch: Does it fully extend when handset is lifted from
cradle?
No Display
Replace the batteries.
Check for proper battery installation.
No Information is Shown After the Phone Rings
Are you subscribed to Caller ID service from your local telephone
company?
Be sure to wait until the second ring before answering.
Phone Dials in Pulse with Tone Service
Make sure T/P DIAL MODE is set to TONE DIAL.
Phone Won't Dial Out with Pulse Service
Make sure T/P DIAL MODE is set to PULSE DIAL.
Memory Location
Select a Memory Location
OR
CASE 2
CASE 1OROR
DIALING A MEMORY LOCATION
Select a Memory
Location
Press and Hold
2 Seconds
DELETING A MEMORY LOCATION
Phone Does Not Ring
You may have too many extension phones on your line. Try
unplugging some extension phones.
Check for dial tone. See troubleshooting tips for no dial tone.
Incoming and Outgoing Voice Volume Low
Are other phones off hook at same time? If so, this is normal condition
as volume drops when additional phones are used at once.
Check the handset receiver or speaker volume.
GENERAL PRODUCT CARE
To keep your phone working and looking good, follow these guidelines:
Avoid putting it near heating appliances and devices that generate
electrical noise (for example. Motors or fluorescent lamps).
DO NOT expose to direct sunlight or moisture.
Avoid dropping and other rough treatment to the unit.
Clean with a soft cloth.
Never use a strong cleaning agent or abrasive powder because this
will damage the finish.
Retain the original packaging in case you need to ship it at a later date.
Used equipment must be disposed of in compliance with current
environment protection regulations. You should return it to your
reseller or disposes of it in an approved recycling centre.
1
DESK
DESK
DESK
DESK
DESKDESK
WALL
WALL
WALL
WALLWALL
DESK
DESK
DESK
DESK
DESKDESK
WALL
WALL
WALL
WALLWALL
Model Temporis 55-EX
00030373 Rev.1 E/S
10-30
Printed in China
Product specificaties
| Merk: | Alcatel |
| Categorie: | HŰTŐK |
| Model: | Temporis 55 |
Heb je hulp nodig?
Als je hulp nodig hebt met Alcatel Temporis 55 stel dan hieronder een vraag en andere gebruikers zullen je antwoorden
Handleiding HŰTŐK Alcatel

6 September 2025
12 Mei 2025
12 Mei 2025
12 Mei 2025
11 Mei 2025
9 Mei 2025
9 Mei 2025
9 Mei 2025
20 Februari 2025
16 November 2024
Handleiding HŰTŐK
Nieuwste handleidingen voor HŰTŐK
7 Mei 2026
6 April 2026
2 April 2026
31 Maart 2026
31 Maart 2026
25 Maart 2026
23 Maart 2026
22 Maart 2026
14 Maart 2026
9 Maart 2026